Table of Contents
Advertisement
Advertisement
Table of Contents
Troubleshooting

Related Manuals for Prusa Research MK4S


Summary of Contents for Prusa Research MK4S
- Page 1 3D PRINTING HANDBOOK FOR THE ORIGINAL PRUSA MK4S 3D PRINTER...
- Page 2 Prusa Research a.s. under license from Prusa Development a.s. | JOSEF PRUSA, ORIGINAL PRUSA, and PRUSAMENT are registered trademarks (or trademark applications) of Prusa Development a.s. and are used by Prusa Research a.s. under license from Prusa Development a.s. in the following countries: Australia, New Zealand, Israel, Mexico, South Korea, Turkey, Ukraine, Russia, Kazakhstan, Switzerland, China, Colombia, Uzbekistan, Philippines and Norway.
- Page 3 About the Author Josef Průša (*23. 2. 1990) became interested in 3D printing when he began studying at the University of Economics in 2009 - it started off as a hobby, a new technology open to modifications and improvements. The hobby quickly became his passion, and Josef became one of the main developers of the international open-source (all works are freely available for any use) RepRap project by Adrian Bowyer.
-
Page 4: Table Of Contents
2. Unpacking and Package Contents ......................2.1. How to Move the Printer ......................... 2.2. Contents of the Package and Accessories ..................3. Original Prusa MK4S Overview and Glossary ..................3.1. Connecting and Disconnecting the Power Cable ............... 3.2. Error Screens .............................. - Page 5 6.5.7. Printing Multicolored Objects (without MMU3) ............6.5.8. Slicing and Exporting ........................ 7. Material Guide ..............................7.1. PLA .................................. 7.2. PETG ................................7.3. ASA (ABS) ..............................7.4. PC (polycarbonate) and PC Blend ....................7.5. PVB ................................. 7.6. Flexible Materials ............................7.7.
- Page 6 The product serial number can be found on the type label located on the back of the printer and on the outer packaging. The Original Prusa MK4S is a device intended for use in indoor environments only, where it is protected against external influences.
- Page 7 Original Prusa MK4S / Original Prusa MK3.9S Warranty Information The parts for the Original Prusa MK4S 3D printer are covered by a 24-month warranty for end customers in the EU, and a 12- month warranty for business customers and end customers in the rest of the world. Consumables and parts subject to wear and tear are excluded from this warranty.
- Page 8 3D printer. Ensure that anyone working with the printer understands and comprehends the contents of this manual. Since we cannot control the conditions in which you assemble the Original Prusa MK4S printer, we do not accept responsibility for any losses, injuries, damages, or expenses arising from or associated with the assembly, handling, storage, use, or disposal of the product.
- Page 9 Warning! During printing, parts of the print head and the print bed can heat to very high temperatures! Do not touch them until the print has finished and the printer has cooled down—risk of burns. Proper Use of Double-Sided Print Sheets Each type of print sheet requires slightly different maintenance.
-
Page 10: Introduction
- check it out on our Blog at blog.prusa3d.com! The MK4S is a new version of our previous model, the Original Prusa MK4. It features several important improvements that make printing faster, easier and even more reliable. The MK4S continues to excel in print quality, delivering objects that are solid, durable, dimensionally accurate, and with a beautiful surface finish. -
Page 11: Unpacking And Package Contents
If you purchased the printer as a fully assembled model, simply remove the top foam inlay from the box. Find a good place for the MK4S. You need at least 520×520mm of space for the printer to operate. Keep in mind that the heatbed moves back and forth during printing and the cables must not hit a wall when the heatbed is in the rearmost position. -
Page 12: Contents Of The Package And Accessories
2.2. Contents of the Package and Accessories Your Original Prusa MK4S printer package includes: Documentation USB drive with sample prints (G-codes) MK4S Toolset Uni-wrench 13-16 wrench Philips screwdriver Nose pliers Allen and torx keys Alcohol-saturated wipe (for initial calibration), acupuncture needle... -
Page 13: Original Prusa Mk4S Overview And Glossary
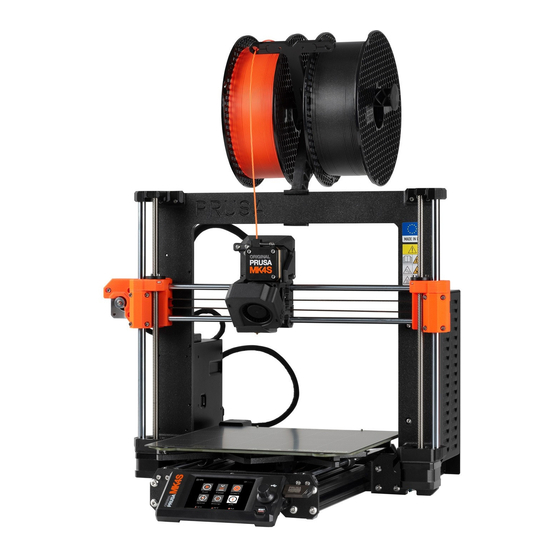
3. Original Prusa MK4S Overview and Glossary Filament spool - The Original Prusa MK4S is compatible with 1.75mm filaments. Frame Z-Axis - vertical, consists of threaded and smooth rods, moves the Nextruder up and down. Nextruder - Our new next-generation extruder with a planetary gearbox and Loadcell sensor. - Page 14 Filament insertion point (from the top) - the MK4S is compatible with 1.75mm filaments. Idler lock (swivel) - flip upwards to unlock the idler door. Idler - maintains pressure on the filament strand which is moved further into the extruder by the extruder gear.
-
Page 15: Connecting And Disconnecting The Power Cable
3.1. Connecting and Disconnecting the Power Cable Always pull the connector, do not pull on the cable itself! Incorrect handling can lead to damage to the connector or cable. The power supply port is located on the rear side of the printer. Before you plug or unplug the cable, turn the printer off using the physical switch on the power supply unit next to the power supply port. -
Page 16: Your First Print
4. Your First Print To get your printer up and running, please pay attention to the information in the following chapters. We will go through the basics together - you’ll be printing in no time! In this chapter you will learn how to: Control the printer Prepare the print sheet for the first print Perform initial calibration... -
Page 17: Preparing Flexible Print Sheets
The Original Prusa MK4S comes standard with a double-sided smooth PEI print sheet. If you have a different type, we recommend that you carefully study how to properly treat the surface in the Regular Maintenance chapter. -
Page 18: Selftest (Calibration Wizard)
The print sheet must be installed onto the printer before the calibration!!! When you first power on the Original Prusa MK4S, the Selftest (Calibration wizard) will start. The wizard will walk you through the initial calibration and all necessary tests to start printing. -
Page 19: Running The Selftest
4.4. Running the Selftest During the Printer Selftest, do not manipulate or touch the printer unless the calibration asks you to. If the printer is placed on an unstable surface or if there is another running 3D printer next to it, it may affect the accuracy of the calibration negatively. The printer should be placed on a stable surface. -
Page 20: Inserting (Loading) Filament
4.5. Inserting (Loading) filament First, prepare a spool of filament - we strongly recommend using PLA because it's easy to work with. Take the spool, make sure the end of the filament is properly secured and place the spool onto the spoolholder on top of the printer's frame. Carefully unhook the end of the filament strand and make sure not to let go, otherwise, the tension in the strand would cause the filament to quickly tangle up. - Page 21 The printer remembers which filament is inserted into it even when you turn it off. The type of filament is displayed in the lower section of the LCD menu. For the next step (Starting the First Print), leave the filament inserted in the printer. If for any reason you need to change the filament, the procedure is described on the next page.
-
Page 22: Unloading (Removing) Filament
4.6. Unloading (Removing) Filament Select LCD Menu - Filament - Unload Filament The printer will preheat automatically. As soon as it reaches the right temperature, the filament will be unloaded from the extruder in a few seconds. Once the extruder stops unloading the filament, remove it from the extruder by hand. The filament needs to be wound up on the spool and secured carefully so that it does not tangle Tangled filament? Let's fix it! If you accidentally manage to let go of the end of the filament and the strand quickly retracts... -
Page 23: Starting The First Print
4.7. Starting the First Print If you haven't done it already, clean the print sheet with the enclosed wipe saturated with isopropyl alcohol or spray a bit of isopropyl alcohol onto the sheet and wipe it clean with a paper towel. - Page 24 Carefully observe the quality of the first layer. The Original Prusa MK4S is equipped with very accurate LoadCell technology, which measures the distance between the nozzle and the bed with perfect accuracy. However, it may happen that due to, e.g., traces of grease, the print may not hold well.
-
Page 25: Removing A Printed Object From The Print Sheet
4.8. Removing a Printed Object from the Print Sheet Once the print job is finished, wait until the print sheet cools down. The print plate and heated bed may exceed 100 °C, depending on the settings - contact with unprotected skin can cause burns, so check the heatbed temperature in the footer of the LCD screen! Depending on the type of material, it may happen that the print will separate from the print sheet automatically by itself after cooling. -
Page 26: Selftest Troubleshooting
4.10. First Print Troubleshooting The calibration and pre-print setup of the Original Prusa MK4S are fully automated - the filament is automatically inserted, axes checked and the first layer precisely measured. If a printing issue does occur, it usually falls into one of the following scenarios: 4.10.1. -
Page 27: Nozzle Moves Too High/Low, Or Extrudes Plastic Outside The Print Area
4.10.3. Nozzle moves too high/low, or extrudes plastic outside the print area Solution: Make sure that the print sheet is properly installed and that nothing is blocking the X/Y/Z axes. If the print sheet is not installed properly (e.g., it's not aligned with the heatbed), it may cause various printing issues. -
Page 28: After A Few Hours Of Printing, The Nozzle Stops Extruding Filament
If you built the printer using the assembly kit, it's possible you might have over-tightened the screws on top of the extruder and the idler is so tight, filament won't pass through it. Open the idler on the side of the extruder and double-check that the filament can reach the gear. You can decrease the pressure of the idler by loosening the two screws on top of the Nextruder. -
Page 29: Updating The Firmware
4.11. Updating the Firmware The Original Prusa MK4S is ready to print once assembled and powered on. To make sure you have the most up-to-date version of the firmware with the latest features and settings, we recommend checking prusa3d.com/drivers. You can perform the firmware update after you complete the initial Selftest. -
Page 30: Sample Models
4.12. Sample Models The USB drive that came with your Original Prusa MK4S 3D printer contains a number of sample files (G-codes). We recommend keeping them on the flash drive. These files have been prepared (sliced) and thoroughly tested by us. If you encounter issues with print quality at any time, try loading and printing one of the sample files - especially the Prusa Logo Keychain. -
Page 31: Advanced User Guide
5. Advanced User Guide This part of the handbook covers everything you need to know once you manage to successfully print your first sample object. Network connection, printing your own models, slicing - all this (and more) is covered on the following pages. 5.1. -
Page 32: Network Connection
Original Prusa MK4S can be connected to a local network (LAN/Wi-Fi), which allows you to have an overview of various functions of the printer through the web interface called Prusa Connect. - Page 33 Setup file with network credentials To connect the printer to a wireless network, via the credentials file please navigate to the Network menu and select Wi-Fi and look for the Load credentials from a file menu option. Start PrusaSlicer 2.8.0 or newer. Insert a USB drive into your computer.
-
Page 34: Touch Control
You can enable the Stealth Mode option in Settings -> Stealth Mode. 5.6. Input Shaper and Pressure Advance The Original Prusa MK4S utilizes Input Shaper and Pressure Advance features, allowing it to print faster and with better quality, reducing ringing, overshoots, and issues with inconsistent filament extrusion. -
Page 35: Using Nozzles With Various Diameters
5.7. Using Nozzles with Various Diameters The Original Prusa MK4S comes equipped with a 0.4mm nozzle by default. This nozzle offers a good quality-speed ratio. However, for some projects, a nozzle of a different diameter might be more suitable. The Original Prusa MK4S uses special nozzles with a metal filament guide, making them easy to swap and highly reliable. -
Page 36: Multi-Material Upgrade 3
5.8. Multi-Material Upgrade 3 The MK4S is fully compatible with the latest generation of our Multi-Material Upgrade 3 add-on, or MMU3 for short. The MMU3 vastly expands your 3D printing possibilities by giving you the option to print with up to 5 colors at the same time. However, you can also mix different materials, e.g. -
Page 37: Flashing An Unofficial (Unsigned) Firmware
Breaking the seal is irreversible and is recommended only for very experienced users. Breaking the seal on the mainboard of the Prusa MK4S is IRREVERSIBLE and leads to the VOIDING OF THE WARRANTY ON ELECTRONIC PARTS OF THE PRINTER. If you break the seal, we disclaim any responsibility for any damage to the printer and/or its surroundings (e.g. -
Page 38: Printing Your Own Models
6. Printing Your Own Models Your Original Prusa MK4S should be now fully calibrated and the first print was a success. And now, you want to print your own model - be it something you already modeled, or something you downloaded from the internet. -
Page 39: Obtaining Printable Models
One of the best places for free 3D models is Printables.com, a large online library full of high- quality 3D models managed by Prusa Research. Its main goal is to bring together a large community of designers, creators, and 3D printing enthusiasts - regardless of the brand of 3D printer they prefer. -
Page 40: Create Your Own Model
It is free, intuitive and there are a lot of tutorials available online. Tinkercad is mainly focused on the creation of less detailed and larger (mechanical) parts, ideal for FFF/FDM printing. Your MK4S will have no problems printing them. -
Page 41: Prusaslicer
Variable layer height Color painting Various print settings Thanks to the strong community and a dedicated team of developers in Prusa Research, PrusaSlicer is constantly evolving with new features and improvements based on community feedback. From print quality improvements to reducing print time and minimizing filament usage, even small updates can have a significant impact on your 3D printing experience. -
Page 42: Prusaslicer Interface Explained
6.5. PrusaSlicer Interface Explained Opens detailed Print, Filament and Printer settings The Add button is used to import a 3D model into the scene The Delete and Delete All buttons remove the model(s) from PrusaSlicer Switching between Simple, Advanced and Expert modes Settings for printing speed and quality Material selection Printer selection... -
Page 43: Initial Setup And General Workflow
(No. 6 in the PrusaSlicer overview on the previous page). If you don't see the Original Prusa MK4S in the list, you need to add it either by using Add Printer-Add Presets menu item (in the same menu), or by using Configuration - Configuration Wizard from the top menu bar. -
Page 44: Using Supports
6.5.2. Using Supports Supports are printed structures resembling scaffolding. They are used for printing complex objects. After printing, they can be easily separated from the output. You can find a large number of objects that can be printed without supports - just place them in the right orientation on the bed, slice them and you can print. -
Page 45: Speed Vs Print Quality
The default support pattern usually works correctly, but if you need to modify the places where the supports will be generated, just go to the Print Settings tab and select Support Material. Check the Generate Support Material box. The Overhang Threshold allows you to set the minimum angle for printing the support material. -
Page 46: Infill
6.5.4. Infill Another parameter that affects the properties of the printed object is Infill. It affects the printing speed, strength and appearance of the object. Objects printed with the FFF/FDM method usually do not have 100% density. Instead, they contain a certain geometric structure inside. It can take various forms, from simple square grids or hexagons to more complex patterns. -
Page 47: Printing Objects Larger Than The Print Volume
6.5.6. Printing Objects Larger than the Print Volume The Original Prusa MK4S printer has a print volume of 250 × 210 × 220 mm. If this is not enough for your project, you can use PrusaSlicer's built-in tools to find a solution. -
Page 48: Printing Multicolored Objects (Without Mmu3)
6.5.7. Printing Multicolored Objects (without MMU3) If you want to have a print with layers in different colors, it can be easily set up directly in PrusaSlicer - follow the instructions below. Switch to the layer view (Preview) using the button in the left bottom corner. Use the slider on the right to select the layer in which you want to change the color. -
Page 49: Slicing And Exporting
6.5.8. Slicing and Exporting One of the most important phases of the slicing process is the final check of the sliced object in the Preview. Using the slider on the right, you can review all the print layers of the object one by one. -
Page 50: Material Guide
The Original Prusa MK4S 3D printer is compatible with almost all filaments available. Individual materials may differ not only in color but also in mechanical and optical properties, or even in printing difficulty. -
Page 51: Petg
7.2. PETG PETG is one of the most popular materials for 3D printing. It is a great choice for parts that will be subject to mechanical stress. Compared to PLA, it has a higher temperature resistance, it is more flexible and less brittle. Thanks to its low thermal expansion, it holds well to the bed and does not warp. -
Page 52: Asa (Abs)
7.3. ASA (ABS) ASA and ABS are very similar materials. In some respects, ASA is better than ABS. ASA is UV- stable compared to ABS and shrinks slightly less during printing. When it comes to post- processing, ABS and ASA can be similar, but the latter is currently more popular, so we will focus mainly on it. -
Page 53: Pc (Polycarbonate) And Pc Blend
7.4. PC (polycarbonate) and PC Blend Polycarbonate (PC) is a technical material boasting excellent strength, tensile strength, and resistance to high temperatures. It is however quite demanding to print, thus making it suitable mainly for advanced users. This of course does not apply to our Prusament PC Blend, which is much easier to print compared to other polycarbonates. -
Page 54: Pvb
7.5. PVB Polyvinyl butyral (PVB) is a material that can be easily smoothed with isopropyl alcohol (IPA). Prints, when properly set up, are clear and transparent, thus making PVB a suitable material for printing vases, lamp shades, and other decorative models. The printing settings are similar to those for PLA, but the mechanical properties of PVB are slightly better. -
Page 55: Flexible Materials
7.6. Flexible Materials Flexible filaments are typically very strong and elastic materials. In many cases, the classic hard plastic (PLA, PETG) may not be ideal or even completely unsuitable for certain models. Whether you are printing a phone case, a housing for an action camera or even wheels for an RC car, it is better to use a flexible material. -
Page 56: Pa (Polyamide) / Pa11Cf
7.7. PA (Polyamide) / PA11CF Polyamide (also known as Nylon) is a versatile material known for its durability and is commonly used for 3D printing special models due to its high difficulty in printing (not applicable to PA11CF) and higher costs. There are several types of polyamide, which differ in properties such as temperature resistance, water absorption and adhesion to different types of surfaces. -
Page 57: Regular Maintenance
8. Regular Maintenance The Original Prusa MK4S was designed from the beginning as a true print "workhorse". Despite its high reliability, it is still a device with mechanical components that require more or less regular maintenance. Follow the instructions below to keep your printer in perfect condition for as long as possible. - Page 58 Consumable materials such as print sheets are not covered by our warranty unless they arrive damaged or incorrectly manufactured. Print sheets are consumables and the warranty only applies to defects that appear immediately after unpacking. All original print sheets made in Prusa Research are double-sided.
-
Page 59: Double-Sided Textured Print Sheet
8.1.1. Double-Sided TEXTURED Print Sheet Surface resistant to damage and scratches The texture on the surface of the sheet is transferred to the bottom side of the printed object Simpler Z-axis calibration FLEX does not require glue (Kores / PVA gluestick) application to the print bed After the print sheet cools down, the print usually detaches itself PLA prints with a small contact area may require a brim Large PLA prints may warp... -
Page 60: Double-Sided Satin Print Sheet
8.1.3. Double-Sided SATIN Print Sheet Suitable for PLA and PETG Soft texture on the bottom part of the print Only use quality isopropyl alcohol (90+ %) to clean FLEX requires the use of a glue separation layer (Kores / PVA glue stick) on the print sheet Wide range of supported materials, including advanced materials such as PC Blend and more Easy maintenance and good adhesion Do not use acetone! Acetone will damage the surface of the print sheet! -
Page 61: Fans
Clean as much as possible, then turn the wheel (LCD Menu - Control - Axis) and continue. Warning: Never, under any circumstances, open the gearbox itself unless you have the gearbox alignment tool that comes with the MK4S assembly kit. There is no need to open the gearbox cover. 8.6. Electronics It is a good practice to check and optionally reconnect the electrical connectors on the xBuddy board and electronics board in the Nextruder every 600-800 hours of printing. -
Page 62: Cleaning The Nozzle
8.8. Cleaning the Nozzle Do not touch the nozzle during this procedure - it is hot and there is a risk of burning yourself! To better access the extruder during cleaning, raise the extruder to the top of the Z-axis in the LCD menu - Control - Movement - Z Axis. -
Page 63: Faq - Frequently Asked Questions And Basic Troubleshooting
9. FAQ - Frequently Asked Questions and Basic Troubleshooting In case of a critical failure, the Original Prusa MK4S may display an error screen with short instructions on how to proceed. This screen contains a link to a detailed article on our Knowledge Base at help.prusa3d.com... -
Page 64: Loose Belts
(e.g., too long screws at the back of the Z-carriage) - this doesn't happen on a factory-built MK4S, but if you built the MK4S as a kit, it's possible there's an issue with assembly. -
Page 65: Advanced Hardware Troubleshooting
Due to the length of the articles, it is not possible to include detailed troubleshooting guides in this handbook. However, the Original Prusa MK4S will display an error screen with a short recommendation on how to proceed further if it runs into a problem. This screen will also contain a link to a detailed article in our Knowledge Base at help.prusa3d.com. - Page 66 PRINT AND SHARE! JOIN OUR COMMUNITY! Download 3D models for free printables.com and participate in design contests! Follow us for tips, guides, inspiring videos and amazing 3D prints!
Need help?
Do you have a question about the MK4S and is the answer not in the manual?
Questions and answers