Table of Contents
Advertisement
Quick Links
English version
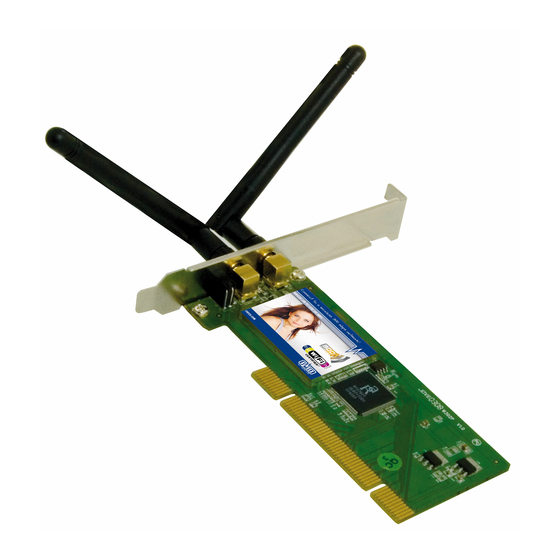
LW312 Sweex Wireless LAN PCI Card 300 Mbps
• Do not expose the Wireless LAN PCI Card 300Mbps to extreme temperatures. Do not place the device in direct sun
light or close to heating elements.
• Do not use the Wireless LAN PCI Card 300 Mbps in extremely dusty or moist environments.
• Prevent hard shocks or impacts of the device, as this can cause damage to the internal electronics.
• Never try to open the device yourself, this voids the warranty.
Hardware Installation
1. Make sure the computer is turned off and that there is no power connected.
2. Also remove the printer and monitor cable, because these have their own power supply.
3. Now unscrew the computer casing.
4. Make sure that you undo yourself of possible static electricity. This can be done by grabbing a (naked) central
heating pipe or an unpainted water pipe. Pay attention not to use a magnetic screwdriver. Briefly touch the iron frame
of the PC casing. Avoid direct contact with the contact points of the PCI slot and contact points on the graphics card.
5. Locate a free PCI slot and remove the metal protection plate that is in the computer casing for the intended slot.
Consult the manual of your computer to find the PCI slot.
6. When possible fasten the card with screws so it can not move.
7. When the card is mounted successfully, check if the other cards are still fitted properly in their expansion slot. It can
happen that when a new card is added the other cards rise a little with as result that the card, or even the entire
computer, may not work.
8. Close the computer casing and reconnect all cables properly.
9. Turn on the computer.
Installation Windows XP and Vista
After starting the computer this window will appear.
Advertisement
Table of Contents

Related Manuals for SWEEX LW312


Summary of Contents for SWEEX LW312
-
Page 1: Hardware Installation
7. When the card is mounted successfully, check if the other cards are still fitted properly in their expansion slot. It can happen that when a new card is added the other cards rise a little with as result that the card, or even the entire computer, may not work. - Page 2 The following screen appears: Click “Start” and follow the instructions on the screen. Select “Driver Only”, click “Next” and follow the rest of the installation. Select “Driver and Utility” if you want to use the WPS function and click “Next”.
- Page 3 English version It is possible that Windows will notify you that the driver is not certified. This is not a problem for correctly functioning of the Sweex Wireless LAN Cardbus Adapter 300 Mbps. All Sweex products and relevant drivers are tested thoroughly.
-
Page 4: Setting Up The Wireless Network
In most cases this is the wireless router, modem or access point. By means of a WEP or WPA security code you can secure your network. This code is also called the network key. Enter this code on every computer that wants to connect to the secured network. - Page 5 WPS signal and establishes a secured connection with it. Select “PIN” if you want to use the number range under “Pin Code” as WPS network key. Then enter the code in the router.
-
Page 6: Windows Xp
English version Connecting the computer to the wireless network After installing the drivers of the Sweex Wireless LAN Cardbus Adapter 300 Mbps, you can connect your wireless computer with the wireless network. We describe this procedure underneath. Windows XP At the bottom right of your screen right-click the wireless connection icon and choose “View Available Wireless Networks”. - Page 7 The network “BLASTER” does have security. To connect your computer to it you need a security code. When you do not get a list, but a message that no wireless networks can be found, check if the wireless router, modem or access point are turned on and that the distance to the wireless computer is not to far.
-
Page 8: Windows Vista
IP-address. A unique number that every computer has to have when it is in a network. In most cases the computer will automatically receive an IP-address. Also check the settings of the computer. - Page 9 English version Select your network and click “Connect”. When asked enter your security code to connect. You are now connected to your network. View the settings on your computer for Windows 2000 and XP At the bottom left of the screen go to Start ‡“Control Panel“.
- Page 10 English version Click the “Support” tab to view your IP-address. In most cases you will receive an IP-address from the wireless router or modem when the connection has been established correctly. If it is needed to enter the IP-address settings or to change them, go back to the “General”...
- Page 11 “Connecting the computer to the wireless network“. Configuring IP-address in Vista If it is needed to enter the IP-address settings or to change them, go back to the “General” tab and click the “Properties” button. Select “Internet Protocol Version 4 (TCP/IPv4)” and select “Properties”.
-
Page 12: Warranty
English version Select that you want to obtain an IP-address automatically or enter the IP-address you want to use. Click “OK” to store the settings. Warranty For most Sweex products a warranty period of 3 years applies. On Graphics Cards and Consumer Electronics Sweex offers 2 years of warranty.
Need help?
Do you have a question about the LW312 and is the answer not in the manual?
Questions and answers