Table of Contents
Advertisement
Quick Links
Advertisement
Table of Contents

Related Manuals for LAZBOY D71 M80902


Summary of Contents for LAZBOY D71 M80902
- Page 1 USE AND CARE GUIDE Sears Peyton Chaise Lounge Product Code: D71 M80902 UPC Code: 7-22938-07956-8 Date of Purchase: __ / __ / __ La-Z-Boy® is a registered trademark of La-Z-Boy Incorporated and is used under license to BJI, Inc. © 2015 La-Z-Boy Incorporated.
-
Page 2: Table Of Contents
Thank you for your purchase THANK YOU FOR YOUR PURCHASE! We are pleased that you have chosen Sears for your outdoor furniture purchase. We hope that you enjoy the unmatched quality, comfort, and style of your new patio set. Every piece is meticulously considered all the way down to the smallest details, exclusively for you, by our world class design team. -
Page 3: Safety Information
Safety Information SET UP YOUR FURNITURE PROPERLY Ensure that all parts are assembled □ Read all of the instructions in CAUTION: properly and fully tightened as per the this manual before you begin assembly. instructions. Failure to do so may result in faulty When placing in the desired location, □... -
Page 4: Care And Maintenance
Warranty (continued) Proof of purchase (dated register receipt) is required for warranty claims. We reserve the right to make substitutions with similar merchandise, if the model in question is no longer in production. For a copy of our full limited warranty, please contact our customer service team below. Contact the Customer Service Team at 1-866-391-4868 or visit www.bjifurniture.com. -
Page 5: Pre-Assembly
Pre-Assembly PLANNING ASSEMBLY PLEASE READ COMPLETE USE AND CARE GUIDE PRIOR TO ASSEMBLY! Identify all parts packed in the carton against the parts list. Remove all protective materials and place the parts on a nonabrasive surface to avoid scratching. It takes about 15 minutes for 2 persons to complete all the assembly. -
Page 6: Package Contents
Pre-Assembly (continued) PACKAGE CONTENTS Part Description Quantity Right arm Left arm Front Panel Back Panel Seat Back Seat cushion Back cushion Lumbar Pillow Safety Information EVERY BOLT NEEDS TO BE USED WITH A WASHER. □ DO NOT FULLY TIGHTEN BOLT UNTIL INDICATED IN STEP 2 AND 3. □... -
Page 7: Assembly Instruction
Assembly Instruction Adding the front panel and back panel □ Attach the front panel (C) to the right arm (A) using M6 hex bolts (AA) and M6 washers (CC). □ Attach the back panel (D) to the right arm (A) using M6 hex bolts (AA) and M6 washers (CC). □... - Page 8 Assembly Instruction (continued) Attaching the seat frame □ Attach the seat (E) to the right arm (A) using M6 hex bolts (AA) and M6 washers (CC). □ Repeat these instructions to attach the seat (E) to the left arm (B). □...
- Page 9 Assembly Instruction (continued) Attaching the back frame □ Attach the back (F) to the right arm (A) using M6 hex bolts (BB), M6 washers (CC) and plastic washer (EE). □ Repeat these instructions to attach the back (F) to the left arm (B). □...
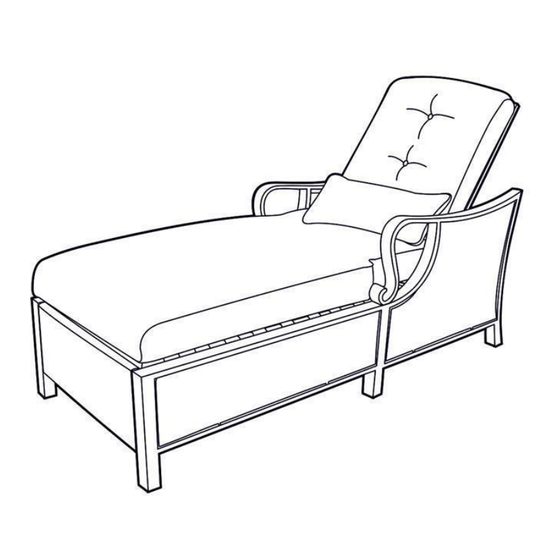
- Page 10 Assembly Instruction (continued) Adding the cushions □ Place the seat cushion (G), back cushion (H) and lumbar pillow (I) onto the chaise. □ The chaise lounge is ready for enjoyment.
-
Page 11: Customer Service
Please refer to part number when reordering Questions, problems, missing parts? Before returning to the store, call our Customer Service 8 a.m. - 5 p.m., EST, Monday-Thursday 8 a.m. – 4 p.m., EST, Friday 1-866-391-4868 Made in/ Hecho en CHINA Distributed by Sears, Roebuck and Co., Hoffman Estates, IL60179 See our extensive assortment of outdoor living products on-line at www.sears.com and www.kmart.com...
Need help?
Do you have a question about the D71 M80902 and is the answer not in the manual?
Questions and answers