Advertisement
Available languages
Available languages
Quick Links
VENT
V
Luz LED
Ventila
(ES)
Para ve
er la ficha téc
cnica de pro
Para cu
ualquier dud
a técnica pó
Estamo
os a su servi
icio en nues
AL
TILAD
DOR D
D
DIMM
MABL
LE CE
D CCT 1.26
60K-3000K
ador con m
motor DC
Funció
ón tempor
GUÍA
A DE
(E
EN) IN
STALL
oducto comp
pleta, puede
óngase en c
ontacto con
stro email
m
perez@schu
LISIO
OS
DE TE
ECHO
O DIM
EILING
13884
1
49
K-6500K (L
LUZ CÁLID
DA, BLANC
de 6 velo
cidades e
rizador. M
Mando a di
INST
TALAC
LATIO
ON GUI
e usar el sigu
uiente códig
n nuestro De
epartamento
uller.es
o en
nuestro telé
1
MABL
LE
G FA
N
A Y FRIA)
inversión
de giro.
istancia.
CIÓN
N · p 2
2
IDE · p
p 9
go QR:
Técnico.
éfono 961 6
01 051
R R ev.07.24
Advertisement

Subscribe to Our Youtube Channel
Related Manuals for Schuller ALISIOS 138849


Summary of Contents for Schuller ALISIOS 138849
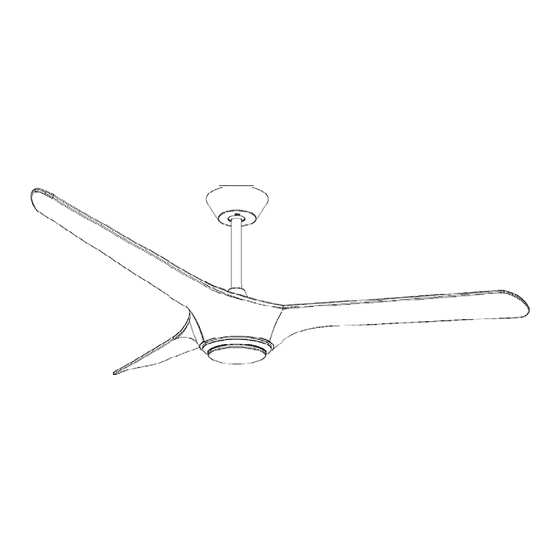
- Page 1 LISIO VENT TILAD DOR D DE TE ECHO O DIM MABL DIMM MABL LE CE EILING G FA 13884 Luz LED D CCT 1.26 60K-3000K K-6500K (L LUZ CÁLID DA, BLANC A Y FRIA) Ventila ador con m motor DC de 6 velo cidades e inversión...
- Page 2 Abra con cuidado el embalaje. Retire los elementos de la espuma de poliestireno. Retire la carcasa del motor y colóquela sobre una alfombra o espuma de poliestireno para evitar daños. Compruebe en el inventario de piezas que se han incluido todas las piezas. Soporte a techo Florón 2 varillas...
- Page 3 INSTALACIÓN DEL VENTILADOR AL TECHO. Techo de madera o escayola. Techo de cemento. Si el techo es de madera o escayola, es necesario instalar Si se trata de un techo de hormigón, es necesario instalar 4 balancines o 4 tornillos autorroscantes para fijar el 2 tornillos de expansión para fijar el soporte a techo.
- Page 4 Afloje los dos tornillos de fijación del soporte de la Por último, vuelva a apretar los dos tornillos de fijación y varilla roscada, a continuación, coloque la varilla en el Coloque y baje la tapa de unión del tubo y coloque el florón. soporte de la varilla.
- Page 5 CONEXIÓN CONTROL REMOTO Y AJUSTE DEL FLORÓN -Introducir el módulo de control en su ubicación dentro del Anclaje anti-balanceo (según esquema) y conectar los cables del cuerpo siguiendo la guía de color y números indicados en el módulo. -Conectar los cables de corriente al módulo en los conectores asignados en el esquema. Para terminar, suba el florón y fíjelo atornillándolo con los tornillos suministrados.
- Page 6 INSTALACIÓN DEL PLAFÓN DE LUCES 1. Retire los tres tornillos de fijación del motor. Introduzca el terminal del cable del LED a través del orificio situado en el centro del plafón de luces y conéctelo al terminal del plafón de luces. Fije el plafón de luces led con los tres tornillos INSTALACIÓN DEL DISFUSOR ACRÍLICO.
- Page 7 NOTAS DE FUNCIONAMIENTO: 1. Las primeras 24 horas tras la instalación es normal apreciar un ligero rumor durante el funcionamiento del ventilador. Tras ese periodo de ajuste el rumor desaparecerá. La luz del ventilador apagada a través del mando a distancia queda en stand-by. Quedará completamente apagada, si se corta la corriente a través del interruptor de pared Si realiza la instalación en un falso techo de escayola, madera o metal es posible que se amplifique el rumor del ventilador debido a la cámara de aire existente.
- Page 8 SOLUCIONES A PROBLEMAS DE FUNCIONAMIENTO 1 No giran las aspas, no se enciende la luz o alguna de ellas. Comprobar que las conexiones de instalación rápida han quedado bien sujetas hasta su posición final. (Puede que se desconecten en el momento de la colocación definitiva por la gran cantidad de cables que se manejan a la vez) 2 Ruidos, roces, zumbidos, golpes cíclicos etc.
- Page 9 If you ha ave any tech hnical questi ions, please do not hesi itate to cont act our tech hnical Depar rtment. We are a at your dispo osal in our e email: export t@schuller.e Rev.07 7 .24...
- Page 10 Carefully open the packaging. Remove the Styrofoam elements. Remove the motor housing and place it on a rug, carpet or Styrofoam to prevent damage. Check the parts inventory to see if all parts have been included.
- Page 11 INSTALLING THE FAN TO THE CEILING. Wooden or plaster ceiling. Concrete ceiling If the ceiling is made of wood or plaster, it is necessary to If it is a concrete ceiling, it is necessary to install 2 install 4 gravity toggles or 4 self-tapping screws to fix the expansion bolts to fix the bracket to the ceiling.
- Page 12 Loosen the two fixing screws of the threaded rod Finally, retighten the two fixing screws and tighten them. holder and then, place the rod in it. Align the holes of Fit and lower the pipe union cap and fit the canopy. the clip with the holes in the rod holder.
- Page 13 REMOTE CONTROL CONNECTION AND CANUPY ADJUSTMENT To avoid possible electric shocks, make sure the power is disconnected at the main fuse box before wiring. Insert the control module into its allocated slot in the anti-wobble bracket (as per the diagram) and connect the cables from the fan body following the colour guide and numbers indicated on the module.
- Page 14 INSTALLATION OF THE LAMP PLATE+LED 1. Remove the three fixing screws from the lamp holder. 2. Insert the terminal of the LED cable through the hole in the centre of the lamp plate and connect it to the terminal of the lamp plate. 3.
- Page 15 REMARKS The first 24 hours after installation, it is normal to notice a slight noise during fan operation. After this adjustment period, it will disappear. 2. The light of the fan turned off through the remote control remains in stand-by mode. It will be completely off if power is cut off through the wall switch.
- Page 16 POSIBLE SOLUTIONS TO OPERATIONAL ISSUES 1. The blades do not rotate, the light or some of them do not turn on. Check quick installation connections have been securely fastened to their final position. (They may be disconnected at the time of final placement due to the large number of cables that are handled at the same time).
Need help?
Do you have a question about the ALISIOS 138849 and is the answer not in the manual?
Questions and answers