Schuller VENTO User Manual
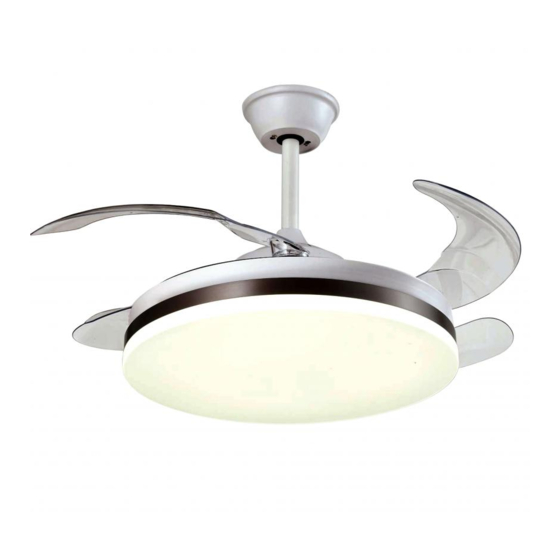
Ceiling fan with led light
Hide thumbs
Also See for VENTO:
- User manual (10 pages) ,
- Installation manual (10 pages) ,
- Installation manual (10 pages)
Advertisement
Available languages
Available languages
VENTILADOR DE TECHO CON LUZ LED "VENTO"
168311
MANUAL DE USUARIO.
Luz LED CCT 3000k a 6000K( LUZ CÁLIDA, NEUTRA Y FRIA)
Ventilador con motor DC de 6 velocidades e inversión de giro.
Aspas escamoteables en acrílico transparente.
Función temporizador.
Mando a distancia.
NOTA
SCHULLER RECOMIENDA LA COLOCACIÓN DE PROTECTORES DE SOBRETENSIÓN PARA EVITAR LOS DAÑOS EN
LOS COMPONENTES ELECTRÓNICOS DE LA LUMINARIA LED.
Disponibles en nuestro catálogo
Para cualquier duda técnica póngase en contacto con nuestro Departamento Técnico.
Estamos a su servicio en nuestro email irodriguez@schuller.es o en nuestro teléfono 961 601 051 Ext. 229
Advertisement
Table of Contents

Related Manuals for Schuller VENTO


Summary of Contents for Schuller VENTO
- Page 1 SCHULLER RECOMIENDA LA COLOCACIÓN DE PROTECTORES DE SOBRETENSIÓN PARA EVITAR LOS DAÑOS EN LOS COMPONENTES ELECTRÓNICOS DE LA LUMINARIA LED. Disponibles en nuestro catálogo Para cualquier duda técnica póngase en contacto con nuestro Departamento Técnico. Estamos a su servicio en nuestro email irodriguez@schuller.es o en nuestro teléfono 961 601 051 Ext. 229...
- Page 2 Advertencia l. La potencia de entrada para este ventilador debe ser de 220 V / 50 HZ. 2. La instalación eléctrica debe ser realizada por un profesional cualificado. 3. Para reducir el riesgo de lesiones, no toque la cuchilla cuando el ventilador esté funcionando. INSTRUCCIONES Y PASOS DE INSTALACIÓN.
- Page 3 3. Instalación del sistema de suspensión 1º- Debe elegir el tubo (2Ao 2B) para designar la altura deseada del ventilador. 2º- Coloque la semiesfera en el tubo seleccionado, si no está ya pre-instalada. Usando el pasador y el tornillo de fijación. 3º- Coloque el canopí...
- Page 4 Después posicione el circuito LED , centrado en la cara inferior del cuerpo del ventilador. Los imanes se fijarán fácilmente al metal. A continuación conecte el DRIVER al circuito con la ficha de conexión, y posteriormente conecte el driver a los cables que salen del centro del cuerpo del ventilador por su cara inferior.
-
Page 5: Solución De Problemas
3. Ajuste de equilibrio para este ventilador. "Sistema invisible" El ventilador se equilibró antes del envío, pero el equilibrio podría verse afectado durante el transporte. Por lo tanto, vuelva a equilibrar el ventilador de acuerdo con los siguientes pasos si encuentra que el ventilador tiene el problema de oscilación notable después de su ensamblaje final: 1º- Saque el paquete del kit de equilibrio del paquete y pegue dos piezas de imán de equilibrio en cualquier lugar marcado como los números que se muestran en la figura A , y encienda el ventilador para verificar si el problema de oscilación aún se nota. - Page 6 Timer function. Remote control. NOTE SCHULLER RECOMMENDS TO PLACE SURGE PROTECTORS TO AVOID DAMAGES TO THE ELECTRONIC COMPONENTS OF THE LED LUMINAIRE. Available in our catalogue If you have any technical questions, please do not hesitate to contact our technical Department.
-
Page 7: Ceiling-Mount Bracket
Warning: l. This ceiling fan requires a power input of 220 V / 50 HZ. 2. The electrical installation should be carried out by a qualified electrician. 3. To reduce risk of injury, do not touch the blades while the fan is in operation. INSTRUCTIONS AND INSTALLATION STEPS. - Page 8 3. Installation of the suspension system. 1º- Select the downrod (2A or 2B) you wish to use according to the desired height of the fan. 2º- If it isn´t already been pre-installed, use the pin and set-screw to insert the hemisphere onto the selected downrod. 3º- Place the canopy and the connector cover onto the tube, in the order indicated in the diagram below.
- Page 9 Then, put the LED ring into position, centred on the underside of the fan body. The magnets will easily attach to the metal. Next, connect the DRIVER to the circuit using the connection card, and then connect the driver to the wires that come out of the centre of the underside of the fan body.
-
Page 10: Troubleshooting
3. Balance adjustment for this fan. "Invisible system" Although the fans are balanced before shipping, balance can be affected by transit. As a consequence, re-balance the fan by following these steps if you find that the fan has a noticeable wobble once fully assembled. 1º- Remove the balance kit from the packaging and place two of the balance magnets on any of the marked spaces, as shown in Figure A.
Need help?
Do you have a question about the VENTO and is the answer not in the manual?
Questions and answers