Table of Contents
Advertisement
Quick Links
Advertisement
Table of Contents

Related Manuals for Razorweld RW250di


Summary of Contents for Razorweld RW250di
- Page 2 anual.
- Page 3 1. Safety precautions ......................1.1. General safety ........................ 1.2. Other precautions ......................2. Description of symbols ...................... 3. Product overview ......................4. Technical parameters ....................... 5. Installation ........................5.1. External interface description ..................5.2. Power installation......................5.3. MIG welding torch and earth cable connection ............. 5.4.
-
Page 4: California Proposition
• Product will only be replaced if repair is not possible • Please view full Warranty term and conditions supplied with machine or at www.razorweld.com or at the back of this manual. - Page 5 . Always carry out a risk assessment before any welding or cutting activity.
- Page 15 T E SE OF E TE SIO CORDS ARE OT RECOMME DED...
- Page 16 5.3. MIG welding torch and earth cable connection Pay attention to the polarity of the wiring before MIG. Generally, there are two wiring methods for DC welder: DCEP and DCEN. DCEP: The polarity changeover connector is connected to the positive polarity, and the workpiece is connected to the negative polarity;...
- Page 17 5.3.2 DCEN 1) Ensure that the welder power switch is turned off. 2) Insert the torch plug into the central socket on the front panel of the welder and tighten it clockwise. 3) Insert the cable plug with earth clamp into the positive polarity socket on the front panel of the welder and tighten it clockwise.
- Page 18 (MMA wiring diagram: DCEP) (MMA wiring diagram: DCEN) Pay attention to the polarity of the wiring before MMA. Generally, there are two wiring methods for DC welder: DCEP and DCEN. DCEP: The electrode holder is connected to the positive polarity, and the workpiece is connected to the negative polarity;...
- Page 19 Generally speaking, DCEP is recommended for basic electrodes, while no special provisions are made for acid electrodes. 1) Ensure that the welder power switch is turned off. 2) Insert the cable plug with electrode holder into the corresponding socket on the front panel of the welder and tighten it clockwise.
- Page 20 you must ensure that the cross-sectional area of the cable is increased appropriately in order to reduce the voltage drop due to the cable length. 5.6. Wired handheld remote controller/foot pedal controller connection (optional) (Wiring diagram of wired remote controller) Insert the 9-pin aviation plug of the handheld remote controller/foot pedal controller directly into the corresponding 9-pin aviation socket of the machine.
-
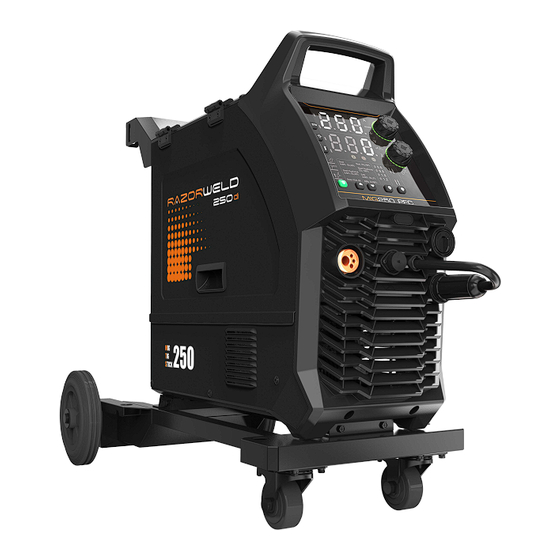
Page 21: Control Panel
6. Control panel The operation panel for this series of models supports HD digital screen and touchless LCD screen, which can be selected or replaced as needed, without needing to replace the main program of the welder. 6.1. HD digital screen 6.1.1 Overview a.Parameter display a b.Parameter display b... - Page 22 a. Parameter display a "Parameter display a" is used to display the current, welding speed, plate thickness and error code. 1) When not welding, the preset value of current parameter will be displayed. If no operation is performed for a long time, the default parameters are displayed. 2) When welding, the actual output current value is displayed.
- Page 23 d. Selection of MIG welding wire type and gas 1) In MIG mode, press the keys to select the welding wire type and gas. 2) If the corresponding indicator is on, it indicates that the welding wire type and gas has been selected.
- Page 24 g. Selection of push/push-pull/spool torch In MIG mode, press the corresponding function switching key to select the push torch or spool torch. 1) If the indicator is on, it indicates that the MIG is in push torch state. 2) If the indicator is on, it indicates that the MIG is in push-pull torch state.
- Page 25 module will remain on and the welder display window will display "OK". After successful pairing, the parameters can be adjusted by the wireless remote controller. (2) Disconnect wireless remote controller After the remote controller has been successfully paired, press and hold the remote control function key on the panel or the pairing key on the wireless remote controller for...
- Page 26 2) If the indicator is on, it indicates that the gas check function is enabled and the gas valve is open; if the indicator is off, it indicates that the gas check function is disabled and the gas valve is closed. Note: The gas check function automatically stops after 20s to avoid gas waste.
- Page 28 If the overcurrent indicator is on, it indicates that the main circuit device of the welder is abnormal, and the welder has entered overcurrent protection and stopped output. Please turn off and restart the machine. If this phenomenon persists, please contact professional maintenance personnel of the company.
- Page 29 X and Y represent the 8th and 9th digits/letters of the digital barcode 6.XY respectively X and Y represent the 10th and 11th digits/letters of the digital barcode 7.XY respectively X and Y represent the 20th and 21st digits/letters of the digital barcode 8.XY respectively X and Y represent the 22nd and 23rd digits/letters of the digital barcode...
- Page 30 Welding current 100A Pre-flow time 0.5S Lift TIG parameters Post-flow time 5.0S TIG downslope time 0.5S 6.1.4 Welding engineer mode function The Welding Engineer Mode function allows users to set/modify the default parameters /functions as follows: 1) Press and hold "Parameter Adjustment Knob A" for 5s in startup state. 2) After pressing and holding the "Parameter Adjustment Knob"...
- Page 31 Set the MIG/Lift TIG welding parameters based on the "Welding Mode" when in Welding Engineer Mode. 1 If the "Welding Mode" is MIG, set the MIG pre-flow MIG: 0.1 Pre-flow time Lift TIG: time, with range of 0-2.0, accuracy of 0.1, and unit of seconds.
-
Page 32: Mig Operation
7. Welding function operation Warning! Before turning on the power supply make sure that the equipment is disconnected to the output. Otherwise, an unexpected arc may be started when the power is turned on. This can cause damage to the work piece and to personnel. - Page 33 7.1.2 Select MIG mode HD digital screen: 1) Press the "Welding Mode Selection" key to select MIG mode. 2) Use the corresponding function switching key to select the welding type, wire diameter, operation method and welding torch type. 3) Enable/disable the "Synergic" function. 4) Use "Parameter Adjustment Knob A/B"...
- Page 34 In "Non-synergic" MIG mode, the parameters that can be set on the panel and their ranges are as follows: Parameter options or Parameter range (Input 230VAC) Name MIG250 Wire feed speed 79~709 (Inch/min) Welding voltage 11~30 Inductance -10~10 Burn back time 0~800 (ms) Burn back...
- Page 35 7.1.4 Set welding parameters with "Synergic" enabled HD digital screen: (Setting welding current) (Setting wire feed speed) (Setting plate thickness) 1) Press "Parameter Adjustment Knob A" to switch display of "Welding Current", "Wire Feed Speed", and "Plate Thickness"; set one parameter and the other two parameters will also change.
- Page 36 After connecting the digital torch with the welder and the remote control indicator turning on, use the keys on the digital torch to adjust the "Wire Feed Speed"/"Welding Current" and "Welding Voltage". For details about panel operations, see sections 7.12-7.14. NOTE! If the digital torch is used, select the welding torch type of "Spool torch".
- Page 37 (Select spool torch on HD digital screen) The welder can select push-pull torch in both "Non-synergic" and "Synergic" MIG modes. 7.1.6 Start welding Description of MIG 2T/4T operation 2T operating mode 4T operating mode Step 1: Press the torch trigger to Step 1: Press the torch trigger for the first start welding.
-
Page 38: Schematic Diagram
Welding sequence of MIG 2T/4T operation Mode Schematic diagram Pre-flow Torch trigger No-load voltage Gas supply Anti-stick time Post-flow supply time Output terminal voltage Wire feed Slow wire feed Welding current Welding Torch trigger Pre-flow No-load voltage Gas supply Anti-stick time Post-flow supply time Output terminal voltage... -
Page 39: Mma Operation
7.1.7 Turn off the power supply after welding The power switch is located on the rear panel of the machine and set it to the "OFF" position. After a time delay, the panel indicator is off and the welder stops working. 7.2. - Page 40 Electrode Electrode Welding diameter (mm) diameter (mm) current (A) 25~40 40~65 2.0~3.2 50~80 100~130 100~130 3.2~4.0 160~210 200~270 220~300 NOTE! The operator should set the functions that meet the welding requirements. If the selections are incorrect this may lead to problems such as an unstable arc, spatter, or sticking of the welding rod to the work piece.
- Page 41 7.2.4 Start welding During DC welding, the heat on the positive and negative polarities of the welding arc is different. When welding using DC power supply, there are DCEP and DCEN connections. The DCEP connection refers to the welding electrode connected to the positive polarity of the power supply and the workpiece connected to the negative polarity of the power supply.
- Page 42 7.3.3 Set welding parameters For HD digital screen, use the "Parameter Adjustment Knob A" to set the "Welding Current"; (as shown in above figure) Choose the appropriate welding current, tungsten electrode and shielding gas flow based on the actual situation. For details, refer to the following data. Selection of parameters for manual TIG welding –...
- Page 43 (LIft TIG mode) NOTE! When starting the arc if the short-circuit time exceeds 2 seconds the welder turns off the output current. Lift the welding torch clear of the work piece. Restart the process as above (7.3.2) to start the arc again. NOTE! During welding, if there is short circuit between tungsten electrode and the work piece, the welder will immediately reduce the output current;...
- Page 52 Perform preliminary troubleshooting or record faults according to the common malfunction analysis and solution checklist. To repair or replace the device, contact a local dealer. Please use accessories or consumables provided by ASIC Technologies America Inc. The warranty of this machine is sub ect to the date of sale on the warranty card or sales contract. Any faults caused by irregular or unreasonable use are not covered by the warranty and will be charged for repair.
-
Page 53: Appendix 1: Wiring Diagram
Appendixes Appendix 1: Wiring diagram Wiring diagram 1 - MIG250 Page 5... -
Page 54: Appendix 2: List Of Common Spare Parts
Appendix 2: List of common spare parts Page 5... - Page 55 List of spare parts Material Code SN Name Quantity MIG250 HD digital screen components 51004648 Wireless receiver module 9-pin aviation socket and cable 51001110 Euro quick socket 51002374 13 Reactor 51001513 14 HF transformer 51001668 17 Inverter board 51001594 22 Large fan 51002483 27 PFC board 51001140...
-
Page 56: Appendix 3. Packaging And Parts
Appendix 3. Packaging and parts General packaging Material code Name Quantity User Manual of MIG Welder (English) Product certificate Warranty card Desiccant Welder Page 5... -
Page 57: Spare Parts
Spare Parts for Tweco 2 style torches Torch Model Description Part Number EAN CODE 15 FT Welding Torch Classic Style TWC2-15FTE 0680474943777 10 FT Welding Torch Euro Style Handle TWC2-10FTE 0680474944095 TWC2 Contact Tips Part Number Description EAN CODE PRW14-30 Contact tip 0.8mm / 0.030”... - Page 58 SPOOL GUN EXPLODED DIAGRAM SPGLBT200E...
- Page 59 NOTES:...
Need help?
Do you have a question about the RW250di and is the answer not in the manual?
Questions and answers