Advertisement

Digital Projector
User Manual
AH700ST/AK700ST
V 1.01

Advertisement

Table of Contents
loading
Need help?

Need help?

Do you have a question about the AH700ST and is the answer not in the manual?

Questions and answers

John Schaefer
April 13, 2025

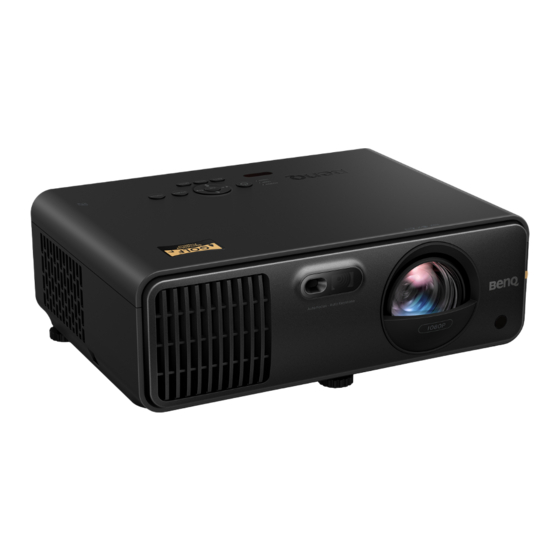
where is the zoom on remote?

1 comments:
Mr. Anderson
April 13, 2025

The zoom function on the BenQ AH700ST remote is accessible directly from the remote control and uses optical zoom, meaning the lens physically moves to adjust the image size.

This answer is automatically generated

Summary of Contents for BenQ AH700ST

  • Page 1 Digital Projector User Manual AH700ST/AK700ST V 1.01...
  • Page 2: Warranty And Copyright Information

    For other information, please visit www.BenQ.com. Copyright Copyright © 2024 by BenQ Corporation. All rights reserved. No part of this publication may be reproduced, transmitted, transcribed, stored in a retrieval system or translated into any language or computer language, in any form or by any means, electronic, mechanical, magnetic, optical, chemical, manual or otherwise, without the prior written permission of BenQ Corporation.
  • Page 3: Table Of Contents

    Table of Contents Warranty and Copyright information ................2 Important safety instructions ..................4 Introduction ........................8 Shipping contents ......................8 Projector exterior view ...................... 9 Controls and functions ....................10 Positioning your projector .................... 13 Choosing a location ......................13 Obtaining a preferred projected image size..............14 Mounting the projector ....................
  • Page 4: Important Safety Instructions

    Important safety instructions Your projector is designed and tested to meet the latest standards for safety of information technology equipment. However, to ensure safe use of this product, it is important that you follow the instructions mentioned in this manual and marked on the product. 1.
  • Page 5 9. Do not place this product on an unstable 12. Always place the projector on a level, cart, stand, or table. The product may fall, horizontal surface during operation. sustaining serious damage. - Do not use if tilted at an angle of more than 10 degrees left to right, nor at angle of more than 15 degrees front to back.
  • Page 6 50 cm clearance from walls and free flow of air around the projector. supply's power outlet and call BenQ to - Locations where temperatures may become have the projector serviced. excessively high, such as the inside of a car with all windows rolled up.
  • Page 7 Risk Group 2 1. According to the classification of photobiological safety of light sources and light source systems, this product is Risk Group 2, IEC 62471-5:2015. 2. Possibly hazardous optical radiation emitted from this product. 3. Do not stare at operating light source. May be harmful to the eyes. 4.
  • Page 8: Introduction

    Introduction Shipping contents Carefully unpack and verify that you have all of the items shown below. If any of these items are missing, please contact your place of purchase. Standard accessories Remote control with Projector Power cord batteries Quick start guide Regulatory statements Warranty card* •...
  • Page 9: Projector Exterior View

    Projector exterior view 11 12 1. Vent (air exhaust) 11. RS-232 control port 2. Vent (air inlet) 12. USB Type A port with power charging 3. Focus lens 13. HDMI 1 input port 4. Auto keystone lens 14. HDMI 2 input port 5.
  • Page 10: Controls And Functions

    Controls and functions Projector & Remote control All the key presses described in this document are available on the remote control or projector. 5. Arrow keys ( , POWER When the On-Screen Display (OSD) menu Toggles the projector between standby is activated, these keys are used as mode and on.
  • Page 11 7. FOCUS 17. ID setting indicator Press to focus the image and then 18. GOLF SETTING displays the adjustment page for manual Displays the golf setting menu. adjustment. 19. ZOOM *Available on compatible projectors only. Press to display the motor zoom menu. 8.
  • Page 12 Remote control effective range The remote control must be held at an angle within 30 degrees perpendicular to the projector's IR remote control sensor(s) to function correctly. The distance between the remote control and the sensor(s) should not exceed 8 meters (~ 26 feet). Make sure that there are no obstacles between the remote control and the IR sensor(s) on the projector that might obstruct the infra-red beam.
  • Page 13: Positioning Your Projector

    Purchase the BenQ Projector Ceiling/Wall screen. Note that a special rear projection Mount Kit from your dealer to mount your screen and the BenQ Projector Ceiling/Wall projector. Mount Kit are required for this installation location.
  • Page 14: Obtaining A Preferred Projected Image Size

    The distance from the projector lens to the screen, the zoom setting (if available), and the video format each factors in the projected image size. Projection dimensions AH700ST • The screen aspect ratio is 16:9 and the projected picture is in a 16:9 aspect ratio 16:9 Screen diagonal...
  • Page 15 All measurements are approximate and may vary from the actual sizes. BenQ recommends that if you intend to permanently install the projector, you should physically test the projection size and distance using the actual projector in situ before you permanently install it, so as to make allowance for this projector's optical characteristics.
  • Page 16 All measurements are approximate and may vary from the actual sizes. BenQ recommends that if you intend to permanently install the projector, you should physically test the projection size and distance using the actual projector in situ before you permanently install it, so as to make allowance for this projector's optical characteristics.
  • Page 17: Mounting The Projector

    BenQ projector mounting kit and that you ensure it is securely and safely installed. If you use a non-BenQ brand projector mounting kit, there is a safety risk that the projector may fall down due to an improper attachment through the use of the wrong gauge or length screws.
  • Page 18: Adjusting The Projected Image

    Adjusting the projected image Adjusting the projection angle If the projector is not placed on a flat surface or the screen and the projector are not perpendicular to each other, the projected image becomes trapezoidal. You can screw the adjuster feet to fine-tune the horizontal angle. To retract the feet, screw the adjuster feet in a reverse direction.
  • Page 19 Using the Auto Screen Fit function The Auto Screen Fit function automatically adjusts the focus, zoom, and aspect ratio of the projected image to fit the screen. 1. Measure the projection distance. Ensure that the distance between the projector and the screen is slightly longer than the intended projection distance.
  • Page 20 Correcting keystone Keystoning refers to the situation where the projected image becomes a trapezoid due to angled projection. 2D keystone (AH700ST) To correct the distorted image: 1. Do one of the following steps to display the keystone correction page. • Press on the projector or remote control.
  • Page 21 3D keystone (AK700ST) To correct the distorted image: 1. Display the 3D Keystone correction page from the following menus. • The setup wizard during the projector initial setup • Press on the projector. • Go to the Basic/Advanced Menu - Installation >...
  • Page 22 Adjusting Corner Fit You can manually adjust four corners of the image by setting the horizontal and vertical values. 1. Do one of the following steps to display the keystone correction page. • Press Geometry key on the remote control. •...
  • Page 23: Connection

    Connection When connecting a signal source to the projector, be sure to: 1. Turn all equipment off before making any connections. 2. Use the correct signal cables for each source. 3. Ensure the cables are firmly inserted. A/V device HDMI cable Speakers USB Type-C cable Wireless dongle...
  • Page 24 Connecting audio The projector has built-in mono speaker(s) which are designed to provide basic audio functionality accompanying data presentations for business purposes only. They are not designed for, nor intended for stereo audio reproduction use as might be expected in home theater or home cinema applications.
  • Page 25 • For Windows OS devices Press the Windows + P / K and choose the projector (BenQ_xxxxxxxx). Connecting the projector to the Internet 1. Select the WiFi SSID (BenQ_xxxxxxxx) of the projector in the WiFi settings on your device. 2. Enter the password from the projected image. 3.
  • Page 26: Operation

    Operation Starting up the projector 1. Plug the power cord. Turn on the power outlet switch (where fitted). The power indicator on the projector lights orange after power has been applied. 2. Press on the projector or on the remote control to start the projector.
  • Page 27: Using The Menus

    Using the menus The projector is equipped with 2 types of On-Screen Display (OSD) menus for making various adjustments and settings. • Basic OSD menu: provides primary menu functions. (See Basic Menu on page • Advanced OSD menu: provides full menu functions. (See Advanced Menu on page To access the OSD menu, press MENU on the projector or remote control.
  • Page 28: Securing The Projector

    Likewise, when you wish to switch from the Advanced OSD menu to the Basic OSD menu, follow the instructions below: 1. Go to System > Menu Settings > Menu Type and press OK. 2. Press to select Basic. Your projector will switch to the Basic OSD menu. Securing the projector Using a security cable lock The projector has to be installed in a safe place to prevent theft.
  • Page 29: Switching Input Signal

    Please write down the recall code, and contact 2. Write down the number and turn off your projector. BenQ Customer Center. 3. Seek help from the local BenQ service center to decode the number. You may be required to provide Recall Code: proof of purchase documentation to verify that you are an authorized user of the projector.
  • Page 30: Shutting Down The Projector

    Once detected, the selected source information will appear at the corner of the screen for seconds. If there is multiple equipment connected to the projector, repeat steps 1-2 to search for another signal. • The brightness level of the projected image will change accordingly when you switch between different input signals.
  • Page 31: Menu Operation

    Picture Mode (33) User2 Aspect Ratio (39) Auto/4:3/16:9/16:10 Normal Light Source Mode (52) SmartEco Custom H: -30~0~30 2D Keystone (20) (AH700ST only) V: -30~0~30 H: -30~0~30 3D Keystone (21) (AK700ST only) V: -30~0~30 R: -30~0~30 Volume (37) 0 – 20 Brightness (34) 0–100...
  • Page 32: Advanced Menu

    Load Settings From Golf/Cinema/Game/sRGB User Management Rename User Mode Brightness 0–100 Contrast 0–100 Sharpness 0–31 Gamma Selection 1.8/2.0/2.1/2.2/2.3/2.4/2.5/2.6/BenQ R/G/B/C/M/Y Hue/Saturation/Gain Color Management W (White Balance) R Gain/G Gain/B Gain Reset Reset/Cancel Advanced Color Brilliant Color Off/On Settings Light Source Mode...
  • Page 33 Function descriptions Menu Descriptions The projector is preset with several predefined picture modes so that you can choose one to suit your operating environment and input signal picture type. • Bright: Maximizes the brightness of the projected image. This mode is suitable for environments where extra-high brightness is required.
  • Page 34 There is one user-definable mode if the current available picture modes are not suitable for your need. You can use one of the picture modes (except the User1/User2 mode) as a starting point and customize the settings. • Load Settings From 1.
  • Page 35 • 2.4/2.5: Best for viewing movies in a dark environment. • 2.6: Best for viewing movies which are mostly composed of dark scenes. • BenQ: Finely-tuned gamma to optimize details and increase contrast. High Brightness Low Brightness Low Contrast High Contrast •...
  • Page 36 Saturation is the amount of that color in a video picture. Lower settings produce less saturated colors; a setting of “0” removes that color from the image entirely. If the saturation is too high, that color will be overpowering and unrealistic. •...
  • Page 37 2. Main menu: Audio Structure Menu Options Audio Output Internal Speaker/3.5mm Jack/Audio Return+ Mute Off/On Volume 0 – 20 Audio Output Auto/LPCM/RAW/RAW+ Format Power On/Off Ring Tone Off/On Reset Audio Reset/Cancel Function descriptions Menu Descriptions Selects the audio output from internal or external speakers. To enjoy sound effect, make sure to turn on the eARC/ARC Audio Return+...
  • Page 38 Off/On (AK700ST only) 16:9 (1920 x 1080)/16:10 (1728 x Standard 1080)/4:3 (1440 x 1080)/1:1 (1080 x 1080) (AH700ST) 16:9 (3840 x 2160)/16:10 (1728 x Enhanced 1080)/4:3 (1440 x 1080)/1:1 (1080 x 1080) Screen Fill 16:9 (1920 x 1080)/16:10 (1728 x...
  • Page 39 Function descriptions Menu Descriptions There are several options to set the image's aspect ratio depending on your input signal source. • Auto: Scales an image proportionally to fit the projector's native resolution in its horizontal or vertical width. 15:9 picture •...
  • Page 40 • The image may seem reddish, greenish, or bluish without wearing 3D glasses. However, you will not notice any color bias when watching 3D contents with 3D glasses. • The 4K source will not be displayed. • 3D Mode The projector can automatically enable 3D mode via the contents when the source type is HDMI and supports 1.4a.
  • Page 41 • HDMI Format Selects a suitable RGB color range to correct the color accuracy. • Auto: Automatically selects a suitable color range for the incoming HDMI signal. • Limited: Utilizes the Limited range RGB 16-235. • Full: Utilizes the Full range RGB 0-255. •...
  • Page 42 4. Main menu: Installation Structure Menu Options Projector Position Front/Front Ceiling/Rear/Rear Ceiling H: -30 – +30 2D Keystone (AH700ST only) V: -30 – +30 H: -30~0~30 3D Keystone (AK700ST V: -30~0~30 only) R: -30~0~30 Test Pattern On/Off High Altitude Mode...
  • Page 43 The projector can be installed on a ceiling or behind a screen, or with Projector Position one or more mirrors. See Choosing a location on page 13 for details. 2D Keystone 2D keystone (AH700ST) on page 20 for details. (AH700ST only) 3D keystone (AK700ST) on page 21 for details. 3D Keystone This image adjustment might impact latency.
  • Page 44 • Corner Fit Adjusting Corner Fit on page 22 for details. • Warping (AK700ST only) This function aims at correcting the geometric distortion of the projector’s images when they are projected onto an uneven surface such as a cylinder, a spherical shape, etc. •...
  • Page 45 • Motor Zoom Magnifies or reduces the projected image size. 1. After the adjustment bar displays, press on the projector repeatedly to reduce or magnify the image to a desired size. 2. Press OK to enter panning mode. 3. Press the directional arrows ( , ) on the projector or remote control to navigate the picture.
  • Page 46 5. Main menu: System Structure Menu Options Language Bhs Ind Background Color Black/Blue/Purple Background Settings Splash Screen BenQ/Black/Blue Menu Type Basic/Advanced Menu Display Time 5 sec/10 sec/20 sec/30 sec/Always Menu Settings Center/Top-Left/Top-Right/ Menu Position Bottom-Right/Bottom-Left Reminder Message Off/On Light Source Usage Time...
  • Page 47 Reset System Reset/Cancel Function descriptions Menu Descriptions Language Sets the language for the On-Screen Display (OSD) menus. • Background Color Sets the background color for the projector. Background • Splash Screen Settings Allows you to select which logo screen will be displayed during projector start-up.
  • Page 48 • LED Indicator You can turn off the LED warning lights. This is to avoid any light disturbance when viewing images in a dark room. • Power On/Off Settings • Direct Power On: Allows the projector to turn on automatically once Operation the power is fed through the power cord.
  • Page 49 6. Main menu: Information Structure Menu Native Resolution Detected Resolution Source Picture Mode Light Source Mode 3D Format Color System Dynamic Range Light Source Usage Time Projector ID Firmware Version Service Code Function descriptions Menu Descriptions Native Resolution Shows the native resolution of the projector. Detected Resolution Shows the native resolution of the input signal.
  • Page 50: Maintenance

    Maintenance Care of the projector Cleaning the lens Clean the lens whenever you notice dirt or dust on the surface. Please be sure to turn off the projector and let it cool down completely before cleaning the lens. • Use a canister of compressed air to remove dust. •...
  • Page 51: Light Source Information

    Light source information Getting to know the light hour When the projector is in operation, the duration (in hours) of light source usage is automatically calculated by the built-in timer. The method of calculating the equivalent light hour is as follows: 1.
  • Page 52 Extending light source life • Setting the Light Source Mode Go to Advanced menu - Picture > Advanced Color Settings > Light Source Mode and select a suitable light source power from among the provided modes. Setting the projector in ECO, SmartEco or Custom mode extends light source life. Light mode Description Normal Mode...
  • Page 53 Indicators Light Status & Description Power events Stand-by mode Powering up Normal operation Normal power-down cooling Download Color wheel start/spin fail Phosphor wheel start/spin fail Burn-in events Burn-in on Burn-in off Light events Light source life exhausted Light error in normal operation Thermal events Fan 1 error (the actual fan speed is outside the desired speed)
  • Page 54: Troubleshooting

    Troubleshooting The projector does not turn on. Cause Remedy Plug the power cord into the AC power jack on the projector, and plug the power cord into the power There is no power from the power cord. outlet. If the power outlet has a switch, make sure that it is switched on.
  • Page 55 • Dim the ambient light to ensure screen detection. • Clean the focus lens, ensure that it is clean and not obstructed. • Ensure that the screen shape is a right rectangle. The projector cannot detect a screen. • Ensure that the screen border is 6 cm in width. •...
  • Page 56: Specifications

    All specifications are subject to change without notice. Optical USB Type C input USB Type C Input DP (Display) ALT Mode and DC Resolution 5V/1A Out x 1 AH700ST: 1920 x 1080 1080p Environmental Requirements AK700ST: 3840 x 2160 4K Display system Operating temperature 1-CHIP DMD 0°C–40°C at sea level...
  • Page 57: Dimensions

    Dimensions 303.5 mm (W) x 234.5 mm (D) x 112.4 mm (H) 303.5 234.5 112.4 Unit: mm Specifications...
  • Page 58: Timing Chart

    84.997 68.667 94.500 XGA_120 (Reduce 119.989 97.551 115.500 Blanking) 1152 x 864 1152 x 864_75 75.00 67.500 108.000 BenQ Notebook 1024 x 576 60.00 35.820 46.996 Timing BenQ Notebook 1024 x 600 64.995 41.467 51.419 Timing 1280 x 720 1280 x 720_60 45.000...
  • Page 59 • Supports auto-detecting and manually setting 3D format. ▲: • : Supports manually setting 3D format. • The timings showing above may not be supported due to EDID file and VGA graphics card limitations. It is possible that some timings cannot be chosen. •...
  • Page 60 Supported timing for USB-C input • PC timings Vertical Horizontal Pixel Supported 3D format Resolution Mode Frequency Frequency Frequency Frame Top-Bott Side By (Hz) (kHz) (MHz) Sequential Side VGA_60 59.940 31.469 25.175 VGA_72 72.809 37.861 31.500 640 x 480 VGA_75 75.000 37.500 31.500...
  • Page 61 • Video timings Horizontal Frequency Vertical Frequency Pixel Frequency Timing Resolution (kHz) (Hz) (MHz) 480p 720 x 480 31.47 59.94 576p 720 x 576 31.25 720/50p 1280 x 720 37.5 74.25 720/60p 1280 x 720 45.00 74.25 1080/50i 1920 x 1080 28.13 74.25 1080/60i...

This manual is also suitable for:

Ak700st

Table of Contents

Save PDF