Table of Contents
Advertisement
Quick Links
Advertisement
Table of Contents

Related Manuals for BenQ PB7230


Summary of Contents for BenQ PB7230
- Page 1 PB7210/ PB7230/ PB7110 Digital Projector User’s Manual Welcome...
- Page 2 Copyright Copyright 2004 by BenQ Corporation. All rights reserved. No part of this publication may be repro- duced, transmitted, transcribed, stored in a retrieval system or translated into any language or com- puter language, in any form or by any means, electronic, mechanical, magnetic, optical, chemical, manual or otherwise, without the prior written permission of this company.
-
Page 3: Table Of Contents
Projector Features ... 4 Shipping Contents ... 5 Optional Accessories ... 5 Projector Description ... 6 You Projector at a Glance ... 6 External Control Panel ... 7 Adjuster ... 8 Remote Control Description ... 9 Remote Control Effective Range ... 10 Installing or Replacing Batteries ... - Page 4 Ordering Parts or Getting Information ... 32 Troubleshooting ...33 Common Problems & Solutions ...33 Status Messages ...34 Specifications ...35 Projector Specifications ...35 Technical Specifications ... 35 Timing Chart ...36 Supported timing for PC input ... 36 Supported timing for YPbPr input ... 36 Supported timing for Video and S-Video inputs ...
-
Page 5: Important Safety Instructions
Important Safety Instructions Your BenQ projector is designed and tested to meet the latest standards for safety of infor- mation technology equipment . However, to ensure safe use of this product, it is important that you follow the instructions mentioned in this manual and marked on the product. - Page 6 This product is capable of displaying inverted images for ceiling mount installation. Please use BenQ’s Ceil- ing Mounting Kit for mounting the unit and ensure it is securely installed.
- Page 7 - Locations where excessive humidity, dust, or cigarette smoke may contaminate optical components, shortening the projector’s lifespan and darkening the image. - Locations near fire alarms - Locations with an ambient temperature above 35°C / 95°F...
-
Page 8: Introduction
Introduction Projector Features The projector integrates high-performance optical engine projection and a user-friendly design to deliver high reliability and ease of use. The projector offers the following features: • Small and light for portability • Full-function remote control with laser pointer/ remote mouse function •... -
Page 9: Shipping Contents
Shipping Contents The projector is shipped with the cables required for connection to a PC and to video equip- ment. Carefully unpack and verify that you have all of the items shown below. If any of these items are missing, please contact your place of purchase. -
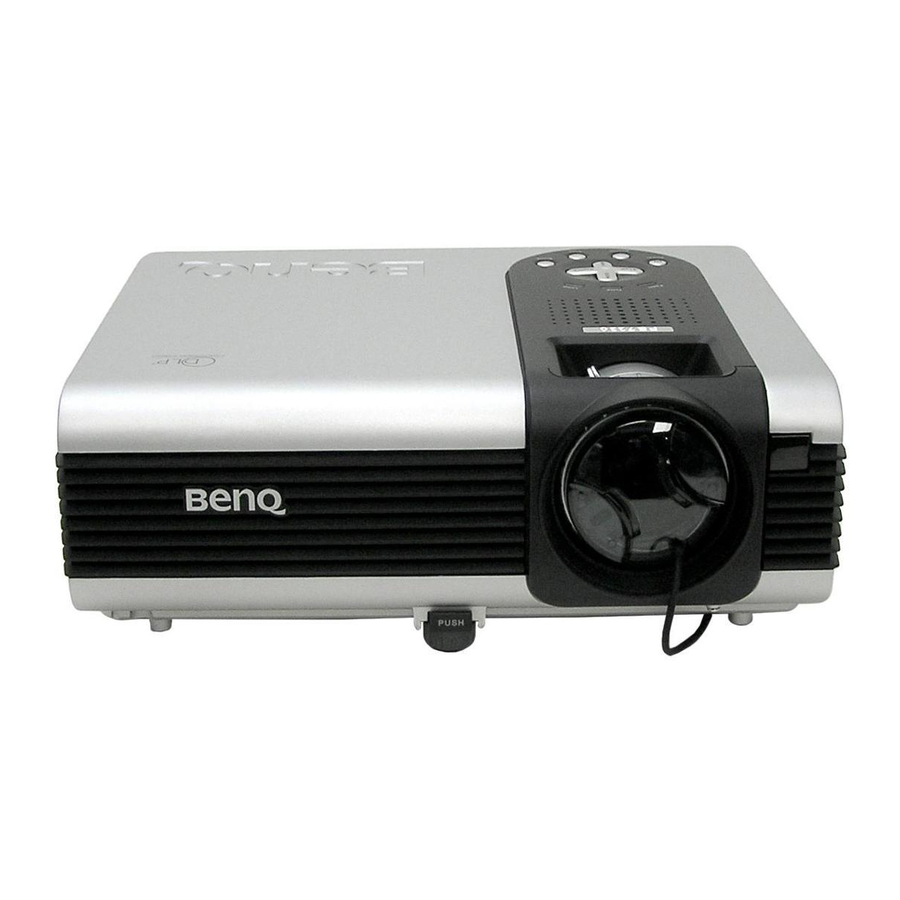
Page 10: Projector Description
Projector Description You Projector at a Glance Ventilation grill Front adjuster Audio jack Video connector RGB signal input - 1 (PC/ Mac) RGB signal input - 2 (PC/ YP AC power cord inlet Introduction Projection lens Rear adjuster External control panel... -
Page 11: External Control Panel
Used to hide the screen image. You can press Blank again or Return to bring the image back. Power indicator light It will light up or flash when the projector is under operation. Menu Temperature warning light The Temp indicator will flash when the sys- tem temperature is too high, which may occur if the projector is operated improperly. -
Page 12: Adjuster
Adjuster The projector is equipped with 1 quick-release adjuster foot. Push the button to adjust its tilt angle. Lift the projector up and press the adjuster button to release the adjuster. The adjuster will drop into position and be locked. -
Page 13: Remote Control Description
Remote Control Description Power Menu 3 Left/ Keystone - 4 Right/ Keystone + Auto L-Click/ R-click Zoom in/ out By pressing ZOOM IN +, the cen- ter of the picture will be magnified. When the + button is pressed again, the picture is further magni- fied, up to four times the original size. -
Page 14: Remote Control Effective Range
Remote Control Effective Range Infra Red (IR) remote control sensors are located on the front and the back of the projector. It can function in a range of 30 degrees horizontally and 30 degrees vertically relative to a line that is a right angle to the remote sensors to function correctly. The distance between the remote control and the remote sensors should not exceed 6 meters (19.5 feet). -
Page 15: Installation
Installation Screen Size Place the projector at the required distance from the screen according to the desired picture size (see the table below). PB7210/ PB7230 (XGA) screen size chart (4:3 aspect ratio) Distance Diagonal measurement from screen Minimum zoom feet inches... - Page 16 PB7210/ PB7230 (XGA) screen size chart (16:9 aspect ratio) Distance Diagonal measurement from screen Minimum zoom feet inches feet inches 2.29 27.5 3.44 41.3 4.59 55.1 5.74 68.8 6.88 82.6 8.03 96.4 9.18 110.1 11.20 134.4 10.32 123.9 12.60 151.2 11.47 137.7 14.00 167.9...
-
Page 17: Connecting To Various Equipment
* 1m = 3.28 feet, 1 feet = 0.305m, 1m = 100cm, 1 feet = 12 inches Connecting to Various Equipment HDTV Equipment The projector is capable of displaying various High Definition TV display modes. Some of these sources are: •... -
Page 18: Connecting To Various Equipment
Please refer to "Menu System" on page 19 for information on the HDTV OSD selections. Connecting to Various Equipment It only takes a few seconds to connect your projector to your desktop or notebook computer, VCR, or other systems. However, a Mac adapter (an optional accessory) may be necessary for connection to an older Macintosh computer. - Page 19 Video device or VCR Video cable Audio cable Installation...
-
Page 20: Operation
Press and hold POWER to start the unit. The back-lit POWER key flashes green and stays green when the power is turned on. (When the power is turned off, there is a 90-second cooling period before the projector can be re-started.) Switch on all connected equipment. -
Page 21: Digital Keystone Correction
To correct this, press 3 Left/ Right 4 (hot key) on the con- trol panel of the projector or KEY- STONE 3/4 on the remote control, and then adjust the sliding bar labeled Keystone, as needed. -
Page 22: Auto Adjustment
Auto Adjustment In some cases, you may need to optimize the picture quality. To do this, press the AUTO key on the control panel of the projector or on the remote control. Within 3 seconds, the built-in Intelligent Auto Adjustment function will re-adjust settings to provide the best picture quality. -
Page 23: Menu System
Menu System Press Menu for the main menu, and then press again to select items in the sub-menu. Menu Bar Sub-menu Display Keystone Auto Resize Brightness H Position Contrast V Position Phase Color Temp H Size Information Ratio Color Y/Pb/Pr Tint Color Temp Keystone... -
Page 24: Display Menu
1. Display Menu FUNCTION DESCRIPTION Corrects any keystoning of the image. Keystone Adjusts the brightness of the image. Brightness Adjusts the degree of difference between dark and light in the image. Contrast Adjusts to avoid the occurrence of flicker. Phase Adjusts the horizontal width of the image. -
Page 25: Image Menu
2. Image Menu FUNCTION DESCRIPTION Makes the best fit of the image to the screen, Auto Resize 1. On 2. Off 3. 16:9 This function is available only when a PC input is selected . Users have 2 options for the image ratio. 1. -
Page 26: Source Menu
3. Source Menu FUNCTION DESCRIPTION 1. Default Mirror 3. Rear screen projection Shows the input source from among RGB-1, RGB-2, YP Source and Video when several sources are available. Adjusts the volume level. Volume Mute Operation 2. Ceiling mounted projection 4. -
Page 27: Control Menu
Sets the length of time before the system is shut off when no input is detected. User Logo Enables the user to select which logo screen will appear during the start- up. Three modes are available: Default (BenQ logo), black screen or blue screen. Operation... - Page 28 Preset modes are provided so you can optimize your projector image set- up to suit your program type PC Signal Input Presentation Mode: Is designed for presentations. The brightness is emphasized in this mode. Vivid Mode: Is perfect for playing games. The color saturation and brightness are well-balanced.
-
Page 29: Pip Menu
5. PIP Menu These functions are available only when the input mode is PC and the PIP source is Video or S-Video. FUNCTION DESCRIPTION Selects the source for the PIP. PIP Source Press the 3 / 4 keys to scroll through the four alternatives: Off, Small, Medium, Large. -
Page 30: Shutdown
Do not unplug the power cord before the projector shutdown sequence is complete or during the 90-second cooling down process. If the projector is not properly shut down, to protect the lamp, the system will detect this and cool the lamp for 90 seconds automatically before turning on again. -
Page 31: Maintenance
The Lamp and Temp indicators will light up if the lamp becomes too hot. Turn the power off and let the projector cool for 45 minutes. If the Lamp or Temp indicator still lights up when turning the power on, please contact your dealer. - Page 32 Step 1. Turn the projector off. Discon- nect the power cord from the outlet and the projector. Step 2. Loosen the screw and remove the lamp cover. If the lamp is hot, avoid burns by waiting 45 min- utes until the lamp has cooled.
-
Page 33: Resetting Lamp Hours
The internal temperature is too high. The fans are not working. Turn the projector off and contact qualified service personnel for further help. For more detailed information, please refer to "LED Indicator Status & Illustration" on page LED Indicator Status & Illustration... - Page 34 Lamp Maintenance Status & Description Power events Power switch on Power-up cooling. The projector needs 90 seconds to cool down as it was abnormally shutdown without the normal cooling dowm sequence. Stand-by mode. Lamp LED is blinking during powering up.
- Page 35 Thermal sensor 1 over-temperature. The projector will shut- down automatically. If you try to restart the projector, it will shutdown again. Please contact your dealer for assistance. Thermal sensor 2 over-temperature. The projector will shut- down automatically. If you try to restart the projector, it will shutdown again.
-
Page 36: Service Information
Presentation Pro..........60.J2278.001 Ordering Parts or Getting Information For product information, product assistance, service information, or to order accessories, please visit the BenQ Corporation website at http://www.BenQ.com. Maintenance... -
Page 37: Troubleshooting
• Adjust brightness, contrast, or saturation. BLURRED IMAGE Try these solutions: • Press Auto on the control panel of the projector or the remote control unit to get better picture quality. • Adjust the focus. • Reposition the unit to improve its projection angle. -
Page 38: Status Messages
20 hours. The lamp has been in operation for over 2000 hours. The warning message will display for 30 seconds every 5 minutes after you turn on the projector and the power will turn off automatically after 10 minutes. -
Page 39: Specifications
Audio 1 Output USB mouse connector Speaker Control RS-232C Digital Projector PB7210 1024 x 768 XGA PB7230 1024 x 768 XGA PB7110 800 x 600 SVGA 1-CHIP DMD F/2.6 250W lamp AC100 ~ 240V, 4.0A, 50/60 Hz (Automatic) 330W (Max) 258 mm (W) x 80 mm (H) x 211.5 mm (D) -
Page 40: Timing Chart
Timing Chart Supported timing for PC input Horizontal Resolution Frequency (kHz) 720 x 400 37.927 31.469 37.861 640 x 480 37.500 43.269 35.156 37.879 48.077 800 x 600 46.875 53.674 832 x 624 49.725 35.522 48.363 56.476 1024 x 768 60.023 68.667 60.134... -
Page 41: Supported Timing For Video And S-Video Inputs
Supported timing for Video and S-Video inputs Horizontal Video mode Frequency (kHz) NTSC 15.73 15.63 SECAM 15.63 PAL-M 15.73 PAL-N 15.63 PAL-60 15.73 NTSC4.43 15.73 Vertical Pixel Frequency Frequency (Hz) (MHz) 3.58 4.43 4.25 or 4.41 3.58 3.58 4.43 4.43 Specifications... -
Page 42: Dimensions
Dimensions Unit: mm Dimensions... -
Page 43: Warranty
In the event this product is found to be defective within the warranty period, BenQ’s only obligation and your exclusive remedy shall be replacement of any defective parts (labor included). To obtain warranty service, imme- diately notify the dealer from which you purchased the product of any defects. -
Page 44: Safety Regulations
Safety Regulations FCC Statement CLASS A: This equipment generates, uses and can radiate radio frequency energy, and if not installed and used in accordance with the instruction manual, may cause interfer- ence to radio communications. It has been tested and found to comply with the limits for a Class “A”...
Need help?
Do you have a question about the PB7230 and is the answer not in the manual?
Questions and answers