Table of Contents
Advertisement
Available languages
Available languages
Advertisement
Table of Contents

Related Manuals for Akai APC20


Summary of Contents for Akai APC20
- Page 1 QUICKSTART GUIDE ENGLISH ( 3 – 5 ) GUÍA DE INICIO RÁPIDO ESPAÑOL ( 6 – 8 ) GUIDE D'UTILISATION RAPIDE FRANÇAIS ( 9 – 11 ) KURZANLEITUNG DEUTSCH ( 12 – 14 ) GUIDA RAPIDA ITALIANO ( 15 – 17 ) WWW.AKAIPRO.COM...
-
Page 3: Software Installation
APC20 is designed for performance with Ableton Live. In this manual, you will find instructions on how to connect the APC20 and use its basic features with Ableton Live – Akai Professional APC Edition. APC20 can also be used in "generic mode" as a controller with other virtual DJ applications that use MIDI protocol. -
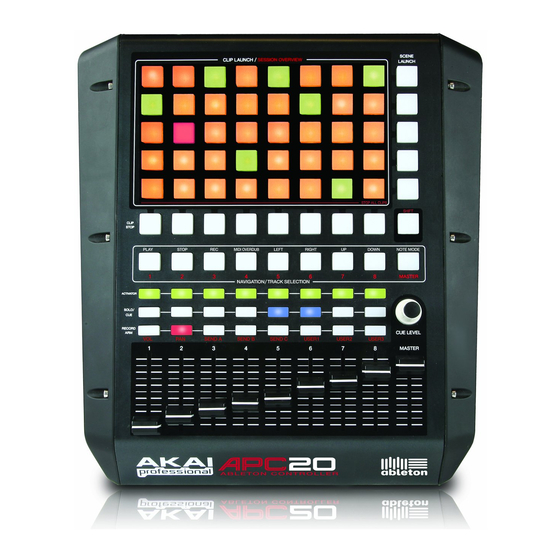
Page 4: Top Panel Overview
RECORD ARM / FADER MODE buttons. SCENE LAUNCH – These buttons triggers an entire row of clips, called a "scene." All clips in that scene will be triggered, including those not represented in that Clip Launch View. -
Page 5: Rear Panel Overview
(C1, C#1, D1, D#1, etc.) from C1 to G2. The right half of the grid ascends similarly from G#2 to D#3. (This is ideal for using with Drum Rack, but it can also be used to play melodic lines with any MIDI device.) -
Page 6: Instalación Del Software
“modo genérico” como controlador con otras aplicaciones de DJ virtual que usan el protocolo MIDI. Si usted ya tiene Ableton Live, debe instalar la edición especial Akai Professional APC que está en el CD de software incluido para aprovechar plenamente las ventajas de la funcionalidad del controlador con el software. Recomendamos consultar el manual de Ableton incluido en el CD, así... -
Page 7: Vista Del Panel Superior
Clip Launch representa los Clips 1-5 de las pistas 9-16. Si mantiene pulsado SHIFT y pulsa el primer botón de la segunda fila, después de soltar SHIFT la vista Clip Launch representa los Clips 6-10 de las pistas 1-8. -
Page 8: Vista Del Panel Trasero
(C1, C#1, D1, D#1, etc.) de C1 a G2 [(Do1, Do sostenido 1, Re1, Re sostenido 1, etc.) desde Do 1 a Sol 2] La mitad derecha de la grilla asciende en forma similar de G#2 to D#3 [Sol sostenido 2 a Re sostenido 3]. (Esto es ideal para usar con Drum Rack, pero se puede usar también para tocar líneas melódicas con cualquier dispositivo MIDI.) -
Page 9: Installation Logiciel
Remarque concernant le mappage MIDI : Les commandes du APC20 sont déjà affectées à certaines des fonctions les plus utiles du Ableton Live, cependant, si vous désirez les modifier, il est possible de le faire en cliquant le bouton « MIDI » dans le coin supérieur droit de l'écran. -
Page 10: Caractéristiques Du Panneau Supérieur
8 x 5 qui contient des emplacements pour clips qui ne sont pas en mode de lecture Exemples : Si vous avez 16 pistes contenant 20 clips chacune, le « premier » affichage Clip Launch représente les clips 1 à 5 des pistes 1 à 8. -
Page 11: Caractéristiques Du Panneau Arrière
Ableton Live (drum rack). En se déplaçant de gauche à droite et de bas en haut à l'intérieur de la partie gauche de la grille, les touches augmentent chromatiquement (C1, C#1, D1, D#1, etc.) de C1 à G2. Les touches de la partie droite de la grille augmentent chromatiquement de G#2 à... -
Page 12: Installation Der Software
Diese Kurzanleitung gibt Ihnen einen kurzen Überblick über die Funktionalität und die Eigenschaften des Akai APC20 Ableton Controllers. Der APC20 ist für den Einsatz mit Ableton Live entwickelt worden. In dieser Anleitung erfahren Sie, wie Sie den APC20 anschließen und die grundlegenden Funktionen mit Ableton Live – Akai Professional APC Edition verwendet werden. Der APC20 kann auch im "Generic Modus"... -
Page 13: Überblick Über Die Oberseite
TRACK KONTROLLFADER kann durch Festhalten der Shift-Taste und Drücken einer der RECORD ARM / FADER MODUS Tasten geändert werden. SCENE LAUNCH – Diese Buttons triggern eine gesamte Reihe von Clips, was sich "Scene" nennt. Alle Clips in dieser Scene werden getriggert, inklusive denen, die nicht diesem Clip Launch View dargestellt... -
Page 14: Übersicht Über Die Rückseite
Hälften unterteilt, wobei jede Taste eine Note auf dem Ableton Live Drum Rack darstellt. Von links nach rechts und unten nach oben auf der linken Seite des Rasters sind die Tasten von C1 bis G2 chromatisch in aufsteigender Reihenfolge angeordnet (C1, C#1, D1, D#1, usw.). Die rechte Hälfte des Rasters hat, beginnend von G#2 bis D#3, die gleiche Einteilung. -
Page 15: Installazione Del Software
Se si dispone già l’Ableton Live, dovreste installare l’edizione speciali Akai Professional APC Edition inclusa nell’allegato CD recante il software in modo da poter sfruttare appieno tutte le funzioni del controller con il software. Fare riferimento al manuale Ableton presente sul CD oltre alle lezioni disponibili nel software stesso. -
Page 16: Panoramica Pannello Superiore
Launch View illustrerà le clip 1-5 delle tracce 9-16. Se si tiene premuto SHIFT e si preme il secondo tasto della seconda riga, dopo aver rilasciato la pressione da SHIFT il Clip Launch View illustrerà le clip 6-10 delle tracce 1-8. -
Page 17: Panoramica Pannello Posteriore
(C1, C#1, D1, D#1, ecc.) da C1 a G2. La metà destra della griglia sale allo stesso modo da G#2 a D#3. (Questo è l’ideale per l’uso con il Drum Rack, ma può anche essere utilizzato per riprodurre linee melodiche con qualsiasi dispositivo MIDI.) PANORAMICA PANNELLO POSTERIORE ALIMENTAZIONE ON/OFF –... - Page 19 7-51-0310-A...
- Page 20 WWW.AKAIPRO.COM WWW.ABLETON.COM...
Need help?
Do you have a question about the APC20 and is the answer not in the manual?
Questions and answers