Table of Contents
Advertisement
Quick Links
Advertisement
Table of Contents

Related Manuals for D-Link DSL-320T


Summary of Contents for D-Link DSL-320T
-
Page 1: Adsl Modem
DSL-320T ADSL Modem User Guide January 2006 ESL320TEU.A1G... -
Page 2: Ce Mark Warning
FCC Warning This device complies with part 15 of the FCC Rules. Operation is subject to the following two conditions: (1) This device may not cause harmful interference, and (2) this device must accept any interference received, including interference that may cause undesired operation. This equipment has been tested and found to comply with the limits for a Class B digital device, pursuant to part 15 of the FCC Rules. -
Page 4: Table Of Contents
BEFORE YOU START ... VI Installation Overview...vi Setup Wizard ...vi Packing List...vi Installation Notes...vii INTRODUCTION ...1 Modem Description and Operation...1 Modem Features ...1 Front Panel Display ...2 Rear Panel Connections ...3 HARDWARE INSTALLATION ...4 Power on Modem ...4 Factory Reset Button ...4 Network Connections...4 BASIC MODEM CONFIGURATION...6 Computer IP Settings ...6... - Page 5 Firmware... 39 Test... 40 STATUS ...41 Device Info... 41 Log ... 42 Statistics... 43 ADSL ... 44 HELP ...45 TECHNICAL SPECIFICATIONS ...46 CONFIGURING IP SETTINGS ON YOUR COMPUTER ...48 LOW PASS FILTERS FOR DSL ...54...
-
Page 6: About This User Guide
Ethernet network or single computer. If you are using a computer with a functioning Ethernet port, the quickest and easiest way to set up the DSL-320T is to insert the Installation CD into the CD-ROM drive of your computer and follow the instructions provided in the Quick Installation Guide. -
Page 7: Operating Systems
Operating Systems The DSL-320T uses an HTML-based web interface for setup and management. The web configuration manager may be accessed using any operating system capable of running web browser software, including Windows 98 SE, Windows ME, Windows 2000, and Windows XP. -
Page 8: Information You Will Need From Your Adsl Service Provider
Information you will need from your ADSL service provider: This is the Username used to log on to your ADSL service provider’s network. It is commonly in the form − Username user@isp.co.uk Your ADSL service provider uses this to identify your account. This is the Password used, in conjunction with the Username Password above, to log on to your ADSL service provider’s network. -
Page 9: Information You Will Need About Your Lan Or Computer
It is recommended that your collect and record this information here, or in some other secure place, in case you have to re-configure your ADSL connection in the future. Once you have the above information, you are ready to setup and configure your DSL-320T ADSL Modem. Record info here... -
Page 11: Introduction
Ethernet network. The Modem combines high-speed ADSL Internet connection and IP routing for the Local Area Network (LAN) connectivity in one package. The Modem is easy to install and use. The DSL-320T connects to an Ethernet LAN or computers via standard Ethernet ports. The ADSL connection is made using ordinary telephone line with standard connectors. -
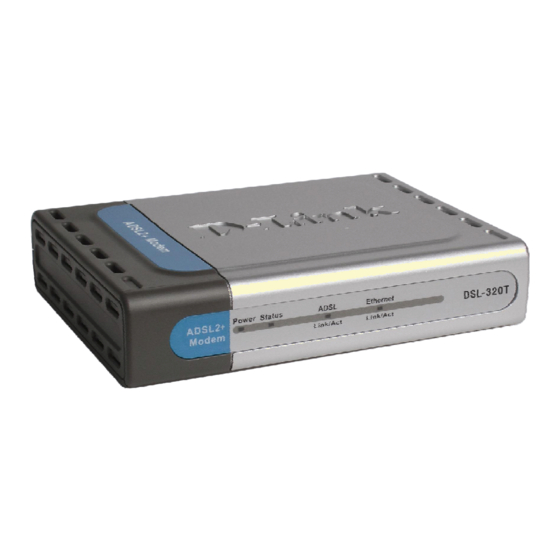
Page 12: Front Panel Display
Front Panel Display Place the Modem in a location that permits an easy view of the LED indicators on the front panel. The LED indicators on the front panel include Power, Status, ADSL, and Ethernet. The ADSL and Ethernet indicators monitor link status and activity (Link/Act). -
Page 13: Rear Panel Connections
Ethernet Adapter or available Ethernet port on your computer. ADSL Port Use the ADSL cable to connect to the your telephone line (RJ-11 port) DSL-320T ADSL Modem User Guide Reset Button To manually reset, depress button with the power on for at least seven seconds... -
Page 14: Hardware Installation
Hardware Installation The DSL-320T Modem maintains two separate interfaces, an Ethernet LAN and an ADSL (WAN) interface. Place the Modem in a location where it can be connected to the various devices as well as to a power source. The Modem should not be located where it will be exposed to moisture or excessive heat. -
Page 15: Computer To Modem Connection
your service provider. The ADSL connection represents the WAN interface, the connection to the Internet. It is the physical link to the service provider’s network backbone and ultimately to the Internet. Connect Modem to Ethernet The Modem may be connected to a single computer or Ethernet device through the 10/100 BASE-TX Ethernet port on the rear panel. -
Page 16: Basic Modem Configuration
Basic Modem Configuration The first time you setup the Modem it is recommended that you configure the WAN connection using a single computer connected directly to the Modem. Once the WAN connection is functioning properly, you may continue to make changes to Modem configuration including IP settings and DHCP setup. -
Page 17: Access The Configuration Manager
Access the Configuration Manager In order to make sure your computer’s IP settings allow it to communicate with the Modem, it is advisable to configure your system be a DHCP client – that is, it will get IP settings from the Modem. Appendix B describes how to configure different Windows operating systems to “Obtain IP settings automatically.”... -
Page 18: Home
DSL-320T ADSL Modem User Guide Home When you successfully connect to the web manager, the Home directory tab will display the Setup Wizard window. You can launch the Setup Wizard from this page or use the buttons located in the left panel of the web page to view other windows used for basic configuration. - Page 19 The initial window summarizes the setup process. Click the Next button to proceed. You may stop using the Setup Wizard at any time by clicking the Exit button. If you exit the wizard you will return to the opening Setup Wizard window without saving any of the settings changed during the process.
- Page 20 DSL-320T ADSL Modem User Guide Using the Setup Wizard - Choose Connection Type Now select the Connection Type used for the Internet connection. Your ISP has given this information to you. The connection types available for “Multi-User” Mode are PPPoE/PPPoA, Static IP Address, and Bridge Mode. Each connection type has different settings that are configured in the next window of the Setup Wizard.
- Page 21 Using the Setup Wizard - For PPPoE/PPPoA connections: 1. Type in the Username and Password used to identify and verify your account to the ISP. 2. Select the specific Connection Type from the drop-down menu. The available PPP connection and encapsulation types are PPPoE LLC, PPPoA LLC and PPPoA VC-Mux.
- Page 22 Using the Setup Wizard - For Static IP Address connections: 1. Select the specific Connection Type from the drop-down menu. The available Static IP Address connection and encapsulation types are 1483 Routed IP LLC and 1483 Routed IP VC-Mux. 2. Change the IP Address, Subnet Mask, ISP Gateway Address, Primary DNS Address, and Secondary DNS Address as instructed by your ISP.
- Page 23 Using the Setup Wizard - For Bridge Mode connections: 1. Select the specific Connection Type from the drop-down menu. The available Bridge Mode connection and encapsulation types are 1483 Bridged IP LLC and 1483 Bridged IP VC-Mux. 2. If you are instructed to change the VPI or VCI value, type in the correct setting in the available entry fields. Most users will not need to change these settings.
- Page 24 Restart button to save the new configuration settings and restart the Modem. If you need to change settings from a previous window, click the Back button. CAUTION: Do not turn the Modem off while it is restarting! The following window opens to indicate the DSL-320T is in the process of restarting.
- Page 25 DSL-320T ADSL Modem User Guide After the system is finished restarting, you will be returned to the opening page of the web manager. You may now continue to configure the Modem as desired.
-
Page 26: Wan
DSL-320T ADSL Modem User Guide To configure the Modem’s basic configuration settings without running the Setup Wizard, you can access the windows used to configure WAN, LAN, and DHCP settings directly from the Home directory. To access the WAN Settings window, click on the WAN link button on the left side of the first window that appears when you successfully access the web manager. -
Page 27: Pppoe/Pppoa
Select the Connection Type used for your account. The window will display settings that are appropriate for the connection type you select. Follow the instruction below according to the type of connection you select in this window. PPPoE/PPPoA Follow the instructions below to configure the Modem to use a PPPoE or PPPoA for the Internet connection. Make sure you have all the necessary information before you configure the WAN connection. - Page 28 14. The Modem will save the new settings and restart. Upon restarting the Modem will automatically establish the WAN connection. The following provides additional description of the settings for PPPoA and PPPoE connections: PPPoA/PPPoE Parameters User Name Password AC Name Service Name Connection Type Default Route...
- Page 29 Static IP Connection Setting by your ISP. Static IP If you have selected the menu, type in the global IP address used for your WAN interface. Your ISP should provide this IP address to you. Select the desired option: Always ON, Connection On Demand, or Manual.
-
Page 30: Static Ip Address
DSL-320T ADSL Modem User Guide Static IP Address When the Modem is configured to use Static IP Address assignment for the WAN connection, you must manually assign a global IP Address, subnet mask and gateway IP Address used for the WAN connection. Follow the instruction below to configure the Modem to use Static IP Address assignment for the WAN connection. - Page 31 To configure a Static IP connection for the WAN, follow these steps: 1. Click the Static IP Address radio button in the WAN Settings section in the middle of the window. 2. The settings under ATM VC Setting at the top of the window should not be changed unless you have been instructed to change them.
- Page 32 Primary DNS Address Secondary DNS Address connection to the Modem for IP routed traffic that is outside your ISP’s network. That is, this will be the primary connection from the Modem to most of the Internet. Get this IP address from your ISP. This is the IP address of the first choice for Domain Name Service (DNS) used to match the named URL web address used by most browsers with the actual global IP address used for a web server.
-
Page 33: Bridge Mode
DSL-320T ADSL Modem User Guide Bridge Mode For Bridged connections it will be necessary for most users to install additional software on any computer that will the Modem for Internet access. The additional software is used for the purpose of identifying and verifying your account, and then granting Internet access to the computer requesting the connection. - Page 34 2. The settings under ATM VC Setting at the top of the window should not be changed unless you have been instructed to change them. However, if you are instructed to change the VPI or VCI values, type in the values assigned for your account.
-
Page 35: Atm Traffic Shaping
ATM Traffic Shaping The ATM settings section in the WAN Settings windows for the different connection types can be used to adjust QoS parameters for ADSL clients. This may not be available to all ADSL accounts. Additional ATM settings for PPPoE or PPPoA connections: ATM Parameters Service Category ATM Settings for WAN Connection... - Page 36 CDVT Sustainable Cell Rate – The SCR is defined for the VBR service category. This is the rate that can be sustained for “bursty”, on-off traffic sources. It is a function of Maximum Burst Size (MBS) and the time interval (between cells).
-
Page 37: Atm Vc Settings
ATM VC Settings ATM VC settings can be configured for all connection types in the WAN Settings windows of the Home directory. The table below describes the ATM VC settings used to configure a PPPoE or PPPoA connection for an ADSL account. ATM VC Parameters Virtual Circuit ATM VC Settings in WAN Settings window... -
Page 38: Lan
DSL-320T ADSL Modem User Guide You can configure the LAN IP address to suit your preference. Many users will find it convenient to use the default settings together with DHCP service to manage the IP settings for their private network. The IP address of the Modem is the base address used for DHCP. -
Page 39: Dhcp
DHCP The DHCP server is enabled by default for the Modem’s Ethernet LAN interface. DHCP service will supply IP settings to workstations configured to automatically obtain IP settings that are connected to the Modem though the Ethernet port. When the Modem is used for DHCP it becomes the default gateway for DHCP client connected to it. Keep in mind that if you change the IP address of the Modem the range of IP addresses in the pool used for DHCP on the LAN will also be changed. -
Page 40: Disable The Dhcp Server
DSL-320T ADSL Modem User Guide The Ending IP Address is the highest IP address number in the pool. Type in the Lease Time in the entry field provided. This is the amount of time in seconds that a workstation is allowed to reserve an IP address in the pool if the workstation is disconnected from the network or powered off. -
Page 41: Save Settings And Reboot
Save Settings and Reboot When you have configured the DSL-320T with the settings you desire, make sure you save those settings. To save the system configuration settings, click the Tools tab. You will be presented first with the Administrator Settings window. -
Page 42: Advanced Modem Management
Advanced Modem Management Directory Home Advanced Tools Status Help This chapter introduces and describes the management features that have not been presented in the previous chapter. These include the more advanced features used for network management and security as well as administrative tools to manage the Modem, view statistics and other information used to examine performance and for troubleshooting. -
Page 43: Adsl
DSL-320T ADSL Modem User Guide ADSL The ADSL Configuration window allows the user to set the configuration for ADSL protocols. For most ADSL accounts the default setting, ADSL2+ (Multi-mode), will work. This configuration works with all ADSL implementations. If you have been given instructions to change the Modulation Type used, select the desired option from the drop-down menu and click the Apply button. -
Page 44: Atm Vcc
DSL-320T ADSL Modem User Guide ATM VCC This ATM Virtual Circuit connection window is used to configure the WAN connection. This window can be used as an alternative to configuring the same settings found on the WAN Settings windows in the Home directory. -
Page 45: Tools
DSL-320T ADSL Modem User Guide Tools Click the Tools tab to reveal the window buttons for various functions located in this directory. Administrator Settings is the first window that appears in the Tools directory. This window is used to change the system password used to access the web manager, to save or load Modem configuration settings, and to restore default settings. -
Page 46: Time
DSL-320T ADSL Modem User Guide Time The Modem provides a number of options to maintain current date and time. Time window To configure system time on the Modem, select the method used to maintain time. The options available include using your computer’s system clock (default) or setting the time and date manually. -
Page 47: Remote Log
DSL-320T ADSL Modem User Guide Remote Log Use the Remote Log Settings window to set up logging to servers or computers that are located outside the LAN or subnet of the Modem. Remote Log Settings window Select the Log Level from the pull-down menu. The levels available are: Alert, Critical, Debug, Error, Info, Notice, Panic, and Warning. -
Page 48: System
DSL-320T ADSL Modem User Guide System Once you have configured the Modem to your satisfaction, it is a good idea to back up the configuration file to your computer. To save the current configuration settings to your computer, click the System button in the Tools directory to display the System Settings window. -
Page 49: Restore Factory Default Settings
Restore Factory Default Settings To reset the Modem to its factory default settings, click the Restore button in the System Settings window. You will be prompted to confirm your decision to reset the Modem. The Modem will reboot with the factory default settings including IP settings (192.168.1.1) and Administrator password (admin). -
Page 50: Test
DSL-320T ADSL Modem User Guide Test The Diagnostic Test window is used to test connectivity of the Modem. A Ping test may be done through the local or external interface to test connectivity to known IP addresses. The diagnostics feature executes a series of tests of your system software and hardware connections. -
Page 51: Status
DSL-320T ADSL Modem User Guide Status Use the various windows in this section to view system information and monitor performance. Device Info Use the Device Information window to quickly view basic current information about the LAN and WAN interfaces and device information including Firmware Version and MAC address. In addition, this window offers the ability to initiate a connection by clicking the Connect button. -
Page 52: Log
DSL-320T ADSL Modem User Guide The system log displays chronological event log data. Use the navigation buttons to view or scroll log pages. You may also save a simple text file containing the log to your computer. Click the Save Log button and follow the prompts to save the file. -
Page 53: Statistics
DSL-320T ADSL Modem User Guide Statistics Use the Traffic Statistics window to monitor traffic on the Ethernet or ADSL Internet connection. Select the interface for which you want to view packet statistics and the information will appear below. Traffic Statistics window... -
Page 54: Adsl
DSL-320T ADSL Modem User Guide ADSL Use the ADSL Status window and the Diagnostic Test window (Tools > Test) for troubleshooting the ADSL connection. ADSL Status window... -
Page 55: Help
DSL-320T ADSL Modem User Guide Help Help window Click the desired hyperlink to access helpfiles. -
Page 56: Technical Specifications
Technical Specifications General ADSL Standards • • Standards: • • • • • • • Protocols: • • • • • • • Data Transfer Rate: • • • Media Interface: • ANSI T1.413 Issue 2 ITU G.992.1 (G.dmt) AnnexA ITU G.992.2 (G.lite) Annex A ITU G.994.1 (G.hs) ITU G.992.5 Annex A... -
Page 57: Power Consumption
Physical and Environmental DC Inputs: Input: 120V AC 60Hz Output: 9V DC, 1A Power Adapter: Power 11.25 Watts (max) Consumption: Operating 0° to 40°C Temperature: Storage -20° to 70°C Temperature Humidity: 5% to 95% (non-condensing) Dimensions: 109 mm x 142.8 mm x 32.1 mm Weight: 200 gm EMI:... -
Page 58: Configuring Ip Settings On Your Computer
Configuring IP Settings on Your Computer In order to configure your system to receive IP settings from the Modem it must first have the TCP/IP protocol installed. If you have an Ethernet port on your computer, it probably already has TCP/IP protocol installed. If you are using Windows XP the TCP/IP is enabled by default for standard installations. - Page 59 Click Network and Internet Connections. In the Network and Internet Connections window, click Network Connections. Click Network Connections. 4. In the Network Connections window, right-click on Local Area Connection, then click Properties. Right-click Local Connection icon select Properties option from the pull-down menu.
- Page 60 5. In the General tab of the Local Area Connection Properties window, highlight Internet Protocol (TCP/IP) under “This connection uses the following items:” by clicking on it once. Click on the Properties button. Click Properties. 6. Select “Obtain an IP address automatically” by clicking once in the circle. Click the OK button Your computer is now ready to use the Modem’s DHCP server.
-
Page 61: Windows 2000
Windows 2000 First, check for the IP protocol and, if necessary, install it: 1. In the Windows task bar, click the Start button, point to Settings, and then click Control Panel. 2. Double-click the Network and Dial-up Connections icon. 3. In the Network and Dial-up Connections window, right-click the Local Area Connection icon, and then select Properties. -
Page 62: Windows 95 And Windows 98
2. Select the network component labeled TCP/IP, and then click Properties. 3. If you have multiple TCP/IP listings, select the listing associated with your network card or adapter. 4. In the TCP/IP Properties dialog box, click the IP Address tab. -
Page 63: Windows Nt 4.0 Workstations
Your computer is now ready to use the Modem’s DHCP server. Windows NT 4.0 Workstations First, check for the IP protocol and, if necessary, install it: 1. In the Windows NT task bar, click the Start button, point to Settings, and then click Control Panel. 2. -
Page 64: Low Pass Filters For Dsl
DSL-320T ADSL Modem User Guide Low Pass Filters for DSL Most ADSL clients will be required to install a simple device that prevents the ADSL line from interfering with regular telephone services. These devices are commonly referred to as microfilters or low pass filters. The two basic styles of low pass filters commonly used are described below. -
Page 65: Port Filter
Three Port Filter Another style of filter is installed at the same point where the Modem connects to the telephone line. Only a single filter is required. The connection ports are typically labeled as follows: • Line - This port connects to the wall jack. •... -
Page 66: International Offices
Australia 1 Giffnock Avenue North Ryde, NSW 2113 Australia TEL: 61-2-8899-1800 FAX: 61-2-8899-1868 URL: www.dlink.com.au India D-Link House, Kurla Bandra Complex Road Off CST Road, Santacruz (East) Mumbai - 400098 India TEL: 91-022-26526696/56902210 FAX: 91-022-26528914 URL: www.dlink.co.in Middle East (Dubai) P.O.Box: 500376...
Need help?
Do you have a question about the DSL-320T and is the answer not in the manual?
Questions and answers