Table of Contents
Advertisement
Quick Links
Advertisement
Table of Contents

Related Manuals for Prusa Research Prusa MINI


Summary of Contents for Prusa Research Prusa MINI
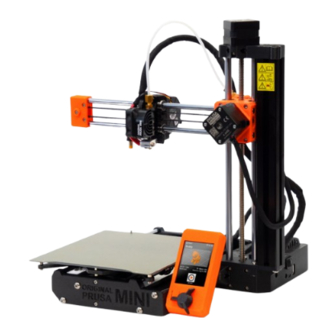
- Page 1 3D PRINTING HANDBOOK USER MANUAL FOR ORIGINAL PRUSA MINI...
- Page 2 JOSEF PRUSA®, PRUSA RESEARCH®, PRUSA POLYMERS®, PRUSA ORANGE®, ORIGINAL PRUSA®, PRUSA 3D®, and PRUSAMENT® are registered trademarks of Prusa Development a.s. in the United States and the European Union used by Prusa Research a.s. under the license of Prusa Development a.s.
- Page 3 About the author Josef Prusa (born Feb 23rd, 1990) became interested in the 3D printing phenomenon before joining Prague’s University of Economics in 2009 - at first, it was a hobby, a new technology open to changes and improvements. The hobby soon became a passion and Josef grew into one of the leading developers of Adrien Bowyer’s international, open-source, RepRap project.
-
Page 4: Table Of Contents
Table of contents 1. Introduction ................................2. Glossary ..................................3. Package contents - Accessories (bundled / optional) ..............4. Handling / Transporting the printer ......................4.1. Disconnecting the power supply ......................4.2. How to contact tech support ....................... 4.3. Error screens ............................... - Page 5 9.4. Spring steel sheet with SATIN double-sided PEI ..............9.5. Increasing the adhesion ........................9.6. Steel sheet profiles ..........................9.7. Bearings ................................ 9.8. Fans ................................9.9. Extruder drive gear ..........................9.10. PTFE tubes ..............................9.11. Clogged / jammed extruder ....................... 9.12.
- Page 6 Information about functionality, correct usage and maintenance of this device can be found in this handbook and online at help.prusa3d.com. The device must be disconnected from the power supply (power adapter) before performing any kind of service, otherwise, you may be risking an electrical injury.
- Page 7 Licensing The Original Prusa MINI+ printer is a part of the RepRap project, the first open-source 3D printer project free to use under a GNU GPL v3 license (www.gnu.org/licenses/gpl-3.0.en.html). If you improve or alter any part of, a printer, and you are willing to sell it, then you have to publish the source code under the same license.
- Page 8 Placement and basic usage Make sure the printer is placed in a suitable location to prevent mechanical damage and potential safety risks. The device is for indoor use only. Do not expose the printer to rain and snow. Contact with water and water-based substance may lead to electrical failures, short circuits and other types of damage.
- Page 9 Mechanical safety Moving mechanical parts of the printer may cause an injury. The printer has moving parts. Do not reach inside the printer while it is still in operation - you may be risking an injury caused by the moving parts or electrical current. Prevent children from unsupervised access to the printer even when it is not printing.
-
Page 10: Introduction
Thank you for purchasing the Original Prusa MINI+ 3D printer from Josef Prusa! Your purchase supports us in the further development of the MINI+ and other devices. Original Prusa MINI+ is our compact, smart and affordable 3D printer, which was designed as a 3D printing workhorse and a great starter printer. -
Page 11: Glossary
Y-Axis - the general name for the entire heatbed assembly (smooth rods, belt, heatbed…). Knob and reset button - The knob is the main control device of the Original Prusa MINI+ 3D printer: rotate left/right to scroll through options, press the knob to confirm your selection. -
Page 12: Package Contents - Accessories (Bundled / Optional)
Spool holder - should be placed near the printer, so the filament strand can enter the PTFE tube from below. Filament must not bend at an acute angle. 3. Package contents - Accessories (bundled / optional) Your Original Prusa MINI+ comes bundled with: • USB drive with firmware files • Allen key •... -
Page 13: Handling / Transporting The Printer
4. Handling / Transporting the printer When transporting the Original Prusa MINI+, use the recommended way of holding the device. You can either grab it by the Z-axis motor at the top, or by the Z-Axis assembly. See photos below for reference. -
Page 14: How To Contact Tech Support
4.4. Unpacking, assembly and first start The Original Prusa MINI+ 3D printer is available as a semi-assembled model, or as an assembly kit. The semi-assembled model consists of three large parts that need to be attached together. On the other hand, the assembly kit presents a unique opportunity to build your 3D printer literally screw by screw by following an online guide at help.prusa3d.com. -
Page 15: Your First Print
5. Your first print Preparing the printer for the first print takes about 15-30 minutes (not including assembly). Please pay attention to the following steps to ensure the machine will operate as intended. In this chapter, you will learn how to: Control the printer Update the firmware Prepare the print surface for the first print... -
Page 16: Updating The Firmware
5.2. Updating the firmware The printer is shipped with latest firmware available at the time of manufacturing. However, we recommend to check www.prusa3d.com/drivers for the latest firmware version to ensure optimal printing experience. To flash firmware downloaded from our website, please follow these steps: 1. -
Page 17: Preparing Flexible Steel Sheets
5.3. Preparing flexible steel sheets Please follow the instructions for the sheet of your choice (see below) and prepare it for the first print. The heatbed has embedded high curie temperature magnets inside, which hold removable spring steel sheets in place. There are two pins at the end of the heatbed that will align perfectly with cut out edges of the spring steel sheets. -
Page 18: Loading And Unloading The Filament
5.6. Loading and unloading the filament Once the Selftest is finished, you can load a strand of filament. We strongly suggest using PLA for the initial calibration and first print, because it's easier to use and does not require any extra steps (such as applying glue onto the steel sheet). -
Page 19: First Layer Calibration
Choose LCD Menu - Filament - Unload filament. The printer will automatically preheat to the correct temperature, the beeper will notify you when the preheating finishes. Press the control knob to start unloading. Once the extruder gears stop unloading the filament, pull the filament out from the PTFE tube manually. - Page 20 nozzle too low (plastic not extruded) What to check: The top of the extruded plastic is slightly squashed The corners of the zig-zag line are sharp and do not lift from the sheet The lines are straight and stay on the sheet firmly The ending box has an even surface, there are no waves or gaps Below, you can see a close up of a print displaying quality issues caused by an incorrect nozzle height.
-
Page 21: Checklist
5.8. Checklist If you followed the steps described in the previous chapter, you are now ready to start your first print. Before you start, let’s go through the final checklist: MINI+ is fully assembled and placed in a suitable location The firmware is updated to the latest version All of the calibration procedures were successful A clean print sheet cleaned with IPA-infused cleaning wipe is on the heatbed... -
Page 22: After-Print Checks And Actions
Try to avoid touching the steel sheet surface with your fingers - fingerprints can decrease the adhesion of the next print. 5.11. After-print checks and actions Once the sample print is removed from the steel sheet, inspect it closely and check for possible issues with quality. -
Page 23: Advanced Features
6. Advanced features 6.1. Menu structure Print Preheat PETG HIPS Flex Cooldown Filament Load filament PETG HIPS Flex Cooldown Unload filament Change filament Purge filament Calibration Wizard Live Adjust Z Auto Home Mesh Bed Leveling Selftest First Layer Calibration Test Fans Test XYZ-Axis Test Heaters Show Selftest results... -
Page 24: Mesh Bed Leveling Explained
6.4. Network connections Original Prusa MINI+ has an ethernet (RJ45) port onboard. You can use this port to connect your printer to your network. Please note that certain network features may not be fully available in the factory firmware. Keep... - Page 25 You can connect your Original Prusa MINI+ to the local area network (LAN) and access basic information about the printer through web-based interface called PrusaConnect. The printer has DHCP turned on by default. Go to LCD Menu - Settings - LAN Settings and check whether the IP address has been assigned correctly.
-
Page 26: Printing Your Own Models
7. Printing your own models Once the printer is fully calibrated and the sample models are looking good, you will probably want to print your own model. You have a number of options - read the following chapters to learn more. 7.1. -
Page 27: Creating Your Own Models
www.prusaprinters.org www.thingiverse.com www.myminifactory.com www.pinshape.com www.youmagine.com www.shapeways.com www.gambody.com However, models in .stl, .obj or similar formats cannot be 3D printed directly. First, they need to be “sliced” (converted) into a G-code file, which is then placed onto a USB drive. Connect the USB drive with a sliced project into the printer and select the model to print from the Print menu. -
Page 28: Importing Objects Into Prusaslicer
7.5. Importing objects into PrusaSlicer Once you start PrusaSlicer, select the Original Prusa MINI+ in the Printer menu on the right side of the window. If it’s not listed, you can add it either by selecting Add a new printer option in the same menu or by going to Configuration ->... -
Page 29: Using Supports
is to select the largest flat surface of the object as the base - the bigger the base, the better the adhesion. Select a perfectly flat side of the model for the best result. 7.6. Using supports Support material is a 3D-printed supporting structure (similar to a scaffolding) used to print complex objects correctly - you can remove the support material after the print job is finished. -
Page 30: Print Speed Vs Print Quality
Areas above supports usually have a less-than-ideal surface quality. Before you decide to use supports, try to move/rotate the object to find an orientation that will require less or even no supports. 7.7. Print speed vs Print quality Printing a small object takes a few minutes, but printing larger models are more time consuming - there are prints that will take dozens of hours to finish. -
Page 31: Infill
Print quality vs print time The speed can also be changed while printing. Go to LCD Menu - Tune - Speed. By turning the control knob clockwise you can increase the print speed up to 150 %. Turning the knob counterclockwise decreases the print speed - the minimum speed is 50%. -
Page 32: Large Object Printing
7.10. Large object printing Original Prusa MINI+ has a smaller bed compared to the Original Prusa i3 MK3S, however, with some clever tricks, you can print massive objects with the MINI+ as well. Do not let the smaller print bed stop you - check our blog at prusaprinters.org to learn how to assemble large models from several smaller parts. -
Page 33: Print Multi-Colored Objects
Cutting the object with the Cut option 7.11. Print multi-colored objects There is a simple way to create layer-based multi-colored 3D prints directly in PrusaSlicer - see the instructions below. Multicolored object printed using color change feature in PrusaSlicer... -
Page 34: Slicing, Exporting
Color change in PrusaSlicer Switch to the layer preview using the button in the lower-left corner Using the slider on the right side, select a layer where the color change should occur Click on the orange plus icon A preview is instantly displayed. You can remove the color change by clicking on the grey cross button that is now displayed instead of the orange plus button Export the G-code and you’re ready to print! -
Page 35: Material Guide
The Original Prusa MINI+ can print with many popular materials. Materials vary in both mechanical and optical properties as well as in the ease of use. If you’re new to 3D printing, your first filament should definitely be PLA. -
Page 36: Pet/Petg
8.2. PET/PETG PETG is another commonly used material for 3D printing. It is a great choice for printing mechanical components. Compared to PLA, it has higher temperature resistance, is more ductile and therefore less brittle. Due to its low thermal expansion it holds well on the heatbed and does not warp. -
Page 37: Pc (Polycarbonate) And Pc Blend
Advantages Disadvantages • High impact and wear resistance • Difficult to print • Very good temperature resistance • Tendency to warp (large models should be • Suitable for outdoor use - UV stable printed in an enclosure) • Soluble in acetone - easy to glue together •... -
Page 38: Pvb
Typical use: The best use of PC is for printing technical parts requiring great heat and mechanical resistance. Tips and tricks: Consider using an enclosure to prevent warping of objects being printed Use a Skirt in PrusaSlicer to reduce warping Add Brim around small objects Do not print in cold areas Nozzle temperature: 275 °C... -
Page 39: Regular Maintenance
camera case, or an RC car wheel, it is better to use a flexible material. However, these materials are relatively uncommon, expensive, and suitable mostly for advanced users due to high print difficulty. Before you print from Flex, clean the nozzle from any previous material. Start by preheating to the highest temperature you’ve recently printed at. - Page 40 The surface does not have to be cleaned before every print! It is just important to not touch the steel sheet with your hands or dirty tools. All original print surfaces by Prusa Research are coated from both sides...
-
Page 41: Spring Steel Sheet With Textured Double-Sided Pei
Smooth PEI sheet, Textured powder-coated PEI and the effect on the first layer 9.2. Spring steel sheet with TEXTURED double-sided PEI • Scratch-proof surface, damage-resistant • PLA prints with a small contact area may need • Transfers texture onto the first layers of your a brim prints •... -
Page 42: Spring Steel Sheet With Satin Double-Sided Pei
If you notice small bubbles forming under the PEI sheet simply flip the sheet over and print on the other side. These bubbles do not affect the print quality and will disappear after a few days or weeks. 9.4. Spring steel sheet with SATIN double-sided PEI •... -
Page 43: Bearings
9.7. Bearings After a couple hundred hours of printing, the smooth rods should be cleaned with a paper towel. The MINI+ comes with a tube of Prusa lubricant and you can also buy it in our e-shop in the Accessories section. Apply it onto the smooth rods (XYZ axes). Then, move the X-axis by hand left and right a couple of times and use the printer’s menu to move the Z-axis up and down. -
Page 44: Ptfe Tubes
9.10. PTFE tubes The MINI+ has four PTFE tubes that may need a basic level of attention from time to time. PTFE tubes are used to lead filament strand from the spool, through the extruder, all the way to the nozzle. - Page 45 Opening the idler will enable you to clean both gears easily and/or remove any filament leftovers caught in the extruder gears. It’s advised to inspect the gears from time to time and remove any debris caught in the extruder Open idler - you can see the strand of loaded filament inside...
-
Page 46: Nozzle Cleaning
9.12. Nozzle cleaning Do not touch the nozzle during these procedures - it’s very hot and it may cause burns! To make cleaning easier, move the print head all the way up in the LCD menu - Settings - Move axis - Move Z axis. - Page 47 Preheat the nozzle to 290 °C (LCD Menu - Settings - Temperature - Nozzle). Heating the nozzle is essential for this process! Unload any loaded filament Gain better access to the nozzle by moving the extruder axis as high as possible: Go to LCD Menu - Settings - Move Axis - Move Z.
-
Page 48: Flashing Unsigned Firmware
You can bend the heatbreak easily - do not use excessive force! Run First layer calibration after changing the nozzle! 9.14. Flashing unsigned firmware We take safety very seriously. Before every release, our firmware goes through intense testing to verify that all safety features work properly. If any of the sensor readings fall out of line, heating is stopped to prevent any possible damage to the printer and its surroundings. -
Page 49: Filament Sensor (Optional Accessory)
10. Filament sensor (optional accessory) You can buy a mechanical IR sensor as an optional accessory for the Original Prusa MINI+. The sensor is installed onto the end of the PTFE tube where you insert the filament into the printer, and it needs to be connected to the mainboard. -
Page 50: Running Out Of Filament
Follow the steps in the assembly guide at help.prusa3d.com (Original Prusa MINI+ assembly - Building your MINI+ - 27. Connecting the filament sensor) and open the electronics box cover. Inspect whether the filament sensor is connected correctly and that the wiring is not damaged. -
Page 51: Printer Can't Read The Usb Drive
Try using a smaller FAT32-formatted USB drive (e.g. 4-16 GB). Please visit help.prusa3d.com - section Original Prusa MINI+ - About your printer - SD cards and USB drives to learn more about supported sizes and formatting options. -
Page 52: Fan Errors
FAT32-formatted USB drive. Insert the drive into the printer, press the restart button and once the screen shows the Original Prusa MINI+ logo, press the knob once. This will activate the firmware flashing screen. Select Flash to overwrite the current firmware with the one placed on the USB drive. - Page 53 Print and share! Do not forget to tag your prints with #prusamini while sharing so we can find, pin and showcase them with our http://www.prusa3d.com/original-prusa-i3-prints/ Happy Printing :)
Need help?
Do you have a question about the Prusa MINI and is the answer not in the manual?
Questions and answers