Table of Contents
Advertisement
Quick Links
Advertisement
Table of Contents

Subscribe to Our Youtube Channel
Related Manuals for SWM HOKU 125 2024


Summary of Contents for SWM HOKU 125 2024
-
Page 2: Table Of Contents
SUMMARY CLUTCH CONTROL ..................... 27 IMPORTANT NOTICES ....................3 REAR BRAKE CONTROL ..................... 27 IMPORTANT ........................4 GEAR SHIFT CONTROL ....................27 PRECAUTIONS FOR CHILDREN .................. 4 FUELLING ........................28 SAFE RIDING AND MOTORCYCLE SAFETY .............. 5 SIDE STAND ........................28 IDENTIFICATION DATA .................... - Page 3 SPARK PLUG CHECK ....................41 REMOVING THE FRONT WHEEL ................50 TYRES ..........................42 REFITTING THE FRONT WHEEL................. 50 FRONT BRAKE FLUID LEVEL CHECK ................ 42 REMOVING THE REAR WHEEL .................. 51 REAR BRAKE FLUID LEVEL CHECK ................43 WIRING DIAGRAM......................52 BRAKE PAD WEAR CHECK ..................
-
Page 4: Important Notices
Welcome to the SWM motorcycling Family! The HOKU model is a motorcycle for ROAD use, guaranteed and free of de- Your new SWM motorcycle is designed and manufactured to be the best in its fects and covered by legal warranty provided that the STANDARD category. -
Page 5: Important
• Park the vehicle where it cannot be easily and maintenance manual by having scheduled bumped or damaged. After a fall, inspect the motorcycle carefully. maintenance carried out at authorised SWM Make sure that the throttle, brake, clutch and workshops. Even slight or involuntary bumps can cause the all other systems and controls are undamaged. -
Page 6: Safe Riding And Motorcycle Safety
SAFE RIDING AND MOTORCYCLE - Always assess the road conditions and adjust crease the braking action through engine com- SAFETY your speed accordingly. pression; using only brakes when going downhill Here are some basic principles for riding your - Reduce speed if it is raining and especially if could cause the brake pads to overheat and re- motorcycle safely. - Page 7 order to keep the motorcycle under control. Anti-lock braking system -ABS Risks related to carbon monoxide - The passenger must always hold on to the rider The ABS is an electromechanical braking-aid sys- Exhaust gas contains carbon monoxide, a color- or the passenger handle with both hands and tem: less and odorless gas.
-
Page 8: Identification Data
IDENTIFICATION DATA ENGINE NUMBER The engine identification number is stamped at the top of the crankcase, while vehicle serial number or Vehicle Identification Number is stamped on the steer- B2 0 M ? ? ? ? ? ing tube of the frame. Always quote the number stamped on the frame when ordering spare parts or ( )... -
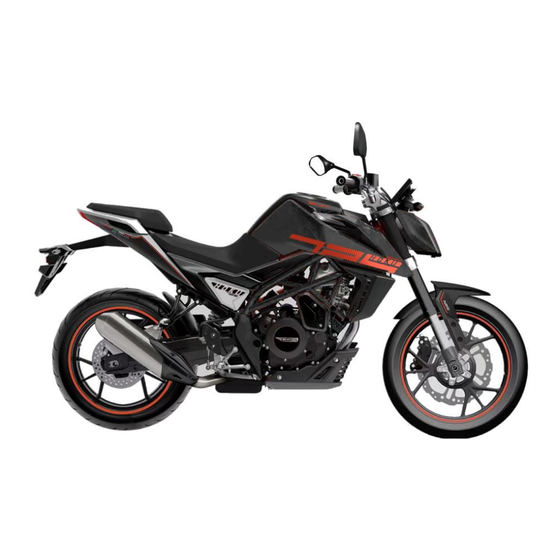
Page 9: Views Of Motorcycles
VIEWS OF MOTORCYCLES RIGHT-HAND SIDE VIEW 1) Fuel tank cap 2) Fuel tank 3) Instrument panel 4) Headlight 5) Taillight 6) Front turning indicators 7) Rear turning indicators 8) Rear brake disc 9) Rear brake calliper 10) Combined braking control pedal 11) Rear brake pump 12) Engine oil filter 13) Engine oil dipstick... - Page 10 LEFT-HAND SIDE VIEW 1) Side stand 2) Front brake disc 3) Front brake calliper 4) Gear shift pedal 5) Horn 6) Fuse control unit 7) Rider seat 8) Passenger seat 9) Transmission chain 10) Coolant radiator. 11) Plate lighting device 12) Passenger handle 13) Cooling fan 9- EN...
- Page 11 CONTROLS AND INSTRUMENTS 1) Left-hand rear-view mirror 2) Right-hand rear-view mirror 3) Instruments 4) Ignition/steering lock block 5) Clutch control lever 6) Left-hand switch 7) Right-hand switch 8) Throttle twist grip 9) Front brake control lever 10) Front brake fluid reservoir EN-10...
-
Page 12: Technical Data
TECHNICAL DATA Spark plug gap................... 0.6-0.7 mm. ENGINE FUEL SYSTEM Type ....................single cylinder, 4 stroke Type..................Electronic injection feed Cooling…………………………………………………………………………… liquid with electric fan PRIMARY DRIVE Water radiators ......................n° 1 Drive pinion gear-Clutch ring gear ............Z 20-Z 67 Bore........................58 mm. Transmission ratio....................3.35 Stroke ........................ - Page 13 SECONDARY DRIVE Cold tyre pressure Transmission sprocket ……………………………………………………………………………Z 13 Front Rear wheel sprocket ……………………………………………………………………………………Z 45 Rider only …………………………………………………………………………………………………2.6 bar Transmission ratio ………………………………………………………………………………………3.461 Rear Transmission chain dimensions. …………………………………………………4/8" x 13/32" Rider only …………………………………………………………………………………………………2.6 bar CHASSIS DIMENSION, WEIGHT, CAPACITY Type …………trellis perimeter frame made of high-resistance steel tubes Wheelbase ……………………………………………………………………………………………1360 mm.
- Page 14 TABLE FOR LUBRICATION, SUPPLIES Engine, gearbox and primary drive lubricating oil MOTUL 10W 40 Brake system fluid MOTUL DOT 4 Grease lubrication MOTUL GREASE 100 Final drive chain lubrication MOTUL CHAIN LUBE Front fork oil MOTUL FORK OIL LIGHT 5W Oil for rear shock absorber MOTUL SHOCK OIL FL Electric contact protection MOTUL EZ LUBE...
-
Page 15: Instruments
The indicator lighting up warns that the engine overheated reaching an alarm temperature. -Stop and turn off the engine; -Wait for the engine to cool down and then restart the engine. If the problem occurs again, it is necessary to refer to the nearest SWM’s dealer for a check. EN-14... - Page 16 -wait for a few minutes and restart the engine. Maintain the engine speed within 11500 rpm If the light turns on again, see the closest SWM dealer to check the ABS system. 5) Unit of measurement TIRE PRESSURE WARNING LIGHT “...
- Page 17 PROJECTION INTERFACE SETTINGS Long press DOWNKEY to switch between PROJECTION INTERFACE and MAIN INTERFACE; Display Projection status, Short press enter. Short press up/down key to switch Adroid (default) and IOS. Short press enter return to the Projection interface. BRIGHTNESS SETTINGS Display brightness status ,Short press the “SET”...
- Page 18 MILEAGE RESET SETTINGS TIRE PRESSURE SETTINGS Display mileage reset status,Short press the “SET” key to enter. Short press Display tire pressure status, Short press the “SET” key to enter. Short press the up/down key to switch between Cancel (default) and Confrim. Short press the up/down key to switch between “Front wheel sensor learning”and ”...
- Page 19 ERROR MESSAGES In the event of a fault, the relevant “ABS” error code is indicated on the dis- play (1), the relevant “ECU” error code is indicated on the display (2); Find the nearest SWM dealer to check the fault. EN-18...
- Page 20 ABS MALFUNCTION LIST Malfunction Possible Causes Possible Impact Recommended Measures Poor connect of battery C1101 ECU Voltage supply: high voltage ABS alarms and not working. Clean the terminal. terminal. Poor connect of battery C1102 ECU Voltage supply: low voltage ABS alarms and not working. Clean the terminal.
- Page 21 ECU error (hardware, Micro-controller C1604 ABS Internal damange ABS internal damange and not working. Replace ABS error) C2308 Valve fault, inlet valve front ABS Internal damange ABS internal damange and not working. Replace ABS C2312 Valve fault, outlet valve front ABS Internal damange ABS internal damange and not working.
- Page 22 APPENDIX: DTC LIST System or component Error code Error description Driver behavior Coolant/Oil Temperature Sensor Circuit High P0118 Voltage or Open Stop the engine and check whether the cylinder tem- Coolant/Oil Sensor Coolant/Oil Temperature Sensor Circuit Low perature sensor is connected effectively. If the error P0117 Voltage still persist ask for assistance.
- Page 23 System or component Error code Error description Driver behavior P2A00 Front oxygen sensor signal activate failure Check if the front oxygen sensor is connected effec- Front Oxygen Sensor tively. If the error still persist ask for assistance. P00D1 Front oxygen sensor heating circuit low current P0232 FPR Coil Circuit High Voltage Check if the fuel pump relay is connected effectively.
- Page 24 System or component Error code Error description Driver behavior Sensor (IAT) P0112 IAT Circuit Low Voltage Intake Temperature P0111 Intake temperature sensor signal stuck Sensor Check if there's history error. Reset. If the error still P0650 MIL Circuit Malfunction persist ask for assistance. P2195 Front oxygen sensor PE too thin Front Oxygen Sensor...
- Page 25 System or component Error code Error description Driver behavior high voltage Park Neutral Switch Check if the park neutral switch is connected effec- P0850 Park Neutral Switch Error Diag tively. If the error still persist ask for assistance. P1693 Tachometer Circuit Low Voltage Check if the crankshaft position sensor is connected Tachometer effectively.
-
Page 26: Controls
CONTROLS STEERING LOCK RH HANDLEBAR SWITCH The right-hand switch features the following con- The motorcycle comes with a steering lock IGNITION SWITCH trols: located on the ignition switch (1) Lock the steering The ignition switch has three positions: as follows: Motorcycle start position (key not remova- 1) Engine start button -Turn the handlebar to the left. -
Page 27: Lh Handlebar Switch
LH HANDLEBAR SWITCH FRONT BRAKE CONTROL The left-hand switch features the following con- The brake control lever (2) is located on the right- trols: hand side of the handlebar. A stop switch, during High beam flasher (self-cancelling). the braking action, causes the stop light on the tail High beam. -
Page 28: Clutch Control
CLUTCH CONTROL REAR BRAKE CONTROL GEAR SHIFT CONTROL The lever (1) is placed on the left-hand side of the The clutch control lever (1) is located on the left- The rear brake control pedal (1) is placed on the engine. hand side of the handlebar and is equipped with right-hand side of the motorcycle. -
Page 29: Fuelling
FUELLING SIDE STAND Recommended fuel: premium grade UNLEADED A side stand (1) is supplied with every motorcy- fuel (R.O.N 95). cle. WARNING Periodically check the side stand (see “Sched- uled Maintenance Chart”); make sure that the Fuel is extremely flammable and can be explo- springs are not damaged and the side stand sive under certain conditions. - Page 30 Note*: Lower the stand with your right foot keep- ing the motorcycle balanced. When the stand has been lowered, make the bike rest on it. Once the motorbike has been brought from its rest position on the ground to vertical position, the rider has to raise the stand from the lowered to the raised po- sition with his/her left foot.
-
Page 31: Instructions For Using The Motorcycle
INSTRUCTIONS FOR USING THE -Turn on the high-beam light and check that the -Ride at low speed until the engine is warmed MOTORCYCLE relative warning light comes on; Note*: If you are not familiar with the motorcy- -Operate the turning indicators and check that -Apply both brakes several times to run-in the cle operation, read paragraphs on “CONTROLS”... - Page 32 -Faulty start button: replace the switch; The alternator fails to charge, or its charge is -Side stand lowered. insufficient The engine has starting troubles -The cables on the voltage regulator are badly -Dirty or worn out spark plug: clean or replace; connected, or in short-circuit: correctly connect, The engine starts, but it is erratic or replace;...
-
Page 33: Mounting/Dismounting Of Rider And Passenger
MOUNTING/DISMOUNTING OF RIDER AND The rider must be the first to get on and the last -Sit on the motorcycle and place both feet on the PASSENGER to get off the motorcycle and must control the ground. Balance the vehicle without putting all General stability of the motorcycle while the passengers your weight on the side stand. - Page 34 Mounting of passenger -Place your left hand on the rider's shoulder, your -Hold onto the special handles (2). Get the rider to mount first as described in the left foot on the footrest and then mount the mo- -Using your left leg, fully retract the stand. relevant section without starting the engine.
-
Page 35: Adjusting The Rear-View Mirrors
Dismounting the motorcycle ADJUSTING THE REAR-VIEW MIRRORS -Stop the vehicle and switch off the engine. Sit on the motorcycle as described in the relative CAUTION paragraph. Make sure that the area where you want to Adjust both mirrors (1) so that you can clearly park the vehicle is stable and level. - Page 36 STARTING THE ENGINE After getting on the motorcycle as described in the relative paragraph, operate as follows to start the engine: -Place ignition key (1) to position (the buzz that you hear when you turn the key to caused by the fuel pump which puts the feeding system under pressure);...
-
Page 37: Important Note In Case Of Cold Starts At Low Temperatures
IMPORTANT NOTE IN CASE OF COLD STOPPING THE MOTORCYCLE AND THE STARTS AT LOW TEMPERATURES ENGINE -Fully close the throttle twist grip (1) to decelerate It is recommended to briefly warm up at idle speed until you get a normal engine response to the motorcycle. -
Page 38: Engine Emergency Stop
WARNING ENGINE EMERGENCY STOP It can be useful to use the front brake inde- -Flick the red switch (7) to stop the engine pendently or to use the combined braking de- and then flick it back to position. pending on the situation. Be careful when using When the bike is off, place it on its side stand. -
Page 39: Periodic Maintenance And Adjustments
PERIODIC MAINTENANCE AND OIL LEVEL CHECK ADJUSTMENTS Note*: Check the oil level when the engine has Carry out proper maintenance according to the just been turned off and is still hot. table given in Appendix A in this manual, which WARNING indicates the periodic maintenance intervals. -
Page 40: Engine Oil And Filter Change
ENGINE OIL AND FILTER CHANGE Note*: Carry out this operation with the engine hot. CAUTION Be careful not to touch the hot oil. - Remove the push rod by unscrewing the two front retaining screw (1) and the two rear screws (2) (one per side). -
Page 41: Engine Coolant Level Check
ENGINE COOLANT LEVEL CHECK AIR FILTER CHECK AND/OR REPLACEMENT Turn the key (1), lift the passenger seat and re- The engine coolant level must be between the MIN and MAX notches on the clear reservoir (1). move it. The coolant level check must be carried out with - Remove the cover (2). -
Page 42: Spark Plug Check
CAUTION same rating. As this procedure is quite complex, it is advised to WARNING contact an SWM Dealer for spark plug check/re- A spark plug with heat rating too high can cause placement. pre-ignition and possible engine damage A spark plug with heat rating too low can cause a signifi- cant increase in carbon deposits. -
Page 43: Tyres
Note*: Tyres age even if they do not visibly appear system immediately checked by the SWM Dealer. worn; cracks in the sides or deformation of the tyre body are a sign of ageing. Have the tyres checked by a tyre dealer before using the motor- cycle. -
Page 44: Rear Brake Fluid Level Check
Completely change the brake fluid in the brake CAUTION WARNING system if you wish to switch to another fluid brand. Contact an SWM dealer to have the brake pads If the brake lever feels too "soft" when pulled, replaced. CAUTION there may be air in the brake lines or the brake Brake fluid may cause pungency. -
Page 45: Pad Cleaning
PAD CLEANING BRAKE DISC WEAR Make sure that there are no traces of brake fluid Measure the thickness of each disc in the point of or oil on the pads or discs Use alcohol to clean maximum wear. Replace the disc if it wear exceeds the pads or discs from any traces of fluid or oil. -
Page 46: Combined Braking Pedal Position Adjustment
COMBINED BRAKING PEDAL POSITION REAR BRAKE PEDAL FREE PLAY SINGLE REAR SHOCK ABSORBER SPRING ADJUSTMENT ADJUSTMENT PRELOAD ADJUSTMENT The position of the rear brake pedal with respect The single rear shock absorber (1) spring pre- The combined braking pedal (3) must have a free to the footrest may be adjusted according to the load can be adjusted;... -
Page 47: Fork Functionality Check
-If you notice oil leaks and jamming, have it checked by an SWM dealer; EN-46... -
Page 48: Chain Cleaning And Lubrication
CHAIN CLEANING AND LUBRICATION CHAIN /FRONT SPROCKET/REAR SPROCKET Note*: If worn, the pinion, crown and chain have The motorcycle is equipped with a chain (1) with WEAR CHECK to be replaced; using a new chain with a worn O-rings; to clean it, operate as follows; -Check the condition of the chain (1);... -
Page 49: Chain Adjustment
CHAIN ADJUSTMENT Preliminary Operations: 6. Tighten the wheel shaft using the nut (2) (tight- Chain should be checked, adjusted and lubricated -Place the bike on a stand so as to have an ade- ening torque 120Nm). as per the Maintenance Chart to ensure safety quate working space in the area of the rear wheel 7. -
Page 50: Throttle Control Cable Adjustment
WARNING THROTTLE CONTROL CABLE ADJUSTMENT CLUTCH ADJUSTMENT To check proper adjustment of the throttle con- Normally, the clutch is adjusted by only stretching Using the motorcycle with a damaged throttle control cable considerably compromises safe rid- trol transmission, operate as follows: the cable using the adjusting unit positioned on ing. -
Page 51: Removing The Front Wheel
REMOVING THE FRONT WHEEL REFITTING THE FRONT WHEEL Position the motorcycle in such a way that the Fit the LH spacer (D) on the wheel hub. front wheel is lifted from the ground. Fit the wheel between the fork legs. Unscrew the two screws (1) and remove the brake Fit the previously greased wheel shaft (5) from the calliper (2). -
Page 52: Removing The Rear Wheel
Note*: Do not operate the rear brake pedal when Fit the brake calliper on the disc assemble it on REMOVING THE REAR WHEEL Unscrew the nut (1) of the wheel pin and extract the relevant support and tighten the two screws the wheel has been removed;... -
Page 53: Wiring Diagram
WIRING DIAGRAM EN-52... - Page 54 Cable Colour Coding O/Bk……………………………………………… Orange/Black KEY TO WIRING DIAGRAM B………………………………………………………………………Blue O/Gr……………………………………………… Orange/ Grey Electronic power unit B/Y ………………………………………………………Blue/Yellow O/W……………………………………………… Orange/ White OBD unit interface B/Gr ……………………………………………………Blue /Grey R…………………………………………………………………… Red Brake fluid filler Bk………………………………………………………………… Black R/ Bk ……………………………………………………Red / Black Starting motor Bk/R……………………………………………………...
-
Page 55: Battery
Ignition switch lock (1), lift the passenger seat and remove it. Remove If electrolyte leaks, or other failure of the electri- Flash relay cal system, are detected, contact the SWM the battery cover. Horn Dealer. -First remove the BLACK negative cable (2) and... -
Page 56: Fuses
FUSES Using a battery charger with a constant voltage, WARNING first connect the RED positive cable to the battery If the battery is unused, it has to be in any case Fuse malfunction could cause problems for the positive terminal then the BLACK negative cable recharged with slow cycle (12V-9Ah battery: 0.9 motorcycle. -
Page 57: Projector Bulb Replacement
Two fuses (10) are present under the rider seat, F1) 25A fuse PROJECTOR BULB REPLACEMENT Motor power fuse -The front projector (1) is the LED type, replace it that protect the battery charge generator and F2) 15A fuse if it does not work. the charge socket under the passenger seat, re- ABS fuse spectively. -
Page 58: Plate Light Bulb Replacement
PLATE LIGHT BULB REPLACEMENT HEADLIGHT ADJUSTMENT -The plate light (3) is of LED type, if it does not When checking the proper aiming of the head- work, replace it. light beam: inflate tyres at the right pressure, have a person sit astride the motorcycle and set the motorcycle perpendicular to its longitudinal axis. -
Page 59: Appendix
APPENDIX To reactivate the motorcycle after storage, pro- CLEANING ceed as follows: Before washing the motorcycle, it is necessary to LONG PERIOD OF INACTIVITY -Make sure the spark plug is tightened; duly protect the following parts: When the motorcycle is to be stored for a certain -Fill the fuel tank;... -
Page 60: Pre-Delivery Inspection
PRE-DELIVERY INSPECTION Hose clamps Check Check / Tighten General lubricatio Description Operation Pre-delivery General test Engine oil Check level Spark plugs Check / Replace Throttle body Check and adjust Brakes / Clutch Check operation ... - Page 61 APPENDIX A EN-60...
- Page 62 HOKU 125 SCHEDULED MAINTENANCE CHART (TO BE CARRIED OUT AT THE SWM DEALER) ENGINE 1000 Km 5000Km 10000 Km 15000 Km 20000 Km REPLACE IF NECESSARY VALVES C (*) C (*) C (*) VALVE SPRING VALVE CUP, VALVE HALF CONE CUVETTES, ROCKER ARM (INTAKE –EXHAUST)
- Page 63 HOKU 125 SCHEDULED MAINTENANCE CHART (TO BE CARRIED OUT AT THE SWM DEALER) CHASSIS 1000 Km 5000Km 10000 Km 15000 Km 20000 Km REPLACE IF NECESSARY AIR FILTER COOLANT FOOTRESTS, FOOTRESTS PINS AND SPRINGS SEAT FRAME FASTENING BOLTS, ENGINE FASTENING BOLTS...
- Page 64 C: CHECK C (*): CHECK CLEARANCE S: CHANGE L: LUBRICATE R: OVERHAUL P: CLEANING NOTE: Upon every removal replace the gaskets Replace screws and nuts if worn General check after riding on mud or sand 63- EN...
- Page 65 SWM Motorcycles srl, Via Nino Bixio 8, 21024 Biandronno (VA), Italy ph. +390332769911, fax +390332769958, info@swm-motorcycles.it, www.swm-motorcycles.it Assembled in CN -Imported by SWM Motorcycles...
Need help?
Do you have a question about the HOKU 125 2024 and is the answer not in the manual?
Questions and answers