Advertisement
Available languages
Available languages
Technical Support and E-Warranty Certificate www.vevor.com/support
ELECTRIC STEAM TABLES
MODEL: MDC-2 MDC-3 MDC-4 MDC-5
We continue to be committed to provide you tools with competitive price.
"Save Half", "Half Price" or any other similar expressions used by us only represents an
estimate of savings you might benefit from buying certain tools with us compared to the major
top brands and does not necessarily mean to cover all categories of tools offered by us. You
are kindly reminded to verify carefully when you are placing an order with us if you are
actually saving half in comparison with the top major brands.
Advertisement
Table of Contents

Related Manuals for VEVOR MDC-2


Summary of Contents for VEVOR MDC-2
- Page 1 Technical Support and E-Warranty Certificate www.vevor.com/support ELECTRIC STEAM TABLES MODEL: MDC-2 MDC-3 MDC-4 MDC-5 We continue to be committed to provide you tools with competitive price. "Save Half", "Half Price" or any other similar expressions used by us only represents an estimate of savings you might benefit from buying certain tools with us compared to the major top brands and does not necessarily mean to cover all categories of tools offered by us.
- Page 2 This is the original instruction, please read all manual instructions carefully before operating. VEVOR reserves a clear interpretation of our user manual. The appearance of the product shall be subject to the product you received. Please forgive us that we won't inform you again if there are any technology or software updates on our product.
- Page 3 I.IMPORTANT SAFETY INFORMATION Please read the following statements carefully and understand their meaning prior to use to ensure safe operation. Symbol Symbol Description Warning: To reduce the risk of injury, the user must read the instructions manual carefully. This symbol, placed before a safety comment, indicates a kind of precaution, warning, or danger.
- Page 4 • Do not store or use gasoline or other flammable vapors or liquids in the vicinity of this or any other appliance. • The information contained in this manual is important for the proper installation, use and maintenance of this product. •...
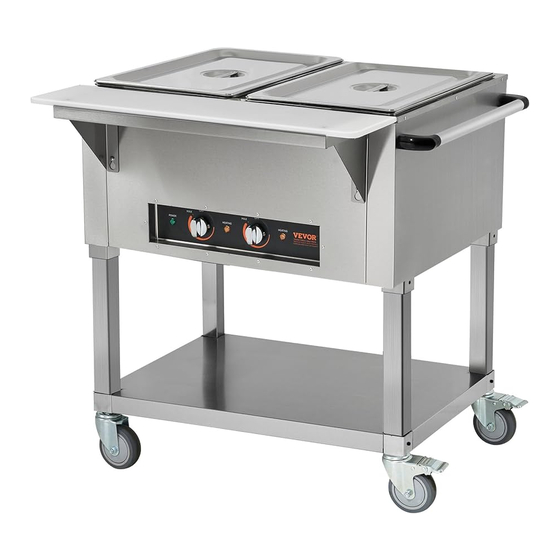
- Page 5 Each Electric Steam Tables has been assembled and tested according to strict quality standards. Technical Specifications: MODEL VOLTS Wells WATTS/Well Total WATTS MDC-2 500W 1000W 120V~ 60Hz MDC-3 500W 1500W 120V~ 60Hz MDC-4...
- Page 6 Note: Ambient Conditions - Make sure that the operating location is in an area where the ambient temperature is held constant (minimum 21°C). Please avoid areas such as near exhaust fans and air conditioning ducts. Warning! Operating environment Ensure that operation location is at a reasonable distance from combustible walls and materials otherwise combustion or discoloration could occur.
- Page 7 Step 1 Slide the legs inside the shelf, and tighten it to the unit by the fixed leg inserts. - 6 -...
- Page 8 Step 2 Place the unit on the floor upside down. Be sure to protect the top surface and well from damage when the unit is placed on its top on the floor. Once the leg inserts are in place,tighten the set screws in the unit. Tighten the handle on the unit.
- Page 9 Step 4 Install the supporting board on the fixing brackets first, then positioning this part in the front of the shell by screws. - 8 -...
- Page 10 Step 5 Install the cutting board stops through the shelf and the shelf support brackets at the each end as shown. IV.Operating Instructions 1. PREHEAT - To preheat individual sections, turn the switch dial to high for 10- 20 minutes before the foods are placed in the compartments. Insure that pan openings are covered to prevent loss of heat.
- Page 11 4. A plastic scouring pad and a mild detergent may be used to remove hardened food. NOTICE: Do not use steel wool. WEEKLY CLEANING 1. Scale deposits due to the mineral content of the water may be removed using a plastic scouring pad and a de-scaling agent approved for use on stainless steel.
- Page 12 clean, flat stainless steel scraper to help seal some of the knife marks. The use of cleavers on synthetic boards or tabletops is not recommended. VI.Wiring Diagram VII.TROUBLESHOOTING Always ask and check the following: TROUBLE SHOOTING GUIDE 1. Problem: Unit does not heat: a.
- Page 13 voltage? b. Is electric turned on at the main? Check the circuit breaker or fuse. c. Are the control knobs set to the "ON" position? 2. Problem: Unit does not maintain proper food temperature. a. Are the controls set to the proper setting? b.
- Page 14 Plug unit into proper Unit is not plugged in power supply Press the On/Off switch Unit is not turned on on the digital control Circuit breaker tripped Reset circuit breaker Unit is not working at all Contact an authorized Control knob is defective electrician Heating element is burned Contact an authorized...
- Page 16 Technical Support and E-Warranty Certificate www.vevor.com/support...
-
Page 17: Modèle : M Dc2 M Dc3 M Dc4 M Dc5
Machine Translated by Google Assistance t echnique e t c ertificat d e g arantie é lectronique w ww.vevor.com/support TABLES À V APEUR É LECTRIQUES MODÈLE : M DC2 M DC3 M DC4 M DC5 Nous c ontinuons à n ous e ngager à v ous f ournir d es o utils à d es p rix c ompétitifs. -
Page 18: Table Of Contents
Assistance t echnique e t c ertificat d e g arantie électronique w ww.vevor.com/support Il s 'agit d es i nstructions o riginales, v euillez l ire a ttentivement t outes l es instructions d u m anuel a vant d e l 'utiliser. V EVOR s e r éserve u ne i nterprétation c laire ... - Page 19 Machine Translated by Google I. I NFORMATIONS D E S ÉCURITÉ I MPORTANTES Veuillez l ire a ttentivement l es d éclarations s uivantes e t c omprendre l eur c'estàdire a vant u tilisation p our g arantir u n f onctionnement s ûr. Symbole Symbole ...
- Page 20 Machine Translated by Google • N e s tockez p as e t n 'utilisez p as d 'essence o u d 'autres v apeurs o u l iquides i nflammables d ans l e proximité d e c et a ppareil o u d e t out a utre a ppareil. • Les ...
-
Page 21: Mdc2
Machine Translated by Google II.Introduction Les t ables à v apeur é lectriques o nt é té s pécialement c onçues p our r épondre a ux exigences r igoureuses d 'une o pération d e r estauration t rès f réquentée. C haque v apeur é lectrique Les ... - Page 22 Machine Translated by Google Remarque : C onditions a mbiantes A ssurezvous q ue l e l ieu d 'utilisation s e t rouve d ans u n zone o ù l a t empérature a mbiante e st m aintenue c onstante ( minimum 2 1°C). Veuillez ...
- Page 23 Machine Translated by Google Étape 1 Faites g lisser l es p ieds à l 'intérieur d e l 'étagère e t s errezla à l 'unité p ar l es i nserts d e p ieds f ixes. ...
- Page 24 Machine Translated by Google Étape 2 Placez l 'appareil s ur l e s ol, à l 'envers. A ssurezvous d e p rotéger l a s urface s upérieure e t le p uits c ontre t out d ommage l orsque l 'appareil e st p lacé s ur l e d essus s ur l e s ol. U ne f ois les ...
- Page 25 Machine Translated by Google Étape 4 I nstallez d 'abord l a p lanche d e s upport s ur l es s upports d e f ixation, p uis p ositionnez cette p ièce à l 'avant d e l a c oque à l 'aide d e v is. ...
- Page 26 Machine Translated by Google Étape 5 Installez l es b utées d e p lanche à d écouper à t ravers l a t ablette e t l e s upport d e t ablette supports à c haque e xtrémité, c omme i ndiqué. IV.Mode ...
- Page 27 Machine Translated by Google 4. U n t ampon à r écurer e n p lastique e t u n d étergent d oux p euvent ê tre u tilisés p our e nlever nourriture d urcie. AVIS : N'utilisez p as d e l aine d 'acier. NETTOYAGE ...
- Page 28 Machine Translated by Google grattoir p ropre e t p lat e n a cier i noxydable p our a ider à s celler c ertaines m arques d e c outeau. L'utilisation d e c ouperets s ur d es p lanches o u d es d essus d e t able s ynthétiques n'est ...
- Page 29 Machine Translated by Google tension? b . L 'électricité e stelle a llumée a u n iveau d u s ecteur ? V érifiez l e d isjoncteur o u l e f usible. c. L es b outons d e c ommande s ontils r églés s ur l a p osition « ON » ? 2. ...
- Page 30 Machine Translated by Google Branchez l 'appareil s ur u ne L'appareil n 'est p as b ranché alimentation é lectrique a ppropriée Appuyez s ur l 'interrupteur m arche/arrêt L'unité n 'est p as a llumée sur l a c ommande n umérique Réinitialiser ...
- Page 31 Machine Translated by Google...
- Page 32 Machine Translated by Google Assistance t echnique e t c ertificat d e g arantie électronique w ww.vevor.com/support...
-
Page 33: Mdc5
Machine Translated by Google Technischer Support und E-Garantiezertifikat www.vevor.com/support ELEKTRISCHE DAMPFTISCHE MODELL: MDC-2 MDC-3 MDC-4 MDC-5 Wir sind weiterhin bestrebt, Ihnen Werkzeuge zu wettbewerbsfähigen Preisen anzubieten. „Sparen Sie die Hälfte“, „Halber Preis“ oder andere ähnliche von uns verwendete Ausdrücke stellen lediglich eine Schätzung der Einsparungen dar, die Sie durch den Kauf bestimmter Werkzeuge bei uns im Vergleich zu den... - Page 34 Dies ist die Originalanleitung. Bitte lesen Sie alle Bedienungsanleitungen sorgfältig durch, bevor Sie das Gerät in Betrieb nehmen. VEVOR behält sich eine klare Auslegung unserer Bedienungsanleitung vor. Das Aussehen des Produkts hängt von dem Produkt ab, das Sie erhalten haben. Bitte entschuldigen Sie, dass wir Sie nicht erneut informieren, wenn es zu unserem Produkt technische oder Software-Updates gibt.
- Page 35 Machine Translated by Google I. WICHTIGE SICHERHEITSHINWEISE Bitte lesen Sie die folgenden Aussagen sorgfältig durch und verstehen Sie sie Bedeutung vor der Verwendung, um einen sicheren Betrieb zu gewährleisten. Symbol Symbolbeschreibung Warnung: Um das Verletzungsrisiko zu verringern, muss der Benutzer die lesen Lesen Sie die Bedienungsanleitung sorgfältig durch.
- Page 36 Machine Translated by Google • Lagern oder verwenden Sie kein Benzin oder andere brennbare Dämpfe oder Flüssigkeiten im Gerät in der Nähe dieses oder eines anderen Geräts. • Die in diesem Handbuch enthaltenen Informationen sind für die ordnungsgemäße Durchführung wichtig Installation, Verwendung und Wartung dieses Produkts.
- Page 37 Anforderungen eines geschäftigen Gastronomiebetriebes. Jeder elektrische Dampf Die Tische wurden nach strengen Qualitätskriterien zusammengebaut und getestet Standards. Technische Spezifikationen: MODELL VOLT Wells WATT/Well Total WATT MDC-2 500W 1000W 120 V ~ 60 Hz MDC-3 500W 1500W 120 V ~ 60 Hz...
- Page 38 Machine Translated by Google Hinweis: Umgebungsbedingungen – Stellen Sie sicher, dass sich der Betriebsstandort in einem befindet Bereich, in dem die Umgebungstemperatur konstant gehalten wird (mindestens 21 °C). Bitte meiden Sie Bereiche wie die Nähe von Abluftventilatoren und Klimaanlagenkanälen. Warnung! Betriebsumgebung Stellen Sie sicher, dass sich der Betriebsstandort an einer Stelle befindet Halten Sie andernfalls einen angemessenen Abstand zu brennbaren Wänden und Materialien ein Es könnte zu Verbrennungen oder Verfärbungen kommen.
- Page 39 Machine Translated by Google Schritt 1 Schieben Sie die Beine in das Regal und befestigen Sie es mit den festen Beineinsätzen am Gerät. - 6 -...
- Page 40 Machine Translated by Google Schritt 2 Stellen Sie das Gerät verkehrt herum auf den Boden. Achten Sie darauf, die Oberseite und den Schacht vor Beschädigungen zu schützen, wenn das Gerät mit der Oberseite auf den Boden gestellt wird. Sobald die Beineinsätze angebracht sind, ziehen Sie die Stellschrauben im Gerät fest. Ziehen Sie den Griff am Gerät fest.
- Page 41 Machine Translated by Google Schritt 4: Installieren Sie zuerst die Trägerplatte an den Befestigungsklammern und positionieren Sie diesen Teil dann mit Schrauben an der Vorderseite des Gehäuses. - 8 -...
- Page 42 Machine Translated by Google Schritt 5 Installieren Sie die Schneidebrettanschläge durch das Regal und die Regalstütze Befestigen Sie die Klammern an beiden Enden wie abgebildet. IV. Bedienungsanleitung 1. VORHEIZUNG – Um einzelne Abschnitte vorzuheizen, drehen Sie den Schalter auf hoch für 10-20 Minuten, bevor die Lebensmittel in die Fächer gelegt werden.
- Page 43 Machine Translated by Google 4. Zum Entfernen können Sie einen Kunststoff-Scheuerschwamm und ein mildes Reinigungsmittel verwenden gehärtetes Essen. HINWEIS: Keine Stahlwolle verwenden. WÖCHENTLICHE REINIGUNG 1. Kalkablagerungen aufgrund des Mineralgehalts des Wassers können entfernt werden unter Verwendung eines Kunststoffs Scheuerschwamm und ein für die Verwendung auf Edelstahl zugelassenes Entkalkungsmittel. Es Es ist wichtig, die Bildung dieser Ablagerungen zu verhindern, da sie dazu führen können Korrosion des Edelstahlbrunnens.
- Page 44 Machine Translated by Google Sauberer, flacher Edelstahlschaber, um einige Messerspuren abzudichten. Die Verwendung von Hackbeilen auf Kunststoffplatten oder Tischplatten wird nicht empfohlen. VI.Schaltplan VII.FEHLERBEHEBUNG Fragen und prüfen Sie immer Folgendes: ANLEITUNG ZUR FEHLERBEHEBUNG 1. Problem: Gerät heizt nicht: A. Wurde das Gerät an eine ordnungsgemäße Stromquelle angeschlossen? - 11 -...
- Page 45 Machine Translated by Google Stromspannung? B. Ist der Strom am Hauptnetz eingeschaltet? Überprüfen Sie den Schutzschalter oder die Sicherung. C. Sind die Bedienknöpfe auf „ON“ gestellt? 2. Problem: Das Gerät hält nicht die richtige Lebensmitteltemperatur aufrecht. A. Sind die Regler auf die richtige Einstellung eingestellt? B. Wurde das Gerät ausreichend vorgeheizt? C.
- Page 46 Machine Translated by Google Schließen Sie das Gerät an die Das Gerät ist nicht angeschlossen richtige Stromversorgung an Drücken Sie den Ein-/Ausschalter Das Gerät ist nicht eingeschaltet auf der digitalen Steuerung Leistungsschalter zurücksetzen Schutzschalter hat ausgelöst Einheit ist nicht funktioniert überhaupt Wenden Sie sich an einen Autorisierten Bedienknopf ist defekt Elektriker...
- Page 47 Machine Translated by Google...
- Page 48 Machine Translated by Google Technischer Support und E-Garantiezertifikat www.vevor.com/support...
- Page 49 Machine Translated by Google Supporto tecnico e certificato di garanzia elettronica www.vevor.com/support TAVOLI A VAPORE ELETTRICI MODELLO: MDC-2 MDC-3 MDC-4 MDC-5 Continuiamo a impegnarci per fornirvi strumenti a prezzi competitivi. "Risparmia la metà", "Metà prezzo" o qualsiasi altra espressione simile da noi utilizzata rappresenta solo una stima del risparmio che potresti trarre dall'acquistare determinati strumenti con noi rispetto ai principali marchi più...
- Page 50 Queste sono le istruzioni originali, leggere attentamente tutte le istruzioni del manuale prima dell'uso. VEVOR si riserva una chiara interpretazione del nostro manuale d'uso. L'aspetto del prodotto sarà soggetto al prodotto ricevuto. Ti preghiamo di perdonarci se non ti informeremo più...
- Page 51 Machine Translated by Google I.INFORMAZIONI IMPORTANTI SULLA SICUREZZA Si prega di leggere attentamente le seguenti dichiarazioni e di comprenderle significato prima dell'uso per garantire un funzionamento sicuro. Simbolo Descrizione del simbolo Avvertenza: per ridurre il rischio di lesioni, l'utente deve leggere il attentamente il manuale di istruzioni.
- Page 52 Machine Translated by Google • Non conservare né utilizzare benzina o altri vapori o liquidi infiammabili all'interno prossimità di questo o di qualsiasi altro apparecchio. • Le informazioni contenute in questo manuale sono importanti per il corretto utilizzo installazione, uso e manutenzione di questo prodotto. • Il rispetto di queste procedure e istruzioni risulterà...
- Page 53 Ogni vapore elettrico I tavoli sono stati assemblati e testati secondo rigorosi standard di qualità standard. Specifiche tecniche: VOLT Pozzi WATT/Pozzo WATT totali MODELLO MDC-2 500W 1000 W 120 V ~ 60 Hz MDC-3 500W 1500W...
- Page 54 Machine Translated by Google Nota: Condizioni ambientali - Assicurarsi che il luogo di utilizzo sia in un ambiente protetto zona in cui la temperatura ambiente è mantenuta costante (minimo 21°C). Si prega di evitare aree come vicino a ventilatori di scarico e condotti dell'aria condizionata. Avvertimento! Ambiente operativo Assicurarsi che il luogo dell'operazione sia a altrimenti una distanza ragionevole da pareti e materiali combustibili potrebbero verificarsi combustione o scolorimento.
- Page 55 Machine Translated by Google Passaggio 1 Far scorrere le gambe all'interno del ripiano e fissarlo all'unità tramite gli inserti fissi delle gambe.
- Page 56 Machine Translated by Google Passaggio 2 Posizionare l'unità sul pavimento capovolta. Assicurarsi di proteggere bene la superficie superiore da eventuali danni quando l'unità viene posizionata sul pavimento. Una volta posizionati gli inserti delle gambe, serrare le viti di fissaggio nell'unità. Stringere la maniglia sull'unità.
- Page 57 Machine Translated by Google Passaggio 4 Installare prima il pannello di supporto sulle staffe di fissaggio, quindi posizionare questa parte nella parte anteriore del guscio tramite viti.
- Page 58 Machine Translated by Google Passaggio 5 Installare i fermi del tagliere attraverso il ripiano e il supporto del ripiano staffe a ciascuna estremità come mostrato. IV.Istruzioni operative 1. PRERISCALDAMENTO - Per preriscaldare le singole sezioni, ruotare il quadrante dell'interruttore su alto per 10-20 minuti prima di introdurre gli alimenti negli scomparti.
- Page 59 Machine Translated by Google 4. Per rimuovere è possibile utilizzare una spugnetta di plastica e un detergente delicato cibo indurito. AVVISO: non utilizzare lana d'acciaio. PULIZIA SETTIMANALE 1. I depositi di calcare dovuti al contenuto minerale dell'acqua possono essere rimossi utilizzando una plastica paglietta e un agente anticalcare approvato per l'uso su acciaio inossidabile.
- Page 60 Machine Translated by Google raschietto pulito e piatto in acciaio inossidabile per aiutare a sigillare alcuni segni del coltello. Si sconsiglia l'uso di mannaie su tavole o piani di tavoli sintetici. VI.Schema elettrico VII.RISOLUZIONE DEI PROBLEMI Chiedi e verifica sempre quanto segue: GUIDA ALLA RISOLUZIONE DEI PROBLEMI 1.
- Page 61 Machine Translated by Google voltaggio? B. La corrente elettrica è accesa? Controllare l'interruttore o il fusibile. C. Le manopole di controllo sono impostate sulla posizione "ON"? 2. Problema: l'unità non mantiene la temperatura corretta del cibo. UN. I controlli sono impostati correttamente? B.
- Page 62 Machine Translated by Google Collegare l'unità L'unità non è collegata all'alimentazione adeguata Premere l'interruttore di accensione/spegnimento L'unità non è accesa sul controllo digitale Ripristinare l'interruttore automatico L'unità non lo è L'interruttore automatico è scattato lavorare affatto Rivolgiti ad un autorizzato La manopola di controllo è...
- Page 63 Machine Translated by Google...
- Page 64 Machine Translated by Google Supporto tecnico e certificato di garanzia elettronica www.vevor.com/support...
- Page 65 Machine Translated by Google Soporte t écnico y c ertificado d e g arantía e lectrónica w ww.vevor.com/support MESAS D E V APOR E LÉCTRICAS MODELO: M DC2 M DC3 M DC4 M DC5 Seguimos c omprometidos a p roporcionarle h erramientas a p recios c ompetitivos.
- Page 66 Soporte t écnico y c ertificado d e g arantía electrónica w ww.vevor.com/support Estas s on l as i nstrucciones o riginales; l ea a tentamente t odas l as instrucciones d el m anual a ntes d e o perar. V EVOR s e r eserva u na ...
- Page 67 Machine Translated by Google I.INFORMACIÓN D E S EGURIDAD I MPORTANTE Lea a tentamente l as s iguientes d eclaraciones y c omprenda s us es d ecir, a ntes d e s u u so p ara g arantizar u n f uncionamiento s eguro. Símbolo Descripción ...
- Page 68 Machine Translated by Google • N o a lmacene n i u se g asolina u o tros v apores o l íquidos i nflamables e n e l cerca d e e ste o c ualquier o tro a parato. • L a información ...
- Page 69 Machine Translated by Google II.Introducción Las M esas d e V apor E léctricas h an s ido d iseñadas e specíficamente p ara c umplir c on l as exigencias r igurosas d e u na o peración d e s ervicio d e a limentos o cupada. C ada v apor e léctrico Las ...
- Page 70 Machine Translated by Google Nota: C ondiciones a mbientales: a segúrese d e q ue l a u bicación d e o peración e sté e n u na zona d onde l a t emperatura a mbiente s e m antenga c onstante ( mínimo 2 1°C). Evite ...
- Page 71 Machine Translated by Google Paso 1 Deslice l as p atas d entro d el e stante y a priételas a l a u nidad m ediante l os i nsertos f ijos p ara las p atas. ...
- Page 72 Machine Translated by Google Paso 2 Coloque l a u nidad e n e l s uelo b oca a bajo. A segúrese d e p roteger l a s uperficie s uperior y e l p ozo contra ...
- Page 73 Machine Translated by Google Paso 4 Primero i nstale l a p laca d e s oporte e n l os s oportes d e f ijación y l uego c oloque e sta p arte e n la ...
- Page 74 Machine Translated by Google Paso 5 Instale l os t opes d e l a t abla d e c ortar a t ravés d el e stante y e l s oporte d el e stante. soportes e n c ada e xtremo c omo s e m uestra. IV.Instrucciones ...
- Page 75 Machine Translated by Google 4. S e p uede u tilizar u n e stropajo d e p lástico y u n d etergente s uave p ara e liminar comida e ndurecida. AVISO: N o u tilice l ana d e a cero. LIMPIEZA ...
- Page 76 Machine Translated by Google un r aspador l impio y p lano d e a cero i noxidable p ara a yudar a s ellar a lgunas d e l as m arcas d el c uchillo. No s e r ecomienda e l u so d e c uchillas s obre t ableros o m esas s intéticas. VI.Diagrama ...
- Page 77 Machine Translated by Google ¿Voltaje? b . ¿ Está e ncendida l a e lectricidad e n l a t ubería p rincipal? V erifique e l d isyuntor o e l f usible. C. ¿ Están l as p erillas d e c ontrol e n l a p osición " ON"? 2. ...
- Page 78 Machine Translated by Google Conecte l a u nidad a u na f uente d e La u nidad n o e stá e nchufada alimentación a decuada Presione e l i nterruptor d e e ncendido/apagado La u nidad n o e stá e ncendida en ...
- Page 79 Machine Translated by Google...
- Page 80 Machine Translated by Google Soporte t écnico y c ertificado d e g arantía electrónica w ww.vevor.com/support...
- Page 81 Machine Translated by Google Wsparcie techniczne i certyfikat e-gwarancji www.vevor.com/support STOŁY PAROWE ELEKTRYCZNE MODEL: MDC-2 MDC-3 MDC-4 MDC-5 Nadal dokładamy wszelkich starań, aby zapewnić Państwu narzędzia w konkurencyjnej cenie. „Zaoszczędź o połowę”, „o połowę ceny” lub inne podobne wyrażenia używane przez nas przedstawiają jedynie szacunkową...
- Page 82 To jest oryginalna instrukcja. Przed przystąpieniem do obsługi prosimy o dokładne zapoznanie się ze wszystkimi instrukcjami. VEVOR zastrzega sobie jasną interpretację naszej instrukcji obsługi. Wygląd produktu zależy od produktu, który otrzymałeś. Proszę wybaczyć nam, że nie będziemy ponownie informować Państwa, jeśli pojawią...
- Page 83 Machine Translated by Google I. WAŻNE INFORMACJE DOTYCZĄCE BEZPIECZEŃSTWA Prosimy o uważne przeczytanie poniższych stwierdzeń i zrozumienie ich znaczenie przed użyciem, aby zapewnić bezpieczną pracę. Symbol Opis symbolu Ostrzeżenie: Aby zmniejszyć ryzyko obrażeń, użytkownik musi przeczytać instrukcję obsługi. Ten symbol, umieszczony przed komentarzem dotyczącym bezpieczeństwa, oznacza: rodzaj środka ostrożności, ostrzeżenia lub niebezpieczeństwa.
- Page 84 Machine Translated by Google • Nie przechowuj ani nie używaj benzyny lub innych łatwopalnych oparów lub cieczy w pomieszczeniu pobliżu tego lub innego urządzenia. • Informacje zawarte w niniejszej instrukcji są istotne dla prawidłowego użytkowania instalacji, użytkowania i konserwacji tego produktu. • Przestrzeganie tych procedur i instrukcji będzie skutkować...
- Page 85 Każda elektryczna para Stoły zostały zmontowane i przetestowane zgodnie ze ścisłą jakością standardy. Specyfikacja techniczna: MODEL WOLTY Wells WAT/Dobrze ogółem WAT MDC-2 500 W 1000 W 120 V ~ 60 Hz MDC-3 500 W 1500 W...
- Page 86 Machine Translated by Google Uwaga: Warunki otoczenia — upewnij się, że miejsce pracy znajduje się w obszarze, w którym utrzymuje się stała temperatura otoczenia (minimum 21°C). Należy unikać miejsc w pobliżu wentylatorów wyciągowych i kanałów klimatyzacyjnych. Ostrzeżenie! Środowisko operacyjne Upewnij się, że miejsce operacji znajduje się w: W przeciwnym razie należy zachować...
- Page 87 Machine Translated by Google Krok 1 Wsuń nogi do wnętrza półki i przymocuj je do mebla za pomocą stałych wkładek na nogi. - 6 -...
- Page 88 Machine Translated by Google Krok 2 Umieść urządzenie na podłodze do góry nogami. Należy pamiętać o zabezpieczeniu górnej powierzchni i studni przed uszkodzeniem, gdy urządzenie jest umieszczane na górze na podłodze. Po umieszczeniu wkładek na nogi dokręć śruby ustalające w urządzeniu. Dokręć...
- Page 89 Machine Translated by Google Krok 4 Najpierw zamontuj płytę nośną na wspornikach mocujących, a następnie umieść tę część z przodu obudowy za pomocą śrub. - 8 -...
- Page 90 Machine Translated by Google Krok 5 Zamontuj ograniczniki deski do krojenia przez półkę i wspornik półki wsporniki na każdym końcu, jak pokazano. IV.Instrukcja obsługi 1. ROZGRZEWANIE — Aby wstępnie rozgrzać poszczególne sekcje, ustaw pokrętło przełącznika w pozycji wysokiej przez 10–20 minut przed umieszczeniem żywności w przegródkach. Upewnij się, że otwory patelni są...
- Page 91 Machine Translated by Google 4. Do usunięcia można użyć plastikowego czyścika i łagodnego detergentu stwardniałe jedzenie. UWAGA: Nie stosować wełny stalowej. COTYGODNIOWE CZYSZCZENIE 1. Można usunąć osady kamienia powstałe na skutek zawartości minerałów w wodzie za pomocą plastiku czyścik i środek odkamieniający dopuszczony do stosowania na stali nierdzewnej. To ważne jest, aby zapobiegać...
- Page 92 Machine Translated by Google czysty, płaski skrobak ze stali nierdzewnej, który pomaga zatrzeć niektóre ślady noża. Nie zaleca się stosowania tasaków na płytach syntetycznych lub blatach stołowych. VI.Schemat połączeń VII.ROZWIĄZYWANIE PROBLEMÓW Zawsze pytaj i sprawdzaj następujące kwestie: PODRĘCZNIK ROZWIĄZYWANIA PROBLEMÓW 1.
- Page 93 Machine Translated by Google Napięcie? B. Czy zasilanie jest włączone w sieci głównej? Sprawdź wyłącznik lub bezpiecznik. C. Czy pokrętła sterujące są ustawione w pozycji „ON”? 2. Problem: Urządzenie nie utrzymuje właściwej temperatury żywności. A. Czy elementy sterujące są ustawione na prawidłowe ustawienie? B. Czy urządzenie zostało odpowiednio podgrzane? C.
- Page 94 Machine Translated by Google Podłącz urządzenie do Urządzenie nie jest podłączone odpowiedniego źródła zasilania Naciśnij włącznik/wyłącznik Urządzenie nie jest włączone na cyfrowym sterowaniu Zresetuj wyłącznik automatyczny Jednostka nie Zadziałał wyłącznik automatyczny w ogóle pracować Skontaktuj się z autoryzowanym Pokrętło sterujące jest uszkodzone elektryk Skontaktuj się...
- Page 95 Machine Translated by Google...
- Page 96 Machine Translated by Google Wsparcie techniczne i certyfikat e-gwarancji www.vevor.com/support...
- Page 97 Technische ondersteuning en e-garantiecertificaat www.vevor.com/support ELEKTRISCHE STOOMTAFELS MODEL: MDC-2 MDC-3 MDC-4 MDC-5 We blijven ons inzetten om u gereedschap tegen een concurrerende prijs te bieden. "Bespaar de helft", "Halve prijs" of andere soortgelijke uitdrukkingen die door ons worden gebruikt vertegenwoordigt slechts een schatting van de besparingen die u zou kunnen profiteren als u bepaalde gereedschappen bij ons koopt in vergelijking met de grote topmerken en betekent niet noodzakelijkerwijs dat deze alle categorieën van aangeboden...
- Page 98 Dit is de originele instructie. Lees alle instructies in de handleiding zorgvuldig door voordat u ermee aan de slag gaat. VEVOR behoudt zich een duidelijke interpretatie van onze gebruikershandleiding voor. Het uiterlijk van het product is afhankelijk van het product dat u heeft ontvangen. Vergeef ons alstublieft dat we u niet opnieuw zullen informeren als er technologie- of software-updates zijn voor ons product.
- Page 99 Machine Translated by Google I.BELANGRIJKE VEILIGHEIDSINFORMATIE Lees de volgende verklaringen aandachtig door en zorg ervoor dat u ze begrijpt betekenis voorafgaand aan gebruik om een veilige werking te garanderen. Symbool Symbool Beschrijving Waarschuwing: Om het risico op letsel te verminderen, moet de gebruiker de instructies lezen gebruiksaanwijzing zorgvuldig.
- Page 100 Machine Translated by Google • Bewaar of gebruik geen benzine of andere brandbare dampen of vloeistoffen in de buurt van dit of enig ander apparaat. • De informatie in deze handleiding is belangrijk voor het juiste gebruik installatie, gebruik en onderhoud van dit product. • Het naleven van deze procedures en instructies zal tot tevredenheid leiden resultaten en langdurige probleemloze service.
- Page 101 De Elektrische Stoomtafels zijn speciaal ontworpen om te voldoen aan de strenge eisen van een drukke foodservice-organisatie. Elke elektrische stoom Tafels zijn volgens strenge kwaliteit samengesteld en getest normen. Technische specificaties: MODEL Wells WATT/Well Totaal WATT VOLTEN MDC-2 500W 1000W 120V~60Hz MDC-3 500W 1500W 120V~60Hz...
- Page 102 Machine Translated by Google Opmerking: Omgevingsomstandigheden - Zorg ervoor dat de bedrijfslocatie zich in een ruimte waar de omgevingstemperatuur constant wordt gehouden (minimaal 21°C). Vermijd gebieden zoals in de buurt van afzuigventilatoren en airconditioningkanalen. Waarschuwing! Bedrijfsomgeving Zorg ervoor dat de bedieningslocatie zich op een locatie bevindt op een redelijke afstand van brandbare muren en andere materialen Er kan verbranding of verkleuring optreden.
- Page 103 Machine Translated by Google Stap 1 Schuif de poten in de plank en maak deze vast aan het meubel met de vaste inzetstukken voor de poten. - 6 -...
- Page 104 Machine Translated by Google Stap 2 Plaats het apparaat ondersteboven op de vloer. Zorg ervoor dat u het bovenoppervlak en de put beschermt tegen beschadiging wanneer het apparaat met zijn bovenkant op de vloer wordt geplaatst. Zodra de pootinzetstukken op hun plaats zitten, draait u de stelschroeven in het apparaat vast. Draai de hendel op het apparaat vast.
- Page 105 Machine Translated by Google Stap 4 Installeer eerst de steunplank op de bevestigingsbeugels en plaats dit onderdeel vervolgens met schroeven aan de voorkant van de schaal. - 8 -...
- Page 106 Machine Translated by Google Stap 5 Installeer de snijplankstoppers door de plank en de planksteun beugels aan elk uiteinde, zoals afgebeeld. IV.Gebruiksaanwijzing 1. VOORVERWARMEN - Om individuele secties voor te verwarmen, draait u de schakelaar naar hoog gedurende 10-20 minuten voordat het voedsel in de compartimenten wordt geplaatst. Zorg ervoor dat de panopeningen afgedekt zijn om warmteverlies te voorkomen.
- Page 107 Machine Translated by Google 4. Voor het verwijderen kunt u een plastic schuursponsje en een mild schoonmaakmiddel gebruiken gehard voedsel. OPMERKING: Gebruik geen staalwol. WEKELIJKSE REINIGING 1. Kalkaanslag als gevolg van het mineraalgehalte van het water kan worden verwijderd gebruik van een kunststof schuursponsje en een ontkalkingsmiddel dat is goedgekeurd voor gebruik op roestvrij staal.
- Page 108 Machine Translated by Google een schone, platte roestvrijstalen schraper om enkele messporen te verzegelen. Het gebruik van hakmessen op kunststof planken of tafelbladen wordt niet aanbevolen. VI. Bedradingsschema VII. PROBLEMEN OPLOSSEN Vraag en controleer altijd het volgende: GIDS VOOR PROBLEEMOPLOSSING 1.
- Page 109 Machine Translated by Google Spanning? B. Is de elektriciteit ingeschakeld op de hoofdleiding? Controleer de stroomonderbreker of zekering. C. Staan de bedieningsknoppen in de stand "ON"? 2. Probleem: Het apparaat handhaaft niet de juiste voedseltemperatuur. A. Zijn de bedieningselementen op de juiste instelling ingesteld? B. Is het apparaat op de juiste manier voorverwarmd? C.
- Page 110 Machine Translated by Google Sluit het apparaat aan op de Het apparaat is niet aangesloten juiste voeding Druk op de aan/uit-schakelaar Het apparaat is niet ingeschakeld op de digitale besturing Reset de stroomonderbreker De stroomonderbreker is geactiveerd Eenheid is dat niet überhaupt werken Neem contact op met een geautoriseerde Bedieningsknop is defect...
- Page 111 Machine Translated by Google...
- Page 112 Machine Translated by Google Technische ondersteuning en e- garantiecertificaat www.vevor.com/support...
- Page 113 Machine Translated by Google Teknisk support och e-garanticertifikat www.vevor.com/support ELEKTRISKA ÅNGBORD MODELL: MDC-2 MDC-3 MDC-4 MDC-5 Vi fortsätter att vara engagerade i att ge dig verktyg till konkurrenskraftiga priser. "Spara hälften", "halva priset" eller andra liknande uttryck som används av oss representerar bara en uppskattning av besparingar du kan dra nytta av att köpa vissa verktyg hos oss jämfört med...
- Page 114 Detta är den ursprungliga instruktionen, läs alla instruktioner noggrant innan du använder den. VEVOR reserverar sig för en tydlig tolkning av vår användarmanual. Utseendet på produkten är beroende av den produkt du fått. Ursäkta oss att vi inte kommer att informera dig igen om det finns någon teknik eller mjukvaruuppdateringar på...
- Page 115 Machine Translated by Google I.VIKTIG SÄKERHETSINFORMATION Vänligen läs följande uttalanden noggrant och förstå deras före användning för att säkerställa säker drift. Symbol Symbol Beskrivning Varning: För att minska risken för skador måste användaren läsa bruksanvisningen noggrant. Denna symbol, placerad före en säkerhetskommentar, indikerar en typ av försiktighetsåtgärd, varning eller fara.
- Page 116 Machine Translated by Google • Förvara eller använd inte bensin eller andra brandfarliga ångor eller vätskor i i närheten av denna eller någon annan apparat. • Informationen i denna handbok är viktig för korrekt installation, användning och underhåll av denna produkt. •...
- Page 117 Electric Steam-borden har designats speciellt för att möta rigorösa krav på en hektisk matserveringsverksamhet. Varje elektrisk ånga Borden har monterats och testats enligt strikt kvalitet standarder. Tekniska specifikationer: MODELL VOLTS Wells WATTS/Well Total WATTS MDC-2 500W 1000W 120V–60Hz MDC-3 500W 1500W 120V–60Hz...
- Page 118 Machine Translated by Google Obs: Omgivningsförhållanden - Se till att driftplatsen är i en område där omgivningstemperaturen hålls konstant (minst 21°C). Undvik områden som nära frånluftsfläktar och luftkonditioneringskanaler. Varning! Driftsmiljö Se till att driftplatsen är vid en rimligt avstånd från brännbara väggar och material i övrigt förbränning eller missfärgning kan uppstå.
- Page 119 Machine Translated by Google Steg 1 Skjut in benen inuti hyllan och dra åt den mot enheten med de fasta beninsatserna. - 6 -...
- Page 120 Machine Translated by Google Steg 2 Placera enheten på golvet upp och ned. Se till att skydda den övre ytan och väl från skador när enheten placeras ovanpå golvet. När beninsatserna är på plats, dra åt ställskruvarna i enheten. Dra åt handtaget på enheten. Steg 3 Dra åt de 4 ställskruvarna i varje hörn av hyllbensinsatserna.
- Page 121 Machine Translated by Google Steg 4 Installera stödbrädan på fästena först och placera sedan denna del på framsidan av skalet med skruvar. - 8 -...
- Page 122 Machine Translated by Google Steg 5 Montera skärbrädestopparna genom hyllan och hyllstödet fästen i varje ände enligt bilden. IV. Driftsinstruktioner 1. FÖRVÄRMNING - För att förvärma enskilda sektioner, vrid omkopplaren till hög i 10-20 minuter innan maten placeras i facken. Se till att pannöppningarna är täckta för att förhindra värmeförlust.
- Page 123 Machine Translated by Google 4. En skursvamp av plast och ett milt rengöringsmedel kan användas för att ta bort härdad mat. NOTERA: Använd inte stålull. VECKOSTÄDNING 1. Skalavlagringar på grund av vattnets mineralinnehåll kan tas bort med hjälp av en plast skursvamp och ett avkalkningsmedel godkänt för användning på...
- Page 124 Machine Translated by Google ren, platt skrapa i rostfritt stål som hjälper till att täta några av knivmärkena. Användning av klyftor på syntetskivor eller bordsskivor rekommenderas inte. VI.Wiring Diagram VII.FELSÖKNING Fråga alltid och kontrollera följande: FELSÖKNINGSGUIDE 1. Problem: Enheten värmer inte: a.
- Page 125 Machine Translated by Google Spänning? b. Är ström påslagen i elnätet? Kontrollera strömbrytaren eller säkringen. c. Är kontrollrattarna inställda på "ON"-läget? 2. Problem: Enheten håller inte rätt mattemperatur. a. Är kontrollerna inställda på rätt inställning? b. Har enheten förvärmts på lämpligt sätt? c.
- Page 126 Machine Translated by Google Anslut enheten till rätt Enheten är inte inkopplad strömkälla Tryck på på/av-knappen Enheten är inte påslagen på den digitala kontrollen Återställ strömbrytaren Strömbrytaren löste ut Enheten är det inte jobbar överhuvudtaget Kontakta en auktoriserad Kontrollvredet är defekt elektriker Kontakta en auktoriserad Värmeelementet är utbränt...
- Page 127 Machine Translated by Google...
- Page 128 Machine Translated by Google Teknisk support och e-garanticertifikat www.vevor.com/support...
Need help?
Do you have a question about the MDC-2 and is the answer not in the manual?
Questions and answers