Table of Contents
Advertisement
Available languages
Available languages
Quick Links
Advertisement
Table of Contents

Related Manuals for LEXIBOOK Spider-Man TimeProjector RP200SP


Summary of Contents for LEXIBOOK Spider-Man TimeProjector RP200SP
- Page 1 ® Instruction Manual - Guide de l’utilisateur RP200SP...
- Page 2 ---------- ENGLISH ---------- FRANÇAIS...
-
Page 3: Unit Layout
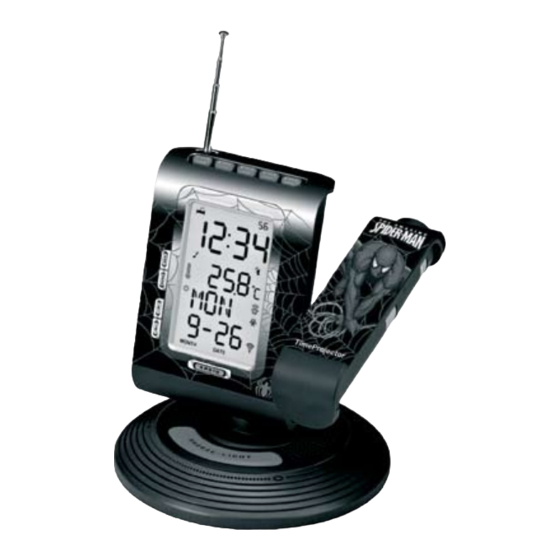
Radio Alarm Clock TimeProjector® RP200SP with exclusive functions: time projection and temperature display. Please read this manual carefully to ensure you understand the operations and keep it in a safe place for future reference. UNIT LAYOUT Function of the keys... -
Page 4: Top And Bottom View
To activate the snooze function and to project the time on the ceiling or wall of a room. Volume Knob Volume knob at the base of the unit. Back view Focus knob To adjust the focus of the projection. Rotation knob To rotate the projection to the right angle. -
Page 5: Lcd Screen Layout
DATE / Radio frequency Alarm icon RCC icon Countdown icon (Radio Controlled Clock) Temperature icon Preset radio turn on icon Temperature °C / °F Radio sleep mode icon Summer time icon Page (frequency saving) icon World time icon Radio on icon... -
Page 6: Getting Started
When you use the RP200SP for the first time: 1. Remove the plastic static label on the screen display. 2. Open the battery door located on the underside of the unit. 3. Insert 4 AA batteries according to the polarities (+/- signs). -
Page 7: Manual Time Settings
RCC signal search. If the RP200SP is brought outside the range of the Frankfurt DCF77 radio signal or if the signal is interfered, please set the time and date manually according to the instructions below. If the unit is located within the radio-controlled range, you may want to customize some of the clock settings. - Page 8 Notes: - When the alarm rings, press any key (but not the Snooze/Light button) to stop it. It will ring again the next day at the same time unless the alarm is turned off. - When the alarm rings and the snooze function is on, press any key to stop the alarm momentarily.
- Page 9 1. In time mode, press [MODE] thrice to select the countdown function. 2. To set the time at which you wish the unit to count down from, press and hold [SET] until hour digit flashes. The maximum time is 23 hours, 59 minutes and 59 seconds.
-
Page 10: Sleep Function
2. Press the key. The icon appears. 3. To set the time at which you wish the radio to turn on, press and hold [SET] until hour digit flashes. 4. Press the keys to set the hour. Press [SET] to confirm. -
Page 11: Replacing Batteries
The supply terminals are not to be short circuited. Do not throw batteries into a fire. Remove the batteries if you are not going to use the game for a long period of time. WARNING: If the unit malfunctions or receives an electrostatic shock, remove the batteries and/or perform the Reset procedure. -
Page 12: General Care
• Avoid exposure to sudden changes in temperature such as direct sunlight, extreme cold and wet or moist conditions. • When cleaning the display and casing, only use a soft damp cloth. Do not use solvents or scouring agents as they may mark the LCD and casing. -
Page 13: Presentation De L'appareil
Spider-Man RP200SP qui offre des fonctions exclusives : projection de l’heure et affichage de la température. Veuillez lire attentivement ce manuel pour vous assurer de comprendre son utilisation complète et conservez-le dans un endroit sûr pour toute future consultation. PRESENTATION DE L’APPAREIL... -
Page 14: Vue Du Dessus
Pour afficher la fonction Snooze (Répétition) et projeter l’heure au plafond ou au mur de la pièce. Molette de volume Molette de volume à la base de l’unité. Vue de dos Molette de focus Pour ajuster la projection. Molette de rotation Pour faire pivoter l’heure... - Page 15 Icône de compte à rebours programmée Icône de température Arrêt de la radio programmée Température °C / °F Icône de « Page » : Icône de l’heure d’été sauvegarde et mise en mémoire de fréquences radio Icône de l’horloge mondiale Icône de mise en marche de...
-
Page 16: Pour Commencer
POUR COMMENCER Lorsque vous utilisez le radio-réveil RP200SP pour la première fois : 1. Retirez la pellicule statique qui protège l’écran à l’aide de la languette. 2. Ouvrez le couvercle du compartiment des piles situé au-dessous de l’appareil. 3. Insérez 4 piles de type LR06 en respectant les polarités (indications +/- ). -
Page 17: Réglage Manuel De L'heure
Lors de la réception du signal, le symbole de la Tour de Radio commencera à clignoter. Une session de réception dure généralement environ 10 minutes, selon la puissance du signal radio. 3. Lorsque la réception est terminée, le symbole de la Tour de Radio s’arrêtera de clignoter et restera fixe. -
Page 18: Horloge Mondiale
4. Appuyez sur [SET] pour sélectionner le réglage des minutes. 5. Appuyez sur [SET] pour confirmer le réglage de l’heure de l’alarme. Appuyez sur la touche pour activer/désactiver l’alarme. Lorsque l’alarme est activée, l’icône s’affiche sur l’écran. -
Page 19: Compte À Rebours
1. En mode horloge, appuyez deux fois sur [MODE] pour sélectionner l’horloge mondiale. 2. Appuyez sur la touche pour sélectionner le code de la ville dans laquelle vous vous trouvez. - Page 20 RADIO Régler une fréquence radio et mémoriser une station La radio du RP200SP contient 6 groupes FM (FM1 à FM6) et pour chacune 5 mémoires disponibles (S1 à S5), vous permettant de mémoriser jusqu’à 30 stations. 1. Appuyez sur la touche [RADIO] pour allumer la radio ou mettre la fonction de réveil radio en marche (cf ci après).
- Page 21 2. Appuyez sur la touche . L’icône apparaît. 3. Pour régler l’heure à laquelle vous désirez que la radio se mette en marche, appuyez et maintenez [SET] jusqu’à ce que les heures clignotent. 4. Appuyez sur la touche pour régler les heures.
-
Page 22: Remplacer Les Piles
Si vous utilisez un adaptateur secteur (optionnel et non inclus) - Si un transformateur externe est branché à une prise secteur, la projection restera allumée lorsque l’interrupteur du projecteur est mis en position (projection continue). - Veuillez utiliser uniquement un adaptateur de 4.5V avec un centre positif Veuillez contacter votre revendeur ou spécialiste pour obtenir un... -
Page 23: Precautions D'emploi
Ne pas utiliser de solvants ou des agents corrosifs car ils risquent de marquer l’écran et la coque. • Ne pas laisser tomber le réveil ou le plonger dans l’eau. • Ne pas essayer de faire des réparations soi-même. Le retourner au distributeur pour toute réparation. - Page 24 CITY CODE LIST / LISTE DES CODES DES VILLES No. GMT CODE CITY/VILLE No. GMT CODE CITY/VILLE 1. GMT -10 HNL Honolulu 18. GMT +1 Milan 2. GMT -9 Anchorage 19. GMT +1 Rome 3. GMT -8 San Francisco 20. GMT +2 Cairo/Le Caire 4.
Need help?
Do you have a question about the Spider-Man TimeProjector RP200SP and is the answer not in the manual?
Questions and answers