Table of Contents
Advertisement
Quick Links
Advertisement
Table of Contents

Related Manuals for Coleman 9998-A60


Summary of Contents for Coleman 9998-A60
- Page 1 This Owner's Manual is provided and hosted by Appliance Factory Parts. Coleman 9998-A60 Owner's Manual Shop genuine replacement parts for Coleman 9998-A60 Find Your Coleman Grill Parts - Select From 255 Models -------- Manual continues below --------...
- Page 2 Keep this manual for future reference. If you have questions about NOTE: assembly, operation, servicing or repair of this Propane tank is not included. grill, please call Coleman at 1-800-356-3612 or ® ® TDD: 316-832-8707. In Canada call ANSI Z21.58-2007 • CSA 1.6-2007 Outdoor Cooking Gas Appliances 1 800 387-6161.
-
Page 3: Table Of Contents
Contents DANGER DANGER indicates an imminently hazardous situation which, if not General Safety Information ........2 avoided, will result in death or serious injury. -
Page 4: General Installation
The maximum sum total amperage rating of electrical • Grill is hot when in use; to avoid burns, DO NOT touch any hot grill accessories attached to the 9998 Series Coleman Grill must surface. Keep children and pets away from hot grill. -
Page 5: Portable L.p. Gas Barbecue Cylinders
DO NOT attempt to connect to any other refillable L.P. cylinder not equipped with a mating Type 1 cylinder valve [F]. This grill may only be used with cylinder connecting devices approved by Coleman. Fig. 1 • A Type 1 compatible cylinder with a Type 1 cylinder valve has a back- check valve which does not permit gas flow, until a positive seal has been obtained. -
Page 6: Hose And Regulator
The pressure regulator and hose assembly with the Type 1 fitting supplied with the appliance must be used. Do not use another hose and regulator assembly other than the one supplied with the grill or a Coleman® replacement pressure regulator assembly. The pressure regulator and hose assembly provided is factory set at an outlet pressure of 11 inches water column (1/2 psi). -
Page 7: Grill Features
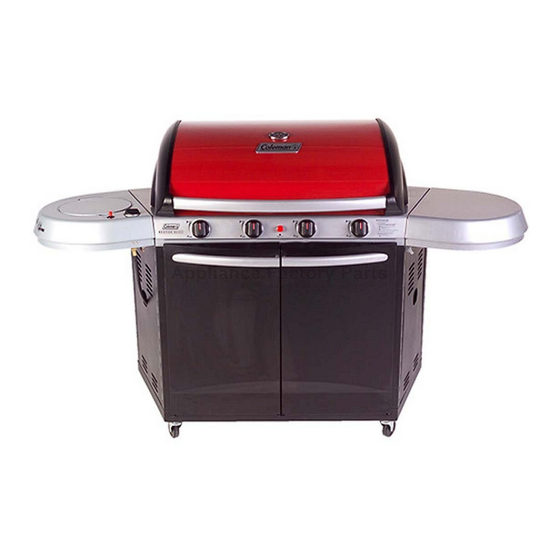
Grill Features — 9998 Series Fig. 4 Fig. 5 Fig. 6 1. Grill Hood 7. Cart with Doors 2. Thermometer 8. 120 VAC Electrical Outlet 3. Hood Handle 9. 120 VAC Electrical Cord Inlet 4. Side Shelf 10. Grilling/Cooking Surface 5. -
Page 8: Parts Identification
Parts Identification - 9998 Series IMPORTANT: Remove all packing material prior to assembly/use. If your grill has stainless steel components, remove all protective plastic film from stainless steel parts prior to assembly/use. This film is installed at the factory to prevent damage that could occur during shipment and handling. Fig. -
Page 9: Grill Assembly
Grill Assembly Assemble the Wheels 3. Assemble the side windbaffles. Each side windbaffle is held in place with four screws and lockwashers. The lockwashers assemble next to the heads of the screws (Fig. 11, 12, and 13). 1. Place part of the shipping carton behind the grill for protection. Lay the grill on its back to assemble the four wheels (Fig. - Page 10 Grill Assembly Assemble the Grill Lid Fig. 27 Fig. 28 2. Carefully place the Grill Lid 1. Hardware to attach the grill onto the grill frame in the lid are two pins and hairpin closed position (Fig. 20). cotters (Fig. 19). Fig.
- Page 11 Grill Assembly (continued) Assemble the Doors and the Tool Hook 2. Loosely engage the screws 3. Insert the screw heads into the only several turns (Fig. 34). In slots in the outside of the door. the next step, the screw heads The screws must be inserted NOTE: On some models, the Doors and the Tool Hook are pre- will engage slots in the doors...
-
Page 12: 20# Lp Cylinder Installation
Grill Assembly 20# LP Cylinder Installation (continued) (continued) 1. Set the LP Cylinder in the Cylinder Support location with the outlet Assemble the Side Tables valve facing toward the door opening of the grill. Lower the Tank Support to engage the Cylinder Collar (Fig. 40). 1. -
Page 13: Leak Testing - Refillable Cylinders
20# LP Cylinder Installation Leak Testing - Refillable Cylinders (continued) 4. Check that all grill burner knobs are in the off position (Fig. 42). DANGER Fig. 42 REVENT IRE OR XPLOSION AZARD • NO SMOKING. DO NOT use or permit sources of ignition in the area while doing a leak test. -
Page 14: Fixing A Fuel Leak
3. Stop a leak by tightening the loose joint, or by replacing the faulty part with a replacement part recommended by Coleman. DO NOT attempt to repair the cylinder valve if it should become 1. -
Page 15: Lighting Instructions
Lighting the Burners Lighting Instructions 1. Push and turn one of the main burner control knobs counterclockwise to the “HIGH” position. Wait 5 seconds WARNING (Fig. 47 and 48). 2. Push and hold the igniter button until burner lights. You will hear a THE FOLLOWING RULES MUST ALWAYS BE snapping sound (Fig. -
Page 16: Shutting Off The Grill
The Burner Flame Shutting Off the Grill (continued) • Grills that have been in use for a while sometimes begin to show more yellow flame. A build-up of food deposits, fats CAUTION or cooking seasonings can cause yellowing flames. Clean the burner to remove residue and check for clogged DO NOT touch hot grill parts with your bare hands! burner holes or a blocked venturi. -
Page 17: Grilling Tips And Hints
5. If any of the above mentioned components are damaged, seek replacement from Coleman before operating the grill again. COOKING GRATES Locate your nearest service center by calling 1-800-356-3612. - Page 18 Component Cleaning: Care, Maintenance and Cleaning (continued) • BURNER: Wire-brush loose corrosion from the burner exterior. Clean clogged gas port holes with an opened paper clip. STAINLESS STEEL Replace corroded or damaged burners that would emit excess gas. After initial usage, areas of the grill may discolor from the intense heat given off by the burners, this is normal and not considered •...
- Page 19 2. Remove the cooking grates and heat tents and set aside. Using a screwdriver, remove the single screw holding each burner tube. There is a hex nut under each burner bracket. It is necessary to hold the hex nut when removing the screw. Lift the burner tube away from the valve and remove from the grill.
-
Page 20: Moving And Storage
Moving and Storage Troubleshooting (continued) CAUTION Problem: Flame blows out on low setting or has uneven heat distribution. A collision with the grill, as with any metal object, could cause injury. Use care when moving a portable gas grill. Possible Causes and Solutions: Moving the grill: 1. -
Page 21: For Your Additional Safety
For Your Additional Safety For Your Additional Safety (continued) Current refillable L.P. gas cylinders are fitted with an Overfill CURRENT GAS CYLINDERS ARE ALSO Protection Device (O.P.D.). To insure that you retain this EQUIPPED WITH AN OVERFILL PROTECTION safety-device, take your cylinder to an L.P. gas service DEVICE (O.P.D.) WHICH GREATLY REDUCES station for filling, or when exchanging your cylinder at a THE CHANCE OF ACCIDENTALLY... -
Page 22: Registration Card
¨ warranty. PROTECT YOUR PRODUCT: We will keep the model number and date of purchase of your new Coleman ¨ product on file to help you refer to this information in the event of an insurance claim such as fire or theft. - Page 23 Dependable igniter Thank you for filling out this questionnaire. Your answers are important to us. Please check here [ ] if you prefer not to learn more about Coleman ® Outdoor Cooking Products or obtain information on new interesting opportunities from other companies.
-
Page 24: Replacement Parts List
Replacement Parts List — 9998 Series No. Part Number Description 9998-1551 Thermometer Assembly 9998-5021 Lid Handle Assembly 9998-5631 Lid Assy Complete “Please Call” Hood Hinge Pin 9998-1261 Hood Cotter Pin 9998-1541 Hood Bumper Pads (2 pk) 9998-1531 Warming Rack 9998-1731 Grill Grate 9998-1661 Heat Tent... -
Page 25: Warranty
Limited Three Year Warranty The Coleman Company, Inc. (“Coleman”) warrants that for a period of three years from the date of original retail purchase, this product will be free from defects in material and workmanship. Coleman, at its option, will repair or replace this product or any component of the product found to be defective during the warranty period.
Need help?
Do you have a question about the 9998-A60 and is the answer not in the manual?
Questions and answers