Advertisement
Advertisement
Table of Contents

Subscribe to Our Youtube Channel
Related Manuals for Disc-O-Bed KID-O-BUNK


Summary of Contents for Disc-O-Bed KID-O-BUNK
- Page 1 Assembly Instructions Manual de montagem Montageanleitung AI30X05BODE-PT...
- Page 2 IMPORTANT INFORMATION CONCERNING THIS PRODUCT TO PREVENT SERIOUS OR FATAL INJURIES Keep these instructions for future reference Read carefully and fully understand the manufacturer’s assembly. Care and special attention should be used where a warning is indicated. Never allow a child under 6 years of age on the top bed. Only one person allowed on each level. Use the bunk as it is intended –...
- Page 3 WICHTIGE WARNHINWEISE ZU DIESEM PRODUKT UM GEFÄHRLICHE UND TÖDLICHE VERLETZUNGEN ZU VERMEIDEN Bitte bewahren Sie diese Montageanleitung für den späteren Gebrauch auf Lesen Sie die Anleitung sorgfältig und befolgen Sie die Anweisungen. Bitte seien Sie besonders achtsam bei den Stellen, die mit einem Warnzeichen versehen sind. Lassen Sie niemals ein Kind unter 6 Jahren auf das obere Bett.
- Page 4 PARTS COMPONENTES BESTANDTEILE 2x Sleeping Mats 2x Colchão 2x Matten 2x Straight End Frames 2x Quadro reto 2x Gerader Rahmen 4x Stack Adapters 4x peças adicionais 4x Zusatzstücke 8x Discs 2x Rounded End Frames 8x Discos 2x Quadro redondo 2x Locking Straps 8x Discs 2x Runder Rahmen 2x Correia de segurança...
- Page 5 Rounded Frame Assembly Instructions Manual de montagem para a cama com estrutura redonda Montageanleitung für das Bett mit rundem Rahmen...
- Page 6 STEP 1. SECURING DISC TO SWAGED SIDE RAIL PASSO 1. ENCAIXE DO DISCO NA BARRA LATERAL COMPRIMIDA SCHRITT 1. EINRASTEN DER DISC AN DER GESTAUCHTEN SEITENSTANGE 1.1. Holding swaged rail, press pin (A) down and hold. 1.1. Segure a barra lateral comprimida e pressione e segure o pino (A). 1.1.
- Page 7 STEP 2. CONNECTING SWAGED SIDE RAIL TO STRAIGHT SIDE RAIL PASSO 2. JUNTAR AS BARRAS LATERAIS RETAS E AS COMPRIMIDAS SCHRITT 2. VERBINDEN DER GESTAUCHTEN UND GERADEN SEITENSTANGEN 2.1. Attach a swaged side rail (completed in step 1) to a straight rail. 2.1.
- Page 8 STEP 3. ATTACHING SLEEPING MAT TO SIDE RAILS PASSO 3. COLOQUE O COLCHÃO NAS BARRAS LATERAIS SCHRITT 3. DIE MATTE AUF DIE SEITENSTANGEN AUFZIEHEN 3.1. Open out sleeping mat with the correct (logo) side up. 3.2. At one end, slide the 2 rails (completed in step 2) into the sleeves of the mat. 3.3.
- Page 9 STEP 4. SECURING EACH DISC INTO THE END FRAME PASSO 4. APOIAR OS DISCOS PARA O QUADRO SCHRITT 4. DIE DISCS IN DEN RAHMEN SICHERN 4.1. Make sure pin (A) is visible, is not covered by the sleeping mat and is facing inwards. Check all four bed posts (see diag.
- Page 10 5.1. Klappen Sie die Lasche am Kopfende der Matte über den Rahmen und befestigen Sie sie an der Unterseite der Lasche an den Klettverschlussstellen. 5.2. Wiederholen Sie 5.1. am anderen Ende des Betts. THE ASSEMBLY OF YOUR KID-O-BUNK® ROUNDED FRAME SINGLE COT IS NOW COMPLETE. A MONTAGEM DA CAMA DE SOLTEIRO KID-O-BED COM QUADRO REDONDO DO KID- O-BUNK®...
- Page 11 6.1. Siga os passos 1-5 para terminar a montagem da cama com um quadro reto. 6.1. Befolgen Sie die Schritte 1-5 um die Montage des Betts mit geradem Rahmen fertigzustellen. THE ASSEMBLY OF YOUR KID-O-BUNK® STRAIGHT FRAME SINGLE COT IS NOW COMPLETE.
- Page 13 Bunk Assembly Instructions Manual de montagem Montageanleitung...
- Page 14 STEP 1. REMOVE FOOT PLUGS PASSO 1. REMOVER OS TAMPÕES DE PÉ SCHRITT 1. FUßPFROPFEN ENTFERNEN 1.1. Remove the 4 foot plugs from the straight bed end frame. 1.1. Remova os tampões de pé do quadro reto. 1.1. Entfernen Sie die vier Fußpfropfen vom geraden Rahmen.
- Page 15 STEP 2. ATTACH STACK ADAPTERS TO STRAIGHT LEG BED END FRAME PASSO 2. PRENDA PEÇAS ADICIONAIS ÀS PERNAS DA QUADRO RETO SCHRITT 2. ZUSATZSTÜCKE AN DEN BEINEN DES GERADEN RAHMENS BEFESTIGEN 2.1. Press pin (A) down on stack adapter and hold. 2.1.
- Page 16 STEP 3. STACK STRAIGHT END FRAME ONTO ROUNDED END FRAME PASSO 3. COLOQUE O QUADRO RETO NO QUADRO REDONDO SCHRITT 3. DEN GERADEN RAHMEN AUF DEN RUNDEN RAHMEN SETZEN 3.1. Place straight end frame (fitted with stack adapters completed in step 2) onto rounded end frame. 3.1.
- Page 17 STEP 4. CORRECT STACK ADAPTER FITMENT PASSO 4. VERIFICAR SE AS PEÇAS ADICIONAIS ESTÃO ASSENTADAS CORRETAMENTE NOS DISCOS SCHRITT 4. KONTROLLE OB DIE ZUSATZSTÜCKE GUT AUF DEN DISCS SITZEN 4.1. Make sure the stack adapter fits directly into the groove of each disc on the bottom cot. 4.2.
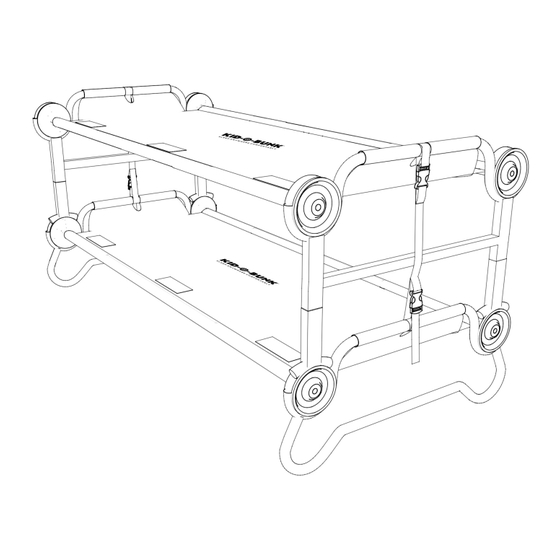
- Page 18 YOU HAVE NOW SUCCESSFULLY COMPLETED THE ASSEMBLY OF YOUR KID-O-BUNK®. JÁ COMPLETOU A MONTAGEM DO SEU KID-O-BUNK ®. SIE HABEN NUN DIE MONTAGE IHRER KID-O-BUNK® FERTIGGESTELLT. We hope that you are completely happy with our product and it is exactly what you expected.
- Page 19 Rounded Frame Package Instructions Instruções de embalagem para a cama com quadro redondo Packanleitung für das Bett mit rundem Rahmen Straight Frame Package Instructions Instruções de embalagem para a cama com quadro reto Packanleitung für das Bett mit geradem Rahmen...
- Page 20 5 POINT CHECK LIST Make sure that these simple checks are followed PRIOR TO EACH use of your Kid-O-Bunk®. 1. The pin (B) is securely locked in to the disc. STEP 1 page 5. 2. Side rails fit into one another completely. Should feel smooth to the touch. STEP 2 page 6.
-
Page 21: Warranty Conditions
WARRANTY CONDITIONS Our products are subject to strict quality controls. If a DISC-O-BED® product purchased from us does not work properly, we regret this very much and ask you to contact us at the contact address below at www.discobed.de. In addition to the statutory warranty, we grant you a guarantee on all DISC-O-BED products purchased from us, in accordance with the following provisions: YOUR LEGAL RIGHTS ARE NOT RESTRICTED BY THIS. - Page 22 Disc-O-Bed EU GmbH Lustgartenstraße 103 79576 Weil am Rhein PATENT AND DESIGN PROTECTED – SEE DISCOBED.COM/PATENTS © 2022 Disc-O-Bed EU GmbH. All rights reserved © 2022 Disc-O-Bed EU GmbH. Todos os direitos reservados © 2022 Disc-O-Bed EU GmbH. Alle Rechte vorbehalten discobed.de...
-
Page 23: Important Safety Warning
If you have any questions, comments or concerns, please don’t hesitate to contact us: Disc-O-Bed EU GmbH, Lustgartenstraße 103, 79576 Weil am Rhein, Germany Tel: +49 (0)7621 1630260 Monday – Friday 8:30 to 5:00pm info@discobed.de...
Need help?
Do you have a question about the KID-O-BUNK and is the answer not in the manual?
Questions and answers