Advertisement
Quick Links
Advertisement

Subscribe to Our Youtube Channel
Related Manuals for Disc-O-Bed DOG BED LARGE


Summary of Contents for Disc-O-Bed DOG BED LARGE
- Page 1 Assembly Instructions Montageanleitung discobed.de AI60001DE...
- Page 3 BED PARTS / TEILE LIEGEFLÄCHE 1x Sleeping Mat 2x Rounded End Frames 1x Matte 2x runde Rahmen 2x Straight Side Rails / 2x gerade Seitenstangen 2x Swaged Side Rails 2x gestauchte Seitenstangen 4x Discs 4x Discs 2x 90 Bend Piece CANOPY PARTS / TEILE SONNENDACH 2x 90°...
- Page 5 Dog-Bed Frame Assembly Instruction Montageanleitung Dog-Bed Rahmen discobed.de...
- Page 6 STEP 1. SECURING DISC TO SIDE RAILS SCHRITT 1. EINRASTEN DER DISC AN DEN SEITENSTANGEN 1.1. Holding side rail, press pin (P1) down and hold. 1.1. Halten Sie die Seitenstange und drücken Sie den Pin (P1) nach unten und halten ihn gedrückt. 1.2.
- Page 7 STEP 2. ATTACHING SLEEPING MAT TO SIDE RAILS SCHRITT 2. DIE MATTE AUF DIE SEITENSTANGEN AUFZIEHEN 2.1. Open out sleeping mat, velcro side down. 2.2. At one end, slide the 2 straight side rails into the sleeves of the mat. 2.3.
- Page 8 STEP 3. SECURING EACH DISC INTO THE END FRAME SCHRITT 3. DIE DISC IN DEN RAHMEN SICHERN 3.1. Make sure pin (P) is visible, is not covered by the sleeping mat and is facing inwards. Check all four bed posts (see diag. 3.1). 3.2.
- Page 9 STEP 4. SECURING HEAD REST SCHRITT 4. KOPFLASCHE BEFESTIGEN 4.1. Flap head rest over bed end frame and secure on underside hook and loop. 4.2. Repeat at other bed end. 4.1. Klappen Sie die Lasche am Kopfende der Matte über den Rahmen und befestigen Sie sie an der Unterseite der Lasche an den Klettverschlussstellen.
- Page 11 Canopy Assembly Instructions Montageanleitung Sonnendach discobed.de...
- Page 12 STEP 1. CONNECT BACKREST ANGLED PIPE A TO BED SIDE A SCHRITT 1. VERBINDEN SIE DAS RÜCKENLEHNEN-WINKELSTÜCK A MIT DER BETTSEITE A 1.1. Holding backrest angled pipe A/C, press pin (P) down and hold. 1.2. Line up pin with hole in dog bed frame A. Let pin go. The pin should be facing inward. 1.1.
- Page 13 STEP 2. CONNECT STRAIGHT PIPES TO BACKREST ANGLED PIPES. SCHRITT 2. VERBINDEN SIE DIE GERADEN STANGEN MIT DEN RÜCKENLEHNEN-WINKELSTÜCKEN. 2.1 Holding straight pipe C/E, Press pin (P) down and hold. 2.2 Line up pin (P) with the hole in angled backrest (completed in step 1), insert. (Make sure pin (P) has popped up and is locked in place.) Pin should be facing inward.
- Page 14 STEP 3. BEGIN TO ATTACH THE CANOPY FABRIC SCHRITT 3. BEFESTIGEN SIE DAS SONNENDACH 3.1. Open out canopy completely locating the sewn side sleeve. 3.2. Slide the sewn side sleeve over the canopy side rail E/C and down to C/A. 3.3.
- Page 15 STEP 5. CONNECTING THE FRONT SECTION OF THE CANOPY TO THE FRAME SCHRITT 5. VERBINDEN SIE DEN VORDEREN TEIL DES SONNENDACHS MIT DEM RAHMEN 5.1. Slide the assembled rails through the front sewn sleeve of the canopy fabric. 5.2. Holding 90o bend peice G/E, press pin (p) down and hold. 5.3.
- Page 16 STEP 6. VELCRO CANOPY SLEEVE B AROUND THE ASSEMBLED B SIDE RAILS SCHRITT 6. VERBINDEN SIE DEN KLETTVERSCHLUSS UM DIE SONNENDACH-ÖFFNUNG B UND DIE MONTIERTEN SEITENSTANGEN B STEP 7. VELCRO CANOPY BACK TO THE BOTTOM OF THE DOG-BED MAT SCHRITT 7. VERBINDEN SIE DEN KLETTVERSCHLUSS VOM RÜCKENTEIL DES SONNEN- DACHS MIT DER UNTERSEITE DER DOG-BED MATTE...
- Page 17 THE ASSEMBLY OF YOUR DOG-BED WITH CANOPY IS NOW COMPLETE. DIE MONTAGE IHRES DOG-BEDS MIT SONNENDACH IST NUN KOMPLETT. We hope that you are completely happy with our product and it is exactly what you expected. Wir hoffen, dass Sie mit unserem Produkt zufrieden sind und es Ihren Erwartungen entspricht.
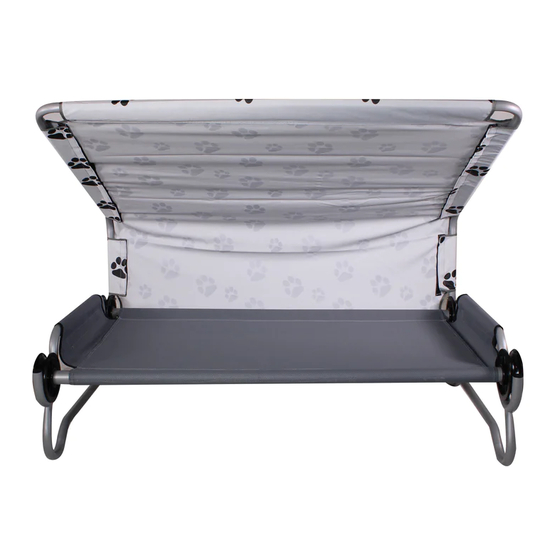
- Page 18 Package Instructions Verpackungsanleitung This diagram shows the Dog-Bed Canopy frame when it is properly assmebled. Dieses Bild zeigt das korrekt montierte Dog-Bed mit Sonnendach.
- Page 19 WARRANTY CONDITIONS Our products are subject to strict quality controls. If a DISC-O-BED® product purchased from us does not work properly, we regret this very much and ask you to contact us at the contact address below at www.discobed.de. In addition to the statutory warranty, we grant you a guarantee on all DISC-O-BED products purchased from us, in accordance with the following provisions: YOUR LEGAL RIGHTS ARE NOT RESTRICTED BY THIS.
Need help?
Do you have a question about the DOG BED LARGE and is the answer not in the manual?
Questions and answers