Table of Contents
Advertisement
Advertisement
Table of Contents

Related Manuals for Bernette Straight Stitch B08


Summary of Contents for Bernette Straight Stitch B08
- Page 1 User Manual...
-
Page 3: Table Of Contents
SAFETY INSTRUCTIONS ........Regulating the Speed ..........General Information ..........Setting the Stitch Length ..........Setting the Presser Foot Pressure ........ My bernette ............Sewing ..............29 Overview Machine ..........Quick reverse ............29 Overview - Front ............Overview Sewing Area .......... -
Page 4: Safety Instructions
1M. dropped into water. Contact the nearest • When the LED light is damaged or authorized bernette dealer to arrange defective, contact your bernette specialist further details. dealer. • Only use the accessories recommended by the manufacturer. - Page 5 – turn power switch to «0». • Do not use bent needles. • Always use an original bernette stitch plate. The wrong stitch plate can cause needle breakage. • To disconnect, turn power switch to «0»...
-
Page 6: General Information
• When passing on the machine to a third party, enclose the short manual of the machine. Proper Use Your bernette machine is conceived and designed for private household use. It is intended for sewing fabrics and other materials as described in this instruction manual. Any other use is not considered proper. BERNINA assumes no liability for consequences resulting from improper use. - Page 7 GENERAL INFORMATION Explanation of Symbols Designates a danger with a high risk which can lead to serious injuries or even death unless it is avoided. DANGER WARNING Designates a medium-risk hazard which can lead to serious injuries if not avoided. Designates a low-risk hazard which can lead to minor or moderate injuries if not avoided.
-
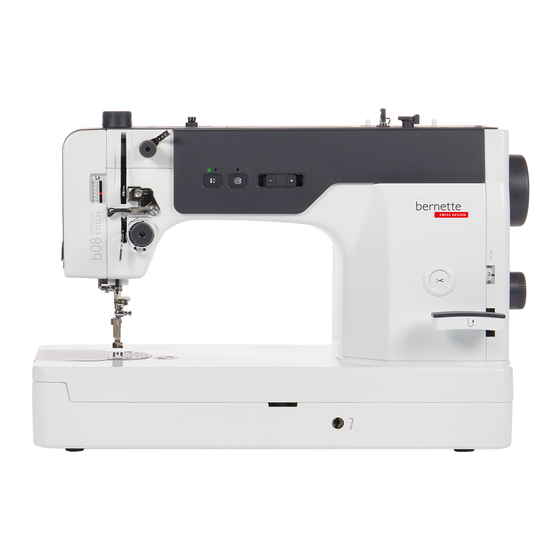
Page 8: My Bernette
MY BERNETTE My bernette 1.1 Overview Machine Overview - Front Bobbin Cover Thread Take-up Lever Top Bobbin Cover Thread Guide Thread Cutter «Stitch Length» Display Thread Guide Connection for Free Hand System «Presser Foot Pressure» Display Overview Sewing Area Stitch Plate... -
Page 9: Overview Of Operating Elements
MY BERNETTE Overview of Operating Elements «Thread tension» Dial Speed Control «Thread Pretension» Dial «Thread Cutter» Button «Needle Stop Up/Down» Button Quick Reverse Lever «Bobbin Winder» Button Overview - Back Panel Connection Power Cable Air Vents Connection for Automatic Thread Cutter... -
Page 10: Overview Top
MY BERNETTE Overview Top «Presser Foot Pressure» Dial Thread Guide Bobbin Winder Pretension Bobbin Winder Unit Carry Handle Stopper Bobbin Winder Unit 1.2 Accessory Included Accessories Visit www.mybernette.com/accessories for more accessory information. Illustration Name Illustration Name Slide-On Table Bobbin (4x) -
Page 11: Overview Presser Feet
MY BERNETTE Illustration Name Illustration Name Knee Lifter Seam Guide Spool net (1x) Lint Brush Accessories Box Spool Disc, large (1x) Screw Driver, large Screw Driver, small Spool Stabilizer Mettler Thread Starter Power Cable Overview Presser Feet Illustration Name Purpose Straight Stitch Foot For straight stitch seams on all fabrics. -
Page 12: Needle, Thread, Fabric
MY BERNETTE Illustration Name Purpose Narrow Straight Stitch Foot For topstitching edges and zippers. 1.3 Needle, Thread, Fabric Needles will wear down over time. Therefore, needles should be replaced regularly. Only a perfect point results in a good stitching result. In general it can be said: the thinner the thread, the finer the needle. -
Page 13: Thread And Needle Overview
MY BERNETTE Thread and Needle Overview Fabric Thread Needle size (HLx5) Thin fabrics Wool Cotton 50 – 60 90/14 Foil Synthetic 50 – 60 Gabardine Thin jersey Flannel wool Synthetic 50 – 60 Thick fabrics Denim Synthetic 20 – 50... -
Page 14: Sewing Preparation
SEWING PREPARATION Sewing Preparation 2.1 Connection and Switching On Connecting the Machine and Foot Control > Insert the device plug of the power cable into the machine's power cable connection. > Insert the power plug of the power cable into the socket. >... -
Page 15: Positioning The Thread Guide
SEWING PREPARATION Adjusting the Knee Lifter The position and angle of the knee lifter can be optimally adjusted to the individual sitting position. > Insert the knee lifter into the knee lifter connection. > Loosen the fixing screw and adjust the angle by moving the lifter. >... -
Page 16: Spool Pin
SEWING PREPARATION 2.2 Spool Pin Placing the Thread Spool and the Spool Cap Spool discs hold the thread spool in place for proper release of thread from the spool. > Place the thread spool on the spool pin. > Position the appropriate spool cap on the spool pin so that there is no space between the spool cap and the thread spool. -
Page 17: Needle
SEWING PREPARATION > Push the slide-on table from left to right over the machine bed. > Rotate the adjustable feet to adjust the height of the slide-on table. > To remove the slide-on table, pull the slide-on table over the machine bed to the left. 2.4 Needle Needle Stop Up/Down (Permanent) >... -
Page 18: Presser Foot
SEWING PREPARATION > Pull the needle down to remove. > Hold the new needle with the flat side to the right and insert it as far up as it will go into the needle holder. > Tighten the fixing screw. 2.5 Presser Foot Raising/Lowering the Presser Foot >... -
Page 19: Threading
SEWING PREPARATION > Fit the new presser foot and tighten the fixing screw. 2.6 Threading Winding the Bobbin Thread Stopper Thread Guide Bobbin Winder Unit Thread Guide Wires Bobbin Winder Pretension Spool Pin > To prevent slippery threads from catching or breaking, pull the spool net over the spool. >... -
Page 20: Threading The Bobbin Thread
SEWING PREPARATION > To stop the winding process, press the button «Bobbin Winder» after a few rotations again. > Cut the end of the thread just above the bobbin. > To start the winding process, push the button «Bobbin Winder». >... -
Page 21: Bringing Up The Bobbin Thread
SEWING PREPARATION > Pass the thread further beneath the spring through the opening. > Pull the thread to ensure that the bobbin is wound clockwise. Needle Breakage Caused by Unevenly Wound Bobbins NOTICE Unevenly wound bobbins can lead to incorrect thread tension or cause needles to break. >... -
Page 22: Threading The Upper Thread
SEWING PREPARATION > Pull both threads approx. 4 in (10 cm) to the back and place them under the presser foot. Threading the Upper Thread > Switch the machine off. > Raise the needle. > Raise the presser foot. > Place the thread spool on the spool pin so that the thread unwinds clockwise. >... - Page 23 SEWING PREPARATION > For regular threads: Hold the thread with both hands and insert it into the guide (1) from below. Feed the thread from right to left through the thread take-up lever (2). Feed the thread through the guide (1) from above. >...
-
Page 24: Sewing Settings
SEWING PREPARATION > Press the threading lever of the needle threader down as far as possible and turn it backwards. – The wire hook runs through the eye of the needle from the right to the left. > Place the thread around the thread guide of the needle threader from the front to the back. >... -
Page 25: Adjusting The Upper Thread Tension
SEWING PREPARATION > Hold the end of the thread and let the bobbin case drop down once abruptly. – If the thread runs continuously out of the bobbin case, the bobbin thread tension is too low. – If the thread does not run out of the bobbin case, the bobbin thread tension is too high. >... - Page 26 SEWING PREPARATION > If the upper thread is visible on the wrong side of the fabric, adjust the upper thread tension to a higher value using the adjusting wheel. Adjusting the Upper Thread Tension in the Thread Guide (Thicker Threads) Additionally, the upper thread tension can be altered by moving the adjustment plate.
-
Page 27: Regulating The Speed
SEWING PREPARATION Thread Tensions Discs Screw Head Thread Pretension Dial > To reduce the upper thread tension, turn the adjusting wheel counterclockwise. > To increase the upper thread tension, turn the adjusting wheel clockwise. Regulating the Speed Regulating the Speed with the Speed Control The maximum possible sewing speed is infinitely variable via the speed control. -
Page 28: Setting The Stitch Length
SEWING PREPARATION Setting the Stitch Length The stitch length can be set from 0 – 6 mm by turning the adjustment dial «Stitch Length». > Turn the adjustment dial «Stitch Length» (1) until the desired stitch length is shown on the stitch length display (2). Setting the Presser Foot Pressure The presser foot pressure can be set via the adjusting dial «Presser Foot Pressure». -
Page 29: Sewing
SEWING Sewing 3.1 Quick reverse Sewing in reverse is used at the beginning and end of the seam to secure the seam. > Press the lever «Quick Reverse» and keep it pressed. > Press the foot control. – The machine sews in reverse until the lever «Quick Reverse» is released. 3.2 Sewing thick Areas using the Height Compensation Tool The height compensation tool (optional accessory) is a useful aid when sewing over thick areas. -
Page 30: Sewing In A Zipper
SEWING 3.5 Sewing in a Zipper As the fabric feed can be difficult when starting to sew, it is recommended to hold the threads firmly or to pull the fabric slightly to the back for a few stitches or to sew 0.5 - 1 inch (1 – 2 cm) reverse first. >... -
Page 31: Stitching Narrow Edges
SEWING > Baste the zipper on the garment. To do this, place a thick piece of paper between the zipper and the fabric. > Remove the center basting thread and open the zipper. > Sew the right and left sides of the zipper to the ends of the zipper opening. 3.7 Stitching narrow edges >... -
Page 32: Wide Edgestitching
SEWING > Tighten the screw. 3.9 Wide Edgestitching > Fit the seam guide and adjust the desired distance to the needle. > Set the required stitch length. > Guide the fabric edge along the seam guide. 3.10 Sewing hem edges >... -
Page 33: Sewing Basting Stitches
SEWING > Continue sewing slowly while slightly folding the cut edge of the fabric in front of the hemmer foot and holding it to the left. Guide the edge of the fabric evenly into the spiral guide on the hemmer foot and sew. -
Page 34: Quilting
QUILTING Quilting 4.1 Free-motion Quilting The quilting stitch plate (optional accessory) and the free-motion quilting foot (optional accessory) are used for quilting work. It is recommended to use the slide-on table. With free motion quilting, it is of advantage to quilt from the center outwards and to guide the fabric using smooth, round movements to form the design of your choice. - Page 35 QUILTING > Press the seam allowances open. 2024-06 EN 5020105.00A.04...
-
Page 36: Maintenance And Cleaning
MAINTENANCE AND CLEANING Maintenance and Cleaning 5.1 Cleaning the Feed Dog and the Hook Remaining threads under the stitch plate must occasionally be removed. Electronically Driven Components CAUTION Risk of injury near the needle and the hook. > Switch the machine off and disconnect it from the power supply. >... -
Page 37: Lubricating The Machine
By oiling the hook, the occurrence of unwanted noises in the hook area can be avoided. Only use the supplied sewing machine oil «M0-70» or alternatively the sewing machine oil «OP-8J» or «Klüber OY 100» for this sewing machine. bernette recommends oiling the hook at the following occasions: • Prior to the machine's first use •... -
Page 38: Troubleshooting
Incorrect needle point. > Match the needle point to the texture of the material. Lighting Defective. > Contact your bernette dealer. Light on the button "Bobbin Winder" does not light up Light on the button "Needle Lighting Defective. - Page 39 The hook tip or the stitch hole in > Replace the stitch plate. the stitch plate is damaged. > Contact your bernette dealer. Lower Thread Breaks The bobbin is not inserted > Remove and reinsert the bobbin and pull on the correctly.
- Page 40 > Connect the machine or plug in the power cable. (see the power supply. page 14) The machine is defective. > Contact the specialized bernette dealer. Unfavorable room temperature. > Place the machine in a warm room one hour before use.
-
Page 41: Technical Data
TECHNICAL DATA Technical Data Term Value Unit Maximum Speed 1600 Stitches per Minute Measurements (W × H × D) 498 × 338 × 228 (19.6 × 13.3 × 9.0) (in) Weight 14.6 (32.2) (lb) Input Voltage Energy Consumption Sound Pressure Level <... - Page 42 2024-06 EN 5020105.00A.04 © BERNINA International AG Steckborn CH, www.bernina.com www.bernette.com/b08...
Need help?
Do you have a question about the Straight Stitch B08 and is the answer not in the manual?
Questions and answers
does this machine have Extra high presser foot lift?
Yes, the Bernette Straight Stitch B08 machine has an extra high presser foot lift, as it can be temporarily raised using the Free Hand System with the knee lifter.
This answer is automatically generated