Table of Contents
Advertisement
Quick Links
Advertisement
Table of Contents

Related Manuals for Harman Kardon TRAFFIC PRO-R


Summary of Contents for Harman Kardon TRAFFIC PRO-R
- Page 1 Navigation System Operation guide...
- Page 2 It is possible that you may re- must not be used as an orientation aid at times of Use of the navigation unit is only advised if the ceive inaccurate or incorrect instructions due to poor visibility.
-
Page 3: Table Of Contents
5.8. Traffic Program (TP) ....33 4.14. P.O.I....... . 23 4.5.2. - Page 4 9.1. Requesting /Quitting the Service Menu ..44 6. CD mode ......36 9.2.
-
Page 5: Keyboard Overview
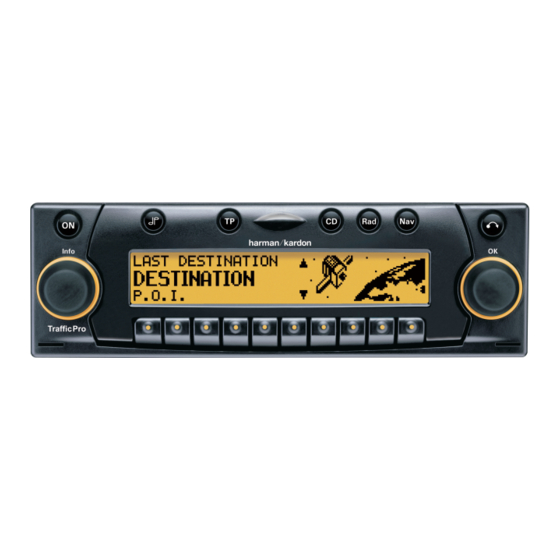
1. Keyboard Overview Left control knob (Info) Select navigation mode ( On / off switch ( CD eject key ( Tone key ( Right control knob (OK) Traffic program key ( Multifunction keys Select CD mode ( Display Select radio mode (... -
Page 6: Anti-Theft Device
2. Anti-theft device 2.2. Removing the detachable faceplate Note It is essential that the CODE CARD be kept in a safe place outside the vehicle. This will prevent unautho- As an effective anti-theft device, the detachable face- 2.1. Entering the Code Number rized use. -
Page 7: Inserting Portable Panel
2.3. Inserting portable panel Insert the detachable faceplate into the lower left catch and then engage it in the lower right catch. Then fold up the detachable faceplate and engage it in the upper catches. -
Page 8: General Operation
(Subwoofer) and Additional options for switching on / off: Ignition. (Loudness). To turn the unit on through the ignition key, the unit must have been switched off via the ignition. After Set the desired treble level using the right control... -
Page 9: Setting The Balance
Linear setting Use the multifunction key to select loudness On ) or loudness Off ( Briefly press For wave bands AM and SW, Loudness is turned off. Setting the subwoofer level Press followed by the multifunction key Press multifunction key briefly- will appear. -
Page 10: Using Navigation
TrafficPro uses a comparison of its sensor system Navigation CD with the data of a digital map and the help of the GPS (Global Positioning System) receiver to determine lo- Your TrafficPro is shipped with two navigation CDs. -
Page 11: General Instructions
21. The distance to the next message and estimated • You can interrupt the current navigation announce- time of arrival are shown on the right side of the ment by pressing the left control knob display. • If you press and hold the left control knob •... -
Page 12: Main Navigation Menu
CD. If calibration of the navigation system is not yet com- 4.5. Entering a Destination pleted, the system will prompt you to take a drive for calibration (see Installation Guide). In the Main Navigation Menu, select... -
Page 13: Entering The Destination
If you switch navigation CDs you will see a display similar to this: Entered letters are displayed inversely. To speed up The name of the town of the last destination entered is selection, the display shows the name of the location displayed. -
Page 14: Entering A Street For The Destination
(e.g. E. Carson St. will be displayed as Entered letters are displayed inversely. To help, the street name most similar to the entry so far is dis- The location name most similar to the entry appears played. Also, the unit offers only letters for your se- in bold type in the location selection list. -
Page 15: Entering The Destination City/Town Center
The street differentiation list appears if the selection Entered letters are displayed inversely. For your help, If there are fewer than 10 centers, the center list is dis- is ambiguous. the system displays the center name most similar to played. -
Page 16: Route Menu
The center name most similar to the entry appears in 4.6. Route Menu stored on the navigation CD. bold type in the center list. • The scroll mark indicates that more centers are avail- Select specifications such as fast route, short route, able in an alphabetically sorted list. -
Page 17: Selecting Intersection For Destination Street
” is often recom- to confirm. mended for larger cities or metropolitan areas. • Any name of your choice consisting of up to 14 char- Provides options for avoiding highways, ferries or acters may be entered for the specified destination toll roads. -
Page 18: Deleting Stored Destinations
If you do not wish to enter a name of your choice, 4.7. Route guidance calculation Deleting stored destinations press and hold the right control knob for more than 2 seconds to store the previously entered destination Select destination memory (see page 23). -
Page 19: Stopover
(see page 23) enables the selection of special desti- 3 . 0 nations as stopovers via If, on your way to your destination you must make a , e.g. gas stations or air- stopover (e.g. find a gas station), this function will al- ports. -
Page 20: Traffic Jam
8 seconds. Press multifunction key Use the right control knob to select your estimate of the length of the traffic jam and press the control to confirm. 3 . 0 The display shows inversely and the unit recal- culates the route. -
Page 21: Notes On Route Guidance
This recommendation prepares you for the next If the route to be traveled is not clear, e.g. at an inter- turn to be taken. You are driving in the wrong direction and should section where a change in direction is not specified, However, "move into the left-hand lane"... -
Page 22: Information During Route Guidance
• "Please leave the roundabout at the third exit on the • "Keep right after 2 Miles." 4.12. Information during route guidance right." 2 . 0 Keeping to the right means that the road will fork This display shows you which exit (marked with and you should follow the indicated direction. -
Page 23: Displaying Route Settings
Press multifunction key Press multifunction key The route settings are displayed. After 8 seconds, the system returns to the route guid- ance display. The current position with street name (if available), degrees of longitude and latitude and the number of Requesting current time satellites received are displayed. -
Page 24: Requesting Road List
Once saved, there is no need to manually enter the menu and press the control to confirm. destination. The current road and the road names up to the desti- nation are displayed. Scroll through the route list by turning the right control knob... - Page 25 (as the crow flies) between the point will be displayed in a list. If there are more than 9 Then select the town from the town selection list of interest and the current location.
-
Page 26: System Settings
, and confirm by and press the control to confirm. pressing the control. A list with points of interest is displayed or, if the • list contains more than 9 entries, you will be The system’s internal clock can be set to the local... -
Page 27: Setting Time
To confirm, you time of arrival, it is necessary to set the GMT time may also mark the small check mark and briefly transmitted from satellites to the current time zone. -
Page 28: Setting The Language
/off ceded by an asterisk ( ). This way you can always recognize which entry in the System Settings menu means language. This may be of use if, e. g. an un- known language was set. Set and confirm in the System Settings menu. -
Page 29: Selecting The Units
Selecting the units Set and confirm in the System Settings menu. Select the units using the right control knob The units are applied by pressing the control. The system returns to the system settings menu. Note: is for calculation in meters and kilometers. -
Page 30: Radio Mode
In radio menu mode, press 99.9 The radio menu mode is activated and displayed. The unit switches back to radio mode if no key is pressed within the next 8 seconds. Set the desired station by pressing the key directly be- low the station designation. -
Page 31: Station Search Fm - Das
Only the currently available PTYs may be selected. Scan search identified by a star (i.e. The first time the unit is operated, or when power sup- If a PTY is selected in mode, only the sta- On the desired waveband (... -
Page 32: Switching Pty Display On / Off
Recall: Momentarily press multifunction key . The stored station is recalled. Autostore on .m Am Recalling/Storing AM station To store: Up to 12 stations can be stored on the sta- Use multifunction key to select either Press multifunction key repeatedly until tion keys. -
Page 33: Manual Am Tuning
If several regional programs are transmitted by one In the AM waveband, press Select radio menu mode. station, this can only be realized when the station is selected. Stations with additional regional programs are indi- cated with a star (i.e. -
Page 34: Switching Radio Text Display On / Off
TP-transmitter. If the selected FM station has Unfavorable reception conditions, including interfer- poor signal quality or cannot function as a TP trans- ence, can garble or even block a radio text display. mitter, the unit applies specified criteria to search for a new TP transmitter. -
Page 35: Setting Automatic Tracking
Quit the TP menu. Interrupting TP announcements Deactivating the TP During a TP announcement, briefly press In all modes and wavebands, TP can be turned on or Note: off by pressing for more than 2 seconds. The dis- If a TP transmitter was already programmed directly,... -
Page 36: Tp Announcement Volume
The telephone characteristics can be set in the user menu (Page 41) if a telephone system is installed in the vehicle and the mute function lead for the car tele- phone is connected to the car radio. is selected, the radio is muted when a call is received. -
Page 37: Cd Mode
Danger of accident matically drawn into the player and the unit begins to • Always touch the CD at the edges only. Keep the play the disc from the first track. Fold the faceplate up to the eyes caused by invisible laser rays when disc clean and never touch the surface. -
Page 38: Skipping To The Next/Previous Track
6.3. Scan search 6.5. Random Play Note When the unit is turned off, the CD will not be eject- ed, but will remain in the CD slot. Press the right control knob , and will appear in Press the multifunction key to activate the ran- the display. -
Page 39: Number Of Tracks And Total Playing Time
12:26 Press the multifunction key to briefly display the number of tracks and the total playing time of the current CD. 6.8. Temperature Protection Circuit A temperature protection circuit in this unit protects the laser diode against overheating. -
Page 40: Cd Changer Mode
. If the unit was last set to CD changer oper- Warning ready for operation when loaded with a CD magazine ation or if there is no CD (or navigation CD) in the CD containing CDs. Close the sliding door after loading. drive, the CD changer menu is now active. -
Page 41: Naming A Cd
To delete an existing name, press Use the right control knob , to select the name to be In order to switch the filter function on or off, repeat- deleted. edly press the multifunction button ; The filter function is switched on (... -
Page 42: User Menu
8.1. Requesting/quitting user menu matically adjusts the car radio volume to the vehicle unit, the call can be heard through the car audio sys- speed. This compensates for the driving noise pro- tem. Thus, there is no need for the usually required duced at higher speeds. -
Page 43: Flashing Diode (Led) Setting
Flashing diode (LED) setting source volume is then changed, the navigation an- nouncement volume is adjusted accordingly. The flashing of the LED (flashes when unit is off) can • - The current audio source and the be turned on or off using this function. -
Page 44: Aux Input (Aux)
AUX input (Aux) Compass display Signal tone volume This can be used to switch on the CD changer AF con- If route guidance is not active, it is possible to display The volume of signal tones (e.g. storage confirma- nections if no CD changer is connected. An external a compass on the right side of the display. -
Page 45: Service Menu
Menu If a malfunction of the unit should occur that renders the unit inoperable or if the unit is defective in any The following information can be called up in the Ser- other way, trigger a restart of the internal unit soft- vice menu. -
Page 46: General Instructions
Talk On level only identified RBDS sta- Classical RBDS SYSTEM tions can be saved. The unit constantly switches to the Rock best receivable transmission frequency for the station. R&B This car radio is capable of receiving RBDS signals During the search for... -
Page 47: Technical Data
8 cm CDs with adapter are not recommended. Loudspeaker impedance: min. 4 Line out: 4 x analog Line Out (Va max 3Veff at 10 k GAL: Speed dependent volume control; the adjustment is performed in 8 to 19 steps of 1.25 dB, dependent on current setting. -
Page 48: Notice
In conformance with current EC/US guidelines, any person may operate this radio receiver. This unit conforms to the current valid EC/US or harmonized national regulations. This designation is your guarantee that the unit conforms to the applicable specifications concerning electromagnetic compatibility. Interference caused by your unit affecting other electrical/electronic devices, as well as interfering influences on your unit from other electrical/ electronic devices are largely prevented.
Need help?
Do you have a question about the TRAFFIC PRO-R and is the answer not in the manual?
Questions and answers