TRENDnet TEW-AI75OB - 11a/g 7/5dBi Indoor Omni Directional Antenna User Manual
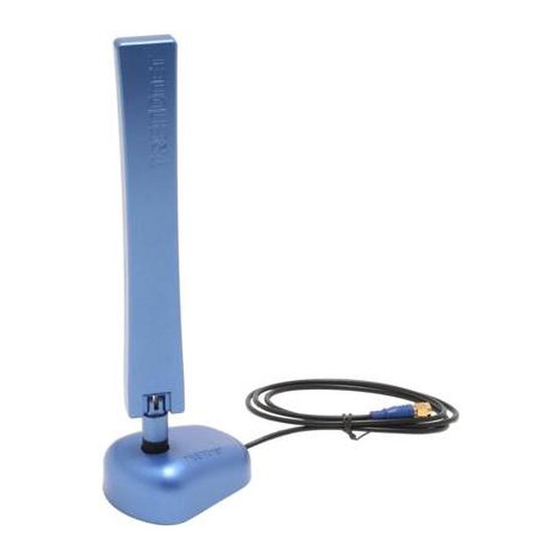
Omni directional indoor antenna
Hide thumbs
Also See for TEW-AI75OB - 11a/g 7/5dBi Indoor Omni Directional Antenna:
- Lühike paigaldusjuhend (11 pages) ,
- Specifications (2 pages) ,
- Quick installation manual (14 pages)
Advertisement
Quick Links
Advertisement

Related Manuals for TRENDnet TEW-AI75OB - 11a/g 7/5dBi Indoor Omni Directional Antenna


Summary of Contents for TRENDnet TEW-AI75OB - 11a/g 7/5dBi Indoor Omni Directional Antenna
- Page 1 User’s Guide TEW-AI75O TEW-AI75OB...
- Page 2 Table of Contents English ..................1. Before You Start .............. 2. Hardware Installation ............Troubleshooting ................ Version:01.04.2006...
-
Page 3: English
Mounting Kit (TEW-AI75OB only) Product details The Omni Directional Indoor Antenna has a reverse SMA female connector that can be connected to your Access point or Wireless Network Adapter. WARNING: The antenna can tilt 0° to 180° and rotate 360° . - Page 4 Wall / partition mount (Antenna base with embedded magnets) For antenna deployment, you can mount the antenna onto a wall using the fasteners and screws included or simply stick to metal surfaces. WARNING: Please do NOT position the antenna in a horizontal direction.
-
Page 5: Hardware Installation
Wireless Access Points / Routers with detachable Antenna(s) PCI adapter or IP Camera Client with detachable Antenna Recommendation: Due to the nature of WiFi devices (receive / transmit), it is recommended that you install external antennas on the base station as well as the client. English... - Page 6 Recommended installation positions This omni directional antenna receives and transmits at 360°. Therefore, the ideal position for the antenna is in the middle of the covered area. Antenna Base Mounting Methods & Configuration PLEASE READ THE FOLLOWING INSTALLATION STEPS BEFORE DRILLING HOLES IN THE WALL.
- Page 7 After drilling holes in the drywall / gypsum/ plasterboard, sink the plastic anchor into the hole (1/8 inch drill bit (3mm)). Leave about 3 to 5mm (1/8 inch) of the threaded screw exposed as depicted in the diagrams below. English...
- Page 8 Ceiling Mount Using Ceiling Clips or Magnets The special ceiling mount feature is mainly recommended for use when your wireless base station is hidden over the ceiling or some kind of anti-theft protection case is implemented. How to assemble the antenna stand for use with ceiling systems.
-
Page 9: Troubleshooting
If you have any questions regarding the TEW-AI75O/TEW-AI75OB, please contact TRENDnet Technical Support Department. Certifications This equipment has been tested and found to comply with FCC and CE Rules. Operation is subject to the following two conditions: (1) This device may not cause harmful interference. - Page 10 TEW-AI75O/TEW-AI75OB - 3 Years Warranty If a product does not operate as warranted above during the applicable warranty period, TRENDnet shall, at its option and expense, repair the defective product or part, deliver to...
- Page 11 OPTION, REPAIR OR REPLACEMENT. THE FOREGOING WARRANTIES AND REMEDIES ARE EXCLUSIVE AND ARE IN LIEU OF ALL OTHER WARRANTIES, EXPRESSED OR IMPLIED, EITHER IN FACT OR BY OPERATION OF LAW, STATUTORY OR OTHERWISE, INCLUDING WARRANTIES OF MERCHANTABILITY AND FITNESS FOR A PARTICULAR PURPOSE.
- Page 12 Tech Support Hours 8:00am - 6:00pm Middle European Time Monday - Friday Product Warranty Registration Please take a moment to register your product online. Go to TRENDnet’s website at http://www.trendnet.com 3135 Kashiwa Street Torrance, CA 90505 Copyright ©2006. All Rights Reserved. TRENDnet.
Need help?
Do you have a question about the TEW-AI75OB - 11a/g 7/5dBi Indoor Omni Directional Antenna and is the answer not in the manual?
Questions and answers