Table of Contents
Advertisement
Quick Links
Advertisement
Table of Contents

Related Manuals for Datavideo PTC-305NDI


Summary of Contents for Datavideo PTC-305NDI
- Page 1 4K TRACKING PTZ CAMERA PTC-305NDI...
-
Page 2: Table Of Contents
Table of Contents FCC COMPLIANCE STATEMENT ..............5 WARNINGS AND PRECAUTIONS ..............5 WARRANTY ....................6 ..................6 TANDARD ARRANTY ..................7 HREE ARRANTY DISPOSAL ...................... 7 PRODUCT OVERVIEW ................9 ......................9 EATURES LOCATION AND FUNCTION OF PARTS ..........10 ...................... - Page 3 Zoom ......................43 Pan and Tilt ..................... 44 Speed ....................... 44 AT ......................44 Home ....................... 44 Presets ..................... 44 ....................45 AMERA ETUP Basic Image Settings (Page 1) ..............45 Exposure (Page 1) ..................45 White Balance (Page 1) ................47 Advanced Image Settings (Page 2) ............
- Page 4 Disclaimer of Product and Services The information offered in this instruction manual is intended as a guide only. At all times, Datavideo Technologies will try to give correct, complete and suitable information. However, Datavideo Technologies cannot exclude that some information in this manual, from time to time, may not be correct or may be incomplete.
-
Page 5: Fcc Compliance Statement
7. This product should only be operated from the type of power source indicated on the marking label of the AC adapter. If you are not sure of the type of power available, consult your Datavideo dealer or your local power company. -
Page 6: Warranty
Warranty Standard Warranty Datavideo equipment are guaranteed against any manufacturing defects for one year from the date of purchase. The original purchase invoice or other documentary evidence should be supplied at the time of any request for repair under warranty. -
Page 7: Three Year Warranty
Camera module, PCIe Card are covered for 1 year. The three-year warranty must be registered on Datavideo's official website or with your local Datavideo office or one of its authorized distributors within 30 days of purchase. Disposal For EU Customers only - WEEE Marking... - Page 8 collection point for the recycling of waste electrical and electronic equipment. The separate collection and recycling of your waste equipment at the time of disposal will help to conserve natural resources and ensure that it is recycled in a manner that protects human health and the environment. For more information about where you can drop off your waste equipment for recycling, please contact your local city office, your household waste disposal service or the shop where you purchased the product.
-
Page 9: Product Overview
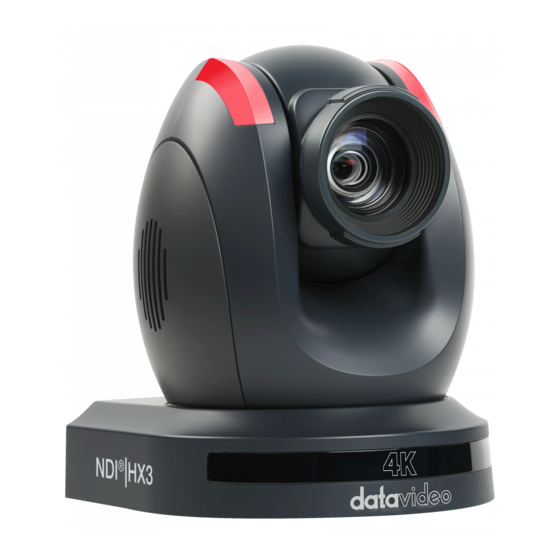
1. Product Overview The PTC-305NDI incorporates a 1/1.8" CMOS sensor, enabling superior 2160p50/60 UHD video output. It boasts a 20x optical zoom, complemented by a 16x digital zoom and offers multiple output interfaces like 3G-SDI, HDMI, IP streaming, and NDI. Elevate your remote video production effortlessly with the PTC-305NDI —... -
Page 10: Location And Function Of Parts
2. Location and Function of Parts Front Lens Built-in 1/1.8” 8.51M Pixel CMOS 4K color camera with white balance control, backlight compensation, automatic gain, etc. Tally LED Tally lamp will be turned ON upon receiving the ON signal. Sensor for Remote Control Remote control IR receiver... -
Page 11: Rear
Rear USB Port Insert a USB drive containing the latest firmware file and use the OSD menu to start the firmware upgrade process. Note: See Firmware Update section for details. Power Input DC in socket connects the supplied 12V PSU. The connection can be secured by screwing the outer fastening ring of the DC In plug to the socket. - Page 12 In addition to NDI, this port can also be used as the DVIP interface which is a protocol designed by Datavideo to allow the user to access the camera’s Web UI by simply connecting a PC to the...
-
Page 13: Bottom
Bottom Tripod Screw Hole allows the user to mount the camera on the tripod. Screw Hole Screw holes for ceiling bracket mounting. For Safety Rope Ties safety ropes for securing the camera to the ceiling. - Page 14 DIP Switch The DIP Switch allows the user to set the camera’s VISCA ID, select the video resolution, and configure how the video format (or resolution) can be selected. See the following table for corresponding settings: DIP SW 1/2/3 VISCA ID (1,2,3) = (ON,OFF,OFF) VISCA-ID 1 (1,2,3) = (OFF,ON ,OFF)
-
Page 15: Installation Instructions
3. Installation Instructions Note: Only mount the bracket on formwork or concrete surface. Do NOT mount the bracket on plasterboard. Step 1 – DIP Switch Setting Enable Flip-H and Flip-V. Step 2 – One End of Retaining Wire Attach the retaining wire to the junction box mounted on the ceiling by screwing one end of the retaining wire into a screw hole in the junction box with a screw (not supplied) as shown in the diagram below. - Page 16 Step 4 – Ceiling Bracket (A) and Camera Screw ceiling bracket (A) into the bottom of the camera using three screws. Position the screws as shown in the diagram below. Align the screw holes on the bottom of the camera with those in the ceiling bracket.
- Page 18 Step 5 – Mount Camera to Ceiling...
- Page 19 Step 6 – Screw to Secure Camera Secure the camera by screwing three screws into the corresponding screw holes as shown in the diagram below. Step 7 – Cable Connection Connect the cables to the connectors located on the rear of the camera.
-
Page 20: Network Connection
4. Network Connection The Ethernet port on the back panel of your PTC-305NDI allows you to connect a PC/laptop to the camera with a static or dynamic IP address. To access and modify these network settings, you will need to log in to the camera’s web interface. - Page 21 Open a web browser and in the address bar, enter the camera’s IP address then press the ENTER key which should take you to the login page of the web interface. The default login credentials are: User Name: admin ...
-
Page 22: Static Ip
Static IP A static IP address is a fixed address manually assigned to PTC-305NDI. First disable DHCP mode then enter an IP address for the camera, as well as the subnet mask and the gateway IP. Note: Never assign an address that ends in .0 or .255 as these addresses are typically reserved for network protocols. - Page 23 iOS: https://itunes.apple.com/tw/app/dvip-network- config/id1177895983?mt=8 After you’ve installed the DVIP Network Configuration Tool, follow the steps outlined below to scan for online DVIP devices and configure their corresponding settings. Step 1: Open the DVIP Network Configuration Tool then select your PC or laptop’s network interface card from the drop-down menu in the pop-up window as shown in the diagram below.
- Page 24 Step 3: Click one of the connected cameras to show the device information and its network settings in the pop-up window shown in the diagram below. Step 4: You are allowed to change the device name in the Host Name field and modify the device’s network settings accordingly.
-
Page 25: Basic Setup
5. Basic Setup Power-On Initialization As shown in the diagram below, after you plug in the power cord, the tally light in the front, depending on your tally setting, will start flashing red, green or a mix of both and will be OFF as soon as the power-on initialization is complete. - Page 26 Connect the PTC-305NDI camera directly to your PC/Notebook PC 1. While still connected to the PTC-305NDI via a router in DHCP mode, open the camera’s web UI on the PC/Notebook then the network page. 2. Disable DHCP then enter a static address in the IP Address textbox.
- Page 27 7. Once logged in, you should be able to see a preview window on which the video is shown. NDI Studio Monitor In addition to the PTC-305NDI’s web UI, the NDI Studio Monitor is another alternative to view the camera video. Before connecting to the PTC-305NDI, the NDI Studio Monitor must be installed on your PC/Notebook.
- Page 28 Click the menu icon located at the top left corner of the interface to open a pop-up menu. You can also right click anywhere on the interface to open the menu. Click the PTC-305NDI camera detected by the NDI Studio Monitor to view the camera video.
- Page 29 To enable the virtual PTZ joystick on the interface, right click on the interface, then follow the menu path Settings->PTZ Settings->Show PTZ Controls. In addition to panning and tilting the camera, you can also enable auto focus, adjust the zoom, and save and recall presets.
-
Page 30: Hdmi Video Out
Note: If you have encountered problems when installing or using the NDI Studio Monitor, please visit NewTek’s official NDI website https://www.ndi.tv/ or contact NewTek’s Technical Support Team. HDMI Video OUT Connect the 4K HDMI OUT to an external monitor using an HDMI cable. 3G-SDI Video Output Connect the 3G-SDI OUT to an external monitor using an SDI cable. -
Page 31: Ir Remote Control And On-Screen Menu
6. IR Remote Control and On-Screen Menu Chapter 6 provides an overview of remote control functions and the OSD menu. IR Remote Control... - Page 32 Function Keys Descriptions Power Button Press to switch between Standby and Operation modes. Note: The power consumption in Standby Mode is approximately half of the power consumption in Operation Mode. Camera Select Keys 1-4 In a multi-camera environment, use the camera select keys (CAM1 –...
- Page 33 Function Keys Descriptions Focus Button Auto focus will be disabled as the Focus button (either F or N) is pressed. Press F to focus on a far object and N to focus on a near object. Note: You can also adjust the focus using the web UI.
- Page 34 Function Keys Descriptions AF Button Press to enable Auto Focus. Back Button Press to return the camera head to its default position. When the OSD menu is opened, press to return to the previous item on the menu. MENU Button Press the “MENU”...
-
Page 35: Osd Menu
OSD Menu On-Screen Menu allows the user to modify various camera settings. Press [MENU] on the remote control to open the on-screen menu as shown below. OSD Menu Exposure Color Image P/T/Z Tracking Config Setup Communication Setup Information Restore Default 【Home】Enter 【Menu】Exit... - Page 36 The table below summarizes the main option items and their sub-options. Main Options Tracking Communication Exposure Color Image P/T/Z Setup Information Restore Default Config Setup Mode WB Mode Luminance SpeedByZoom Tracking Language Protocol Restore? ExpComp HDMI RGB RG Tuning Contrast AF-Zone Tracking Area V_Address...
- Page 37 Details of all options in the on-screen menu are listed in the table below. Main Menu Sub Menu Options Descriptions Auto Manual Mode Exposure Bright Exposure ExpCompMode Compensation Mode; Exposure Backlight Backlight Compensation Mode; Exposure Gain Limit 0 – 22; Step Size: 1 Exposure Advanced Image Anti-Flicker...
- Page 38 Main Menu Sub Menu Options Descriptions 1/2000 1/2000 1/3000 1/3000 1/4000 1/4000 1/6000 1/6000 1/10000 1/10000 Accessible when exposure mode is set Gain 0 – 22; Step Size: 1 to manual; See Exposure Accessible when exposure mode is set Bright 0 –...
- Page 39 Main Menu Sub Menu Options Descriptions Settings. 1 – 8; Step Size: 1 Default Norm Style Bright Pan and tilt speed as a function of zoom once enabled. The PTZ SpeedByZoom speed should increase and decrease gradually in a linear fashion.
- Page 40 Main Menu Sub Menu Options Descriptions Full Figure SIze Figure Size Half-Body Auto-Tracking Close Up Traditional Chinese Language OSD menu language Simplified Chinese Note: DVI Mode is HDMI HDMI RGB NOT available for Mode 4K50/59/60 1080P25 720P50 1080P60 1080P50 1080I60 These are the 1080I50 available camera...
- Page 41 Main Menu Sub Menu Options Descriptions Date Firmware information Information Format Model Model number GateWay Network information NetMask Restore Default Restore? Yes/No Factory reset...
-
Page 42: Web User Interface
7. Web User Interface The web based user interface allows you to set and control your PTC-305NDI devices. On any browser, enter the camera’s IP address then hit the Enter key, after which you should be taken to the login page. The default login credentials are admin/admin. -
Page 43: Focus
A preview window is positioned in the left half of the panel, allowing you to view the live camera video. Elapsed time is shown in the bottom left corner of the window. At the bottom right corner, click to enable sound. Use the sound slider that appears to adjust the volume accordingly. -
Page 44: Pan And Tilt
Pan and Tilt Use the up/down arrows to tilt the camera head up and down and the left/right arrows to pan the camera head left and right. You can simply hover the mouse cursor over these arrow buttons. Speed Click the Fast/Slow buttons to increase/decrease the pan, tilt and zoom speed. -
Page 45: Camera Setup
Camera Setup In Camera Setup, you will be able to find various settings for the camera video. These options will be described in detail in this section. Basic Image Settings (Page 1) Contrast Adjust image contrast from 0 – 14. Brightness Adjust image brightness from 0 –... - Page 46 ExpCompMode √ Backlight √ Meter √ √ √ √ √ √ √ √ √ Bright √ Iris √ √ √ Gain √ Gain Limit Setting the gain limit allows you to cap the maximum gain to a value in the range of 1 –...
-
Page 47: White Balance
Smart: Measures light on each area after dividing the total scene area into multiple areas and determines the proper exposure of the entire scene. Top: Measures the top area. DRC sets the amount of Dynamic Range Compression where higher values lead to more compression (1 –... -
Page 48: Advanced Image Settings
RGTuning This fine tunes red gain from -10 to 10. Accessible when White Balance is set to Auto, OnePush and VAR. BGTuning This fine tunes blue gain from -10 to 10. Accessible when White Balance is set to Auto, OnePush and VAR. RGain RGain sets intensity of red color from 0 to 225. -
Page 49: Video Output
Mirror The mirror function (Flip-H) flips the camera video image horizontally, and the flip function (Flip-V) does it otherwise. You can turn either or both of them on. Select the right combination from the drop-down menu. Mirror Off/Flip Off Mirror On/Flip Off Mirror Off/Flip On Mirror On/Flip On Anti-Flicker... -
Page 50: Stream
Stream In this section, we will first show you all common streaming setup options then the settings specific to the respective streaming protocols. Encoding Format First select either the H.264 or H.265 video codec after you’ve turned on the streaming server (main or sub). If you’re working with high-resolution video formats such as 4K and 8K, H.265 is the better choice due to its improved compression efficiency. - Page 51 if you’re streaming video over a limited bandwidth connection, H.264 may be the better option. Protocol Each streaming server offers the user multiple stream types. There are RTP Multicast, RTSP, RTMP(S), SRT, NDI and Onvif. Please note that when streaming, the server converts video into data, which are sent across an IP network.
-
Page 52: Rtp Multicast
Bitrate Enter the desired video bitrate for your video stream. The recommended video bitrates to use are listed as follows: 4,500 to 6,000 kbps for full HD videos with a high frame rate (1080p, 60fps) 3,500 to 5,000 kbps for full HD videos with a standard frame rate (1080p, 30fps) ... - Page 53 It is recommended to use VLC media player to view an RTP live stream. Open VLC on your PC, then click “Media” “Open Network Stream”. On the window that opens, enter rtp://224.1.2.3:6688 as shown in the diagram below then click Play to start viewing.
-
Page 54: Rtsp
RTSP RTSP (Real-Time Streaming Protocol) is a network protocol designed to transfer video over a network or to the internet with an easy-to-use link. The default RTSP port number is 554. The alternate port number is 8551. When RTSP Auth is enabled, only authorized users have access to the footage captured by the camera. -
Page 55: Rtmp(S)
It is recommended to use VLC media player to view an RTSP live stream. Open VLC on your PC, then click “Media” “Open Network Stream”. On the window that opens, enter rtsp://IP address:554/channel number as shown in the diagram below then click Play to start viewing. RTMP(S) Real-Time Messaging Protocol (RTMP) is a communication protocol for streaming audio, video and data over the Internet. - Page 56 After RTMP(S) is enabled, you will see the following options: Audio and Video Switch: In the drop-down menu, you can either turn both audio and video on/off or either one on/off. MRL: In the textbox, enter the RTMP link (Server URL/Stream Name) to which your video will be published.
- Page 57 Please note that you can also link to Facebook Live from your Facebook Personal Page or Facebook Fan Page by clicking “Live Video” as depicted on the right. 2. Select “Go live”. 3. Select “Streaming software” where you will be able to find the server URL and the stream key.
- Page 58 4. Go back to the camera’s web UI and as depicted in the diagram on the right, Enter “Server URL/Stream key” in the MRL textbox. In this example, we use the link retrieved at step 3, which is rtmps://live-api- s.facebook.com:443/rtmp/FB- 370758482040289-0- AbwT_NpvFKtprYPK.
- Page 59 5. Click the Apply button to activate the RTMP video stream. Make sure both audio and video are enabled. The RTMP video stream is successfully activated when you see “Data Update Successful” appear at the bottom of the UI. At the top right corner of the web UI, you should see that the main stream channel is now switched to RTMP(S) mode.
- Page 60 6. As shown in the diagram below, you can also preview the live camera video on Facebook Live. 7. Before you activate the live stream on Facebook, on the left pane of Facebook Live, choose where and when you want to post your live video as well as the audience.
- Page 61 8. To end the live stream, simply click “End Live Video”. Youtube 1. Open the Youtube Live Control Room by clicking the link below: https://www.youtube.com/live_dashboard Alternatively, log in to your Youtube account, locate and click the camera icon at the top right corner, then select “Go live”.
- Page 62 2. If this is your first time using Youtube Live Control Room, select “Right Now” on the pop-up prompt. 3. Select Streaming Software. 4. You will be able to find the server URL and the stream key in Stream settings pane of the Youtube Live Control Room. If you’d like, you can also click Edit to modify the stream information such as title and descriptions.
- Page 63 5. Enter “Server URL/Stream key” which is rtmp://a.rtmp.youtube.com/li ve2/8pbj-egmr-vjfg-acug-6vsc in this example in the MRL textbox as depicted in the diagram on the right.
-
Page 64: Srt
6. Click the Apply button to activate the RTMP video stream. Make sure both audio and video are enabled. The RTMP video stream is successfully activated when you see “Data Update Successful” appear at the bottom of the UI. At the top right corner of the web UI, you should see that the main stream channel is now switched to RTMP(S) mode. - Page 65 PTC-305NDI set to the Listener Mode Open the web UI of the PTC-305NDI then the Stream page. Select SRT from the Protocols pull-down menu then set SRT mode to Listener. Use the default SRT port (9000).
- Page 66 On the Input Select window, click “Stream/SRT” then select “SRT Caller” from the “Stream Type” drop-down menu. After that, enter the following into the respective fields. Hostname: 192.168.1.198 (The IP address of your connected device. In this case, it is the PTC-305NDI) Port: 9000...
- Page 67 Passphrase: 1234567890 (The password set previously on the PTC- 305NDI’s Web UI) Key length: 32 Click the “OK” button.
- Page 68 The camera video is now successfully streamed to the vMix via SRT. PTC-305NDI set to the Caller Mode Open the web UI of the PTC-305NDI then the Stream page. Select SRT from the Protocols pull-down menu then set SRT mode to Caller. Enter the IP address of the PC/laptop on which the vMIX is installed.
- Page 69 Click “Add Input” then “More”. On the Input Select window, click “Stream/SRT” then select “SRT Listener” from the “Stream Type” drop-down menu. After that, enter the following into the respective fields. Port: 9000 Passphrase: 1234567890 (Password for Stream Encryption) ...
-
Page 70: Ndi
The camera video is now successfully streamed to the vMix via SRT. NDI is a network protocol that enables real-time bi-directional delivery of audio and video over standard networks. NDI Preset The NDI Preset pull-down menu allows you to select a compression option. The options are listed as follows:... - Page 71 Simply enter the IP address of the NDI discovery server in the textbox. Enable NDI Multicast Service Set this option to ON if you would like the PTC-305NDI to subscribe to a multicast group. Note: You must have a properly configured multicast enabled network in order to use the NDI Multicast features.
-
Page 72: Onvif
Note: All ONVIF-enabled devices need to be connected to the same network. Network The PTC-305NDI uses DHCP to obtain an IP address over an Ethernet-based network by default. You can also configure the device to use a static IP address. In this section, we will show you how. -
Page 73: Ntp Settings
Zone drop-down menu then enter the domain name of your NTP server. The default NTP server is time.google.com. Audio You can connect an audio source to the PTC-305NDI. Configure the MIC IN/LINE IN port on the Audio page. Audio Input Select between Line IN and MIC IN. -
Page 74: Adts Options
ADTS Options Enable for streaming audio over the Internet. System General Camera Name Enter a name for your camera. Language Select a preferred language for the web UI. Tally Mode Enable the tally light by selecting either green or red. You can also select dual color mode (Red/Green). -
Page 75: Account And Password
Auto-Tracking Configure the auto-tracking function on this page. Mode In Presenter mode, the PTC-305NDI will start tracking as soon as a presenter is on the stage or in the camera view and stops when the presenter leaves the stage. Auto Zoom Enable auto zoom so that the camera zooms in/out automatically when the presenter is tracked. - Page 76 Auto Tilt Enable auto tilt so that the camera tilts automatically when the presenter is tracked. Detected Indicator Once enabled, the camera will detect the presenter and automatically pan, tilt and zoom to follow the targeted person. Tracking Start Position This sets the initial tracking position.
-
Page 77: At Speed
Select Subject When there are multiple targets, you can use the right and left arrow keys to switch between them. Click the Confirm button to confirm selection of the target. Placement As shown in the diagram below, you can keep the target to the left, in the center or to the right of the image while the camera tracks it. -
Page 78: Remote Control
RS-422 You can connect your PC or any keyboard controllers to the RS-422 remote port to control your PTC-305NDI. Use an Ethernet cable and make your own cable using the pinout information provided in this section. The RS-422 pinouts are shown below. -
Page 79: Wi-Fi
Wi-Fi PTZ View Assist is an App designed by Datavideo for controlling up to 4 PTC-305NDI cameras using an Android or iOS device. Wirelessly connect your Android or iOS device to a wireless router and make sure the DVIP port of the camera is also connected to the same router. -
Page 80: Firmware Update
Ethernet Port The DVIP port allows you to update the firmware from a remote location. You should connect the PTC-305NDI and your PC to a DHCP server. In the procedure outlined below, we assume you will be connecting in DHCP mode. - Page 81 5. To update the firmware, click the Browse button to search for the latest firmware file saved on the PC’s hard disk. 6. Click the Update button after the file is uploaded.
-
Page 82: Frequently-Asked Questions
10. Frequently-Asked Questions This section describes problems that you may encounter while using PTC- 305NDI. If you have any questions, please refer to related sections and follow all suggested solutions. If problem still exists, please contact your distributor or the service center. Problems Solutions What are important points... - Page 83 3. Make sure the OSD menu is closed as the serial port is disabled if the OSD menu is active. I cannot log in to the Web 1. Check your Ethernet connection. 2. Check your network settings such as IP address.
-
Page 84: Dimensions
11. Dimensions Unit: mm... -
Page 85: Specifications
12. Specifications Camera Parameters Product Name 4K NDI Tracking PTZ Camera HDMI: 2160p60/59.94/50/30/29.97/25 1080p60/59.94/50/30/29.97/25 1080i60/59.94/50 720p60/59.94/50 Video Format *2160p60/59.94/50 YUV 4:2:2 SDI: 1080p 60/59.94/50/30/29.97/25 1080i 60/59.94/50 720p 60/59.94/50 Image Sensor 1/1.8" CMOS Effective Pixels (approx.) 8.42 Mega Pixels S/N Ratio ≥55dB Min. - Page 86 Focus Mode Auto / Manual Pan: 300 degrees, Panning / Tilting Range Tilt: +130 to -15 degrees Pan: 0.876°/s ~ 43°/s Panning / Tilting Speed Tilt: 0.693°/s ~ 21.32°/s Preset 255 Positions 20x, f=6.7 to 125 mm Focal Length F1.58 to F3.95 Field of View (Horizontal, 60°...
- Page 87 3840x2160 1920x1080 1280x720 First Stream Supported 1024x576 Resolution 960x540 640x480 640x360 720x480 Second Stream Supported 640x360 Resolution 480x270 320x240 Video Bitrate 32Kbps ~ 50Mbps (Single Stream) Video Bitrate Mode 50Hz: 1-50fps Encoding Frame rate 60Hz: 1-60fps IEEE 802.3at F/W Update Via Web UI or USB 2.0 IR Control RMC-180 series...
-
Page 88: Service And Support
Service and Support www.datavideo.com/product/PTC-305NDI Apr.10.2024 Ver: E5...
Need help?
Do you have a question about the PTC-305NDI and is the answer not in the manual?
Questions and answers