Table of Contents
Advertisement
Available languages
Available languages
Quick Links
Advertisement
Table of Contents

Related Manuals for PNI CT410 PRO


Summary of Contents for PNI CT410 PRO
- Page 1 PNI CT410 PRO...
- Page 2 Contents English ....Български ..... Deutsch ....Español ....Français ....Magyar ....Italiano ....Nederlands ..... Polski ....... Romana ....
-
Page 3: Special Warnings
Special warnings • Since this thermostat must be connected to a 230V network and to heating equipment, the installation must only be performed by qualified personnel. • Also, we recommend that the initial configuration of the thermostat be performed only by qualified personnel able to implement the technical procedures detailed in this manual. - Page 4 NO (normally open)/NC (normally closed) relay Receiver unit control type without potential (not energized) Max. 250 V, max. 10A Relay operating parameters (resistive), Current AC/DC Set temperature range 5 - 35 C, step 0.5 ° ° Measured temperature range 0 - 50 C, step 0.1 °...
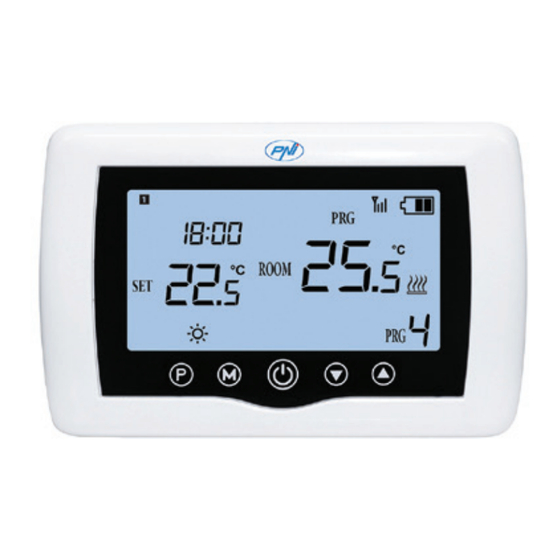
- Page 5 The main unit 18:00 °C °C 15 16 Day of the week 1 (Monday) - 7 Wireless signal indicator (Sunday) Clock Cooling system is On The set temperature Heating system is On Active heating mode The room temperature Active cooling mode Active program number User manual...
-
Page 6: The Receiver Unit
Eco, Manual, Eco mode active Programmed mode selection Heating, Cooling mode Manual mode active selection Programmed mode Thermostat On/Off active Up and Down arrow for Battery indicator setting temperature and parameters The receiver unit User manual... -
Page 7: Override Function
4 - Zone 2, RF pairing with 1 - WiFi pairing and On/Off the central unit no. 2 2 - Zone 1, RF pairing with the 5 - Zone 2, Override function central unit no. 1 3 - Zone 1, Override function Override function Override 1: Long press the Override 1 button on the receiver unit. -
Page 8: Led Blinking
The LEDs LED Blinking Unit on Unit off Blinks rarely: The unit is not connected to The unit is WiFi. connected to Blinks often: The WiFi. unit is in WiFi pairing mode. User manual... -
Page 9: Connection Diagram
The unit is in RF The heat on zone The heat on zone pairing mode. 1 is on. 1 is off. The Override The Override function for zone function for zone 1 is active. 1 is inactive. The unit is in RF The heat on zone The heat on zone pairing mode. - Page 10 1: 230 V AC power supply (permanent) 2 and 3: 230 V power supply for each separate zone controled by pumps, valves, general distribution box. 4: COM-NO - Dry contact - for central heating boiler (with input command compatible with COM - NO non-energized relay) User manual...
- Page 11 Instructions and warnings for the first use Note: The system comes with the three units paired from the factory. During installation, it is only necessary to connect the receiver unit to the wireless router in the house. • Insert 2 AAA alkaline batteries (not included) into the central unit and turn on the unit by pressing the on/off button.
- Page 12 2.4 GHz frequency. New generation routers and phones are also equipped with the 5 GHz wireless network, but the PNI thermostat does not support this frequency. Download the Tuya Smart application from the App Store or...
- Page 13 complete the procedure. The LED on the receiver will stop blinking. At this moment, the wireless internet connection is successful. If the LED continues to blink slowly, the connection failed, repeat the procedure. User manual...
- Page 14 Functions available in the application The following functions are available in the Tuya Smart application: • Display the set temperature and the measured temperature. • Heating/cooling status: the icon appears when the heating system is on and the icon when the cooling system is on.
- Page 15 • Advanced settings: For the two operation modes, Heat and Cold, the following settings are available: Daily program setting (maximum 4 periods), Child protection (Keypad lock), Anti-freeze protection, Open window protection, Temperature calibration, Setting Dead Zone (Hysteresis), Temperature report. User manual...
- Page 16 Temperature control from the thermostat Press the Up and Down keys on the central unit to set the desired temperature. Heating mode: • If the set temperature (SET) is higher than the temperature in the room (ROOM), the central unit will send a command to the receiver unit in a maximum of 90 seconds.
- Page 17 indicating the activation of the internal relay. The icon (the cooling system is on) appears on the screen of the central unit. • If the set temperature (SET) is higher than the temperature in the room (ROOM), the central unit will send a command to the receiver unit in a maximum of 90 seconds.
- Page 18 Note: If the temperature on the screen of the central unit does not update within a maximum of 2 minutes, check again in the application the status of the thermostat (Online or Offline) and the set temperature. Pairing the three units Warning: The three units come paired from the factory.
-
Page 19: Delete Pairing
Immediately press the up arrow button to pair with the receiver unit. After pairing, the LED corresponding to Zone 1 blinks rarely and then turns off. The main interface appears on the screen. The WiFi icon stops blinking. Test the functionality by changing the set temperature (SET) and watch the triggering of the relay in the receiver unit. - Page 20 LED corresponding to the zone (Zone 1 or Zone 2) will blink rarely. In case of loss of the WiFi signal between the receiver unit and the router, the WiFi LED on the receiver unit will blink. Recommendations: • Change the batteries of the central unit if necessary. •...
- Page 21 (Monday) - 7 (Sunday) will flash. Press the Up and Down keys until you reach the desired value. Press the M key to confirm. The screen returns to normal display mode. Open window detection When the open window detection function is activated by the application, the system will automatically stop the heating if a sudden drop in temperature is registered (2°C in 15 minutes by default).
- Page 22 of execution, we recommend. With the screen on, long press the P button (6-7 seconds) to enter the PROGRAM settings. The days of the week are marked from 1 (Monday) to 7 (Sunday). Each day has 4 time periods (1 ~ 4). Each press of the P button leads to the next setting.
-
Page 23: Advanced Settings
Advanced settings Turn off the central unit by pressing the on/off button. With the screen off, press and hold the M and Up buttons simultaneously. Press the M button to navigate through the menu and the Up and Down arrows to change the Options. Press the on/off button to exit the menu. - Page 24 1: On (Long press the M key for Key lock function 5 seconds to unlock the keys) 0: Off Open window detection - OWD OWD - Detection time 2 ~ 30 min. 15 min. OWD - Temperature 2,3,4 ° ° drop (during detection) OWD - Time Delay (return to previous...
-
Page 25: Технически Спецификации
Специални предупреждения • Тъй като този термостат трябва да бъде свързан към мрежа от 230 V и към отоплително оборудване, инсталирането трябва да се извършва само от квалифициран персонал. • Освен това препоръчваме първоначалната конфигурация на термостата да се извършва само от... - Page 26 памет EEPROM NO (нормално отворено) Тип управление на реле без потенциал (без приемника напрежение) Параметри на работа на Макс. 250 V, макс. 10A релето (резистивен), ток AC/DC Задайте температурен 5 - 35 C, стъпка 0.5 ° ° диапазон Измерен температурен 0 - 50 C, стъпка...
- Page 27 Основната единица 18:00 °C °C 15 16 Ден от седмицата Индикатор за безжичен 1 (понеделник) - 7 сигнал (неделя) Охладителната Часовник система е включена Зададената Отоплителната система температура е включена Ръководство...
- Page 28 Активен режим на 13 Стайната температура отопление Активен режим на Номер на активна охлаждане програма Еко, Ръчен, Активен еко режим Програмиран избор на режим Активен ръчен Избор на режим на режим отопление, охлаждане Програмираният 17 Термостат Вкл./Изкл режим е активен Стрелка...
- Page 29 Приемното устройство 4 - Зона 2, RF сдвояване с 1 - WiFi сдвояване и централното устройство включване/изключване №. 2 2 - Зона 1, RF сдвояване с централното устройство 5 - Зона 2, функция Override №. 1 3 - Зона 1, функция Override Функция...
- Page 30 връзката между централното устройство №. 1 и приемното устройство се губи.. Натиснете за кратко бутона Override 1, за да излезете от режим Override. Замяна 2: Натиснете продължително бутона Override на приемника. Съответният светодиод ще светне. Зона 2 ще продължи да се нагрява. Тази функция се използва, когато връзката...
- Page 31 мига Устройството е Устройството е включено изключено Мига рядко: Устройството не е свързано с Устройството е WiFi. свързано към Мига често: WiFi. Устройството е в режим на WiFi сдвояване. Устройството е Топлината Топлината в режим на RF на зона 1 е в...
-
Page 32: Схема На Свързване
Функцията Функцията Override Override за зона 2 е за зона 2 е активна. неактивна. Схема на свързване Предупреждение: Свързването на приемника към електрическа мрежа 230 V и към отоплителна централа се извършва само от квалифициран персонал и само след справка с документацията на термостата и отоплителната централа. - Page 33 1: 230 V AC захранване (постоянно) 2 и 3: захранване 230 V за всяка отделна зона, управлявано от помпи, вентили, обща разпределителна кутия. 4: COM-NO - Сух контакт - за котел за централно отопление (с входна команда, съвместима с COM - NO незахранено реле) Ръководство...
- Page 34 Инструкции и предупреждения за първа употреба Забележка: Системата се доставя с двата модула, сдвоени от фабриката. По време на инсталацията е необходимо само да свържете приемника към безжичния рутер в къщата. • Поставете 2 AAA алкални батерии (не са включени) в...
- Page 35 Предупреждение: Уверете се, че сте свързали телефона към безжичната мрежа на честота 2,4 GHz. Новото поколение рутери и телефони също са оборудвани с 5 GHz безжична мрежа, но PNI термостатът не поддържа тази честота. Изтеглете приложението Tuya Smart от App Store или...
- Page 36 към приложението. В следващия интерфейс изберете опцията „Small Home Appliances“ - „Thermostat (Wi-Fi)“. Изберете WiFi мрежата и добавете паролата за мрежата. Натиснете продължително бутона за сдвояване на приемника, докато WiFi светодиодът започне да мига бързо.. В приложението натиснете „Next“ и потвърдете, че LED индикаторът...
- Page 37 Ръководство...
- Page 38 Функции, налични в приложението Следните функции са налични в приложението Tuya Smart: • Показване на зададената температура и измерената температура. • Състояние на отопление/охлаждане: иконата се появява, когато отоплителната система е включена и иконата когато охладителната система е включена. • Избор...
- Page 39 Контрол на температурата от термостат Натиснете бутоните Нагоре и Надолу на централното устройство, за да зададете желаната температура. Режим на отопление: • Ако зададената температура (SET) е по-висока от температурата в помещението (ROOM), централното Ръководство...
- Page 40 устройство ще изпрати команда до приемника за максимум 90 секунди. Светодиодът „Светодиодът на зоната“ на приемника ще светне и ще се чуе щракване, показващо активирането на вътрешното реле. Иконата (отоплителната система е включена) се появява на екрана на централното устройство. •...
- Page 41 устройство ще изпрати команда до приемника за максимум 90 секунди. Светодиодът Светодиодът на зоната на приемника ще изгасне и ще се чуе щракване, показващо активирането на вътрешното реле. Иконата изчезва от екрана. Контрол на температурата от приложението Tuya Smart Отворете приложението Tuya Smart и в списъка с устройства, добавени...
- Page 42 Забележка: Ако температурата на екрана на централното устройство не се актуализира в рамките на максимум 2 минути, проверете отново в приложението състоянието на термостата (Онлайн или Офлайн) и зададената температура. Сдвояване на единици Предупреждение: Двете устройства идват фабрично сдвоени. Изпълнете тази процедура само ако е абсолютно необходимо.
- Page 43 ще мига бързо. Изключете екрана на първото централно устройство, което искате да сдвоите, като натиснете бутона за включване/изключване. Когато екранът е изключен, натиснете и задръжте бутона M на централното устройство, докато на екрана се появи 4-цифрен код. Кодът и иконата на WiFi мигат...
- Page 44 Изтриване на сдвояването За да отмените сдвояването между приемника и централното устройство в определена зона, изтрийте желаното устройство от приложението или сдвоете ново устройство в съответната зона. Предходно сдвоеното устройство в съответната област ще бъде изтрито автоматично. Загубен или слаб сигнал В...
- Page 45 продължава да мига рядко, изтрийте и извършете отново процедурите по сдвояване: първо на централното устройство с приемника и след това сдвояването с безжичния рутер ( чрез мобилното приложение). Задайте часа и деня от седмицата При включен екран натиснете дълго бутона M за 5-6 секунди.
- Page 46 Откриване на отворен прозорец Когато функцията за откриване на отворен прозорец е активирана от приложението, системата автоматично ще спре отоплението, ако се регистрира внезапен спад на температурата (2°C за 15 минути по подразбиране). Иконата „отворен прозорец“ се появява на екрана и зададената...
- Page 47 (6-7 секунди), за да влезете в настройките на ПРОГРАМАТА. Дните от седмицата са отбелязани от 1 (понеделник) до 7 (неделя). Всеки ден има 4 периода от време (1 ~ 4). Всяко натискане на бутона P води до следващата настройкаs. Натиснете продължително бутона P. Индикаторът за минути...
- Page 48 Разширени настройки Изключете централното устройство, като натиснете бутона за включване/изключване. При изключен екран натиснете и задръжте бутоните M и Up едновременно. Натиснете бутона M, за да навигирате в менюто, и стрелките нагоре и надолу, за да промените стойностите. Натиснете бутона за включване/изключване, за да излезете...
- Page 49 Задаване на минималната зададена C ~ 35 ° ° ° температурна граница Температура на защита от C ~ 15 ° ° ° замръзване Хистерезис (мъртва C ~ 6 ° ° ° зона) (стъпка 0.1 ° 1: On (Продълж- ително Функция за натискане...
- Page 50 OWD - Време за 2 ~ 30 минути 15 минути откриване OWD - Температурен 2,3,4 ° ° спад (по време на откриване) OWD - забавяне във 10 ~ 60 минути 30 минути времето 0: Не 1: Да Натиснете продължи- (връщане към телно...
-
Page 51: Technische Spezifikationen
Besondere Warnungen • Da dieser Thermostat an ein 230-V-Netz und an Heizgeräte angeschlossen werden muss, darf die Installation nur von qualifiziertem Personal durchgeführt werden. • Außerdem empfehlen wir, dass die Erstkonfiguration des Thermostats nur von qualifiziertem Personal durchgeführt wird, das in der Lage ist, die in diesem Handbuch beschriebenen technischen Verfahren umzusetzen. - Page 52 Erinnerung EEPROM NO (normalerweise offen) Steuerungstyp der Relais ohne Potenzial (nicht Empfängereinheit bestromt) Max. 250 V, max. 10A Betriebsparameter des Relais (ohmsch), Strom AC/DC Temperaturbereich einstellen 5 - 35 C, Schritt 0.5 ° ° Gemessener 0 - 50 C, Schritt 0.1 °...
- Page 53 Die Haupteinheit 18:00 °C °C 15 16 Wochentag 1 (Montag) - 7 Drahtlose Signalanzeige (Sonntag) Das Kühlsystem ist eingeschaltet Die eingestellte Das Heizsystem ist Temperatur eingeschaltet Aktiver Heizmodus Die Raumtemperatur Aktive Aktiver Kühlmodus Programmnummer Benutzerhandbuch...
- Page 54 Auswahl des Eco- Eco-Modus aktiv , manuellen oder programmierten Modus Auswahl des Heiz- und Manueller Modus aktiv Kühlmodus Programmierter Thermostat ein/aus Modus aktiv Pfeil nach oben und unten zum Einstellen Batterieanzeige von Temperatur und Parametern Die Empfängereinheit Benutzerhandbuch...
- Page 55 1 – WLAN-Kopplung und 4 – Zone 2, HF-Kopplung mit Ein/Aus der Zentraleinheit Nr. 2 2 – Zone 1, HF-Kopplung mit 5 – Zone 2, Override- der Zentraleinheit Nr. 1 Funktion 3 – Zone 1, Override-Funktion Override-Funktion Override 1: Drücken Sie lange die Override 1-Taste an der Empfängereinheit. Die entsprechende LED leuchtet auf.
- Page 56 Die LEDs LED Blinkt Gerät Gerät eingeschaltet ausgeschaltet Blinkt selten: Das Gerät ist nicht mit WLAN verbunden. Das Gerät ist Blinkt häufig: mit WLAN Das Gerät verbunden. befindet sich im WLAN-Pairing- Modus. Benutzerhandbuch...
- Page 57 Das Gerät Die Heizung Die Heizung befindet sich in Zone 1 ist in Zone 1 ist im RF-Pairing- eingeschaltet. ausgeschaltet. Modus. Die Override- Die Override- Funktion für Funktion für Zone 1 ist aktiv. Zone 1 ist inaktiv. Das Gerät Die Heizung Die Heizung befindet sich in Zone 2 ist...
- Page 58 Schließen eines Befehlskreises mit einem maximalen Strom von 10 A und einer maximalen Spannung von 250 V AC/DC ausführt. 1: 230 V AC-Stromversorgung (permanent) 2 und 3: 230-V-Stromversorgung für jede einzelne Zone, gesteuert durch Pumpen, Ventile, allgemeiner Verteilerkasten. Benutzerhandbuch...
- Page 59 4: COM-NO – Trockenkontakt – für Zentralheizungskessel (mit Eingangsbefehl kompatibel mit COM – NO, nicht erregtes Relais). Hinweise und Warnhinweise für den ersten Gebrauch Hinweis: Das System wird mit werkseitig gekoppelten beiden Einheiten geliefert. Bei der Installation muss lediglich die Empfangseinheit mit dem WLAN-Router im Haus verbunden werden.
- Page 60 Warnung: Stellen Sie sicher, dass Sie das Telefon über die 2,4-GHz-Frequenz mit dem drahtlosen Netzwerk verbunden haben. Router und Telefone der neuen Generation sind ebenfalls mit dem 5-GHz-Funknetzwerk ausgestattet, der PNI-Thermostat unterstützt diese Frequenz jedoch nicht. Laden Sie die Tuya Smart-Anwendung aus dem App...
- Page 61 Öffnen Sie die Tuya Smart-Anwendung und drücken Sie die +-Taste oder „Add device“, um den Thermostat zur Anwendung hinzuzufügen. Wählen Sie in der folgenden Oberfläche die Option „Small Home Appliances“ – „Thermostat (Wi-Fi)“. Wählen Sie das WLAN-Netzwerk aus und fügen Sie das Netzwerkkennwort hinzu.
- Page 62 Benutzerhandbuch...
- Page 63 In der Anwendung verfügbare Funktionen Die folgenden Funktionen stehen in der Tuya Smart-Anwendung zur Verfügung: • Anzeige der eingestellten Temperatur und der gemessenen Temperatur. • Heiz-/Kühlstatus: das Symbol erscheint, wenn die Heating ongeschaltet ist und das Symbol wenn das Kühlsystem eingeschaltet ist. •...
- Page 64 Temperaturregelung über den Thermostat Drücken Sie die Auf- und Ab-Tasten an der Zentraleinheit, um die gewünschte Temperatur einzustellen. Heizmodus: • Wenn die eingestellte Temperatur (SET) höher ist als die Temperatur im Raum (ROOM), sendet die Zentraleinheit Benutzerhandbuch...
- Page 65 innerhalb von maximal 90 Sekunden einen Befehl an die Empfängereinheit. Die LED Die Zonen-LED an der Empfängereinheit leuchtet auf und ein Klicken ertönt, um die Aktivierung des internen Relais anzuzeigen. Das Symbol (Heizung ist eingeschaltet) erscheint auf dem Bildschirm der Zentraleinheit. •...
- Page 66 innerhalb von maximal 90 Sekunden einen Befehl an die Empfängereinheit. Die LED Die Zonen-LED an der Empfängereinheit erlischt und ein Klicken ertönt, was die Aktivierung des internen Relais anzeigt. Das Symbol verschwindet vom Bildschirm. Temperaturregelung über Tuya Smart- Anwendung Öffnen Sie die Tuya Smart-Anwendung und klicken Sie in der Liste der zur Anwendung hinzugefügten Geräte auf den Thermostat.
- Page 67 Hinweis: Wenn die Temperatur auf dem Bildschirm der Zentraleinheit nicht innerhalb von maximal 2 Minuten aktualisiert wird, überprüfen Sie in der Anwendung erneut den Status des Thermostats (Online oder Offline) und die eingestellte Temperatur. Koppeln der Einheiten Warnung: Die beiden Einheiten werden ab Werk gepaart geliefert. Führen Sie diesen Vorgang nur durch, wenn dies unbedingt erforderlich ist.
- Page 68 Schalten Sie den Bildschirm der ersten Zentraleinheit aus, die Sie koppeln möchten, indem Sie die Ein-/Aus-Taste drücken. Halten Sie bei ausgeschaltetem Bildschirm die M-Taste an der Zentraleinheit gedrückt, bis ein 4-stelliger Code auf dem Bildschirm erscheint. Der Code und das WLAN- Symbol blinken auf dem Bildschirm.
- Page 69 Sie die gewünschte Einheit aus der Anwendung oder koppeln Sie eine neue Einheit in der entsprechenden Zone. Das zuvor auf dem jeweiligen Bereich gekoppelte Gerät wird automatisch gelöscht. Signal verloren oder schwach Bei einem Verlust des HF-Signals zwischen der Empfängereinheit und der Zentraleinheit verschwindet das WLAN-Symbol auf dem Bildschirm und die der Zone (Zone 1 oder Zone 2) entsprechende LED blinkt selten.
- Page 70 Stellen Sie die Uhrzeit und den Wochentag ein Drücken Sie bei eingeschaltetem Bildschirm 5–6 Sekunden lang die M-Taste. Auf dem Bildschirm wird nur noch die Uhrzeit angezeigt und die Minutenanzeige blinkt. Drücken Sie die Auf- und Ab-Tasten, bis Sie den gewünschten Wert erreicht haben.
- Page 71 öffnen“ erscheint auf dem Bildschirm und die eingestellte Temperatur (SET) beträgt 5 °C. Diese Funktion ist nützlich, wenn Sie ein Fenster öffnen (z. B. zum Lüften), ohne die Heizung anzuhalten. Der Thermostat kehrt nach 30 Minuten in den vorherigen Betriebsmodus zurück und das Symbol „Fenster öffnen“ verschwindet vom Bildschirm.
-
Page 72: Erweiterte Einstellungen
Sie den Wert mit den Auf- und Ab-Tasten. Drücken Sie die P-Taste. Die Anzeige für die eingestellte Temperatur (SET) blinkt. Ändern Sie den Wert mit den Auf- und Ab-Tasten. Drücken Sie die P-Taste für die nächste Periode. Wiederholen Sie die Schritte für die anderen Tage und Zeiträume. - Page 73 Menu Beschreibung Möglichkeit Default Interne C ~ 8 ° ° Sensortemperatur ° (Schritt 0.1 ° kalibrierung Einstellen der maximal eingestellten C ~ 35 ° ° ° Temperaturgrenze Einstellen der minimal eingestellten Temperatur C ~ 35 ° ° ° grenze Frostschutz C ~ 15 °...
- Page 74 OWD - Erkennungszeit 2 ~ 30 Minuten Minuten OWD - Temperaturabfall (während der 2,3,4 ° ° Erkennung) OWD - Zeitverzögerung (Zurück zur vorherigen 10 ~ 60 Einstellung/Programm) Minuten Minuten 0: Nein 1: Ja Halten Sie die Zurück zu den Ein-/Aus-Taste Werkseinstellungen 5 Sekunden lang gedrückt, bis der...
-
Page 75: Advertencias Especiales
Advertencias especiales • Dado que este termostato debe conectarse a una red de 230V y a equipos de calefacción, la instalación sólo debe ser realizada por personal cualificado. • Además, recomendamos que la configuración inicial del termostato sea realizada únicamente por personal calificado capaz de implementar los procedimientos técnicos detallados en este manual. - Page 76 Memoria EEPROM Tipo de control de la unidad Relé NO (normalmente receptora abierto) no energizado Parámetros de Máx. 250 V, máx. 10A funcionamiento del relé (resistivo), corriente CA/CC Establecer rango de 5 - 35 C, paso 0.5 ° ° temperatura Rango de temperatura 0 - 50 C, paso 0.1...
- Page 77 La unidad principal 18:00 °C °C 15 16 Día de la semana Wireless signal indicator 1 (lunes) - 7 (domingo) Hora Cooling system is On La temperatura El sistema de calefacción establecida está encendido Modo de calefacción La temperatura ambiente activo Manual de usuario...
- Page 78 Modo de enfriamiento Número de programa activo activo Selección de modo Eco, Modo ecológico activo Manual, Programado Selección de modo de Modo manual activo calefacción, refrigeración Modo programado Termostato encendido/ activo apagado Flecha arriba y abajo para Indicador de bateria configurar la temperatura y los parámetros La unidad receptora...
- Page 79 1 - Emparejamiento WiFi y 4 - Zona 2, emparejamiento encendido/apagado RF con la unidad central núm. 2 2 - Zona 1, emparejamiento 5 - Zona 2, función de RF con la unidad central anulación núm. 1 3 - Zona 1, función de anulación Función de anulación Override)
- Page 80 Los LED LED Parpadeo Unidad Unidad apagada encendida Parpadea raramente: La unidad no está conectada a WiFi. La unidad está Parpadea con conectada a frecuencia: la WiFi. unidad está en modo de emparejamiento WiFi. Manual de usuario...
-
Page 81: Diagrama De Conexión
La unidad está La calefacción La calefacción en modo de en la zona 1 está de la zona 1 está emparejamiento encendida. apagada. La función La función Anulación para Override para la la zona 1 está zona 1 está activa. inactiva. - Page 82 La unidad receptora cuenta con un comando tipo relé, NO (Normal Abierto) sin potencial (no energizado) que ejecuta el cierre de un circuito de comando con una corriente máxima de 10 A y un voltaje máximo de 250 V AC/DC Manual de usuario...
- Page 83 1: Alimentación de 230 V CA (permanente) 2 y 3: Alimentación de 230 V para cada zona separada controlada por bombas, válvulas, caja de distribución general. 4: COM-NO - Contacto seco - para caldera de calefacción central (con comando de entrada compatible con COM - NO relé no energizado) Instrucciones y advertencias para el primer uso.
- Page 84 2,4 GHz. Los enrutadores y teléfonos de nueva generación también están equipados con la red inalámbrica de 5 GHz, pero el termostato PNI no admite esta frecuencia. Descargue la aplicación Tuya Smart desde App Store o Google Play o escanee el código QR a continuación:...
- Page 85 Abra la aplicación Tuya Smart y presione el botón + o “Add device” para agregar el termostato a la aplicación. En la siguiente interfaz, seleccione la opción “Small Home Appliances” - “Thermostat (Wi-Fi)”. Seleccione la red WiFi y agregue la contraseña de la red. Mantenga presionado el botón de emparejamiento en la unidad receptora hasta que el LED WiFi parpadee rápidamente..
- Page 86 Manual de usuario...
- Page 87 Funciones disponibles en la aplicación Las siguientes funciones están disponibles en la aplicación Tuya Smart: • Muestra la temperatura establecida y la temperatura medida. Estado de calefacción/refrigeración: el icono aparece cuando el sistema de calefacción está encendido y el icono cuando el sistema de enfriamiento está...
- Page 88 Control de temperatura desde el termostato. Pulse las teclas Arriba y Abajo de la unidad central para configurar la temperatura deseada. Modo calefacción: • Si la temperatura configurada (SET) es superior a la temperatura de la habitación (ROOM), la unidad central enviará...
- Page 89 segundos. Se encenderá el LED El LED de zona de la unidad receptora y se escuchará un clic indicando la activación del relé interno. El icono (el sistema de calefacción está encendido) aparece en la pantalla de la unidad central. •...
- Page 90 Control de temperatura desde la aplicación Tuya Smart Abra la aplicación Tuya Smart y en la lista de dispositivos agregados a la aplicación, haga clic en el termostato. Desde el menú de configuración, seleccione el modo refrigeración (Cold) o calefacción (Heat). En la interfaz de control del termostato, presione los botones “-”...
- Page 91 Si el termostato aparece Sin conexión en la aplicación, el icono de señal no aparece en la pantalla, el LED El LED de zona en la unidad receptora está apagado y las unidades no se comunican entre sí, realice el procedimiento de emparejamiento a continuación: Presione el botón de encendido/apagado en la unidad receptora.
- Page 92 Pruebe la funcionalidad cambiando la temperatura establecida (SET) y observe el disparo del relé en la unidad receptora. Proceder del mismo modo para emparejar la unidad receptora con la segunda unidad central, pulsando en su lugar el botón correspondiente a la Zona 2. Eliminar emparejamiento Para cancelar el emparejamiento entre la unidad receptora y una unidad central en una zona determinada, elimine la unidad deseada...
- Page 93 • Cambie las baterías de la unidad central si es necesario. • Acerque las unidades entre sí y la unidad receptora al enrutador WiFi y verifique nuevamente el estado de los dispositivos. • Si después de unos minutos el funcionamiento no vuelve a la normalidad y el LED El LED de zona continúa parpadeando raramente, borre y realice nuevamente los procedimientos de emparejamiento: primero de la unidad central con la...
- Page 94 La pantalla vuelve al modo de visualización normal.. Detección de ventana abierta Cuando la aplicación activa la función de detección de ventana abierta, el sistema detendrá automáticamente la calefacción si se registra un descenso brusco de la temperatura (2°C en 15 minutos por defecto).
- Page 95 Con la pantalla encendida, mantenga presionado el botón P (6-7 segundos) para ingresar a la configuración del PROGRAMA. Los días de la semana están marcados del 1 (lunes) al 7 (domingo). Cada día tiene 4 periodos de tiempo (1 ~ 4). Cada pulsación del botón P conduce a la siguiente configuración.
-
Page 96: Ajustes Avanzados
Ajustes avanzados Apague la unidad central presionando el botón de encendido/ apagado. Con la pantalla apagada, mantén presionados los botones M y Arriba simultáneamente. Presione el botón M para navegar por el menú y las flechas hacia arriba y hacia abajo para cambiar las Opciones. Presione el botón de encendido/apagado para salir del menú. - Page 97 Temperatura de protección contra C ~ 15 ° ° ° heladas Deadzone C ~ 6 ° ° ° 1: On (Mantenga presionada la Función de bloqueo tecla M 5 seg de teclas para desbloquear las teclas) 0: Off Detección de ventana abierta - OWD OWD - Tiempo de 2 ~ 30 minutos...
- Page 98 0: No 1: Sí Mantenga presionado Volver a la el botón de configuración de encendido/ fábrica apagado durante 5 segundos hasta que el termostato se reinicie. Versión del software 5055-02 Manual de usuario...
-
Page 99: Spécifications Techniques
Avertissements spéciaux • Ce thermostat devant être connecté à un réseau 230V et à des équipements de chauffage, l’installation ne doit être effectuée que par du personnel qualifié. • Nous recommandons également que la configuration initiale du thermostat soit effectuée uniquement par du personnel qualifié... - Page 100 Mémoire EEPROM Relais NO (normalement Type de commande du ouvert) sans potentiel (non récepteur alimenté) Paramètres de Max. 250 V, maximum. 10A fonctionnement du relais (résistif), courant AC/DC Régler la plage de 5 - 35 C, pas 0.5 ° ° température Plage de température 0 - 50...
- Page 101 L’unité principale 18:00 °C °C 15 16 Jour de la semaine Indicateur de signal 1 (lundi) - 7 (dimanche) sans fil Le système de Heure refroidissement est activé Le système de chauffage La température réglée est allumé Manuel utilisateur...
- Page 102 Mode chauffage actif La température ambiante Mode refroidissement Numéro de programme actif actif Sélection du mode Eco, Mode éco actif Manuel, Programmé Sélection du Mode manuel actif mode Chauffage, Refroidissement Marche/Arrêt du Mode programmé actif thermostat Flèche haut et bas pour Indicateur de batterie régler la température et les paramètres...
- Page 103 L’unité de réception 1 - Appairage WiFi et On/Off 4 - Zone 2, appairage RF avec la centrale no. 2 2 - Zone 1, appairage RF avec 5 - Zone 2, fonction de la centrale no. 1 dérogation 3 - Zone 1, fonction de dérogation Fonction de remplacement Override 1:...
- Page 104 Cette fonction est utilisée lors de la connexion entre l’unité centrale no. 1 et le récepteur est perdu. Appuyez brièvement sur le bouton Override 1 pour quitter le mode Override.. Override 2: Appuyez longuement sur le bouton Override 2 du récepteur. La LED correspondante s’allumera.
- Page 105 LED Clignotant Unité allumée Unité éteinte Clignote rarement: L’appareil n’est pas connecté au L’appareil est WiFi. connecté au Clignote souvent WiFi. : l’appareil est en mode de couplage WiFi. L'appareil est en Le chauffage Le chauffage mode d'appairage de la zone 1 est de la zone 1 est allumé.
-
Page 106: Diagramme De Connexion
La fonction La fonction Override pour Override pour la la zone 2 est zone 2 est active. inactive. Diagramme de connexion Attention : Le raccordement du boîtier récepteur à une alimentation 230 V et à une installation de chauffage est effectué... - Page 107 1 : Alimentation 230 V AC (permanente) 2 et 3 : alimentation 230 V pour chaque zone séparée contrôlée par pompes, vannes, coffret de distribution générale. 4 : COM-NO - Contact sec - pour chaudière chauffage central (avec commande d’entrée compatible COM - NO relais non alimenté) Manuel utilisateur...
- Page 108 Instructions et avertissements pour la première utilisation Remarque: Le système est livré avec les 3 unités jumelées en usine. Lors de l’installation, il suffit de connecter le récepteur au routeur sans fil de la maison. • Insérez 2 piles alcalines AAA (non incluses) dans l’unité centrale et allumez l’appareil en appuyant sur le bouton marche/arrêt.
- Page 109 2,4 GHz. Les routeurs et téléphones nouvelle génération sont également équipés du réseau sans fil 5 GHz, mais le thermostat PNI ne prend pas en charge cette fréquence. Téléchargez l’application Tuya Smart depuis l’App Store ou Google Play ou scannez le code QR ci-dessous: Ouvrez l’application Tuya Smart et appuyez sur le bouton +...
- Page 110 Appuyez longuement sur le bouton d’appairage du récepteur jusqu’à ce que le voyant WiFi clignote rapidement.. Dans l’application, appuyez sur « Next » et confirmez que le voyant LED du produit clignote rapidement. L’application commencera à analyser les appareils à proximité.
- Page 111 Fonctions disponibles dans l’application Les fonctions suivantes sont disponibles dans l’application Tuya Smart: • Affiche la température réglée et la température mesurée. • Etat chauffage/refroidissement: l’icône apparaît lorsque le système de chauffage est allumé et l’icône lorsque le système de refroidissement est allumé. •...
- Page 112 Pour les deux modes de fonctionnement, Chaud et Froid, les réglages suivants sont disponibles: Réglage du programme journalier (maximum 4 périodes), Protection enfants (Verrouillage du clavier), Protection antigel, Protection fenêtre ouverte, Calibrage de la température, Réglage de la zone morte (Hystérésis). , Rapport de température. Manuel utilisateur...
- Page 113 Contrôle de la température depuis le thermostat Appuyez sur les touches Haut et Bas de l’unité centrale pour régler la température souhaitée. Mode chauffage: • Si la température réglée (SET) est supérieure à la température de la pièce (ROOM), l’unité centrale enverra une commande à...
- Page 114 récepteur s’allumera et un clic se fera entendre indiquant l’activation du relais interne. L’icône (le système de refroidissement est allumé) apparaît sur l’écran de l’unité centrale. • Si la température réglée (SET) est supérieure à la température de la pièce (ROOM), l’unité centrale enverra une commande à...
- Page 115 temps, la température (SET) affichée sur l’écran de l’unité centrale sera également mise à jour. Remarque: Si la température sur l’écran de l’unité centrale ne se met pas à jour dans un délai maximum de 2 minutes, vérifiez à nouveau dans l’application l’état du thermostat (En ligne ou Hors ligne) et la température réglée.
- Page 116 souhaitez appairer en appuyant sur le bouton marche/arrêt. Lorsque l’écran est éteint, maintenez enfoncé le bouton M de l’unité centrale jusqu’à ce qu’un code à 4 chiffres apparaisse à l’écran. Le code et l’icône WiFi clignotent sur l’écran. Appuyez immédiatement sur la touche fléchée vers le haut pour effectuer le couplage avec le récepteur.
- Page 117 automatiquement supprimée. Signal perdu ou faible En cas de perte du signal RF entre le boîtier récepteur et l’unité centrale, l’icône WiFi sur l’écran disparaîtra, et la LED correspondant à la zone (Zone 1 ou Zone 2) clignotera rarement. En cas de perte du signal WiFi entre le récepteur et le routeur, la LED WiFi du récepteur clignote.
- Page 118 l’écran, et l’indicateur des minutes clignote. Appuyez sur les touches Haut et Bas jusqu’à atteindre la valeur souhaitée. Appuyez sur la touche M pour confirmer. L’indicateur des heures clignote. Appuyez sur les touches Haut et Bas jusqu’à atteindre la valeur souhaitée. Appuyez sur la touche M pour confirmer.
- Page 119 Toute autre pression sur un bouton dans les 30 minutes arrêtera la fonction, ramenant le système au mode de fonctionnement précédent. Configuration du programme quotidien via le thermostat Remarque: La configuration du programme quotidien peut également être effectuée via l’application Tuya Smart, procédure que nous recommandons pour faciliter son exécution.
-
Page 120: Réglages Avancés
Répétez les étapes pour les autres jours et périodes. Exemple de programmation de température par jour: Day h ° ° ° ° 7:00 22 C 8:30 19 17:00 22 C 22:00 19 ° ° ° ° 8:00 22 C 8:30 22 C 17:00 22 C 22:00 19 °... - Page 121 Réglage de la limite maximale de température C ~ 35 ° ° ° réglée Réglage de la limite minimale de température C ~ 35 ° ° ° de consigne Température de C ~ 15 ° ° ° protection contre le gel C ~ 6 C (pas °...
- Page 122 OWD - Chute de température (pendant la 2,3,4 ° ° détection) OWD - Temporisation (retour au réglage/ 10 ~ 60 minutes minutes programme précédent) 0: Non 1: Oui Appuyez longuement sur le bouton Revenir aux paramètres marche/ d'usine arrêt pendant 5 secondes jusqu’à...
-
Page 123: Műszaki Adatok
Különleges figyelmeztetések • Mivel ezt a termosztátot 230 V-os hálózathoz és fűtőberendezéshez kell csatlakoztatni, a telepítést csak szakképzett személyzet végezheti. • Azt is javasoljuk, hogy a termosztát kezdeti beállítását csak szakképzett személyzet végezze el, aki képes végrehajtani az ebben a kézikönyvben részletezett műszaki eljárásokat. •... - Page 124 NO (normál nyitott) relé Vevőegység vezérlési típusa potenciál nélkül (nincs feszültség alatt) Max. 250 V, max. 10A Relé működési paraméterei (ellenállás), áram AC/DC Állítsa be a hőmérsékleti 5 - 35 C, lépés 0.5 ° ° tartományt Mért hőmérséklet tartomány 0 - 50 C, lépés 0.1 °...
- Page 125 A fő egység 18:00 °C °C 15 16 A hét napja Vezeték nélküli jel jelző 1 (hétfő) - 7 (vasárnap) A hűtőrendszer be van Óra kapcsolva A beállított A fűtési rendszer be van hőmérséklet kapcsolva Aktív fűtési mód A szoba hőmérséklete Használati utasítás...
- Page 126 Aktív hűtési mód Aktív programszám Eco, Manuális, Eco mód aktív Programozott mód kiválasztása Fűtés, hűtés üzemmód Manuális mód aktív kiválasztása Programozott mód Termosztát be/ki aktív Fel és le nyíl a Akkumulátor jelző hőmérséklet és a paraméterek beállításához A vevőegység Használati utasítás...
- Page 127 1 – WiFi párosítás és be/ki 4 - 2. zóna, RF párosítás a központi egységgel sz. 2 2 - 1. zóna, RF párosítás a 5 - 2. zóna, felülírás funkció központi egységgel sz. 1 3 - 1. zóna, felülírás funkció Override funkció...
- Page 128 A LED-ek LED Villog Az egység Az egység bekapcsolva kikapcsolva Ritkán villog: A készülék nem csatlakozik WiFi- hez. A készülék WiFi- Gyakran villog: re csatlakozik. A készülék WiFi párosítási módban van. Használati utasítás...
- Page 129 A készülék Az 1. zóna fűtése Az 1. zóna fűtése RF párosítási be van kapcsolva. ki van kapcsolva. módban van. Az 1. zóna Az 1. zóna felülbírálási felülbírálási funkciója aktív. funkciója inaktív. A készülék A 2. zóna fűtése A 2. zóna fűtése RF párosítási be van kapcsolva.
- Page 130 1: 230 V AC tápegység (állandó) 2 és 3: 230 V tápellátás minden külön zónához, szivattyúk, szelepek, általános elosztódoboz által vezérelt. 4: COM-NO - Száraz érintkező - központi fűtési kazánhoz (COM- val kompatibilis bemeneti paranccsal - NINCS feszültségmentes relé) Használati utasítás...
- Page 131 Utasítások és figyelmeztetések az első használathoz Megjegyzés: A rendszer a gyárilag párosított két egységgel érkezik. A telepítés során csak a vevőegységet kell csatlakoztatni a vezeték nélküli útválasztóhoz a házban. • Helyezzen be 2 db AAA alkáli elemet (nem tartozék) a központi egységbe, és kapcsolja be az egységet a be/ki gomb megnyomásával.
- Page 132 Az új generációs routerek és telefonok is fel vannak szerelve az 5 GHz-es vezeték nélküli hálózattal, de a PNI termosztát nem támogatja ezt a frekvenciát. Töltse le a Tuya Smart alkalmazást az App Store vagy a Google Play áruházból, vagy olvassa be az alábbi QR-kódot:...
- Page 133 villog-e. Az alkalmazás megkezdi a közeli eszközök vizsgálatát. A termosztát azonosítása után nyomja meg a „Done” gombot az eljárás befejezéséhez. A vevő LED-je abbahagyja a villogást. Jelenleg a vezeték nélküli internetkapcsolat sikeres. Ha a LED továbbra is lassan villog, és a csatlakozás nem sikerült, ismételje meg az eljárást.
- Page 134 Az alkalmazásban elérhető funkciók A következő funkciók érhetők el a Tuya Smart alkalmazásban: • A beállított hőmérséklet és a mért hőmérséklet megjelenítése. • Fűtés/hűtés állapota: a ikon megjelenik, ha a fűtési rendszer be van kapcsolva, és a ikon amikor a hűtőrendszer be van kapcsolva.
- Page 135 • Üzemmód kiválasztása: Kézi, Eco és Programozott • További beállítások: A két üzemmódhoz, a meleghez és a hideghez, a következő beállítások érhetők el: Napi programbeállítás (maximum periódus), Gyermekvédelem (Billentyűzetzár), Fagyvédelem, Nyitott ablakvédelem, Hőmérséklet kalibrálása, Holt zóna beállítása (hiszterézis) , Hőmérséklet jelentés.
- Page 136 Hőmérséklet szabályozás a termosztátról Nyomja meg a fel és le gombokat a központi egységen a kívánt hőmérséklet beállításához. Fűtési mód: • Ha a beállított hőmérséklet (SET) magasabb, mint a szoba (ROOM) hőmérséklete, a központi egység legfeljebb 90 másodpercen belül parancsot küld a vevőegységnek. A vevőegységen kigyullad a A zóna LED LED, és egy kattanás hallható, ami a belső...
- Page 137 hűtőrendszer be van kapcsolva) megjelenik a központi egység képernyőjén. • Ha a beállított hőmérséklet (SET) magasabb, mint a szoba (ROOM) hőmérséklete, a központi egység legfeljebb 90 másodpercen belül parancsot küld a vevőegységnek. A A zóna LED LED a vevőegységen kialszik, és egy kattanás hallható, jelezve a belső...
- Page 138 nem frissül legfeljebb 2 percen belül, ellenőrizze újra az alkalmazásban a termosztát állapotát (Online vagy Offline) és a beállított hőmérsékletet.. A két egység párosítása Figyelmeztetés: A két egység gyárilag párosítva érkezik. Ezt az eljárást csak akkor végezze el, ha feltétlenül szükséges. Ha a termosztát Offline állapotban jelenik meg az alkalmazásban, a jel ikont hiányzik a képernyőről, a A zóna LED LED a...
- Page 139 számjegyű kód meg nem jelenik a képernyőn. A kód és a WiFi ikon villog a képernyőn. Azonnal nyomja meg a felfelé mutató nyíl gombot a vevőegységgel való párosításhoz. A párosítás után az 1. zónának megfelelő LED ritkán villog, majd kialszik. A fő...
- Page 140 Elveszett vagy gyenge jel A vevőegység és a központi egység közötti RF jel megszakadása esetén a WiFi ikon eltűnik a képernyőről, és a zónának (Zóna 1 vagy Zone 2) megfelelő LED ritkán villog. Ha megszakad a WiFi jel a vevőegység és az útválasztó között, a vevőegységen lévő...
- Page 141 Az órajelző villog. Nyomja le a Fel és Le gombokat, amíg el nem éri a kívánt értéket. Nyomja meg az M gombot a megerősítéshez. Villogni fog a hét napjának megfelelő 1 (hétfő) - 7 (vasárnap) jelző. Nyomja le a Fel és Le gombokat, amíg el nem éri a kívánt értéket.
- Page 142 Napi program konfigurálása a termosztáton keresztül Megjegyzés: A napi program konfigurálása a Tuya Smart alkalmazáson keresztül is elvégezhető, az eljárást a könnyebb végrehajtás érdekében javasoljuk. Bekapcsolt képernyő mellett nyomja meg hosszan a P gombot (6-7 másodperc), hogy belépjen a PROGRAM beállításokba. A hét napjai 1-től (hétfő) 7-ig (vasárnap) vannak jelölve.
- Page 143 8:00 22 C 8:30 22 C 17:00 22 C 22:00 19 ° ° ° ° 8:00 22 C 8:30 22 C 17:00 22 C 22:00 19 ° ° ° ° További beállítások Kapcsolja ki a központi egységet a be-/kikapcsoló gomb megnyomásával.
- Page 144 Fagyvédelmi C ~ 15 ° ° ° hőmérséklet Hysteresis C ~ 6 ° ° ° (Deadzone) (lépés 0.1 ° 1: On (A billentyűk feloldásához Billentyűzár funkció tartsa lenyomva az M gombot 5 másodpercig) 0: Off Nyitott ablak észlelése - OWD OWD –...
- Page 145 0: No 1: Yes Long press the Visszatérés a gyári on/off button for beállításokhoz 5 seconds until the thermostat restarts. Szoftver verzió 5055-02 Használati utasítás...
-
Page 146: Avvertenze Speciali
Avvertenze speciali • Poiché questo termostato deve essere collegato ad una rete 230V e ad apparecchi di riscaldamento, l’installazione deve essere eseguita solo da personale qualificato. • Inoltre, raccomandiamo che la configurazione iniziale del termostato venga eseguita solo da personale qualificato in grado di implementare le procedure tecniche dettagliate in questo manuale. - Page 147 Relè NO (normalmente Tipo di controllo dell'unità aperto) senza potenziale (non ricevente eccitato) Massimo. 250 V, massimo. Parametri di funzionamento 10 A (resistivo), corrente del relè CA/CC Impostare l'intervallo di 5 - 35 C, passo 0.5 ° ° temperatura Intervallo di temperatura 0 - 50 C, passo 0.1 °...
- Page 148 L’unità principale 18:00 °C °C 15 16 Giorno della settimana Indicatore del segnale 1 (lunedì) - 7 wireless (domenica) Il sistema di raffreddamento è attivo La temperatura Il sistema di impostata riscaldamento è acceso Manuale dell’utente...
- Page 149 Modalità di La temperatura della riscaldamento attiva stanza Modalità di Numero del programma raffreddamento attivo attivo Modalità ecologica Selezione modalità Eco, attiva Manuale, Programmata Selezione modalità Modalità manuale Riscaldamento, attiva Raffreddamento Modalità programmata Termostato acceso/ attiva spento Freccia su e giù per Indicatore della impostare temperatura e batteria...
- Page 150 L’unità ricevente 1 - Associazione WiFi e 4 - Zona 2, abbinamento RF accensione/spegnimento con la centrale n. 2 2 - Zona 1, abbinamento RF 5 - Zona 2, funzione Override con la centrale n. 1 3 - Zona 1, funzione Override La funzione Override Override 1: Premere a lungo il pulsante Override 1 sull’unità...
- Page 151 centrale n. 1 e l’unità ricevente viene persa. Premere brevemente il pulsante Override 1 per uscire dalla modalità Override.. Override 2: Premere a lungo il pulsante Override 2 sull’unità ricevente. Il LED corrispondente si accenderà. La zona 2 continuerà a riscaldarsi. Questa funzione viene utilizzata quando il collegamento tra l’unità...
- Page 152 LED Lampeggia Unità accesa Unità spenta Lampeggia raramente: L’unità non è connessa al WiFi. L’unità è Lampeggia connessa al WiFi. spesso: l’unità è in modalità di accoppiamento WiFi. L'unità è in Il riscaldamento Il riscaldamento modalità di della zona 1 è della zona 1 è...
-
Page 153: Schema Di Collegamento
La funzione La funzione Override per la Override per la zona 2 è attiva. zona 2 è inattiva. Schema di collegamento Attenzione: Il collegamento dell’unità ricevente ad una alimentazione a 230 V e ad un impianto di riscaldamento deve essere effettuato solo da personale qualificato e solo dopo aver consultato la documentazione del termostato e dell’impianto di riscaldamento. - Page 154 1: Alimentazione 230 V AC (permanente) 2 e 3: alimentazione a 230 V per ogni zona separata controllata da pompe, valvole, scatola di distribuzione generale. 4: COM-NO - Contatto pulito - per caldaia riscaldamento centralizzato (con comando di ingresso compatibile con COM - relè...
- Page 155 Istruzioni e avvertenze per il primo utilizzo Nota: il sistema viene fornito con le due unità accoppiate in fabbrica. Durante l’installazione è solo necessario collegare l’unità ricevente al router wireless della casa. • Inserire 2 batterie alcaline AAA (non incluse) nell’unità centrale e accendere l’unità...
- Page 156 2,4 GHz. Anche i router e i telefoni di nuova generazione sono dotati della rete wireless a 5 GHz, ma il termostato PNI non supporta questa frequenza. Scarica l’applicazione Tuya Smart dall’App Store o da Google Play oppure scansiona il codice QR qui sotto: Apri l’applicazione Tuya Smart e premi il pulsante + o “Add...
- Page 157 L’applicazione inizierà la scansione dei dispositivi nelle vicinanze. Dopo aver identificato il termostato, premi “Done” per completare la procedura. Il LED sul ricevitore smetterà di lampeggiare. In questo momento la connessione Internet wireless ha esito positivo. Se il LED continua a lampeggiare lentamente, la connessione è...
- Page 158 Funzioni disponibili nell’applicazione Nell’applicazione Tuya Smart sono disponibili le seguenti funzioni: • Visualizza la temperatura impostata e la temperatura misurata. • Stato riscaldamento/raffrescamento: l’icona appare quando è attivo il sistema di riscaldamento e l’icona quando è attivo il sistema di raffrescamento. Manuale dell’utente...
- Page 159 • Selezione modalità di funzionamento: Manuale, Eco e Programmata • Impostazioni avanzate: Per le due modalità di funzionamento, Caldo e Freddo, sono disponibili le seguenti impostazioni: Impostazione programma giornaliero (massimo 4 periodi), Protezione bambini (Blocco tastiera), Protezione antigelo, Protezione finestra aperta, Calibrazione temperatura, Impostazione Zona morta (Isteresi) , Rapporto sulla temperatura.
- Page 160 Controllo della temperatura dal termostato Premere i tasti Su e Giù dell’unità centrale per impostare la temperatura desiderata. Modalità riscaldamento: • Se la temperatura impostata (SET) è superiore alla temperatura dell’ambiente (ROOM), la centrale invierà un comando all’unità ricevente in un tempo massimo di 90 secondi.
- Page 161 accenderà e si sentirà un clic che indica l’attivazione del relè interno. L’icona (il sistema di raffreddamento è acceso) appare sullo schermo dell’unità centrale. • Se la temperatura impostata (SET) è superiore alla temperatura dell’ambiente (ROOM), la centrale invierà un comando all’unità ricevente in un tempo massimo di 90 secondi.
- Page 162 Nota: se la temperatura sullo schermo dell’unità centrale non si aggiorna entro un massimo di 2 minuti, verificare nuovamente nell’applicazione lo stato del termostato (Online o Offline) e la temperatura impostata. Associazione delle unità Avvertenza: le 3 unità vengono accoppiate dalla fabbrica. Eseguire questa procedura solo se assolutamente necessario.
- Page 163 centrale finché sullo schermo non viene visualizzato un codice di 4 cifre. Il codice e l’icona WiFi lampeggiano sullo schermo. Premere immediatamente il pulsante freccia su per associare l’unità ricevente. Dopo l’associazione, il LED corrispondente alla Zona 1 lampeggia raramente e poi si spegne. Sullo schermo viene visualizzata l’interfaccia principale.
- Page 164 Segnale perso o debole In caso di perdita del segnale RF tra l’unità ricevente e l’unità centrale, l’icona WiFi sullo schermo scomparirà e il LED corrispondente alla zona (Zona 1 o Zona 2) lampeggerà raramente. In caso di perdita del segnale WiFi tra l’unità ricevente e il router, il LED WiFi sull’unità...
- Page 165 Premere i tasti Su e Giù fino a raggiungere il valore desiderato. Premere il tasto M per confermare. L’indicatore dell’ora lampeggia. Premere i tasti Su e Giù fino a raggiungere il valore desiderato. Premere il tasto M per confermare. L’indicatore corrispondente al giorno della settimana, 1 (lunedì) - 7 (domenica) lampeggerà.
- Page 166 interromperà la funzione, riportando il sistema alla modalità operativa precedente. Configurazione del programma giornaliero tramite termostato Nota: La configurazione del programma giornaliero può essere effettuata anche tramite l’applicazione Tuya Smart, procedura che, per comodità di esecuzione, consigliamo. Con lo schermo acceso, premere a lungo il pulsante P (6-7 secondi) per accedere alle impostazioni del PROGRAMMA.
-
Page 167: Impostazioni Avanzate
Esempio di programmazione della temperatura per giorni: Day h ° ° ° ° 7:00 22 C 8:30 19 17:00 22 C 22:00 19 ° ° ° ° 8:00 22 C 8:30 22 C 17:00 22 C 22:00 19 ° ° °... - Page 168 Impostazione del limite massimo C ~ 35 ° ° ° di temperatura impostato Impostazione del limite minimo C ~ 35 ° ° ° di temperatura impostato Temperatura di C ~ 15 ° ° ° protezione antigelo Hysteresis C ~ 6 °...
- Page 169 OWD - Calo di temperatura (durante 2,3,4 ° ° il rilevamento) OWD - Ritardo (ritorno all'impostazione/ 10 ~ 60 minuti 30 minuti programma precedente) 0: No 1: Sì Premere a lungo Ritorna alle il pulsante di impostazioni di accensione/ fabbrica spegnimento per 5 secondi fino al riavvio del...
-
Page 170: Technische Specificaties
Speciale waarschuwingen • Aangezien deze thermostaat moet worden aangesloten op een 230V-netwerk en op verwarmingsapparatuur, mag de installatie alleen worden uitgevoerd door gekwalificeerd personeel. • We raden ook aan dat de initiële configuratie van de thermostaat alleen wordt uitgevoerd door gekwalificeerd personeel dat in staat is de technische procedures uit deze handleiding te implementeren. - Page 171 Voeding ontvangereenheid 230VAC 50/60Hz Geheugen EEPROM NO (normaal open) relais Besturingstype zonder potentiaal (niet ontvangereenheid bekrachtigd) Bedrijfsparameters van het Max. 250 V, max. 10A relais (resistief), stroom AC/DC Temperatuurbereik instellen 5 - 35 C, step 0.5 ° ° Gemeten temperatuurbereik 0 - 50 C, step 0.1 °...
- Page 172 De hoofdeenheid 18:00 °C °C 15 16 Dag van de week Draadloze 1 (maandag) - 7 signaalindicator (zondag) Koelsysteem is Klok ingeschakeld De ingestelde Verwarmingssysteem is temperatuur ingeschakeld Gebruikershandleiding...
- Page 173 Actieve De kamertemperatuur verwarmingsmodus Actief Actieve koelmodus programmanummer Eco, Handmatig, Eco-modus actief Geprogrammeerde modusselectie Handmatige modus Verwarming, selectie actief koelmodus Geprogrammeerde Thermostaat aan/uit modus actief Pijl omhoog en omlaag voor het instellen Batterij indicator van temperatuur en parameters Gebruikershandleiding...
- Page 174 De ontvangsteenheid 1 - WiFi-koppeling en aan/uit 4 - Zone 2, RF-koppeling met de centrale eenheid nr. 2 2 - Zone 1, RF-koppeling met 5 - Zone 2, de centrale eenheid nr. 1 overbruggingsfunctie 3 - Zone 1, overbruggingsfunctie Override functie Override 1: Druk lang op de Override 1-knop op de ontvangereenheid.
- Page 175 functie wordt gebruikt wanneer de verbinding tussen de centrale eenheid nr. 1 en de ontvangereenheid gaat verloren. Druk kort op de Override 1-knop om de Override-modus te verlaten.. Override 2: Druk lang op de Override 2-knop op de ontvanger. De bijbehorende LED gaat branden.
- Page 176 LED Knipperend Eenheid aan Eenheid uit Knippert zelden: Het apparaat is niet verbonden met Het apparaat is WiFi. verbonden met Knippert vaak: Het WiFi. toestel bevindt zich in de WiFi- koppelingsmodus. Het apparaat De verwarming bevindt zich verwarming op zone 1 staat in de RF- op zone 1 staat aan.
- Page 177 De Override- De Override- functie voor functie voor zone zone 2 is niet 2 is actief. actief. Verbindingsdiagram Waarschuwing: Het aansluiten van de ontvanger op een 230 V-voeding en op een verwarmingsinstallatie mag alleen worden uitgevoerd door gekwalificeerd personeel en alleen na raadpleging van de documentatie van de thermostaat en de verwarmingsinstallatie.
- Page 178 1: 230 V AC-voeding (permanent) 2 en 3: 230 V-voeding voor elke afzonderlijke zone geregeld door pompen, kleppen, algemene verdeelkast. 4: COM-NO - Droog contact - voor CV-ketel (met ingangscommando compatibel met COM - NO niet-bekrachtigd relais) Gebruikershandleiding...
- Page 179 Instructies en waarschuwingen voor het eerste gebruik Opmerking: Het systeem wordt geleverd met twee eenheden die in de fabriek zijn gekoppeld. Tijdens de installatie is het alleen nodig om de ontvangerunit aan te sluiten op de draadloze router in huis. •...
- Page 180 Waarschuwing: Zorg ervoor dat u de telefoon hebt verbonden met het draadloze netwerk op de 2,4 GHz-frequentie. Nieuwe generatie routers en telefoons zijn ook uitgerust met het 5 GHz draadloze netwerk, maar de PNI-thermostaat ondersteunt deze frequentie niet. Download de Tuya Smart applicatie uit de App Store of Google Play of scan onderstaande QR-code: Open de Tuya Smart applicatie en druk op de + knop of “Add...
- Page 181 Druk lang op de koppelingsknop op de ontvanger totdat de WiFi-LED snel knippert.. Druk in de applicatie op “Next” en bevestig dat de LED- indicator op het product snel knippert. De applicatie begint met het scannen van apparaten in de buurt.
- Page 182 Functies beschikbaar in de applicatie De volgende functies zijn beschikbaar in de Tuya Smart-applicatie: • Weergave van de ingestelde temperatuur en de gemeten temperatuur. • Verwarmings-/koelingsstatus: het pictogram verschijnt als het verwarmingssysteem is ingeschakeld en het pictogram als het koelsysteem is ingeschakeld. •...
- Page 183 Voor de twee bedrijfsmodi, Verwarmen en Koud, zijn de volgende instellingen beschikbaar: Dagprogramma- instelling (maximaal periodes), Kinderbeveiliging (Toetsenslot), Antivriesbeveiliging, Open raambeveiliging, Temperatuurkalibratie, Instelling dode zone (Hysteresis) , Temperatuurrapport. Gebruikershandleiding...
- Page 184 Temperatuurregeling vanaf de thermostaat Druk op de toetsen Omhoog en Omlaag op de centrale eenheid om de gewenste temperatuur in te stellen. Verwarmingsmodus: • Als de ingestelde temperatuur (SET) hoger is dan de temperatuur in de kamer (ROOM), stuurt de centrale binnen maximaal 90 seconden een commando naar de ontvangstunit.
- Page 185 ontvangstunit. De led De Zone-LED op de ontvanger gaat branden en er klinkt een klik die aangeeft dat het interne relais is geactiveerd. Het icoon (het koelsysteem is ingeschakeld) verschijnt op het scherm van de centrale eenheid. • Als de ingestelde temperatuur (SET) hoger is dan de temperatuur in de kamer (ROOM), stuurt de centrale binnen maximaal 90 seconden een commando naar de ontvangstunit.
- Page 186 hoorbaar met een klik, wat de activering van het interne relais betekent. Binnen korte tijd zal ook de temperatuur (SET) die op het scherm van de centrale eenheid wordt weergegeven, worden bijgewerkt. Let op: Als de temperatuur op het scherm van de centrale eenheid niet binnen maximaal 2 minuten wordt bijgewerkt, controleer dan in de applicatie opnieuw de status van de thermostaat (Online of Offline) en de ingestelde temperatuur.
- Page 187 snel knipperen. Schakel het scherm van de eerste centrale eenheid die u wilt koppelen uit door op de aan/uitknop te drukken. Als het scherm is uitgeschakeld, houdt u de M-knop op de centrale eenheid ingedrukt totdat er een 4-cijferige code op het scherm verschijnt.
- Page 188 gewenste eenheid uit de applicatie of koppelt u een nieuwe eenheid in de betreffende zone. Het eerder gekoppelde apparaat in het betreffende gebied wordt automatisch verwijderd. Verloren of zwak signaal In geval van verlies van het RF-signaal tussen de ontvanger en de centrale eenheid zal het WiFi-pictogram op het scherm verdwijnen en zal de LED die overeenkomt met de zone (Zone 1 of Zone 2) zelden knipperen.
- Page 189 Stel de tijd en de dag van de week in Terwijl het scherm is ingeschakeld, drukt u lang op de M-knop gedurende 5-6 seconden. Alleen de tijd blijft op het scherm weergegeven en de minutenindicator knippert. Druk op de toetsen Omhoog en Omlaag totdat u de gewenste waarde bereikt.
- Page 190 Deze functie is handig bij het openen van een raam (bijvoorbeeld voor ventilatie) zonder de verwarming uit te zetten. De thermostaat keert na 30 minuten terug naar de vorige bedrijfsmodus en het pictogram “open raam” verdwijnt van het scherm. Elke andere druk op de knop binnen 30 minuten stopt de functie en brengt het systeem naar de vorige bedrijfsmodus.
-
Page 191: Geavanceerde Instellingen
temperatuur (SET) knippert. Wijzig de waarde met de knoppen Omhoog en Omlaag. Druk op de P-toets voor de volgende periode. Herhaal de stappen voor de overige dagen en periodes. Voorbeeld van temperatuurprogrammering voor dagen: Day h ° ° ° ° 7:00 22 C 8:30 19 17:00 22... - Page 192 Menu Beschrijving Opties Default Kalibratie van C ~ 8 C (stap ° ° de interne ° ° sensortemperatuur Instellen van de maximaal ingestelde C ~ 35 ° ° ° temperatuurlimiet Instellen van de minimaal ingestelde C ~ 35 ° ° °...
- Page 193 Detectie open raam - OWD OWD - Detectietijd 2 ~ 30 minuten 15 minuten OWD - Temperatuurdaling 2,3,4 ° ° (tijdens detectie) OWD - Tijdvertraging (terug 10 ~ 60 minuten 30 minuten naar vorige instelling/ programma) 0: Nee 1: Ja Houd de aan/ uitknop 5 Keer terug naar de...
-
Page 194: Specyfikacja Techniczna
Specjalne ostrzeżenia • Ponieważ termostat musi być podłączony do sieci 230 V oraz do urządzeń grzewczych, montaż może być wykonany wyłącznie przez wykwalifikowany personel. • Zalecamy również, aby wstępną konfigurację termostatu przeprowadził wyłącznie wykwalifikowany personel, który jest w stanie wdrożyć procedury techniczne opisane w niniejszej instrukcji. - Page 195 Przekaźnik NO (normalnie Typ sterowania jednostką otwarty) bez potencjału odbiorczą (niezasilany) Maks. 250 V, maks. 10A Parametry pracy przekaźnika (rezystancyjny), prąd AC/DC Ustawić zakres temperatur 5 - 35°C, krok 0,5°C Zmierzony zakres temperatur 0 - 50°C, krok 0,1°C Hysteresis 0.2°C Jednostka pomiaru Stopni Celsjusza temperatury...
- Page 196 Jednostka główna 18:00 °C °C 15 16 Dzień tygodnia Wskaźnik sygnału 1 (poniedziałek) - 7 bezprzewodowego (niedziela) Układ chłodzenia jest Zegar włączony Ustawiona System ogrzewania jest temperatura włączony Instrukcja obsługi...
- Page 197 Aktywny tryb Temperatura pokojowa ogrzewania Aktywny tryb Aktywny numer chłodzenia programu Wybór trybu Eco, Tryb Eco aktywny Ręczny, Programowany Wybór trybu ogrzewania, Tryb ręczny aktywny chłodzenia Tryb zaprogramowany Włączenie/wyłączenie aktywny termostatu Strzałka w górę i w dół do Wskaźnik baterii ustawiania temperatury i parametrów Instrukcja obsługi...
- Page 198 Jednostka odbiorcza 1 - Parowanie Wi-Fi i 4 - Strefa 2, parowanie RF z włączanie/wyłączanie jednostką centralną nr. 2 2 - Strefa 1, parowanie RF z 5 - Strefa 2, funkcja override jednostką centralną nr. 1 3 - Strefa 1, funkcja override Override funkcja Override 1: Naciśnij długo przycisk Override 1 na odbiorniku.
-
Page 199: Diody Led
pomiędzy jednostką centralną nr. 1 i jednostka odbiorcza została utracona. Krótko naciśnij przycisk Override 1, aby wyjść z trybu Override. Override 2: Naciśnij długo przycisk Override 2 na odbiorniku. Odpowiednia dioda LED zaświeci się. Strefa 2 będzie nadal się nagrzewać. Funkcja ta wykorzystywana jest w przypadku połączenia pomiędzy jednostką... - Page 200 LED Migający Urządzenie Jednostka włączone wyłączona Miga rzadko: Urządzenie nie jest połączone z Wi-Fi. Urządzenie jest Często miga: połączone z siecią urządzenie Wi-Fi. znajduje się w trybie parowania Wi-Fi. Urządzenie Ogrzewanie Ogrzewanie znajduje się w w strefie 1 jest w strefie 1 jest trybie parowania włączone.
- Page 201 Funkcja Override Funkcja Override dla strefy 2 jest dla strefy 2 jest aktywna. nieaktywna. Diagram połączeń Uwaga: Podłączenia odbiornika do sieci elektrycznej 230 V oraz do instalacji grzewczej dokonuje wyłącznie osoba wykwalifikowana i wyłącznie po zapoznaniu się z dokumentacją termostatu i instalacji grzewczej.
- Page 202 1: Zasilanie 230 V AC (stałe) 2 i 3: Zasilanie 230 V dla każdej oddzielnej strefy sterowane pompami, zaworami, ogólną skrzynką rozdzielczą. 4: COM-NO – styk bezpotencjałowy – dla kotła centralnego ogrzewania (z poleceniem wejściowym zgodnym z COM – przekaźnik beznapięciowy NO) Instrukcja obsługi...
- Page 203 Instrukcje i ostrzeżenia dotyczące pierwszego użycia Uwaga: system jest dostarczany z dwoma jednostkami sparowanymi fabrycznie. Podczas instalacji wystarczy podłączyć odbiornik do routera bezprzewodowego w domu. • Włóż 2 baterie alkaliczne AAA (brak w zestawie) do jednostki centralnej i włącz jednostkę naciskając przycisk włączania/ wyłączania.
- Page 204 2,4 GHz. Routery i telefony nowej generacji są również wyposażone w sieć bezprzewodową 5 GHz, ale termostat PNI nie obsługuje tej częstotliwości. Pobierz aplikację Tuya Smart z App Store lub Google Play lub zeskanuj poniższy kod QR: Otwórz aplikację...
- Page 205 bezprzewodowe połączenie internetowe działa pomyślnie. Jeśli dioda LED nadal miga powoli, oznacza to, że połączenie nie zostało nawiązane, powtórz procedurę. Instrukcja obsługi...
- Page 206 Funkcje dostępne w aplikacji W aplikacji Tuya Smart dostępne są następujące funkcje: • Wyświetla ustawioną i zmierzoną temperaturę. • Stan ogrzewania/chłodzenia: ikona pojawia się, gdy system ogrzewania jest włączony, a ikona, gdy system chłodzenia jest włączony. • Wybór trybu pracy: Ręczny, Eco i Programowany Instrukcja obsługi...
- Page 207 • Zaawansowane ustawienia: Dla dwóch trybów pracy, ogrzewania i chłodzenia, dostępne są następujące ustawienia: ustawienie programu dziennego (maksymalnie okresy), zabezpieczenie przed dziećmi (blokada klawiatury), zabezpieczenie przed zamarzaniem, zabezpieczenie otwartego okna, kalibracja temperatury, ustawienie martwej strefy (histereza) , Raport temperaturowy. Instrukcja obsługi...
- Page 208 Regulacja temperatury z termostatu Naciśnij klawisze „w górę” i „w dół” na jednostce centralnej, aby ustawić żądaną temperaturę. Tryb ogrzewania: • Jeżeli ustawiona temperatura (SET) jest wyższa od temperatury pomieszczeniu (ROOM), jednostka centralna wyśle polecenie do jednostki odbiorczej w ciągu maksymalnie 90 sekund.
- Page 209 centralna wyśle polecenie do jednostki odbiorczej w ciągu maksymalnie 90 sekund. Dioda LED Dioda strefy na odbiorniku zaświeci się i usłyszysz kliknięcie wskazujące aktywację wewnętrznego przekaźnika. Ikona (układ chłodzenia jest włączony) pojawia się na ekranie jednostki centralnej. • Jeżeli ustawiona temperatura (SET) jest wyższa od temperatury pomieszczeniu (ROOM),...
- Page 210 wyłączeniem diody Dioda strefy oraz dźwiękiem kliknięcia, co oznacza aktywację wewnętrznego przekaźnika. W krótkim czasie zaktualizowana zostanie także temperatura (SET) wyświetlana na ekranie jednostki centralnej. Uwaga: Jeżeli temperatura na ekranie centralki nie zaktualizuje się w ciągu maksymalnie 2 minut, sprawdź ponownie w aplikacji stan termostatu (Online lub Offline) i ustawioną...
- Page 211 Wyłącz ekran pierwszej jednostki centralnej, którą chcesz sparować, naciskając przycisk włączania/wyłączania. Gdy ekran jest wyłączony, naciśnij i przytrzymaj przycisk M na jednostce centralnej, aż na ekranie pojawi się 4-cyfrowy kod. Kod i ikona Wi-Fi migają na ekranie. Natychmiast naciśnij przycisk strzałki w górę, aby sparować z odbiornikiem.
- Page 212 Utracony lub słaby sygnał W przypadku utraty sygnału RF pomiędzy odbiornikiem a jednostką centralną, ikona Wi-Fi na ekranie zniknie, a dioda odpowiadająca strefie (Strefa 1 lub Strefa 2) będzie rzadko migać. W przypadku utraty sygnału Wi-Fi pomiędzy odbiornikiem a routerem, dioda Wi-Fi na odbiorniku będzie migać.. Zalecenia: •...
- Page 213 wartość. Naciśnij klawisz M, aby potwierdzić. Wskaźnik godziny miga. Naciskaj klawisze „w górę” i „w dół”, aż osiągniesz żądaną wartość. Naciśnij klawisz M, aby potwierdzić. Wskaźnik odpowiadający dniu tygodnia, 1 (poniedziałek) - 7 (niedziela) będzie migać. Naciskaj klawisze „w górę” i „w dół”, aż...
- Page 214 Codzienna konfiguracja programu za pomocą termostatu Uwaga: Konfigurację programu dziennego można również przeprowadzić za pomocą aplikacji Tuya Smart, procedurę tę zalecamy dla ułatwienia wykonania. Przy włączonym ekranie naciśnij długo przycisk P (6-7 sekund), aby wejść do ustawień PROGRAMU. Dni tygodnia są oznaczone od 1 (poniedziałek) do 7 (niedziela).
-
Page 215: Zaawansowane Ustawienia
Przykład programowania temperatury na dni: Day h ° ° ° ° 7:00 22 C 8:30 19 17:00 22 C 22:00 19 ° ° ° ° 8:00 22 C 8:30 22 C 17:00 22 C 22:00 19 ° ° ° ° 8:00 22 C 8:30 22 C 17:00 22... - Page 216 Ustawianie maksymalnego C ~ 35 ° ° ° ustawionego limitu temperatury Ustawianie minimalnego C ~ 35 ° ° ° ustawionego limitu temperatury Temperatura ochrony C ~ 15 ° ° ° przed zamarzaniem Hysteresis C ~ 6 ° ° ° (Deadzone) (krok 0.1 °...
- Page 217 OWD – Czas detekcji 2 ~ 30 minuty 15 minuty OWD – spadek temperatury (podczas 2,3,4 ° ° detekcji) OWD – Opóźnienie czasowe (powrót 10 ~ 60 minuty 30 minuty do poprzedniego ustawienia/programu) 0: Nie 1: Tak Naciśnij i przytrzymaj przycisk Wróć...
-
Page 218: Specificatii Tehnice
Atentionari speciale • Deoarece acest termostat trebuie conectat la o retea de 230V si la un echipament de incalzire, instalarea trebuie efectuata doar de personal calificat. • De asemenea, configurarea initiala a termostatului recomandam sa fie efectuata doar de personal calificat in masura sa puna in aplicare procedurile tehnice detaliate in acest manual. - Page 219 Releu NO (normal deschis) Tip comanda unitate receptor fara potential (neenergizat) Parametri de functionare Max. 250 V, max. 10A releu (rezistiv), Curent AC/DC Interval temperatura setata 5 - 35 C cu pas de 0.5 ° ° Interval temperatura 0 - 50 C cu pas de 0.1 °...
- Page 220 Prezentare unitate centrala 18:00 °C °C 15 16 Ziua saptamanii Indicator semnal wireless 1 (luni) - 7 (duminica) Ora curenta Indicator racire pornita Temperatura setata Indicator incalzire pornita Mod incalzire activ Temperatura din camera Mod racire activ Numar program activ Manual de utilizare...
- Page 221 Selectare mod Eco, Mod Eco activ Manual, Programat Selectare mod Incalzire, Mod Manual activ Racire Mod Programat activ Pornire/Oprire termostat Sageata Sus si Jos pentru Indicator baterie setare temperatura si parametri Prezentare unitate receptor Manual de utilizare...
- Page 222 1 - Buton imperechere WiFi si 4 - Zona 2, imperechere RF Pornire/Oprire unitate cu unitatea centrala nr. 2 2 - Zona 1, imperechere RF cu 5 - Zona 2, functia Override unitatea centrala nr. 1 3 - Zona 1, functia Override Functia Override Override 1: Apasati lung butonul Override 1 de pe unitatea receptor.
- Page 223 Stare LED-uri LED Clipeste Aprins Stins Unitate pornita Unitate stinsa Clipeste rar: Unitatea nu este conectata la WiFi. Unitatea este Clipeste des: conectata la Unitatea se afla WiFi. in modul de imperechere WiFi. Manual de utilizare...
- Page 224 Unitatea se afla Caldura pe zona 1 Caldura pe zona 1 in modul de este pornita. este oprita. imperechere RF. Functia Override Functia Override pentru zona 1 pentru zona 1 este activa. este inactiva. Unitatea se afla Caldura pe zona Caldura pe zona in modul de 2 este pornita.
- Page 225 1: Alimentare 230 V AC (permanent) 2 si 3: Alimentare 230 V pentru fiecare zona controlata de pompe, valve, cutii de distributie 4: COM-NO - Releu ne-energizat - pentru centrala termica (centrala termica cu comanda de intrare compatibila cu releu neenergizat COM - NO) Manual de utilizare...
- Page 226 Instructiuni si atentionari la prima utilizare Nota: Sistemul vine cu cele trei unitati imperecheate din fabrica. La instalare, mai este necesara doar conectarea unitatii receptor cu router-ul wireless din casa. • Introduceti 2 baterii AAA alcaline (nu sunt incluse) in unitatea centrala si porniti unitatea apasand butonul de pornire/oprire.
- Page 227 2.4 GHz. Router-ele si telefoanele de generatie noua vin echipate si cu reteaua wireless de 5 GHz dar termostatul PNI nu suporta aceasta frecventa. Descarcati aplicatia Tuya Smart din App Store sau Google Play sau scanati codul QR de mai jos: Deschideti aplicatia Tuya Smart si apasati pe butonul + sau pe “Add device”...
- Page 228 LED de pe produs clipeste des. Aplicatia va porni scanarea dispozitivelor din apropiere. Dupa ce termostatul dvs. a fost identificat, apasati pe “Done“ pentru a finaliza procedura. LED-ul de pe receptor va ramane aprins. In acest moment conectarea la internet prin wireless este reusita. Daca LED- ul continua sa clipeasca lent, conexiunea nu a reusit, reluati procedura.
- Page 229 Apasati lung butonul de pornire/oprire de pe unitatea receptor pentru a sterge unitatea din aplicatie. Functii disponibile in aplicatie In aplicatia Tuya Smart sunt disponibile urmatoarele functii: • Afisare temperatura setata si temperatura masurata. • Afisare stare incalzire/racire: apare pictograma cand Manual de utilizare...
- Page 230 sistemul de incalzire este pornit si pictograma cand sistemul de racire este pornit. • Selectare mod de lucru: Manual, Eco si Programat. • Setari avansate: Pentru cele doua moduri de lucru, Heat (Incalzire) si Cold (Racire) sunt disponibile urmatoarele setari: Setare program zilnic (maxim 4 perioade), Protectie copii (Blocare taste), Protectie anti-inghet, Protectie geam deschis, Calibrare temperatura, Setare Dead Zone (Hysteresis), Afisare raport...
- Page 231 Controlul temperaturii din termostat Apasati tastele Sus si Jos de pe unitatea centrala pentru a seta temperatura dorita. Mod incalzire: • Daca temperatura setata (SET) este mai mare decat temperatura din camera (ROOM), unitatea centrala va trimite in maxim 90 de secunde o comanda catre unitatea receptor.
- Page 232 pe unitatea receptor se va aprinde si se va auzi un click care indica actionarea releului din interior. Pe ecranul unitatii centrale apare pictograma (racire pornita). • Daca temperatura setata (SET) este mai mare decat temperatura din camera (ROOM), unitatea centrala va trimite in maxim 90 de secunde o comanda catre unitatea receptor.
- Page 233 si temperatura (SET) afisata pe ecranul unitatii centrale. Nota: Daca temperatura pe ecranul unitatii centrale nu se actualizeaza intr-un interval de maxim 2 minute, verificati din nou in aplicatie statusul termostatului (Online sau Offline) si temperatura setata. Imperechere unitate centrala cu unitate receptor Atentionari: 1.
- Page 234 Stingeti ecranul primei unitati centrale pe care doriti sa o imperecheati apasand butonul de pornire/oprire. Cand ecranul este stins, apasati lung butonul M de pe unitatea centrala pana cand pe ecran apare un cod format din 4 cifre. Codul si pictograma clipesc pe ecran.
- Page 235 Semnal slab sau pierdut In cazul pierderii semnalului RF dintre unitatea receptor si unitatea centrala, pictograma de pe ecran va disparea, iar LED-ul corespunzator zonei (Zona 1 sau Zona 2) va clipi rar. In cazul pierderii semnalului WiFi dintre unitatea receptor si router, LED-ul corespunzator de pe unitatea receptor va clipi.
- Page 236 Apasati tastele Sus si Jos pana ajungeti la valoarea dorita. Apasati tasta M pentru a confirma. Indicatorul orei la clipi. Apasati tastele Sus si Jos pana ajungeti la valoarea dorita. Apasati tasta M pentru a confirma. Indicatorul corespunzator zilei saptamanii, 1 (luni) - 7 (duminica) va clipi.
- Page 237 Configurare program zilnic prin termostat Nota: Configurarea programului zilnic poate fi facuta si prin aplicatia Tuya Smart, procedura pe care, pentru usurinta executarii, o recomandam. Cu ecranul aprins, apasati lung butonul P (6-7 secunde) pentru a intra in setarile de PROGRAM. Zilele saptamanii sunt marcate de la 1 (luni) la 7 (duminica).
- Page 238 8:00 22 C 8:30 22 C 17:00 22 C 22:00 19 ° ° ° ° 8:00 22 C 8:30 22 C 17:00 22 C 22:00 19 ° ° ° ° Setari avansate Opriti unitatea centrala apasand butonul de pornire/oprire. Cu ecranul stins, apasati lung si simultan butoanele M si Sus. Apasati butonul M pentru a naviga prin meniu si sagetile Sus si Jos pentru a modifica valorile.
- Page 239 Hysteresis C ~ 6 C (pas ° ° ° (Deadzone) ° 1: Pornit (Apasati lung timp de 5 sec. Functie blocare taste tasta M pentru a debloca tastele) 0: Oprit Functie detectie On: Pornit geam deschis - OWD Off: Oprit OWD - Timp 2 ~ 30 minute 15 minute...
- Page 240 0: Nu 1: Da Apasati lung butonul de Revenire la setarile pornire/oprire din fabrica timp de 5 secunde pana se restarteaza termostatul. Versiune Software 5055-02...
- Page 241 EU Simplified Declaration of Conformity ONLINESHOP SRL declares that Smart thermostat PNI CT410 PRO complies with the Directive EMC 2014/30/EU, RED 2014/53/UE, and ROHS 2011/65/EU. The full text of the EU declaration of conformity is available at the following Internet address: https://www.mypni.eu/products/9491/download/certifications...
- Page 242 à l’adresse Internet suivante: https://www.mypni.eu/products/9491/download/certifications Egyszerűsített EU Megfelelési Közlemény ONLINESHOP SRL kijelenti azt, hogy a Intelligens termosztát PNI CT410 PRO megfelel az EMC 2014/30/EU, RED 2014/53/UE és ROHS 2011/65/EU irányelvnek. Az EU-megfelelőségi nyilatkozat teljes szövege a következő internetes címen érhető el: https://www.mypni.eu/products/9491/download/certifications Dichiarazione UE di conformità...
- Page 243 Vereenvoudigde EU-conformiteitsverklaring ONLINESHOP SRL verklaart dat Slimme thermostaat PNI CT410 PRO voldoet aan de richtlijn EMC 2014/30/EU, RED 2014/53/UE en ROHS 2011/65/EU. De volledige tekst van de EU-conformiteitsverklaring is beschikbaar op het volgende internetadres: https://www.mypni.eu/products/9491/download/certifications Uproszczona deklaracja zgodności UE ONLINESHOP SRL oświadcza, że Inteligentny termostat PNI CT410 PRO jest zgodny z dyrektywą...
Need help?
Do you have a question about the CT410 PRO and is the answer not in the manual?
Questions and answers