
Related Manuals for P'kolino Curva Rattan Full Bed


Summary of Contents for P'kolino Curva Rattan Full Bed
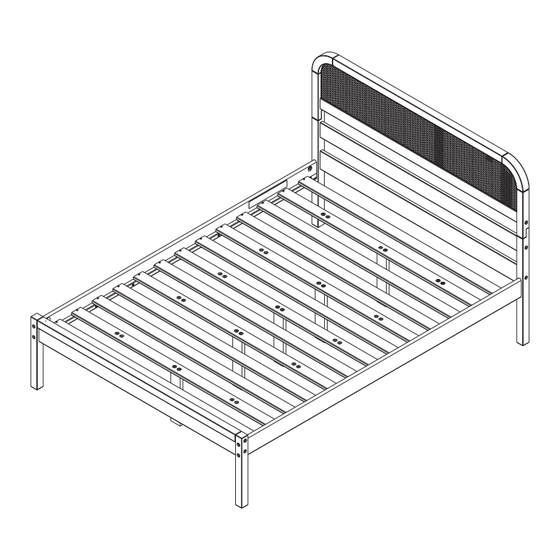
- Page 1 Curva Rattan Full Bed READ ALL INSTRUCTIONS BEFORE ASSEMBLING FULL BED. KEEP INSTRUCTIONS FOR FUTURE USE. THE ASSEMBLY OF THIS PRODUCT REQUIRES TWO ADULT. 2023 Made in Brazil. May / 2024...
- Page 2 packaging are to Full 2023 Made in Brazil. May / 2024...
- Page 3 Curva Rattan Full Bed - Parts: MANUFACTURER LABEL DO NOT REMOVE ! 10 10 PLEASE ASSEMBLE THE BED ON THE GROUND, BUT FIRST PLACE SOME PROTECTIVE MATERIAL, SUCH AS A CARDBOARD BOX OR A RUG, ON THE FLOOR TO PREVENT ANY DAMAGE TO THE BED.
- Page 4 Identify the size and type of hardware using the illustration below: 12 - Wooden dowels 1 3/16" (10 x 30mm) 12 - Bolts 3 1/2" (1/4" x 90mm) 04 - Bolts 3 1/2" (7 x 90mm) 10 - Bolts 1 9/16" (7 x 40mm) 20 - Screws 02 -...
- Page 5 Step 1 Headboard Insert 8 wooden dowels into the holes on parts as shown in the diagram. Hammer 1 3/16" Wooden Dowel PLEASE ASSEMBLE THE HEADBOARD ON THE GROUND, BUT FIRST PLACE SOME PROTECTIVE MATERIAL, SUCH AS A CARDBOARD BOX OR A RUG, ON THE Step 2 FLOOR TO PREVENT ANY DAMAGE TO THE HEADBOARD.
- Page 6 Step 3 Headboard Attach part to parts with 1 bolt ,1 bolt ), 1 half moon nut , using Allen wrench B and C 3 1/2" Bolt 3 1/2" Bolt 1/4" Half Allen Moon Nut wrench PLEASE ASSEMBLE THE HEADBOARD ON THE GROUND, BUT FIRST PLACE SOME PROTECTIVE MATERIAL, SUCH AS A CARDBOARD BOX OR A RUG, ON THE Step 4...
- Page 7 Step 5 Headboard Insert panel into the grooves on parts , as shown in the diagram. PLEASE BE CAREFUL WHEN INSERTING THE RATTAN PANEL INTO THE CROSSBAR CHANNEL TO PREVENT THE RATTAN FIBERS FROM DETACHING RATTAN INSIDE THIS FACE PLEASE ASSEMBLE THE HEADBOARD ON THE GROUND, BUT FIRST PLACE SOME PROTECTIVE MATERIAL, SUCH AS A CARDBOARD BOX OR A RUG, ON THE Step 6...
- Page 8 Step 7 Headboard Attach Metal Plate to Headboard with 4 screws using a Phillips Screwdriver. ATTENTION! PRE-DRILLED HOLES Phillips screwdriver 1 3/8" Screw Metal Plate PLEASE ASSEMBLE THE HEADBOARD ON THE GROUND, BUT FIRST PLACE SOME PROTECTIVE MATERIAL, SUCH AS A CARDBOARD BOX OR A RUG, ON THE Step 8 FLOOR TO PREVENT ANY DAMAGE TO THE HEADBOARD.
- Page 9 Step 9 Footboard Insert 4 wooden dowels (A) into the holes on to part as shown in the diagram. Hammer 1 3/16" Wooden Dowel PLEASE ASSEMBLE THE FOOTBOARD ON THE GROUND, BUT FIRST PLACE SOME PROTECTIVE MATERIAL, SUCH AS A CARDBOARD BOX OR A RUG, ON THE FLOOR TO PREVENT ANY DAMAGE TO THE FOOTBOARD.
- Page 10 Step 11 Footboard Attach part to parts with 4 Screws , using Phillips Screwdriver. Phillips screwdriver 1 3/8" Screw Step 12 Siderails Attach the Siderail to the headboard with 2 bolts 2 Half moon nuts , using Allen wrench MANUFACTURER LABEL DO NOT REMOVE! 3 1/2"...
- Page 11 Step 13 Siderails Attach the Footboard to the Siderail with 2 bolts 2 half moon nuts , using Allen wrench In this step it is necessary MANUFACTURER LABEL DO NOT REMOVE! for 2 people to avoid damage. 3 1/2" Bolt 1/4"...
- Page 12 Step 15 Bed Slats 1) Attach the slats 11 to parts 12 with 2 screws , using Allen wrench (H) Allen wrench 1 9/16" Bolt Step 16 Bed Slats 1) Attached the rst slat to the end of the side rail base with 2 screws , using Phillips screwdriver.
- Page 13 Optional Trundle use Bed Slats 1) To use a trundle, attach the parts 12 with 2 screws into the side holes of the slats 11, using allen wrench (H). Allen wrench 1 9/16" Bolt...
Need help?
Do you have a question about the Curva Rattan Full Bed and is the answer not in the manual?
Questions and answers