Advertisement
- 1 Introduction
- 2 What's Included
- 3 First Use & Cleaning
- 4 Dishwasher Safe
- 5 Hand Wash Only
- 6 Getting to Know Your Mixer
- 7 BOWL COVER
- 8 MIXING BOWL
- 9 WIRE WHIPS
- 10 DOUGH HOOK
- 11 Tool Speed Guide
- 12 Baking Bread
- 13 Artiste Mixer Bread Steps
- 14 Whole Wheat Bread
- 15 Baker's Pack Includes
- 16 Important Safeguards
- 17 Documents / Resources
Introduction
When you purchase from us you expect the best money can buy, which is why here at NutriMill we pride ourselves on creating quality, state-of-the-art kitchen appliances that you can be proud to use in your home.
The Artiste mixer was designed with you in mind; to provide you with the ease of creating fresh baked goods, delicious and healthy meals, and other tasty treats. You'll be eating well, saving time on the prep work, and have the freedom to make just about any type of food in a simplified manner. The Artiste mixer is your answer to better health, more flavor, and nutrition in whatever you choose to prepare.
The Artiste mixer has a compact powerful bottom drive motor, easy-to-clean parts, and a variety of attachments to accommodate preparing a wide range of foods, perfect for large or small batches.
For video guides & other resources scan the QR code below or visit:
nutrimill.com/artiste-mixer-resources/

What's Included

First Use & Cleaning
BEFORE USING FOR THE FIRST TIME
Carefully remove the mixer from it's package and place it on the counter. As you remove the accessories from the package make sure all the standard parts are present.
Before using any of the attachments for the first time it is recommended that they be washed, rinsed well, and dried.
Cleaning & Care
- TheWhip Drive should be hand washed in warm soapy water, rinsed and dried to maintain it's luster.
- Plastic Bowl & Driveshaft, Splash Ring & Lid, Wire Whips and Dough Hook are dishwasher safe. (Remove drive shaft from bowl when washing).
- The mixer base should only be wiped with a damp cloth.
- DO NOT IMMERSE THE MOTOR BASE.
Drive Shaft
The bowl's center drive pole is removed from the bottom of the bowl by turning counter-clockwise on the tabs firmly and pulling. Make sure everything is dried well before putting the bowl back on the mixer base. This prevents corrosion or damage inside the machine.
Dishwasher Safe

Hand Wash Only

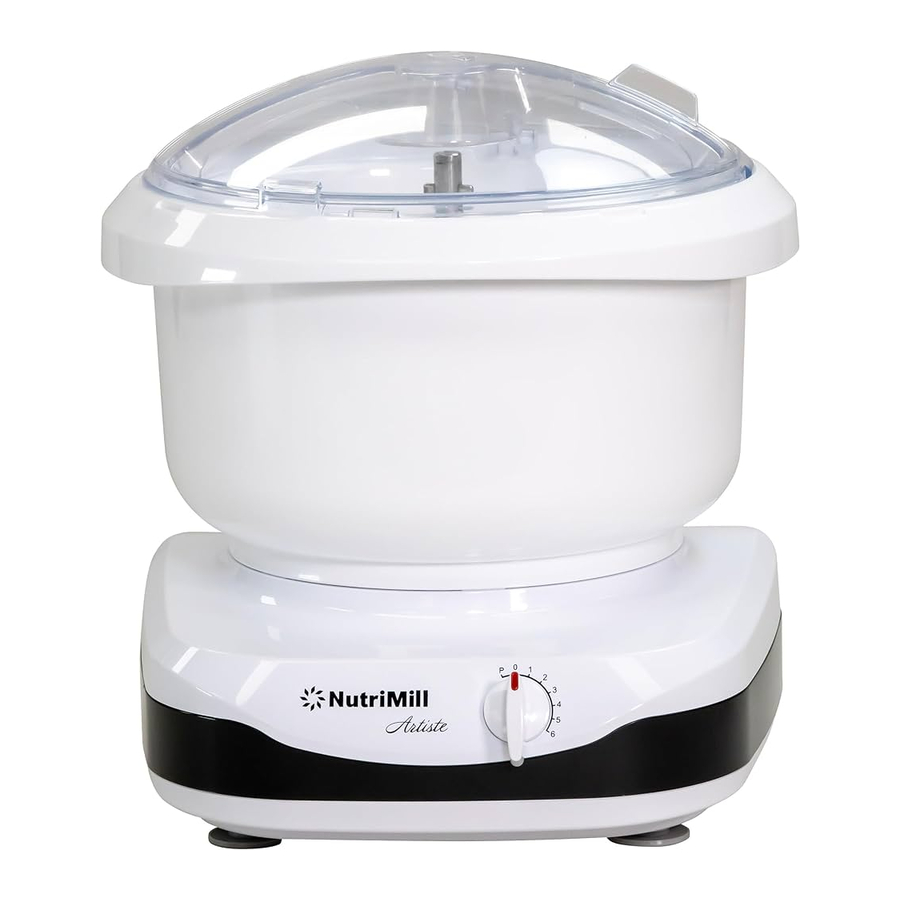
Getting to Know Your Mixer
Place the mixer base on a clean, stable work surface.
Unwind or pull out the power cord and plug it in.

Push in to store cord, and latch plug behind small notch as shown below.

Familiarize yourself with the motor speed switch "0" is off. The "P" position is pulse, this setting provides full power while it is held in position. You can use this to quickly incorporate ingredients. There are six speeds giving you total control over your mixing.

The Artiste® motor has a safety cut-off switch to protect against overheating. If the motor is overloaded or overheated, the thermal switch will stop the motor. To reset the mixer follow these instructions:
- Unplug
- Turn knob to zero (0)
- Wait 5 - 30 seconds
- Turn on mixer
BOWL COVER
For safety, place the bowl cover on the bowl when it is in operation. This prevents accidental contact with moving parts and helps prevent splashing at the beginning of mixing.
For easy cleaning of the lid rotate the sliding lid clockwise until the notch on the sliding lid lines up with the hole in the cover. Lift the sliding lid straight up to separate the two pieces. To reconnect align the center notch of the sliding lid with the hole in the cover and the sliding lid will drop easily into place.

MIXING BOWL

Do not overload the mixer. The bowl should not be completely full when making heavy or stiff dough. You can do a full bowl of light batter. You can also completely fill the bowl with foods when using other accessories, like the Slicer Shredder or the Spiralizer.
To attach the mixing bowl securely, ensure that it locks into place. Place the bowl on the mixer base and rotate counter—clockwise with slight downward pressure. You will hear and feel it click into place.

WIRE WHIPS
The wire whips are very efficient for mixing light foods, such as cream, egg whites, batters, and light doughs thin enough to pour.
Switch to the dough hook before adding flour to heavy doughs and when adding nuts, chocolate chips, or other hard items to your cookies.
First attach the wire whips to the whip drive then place the assembly onto the center column until it is properly seated.

DOUGH HOOK
The dough hook is very effective for kneading dough, even a small, one loaf batch.
Place the dough hook onto the center column rotating it clockwise until it is properly seated.

Tool Speed Guide
| Tool/Food | Speed | Time |
| Whisks | ||
| Egg Whites (2) | 6 | 2 min. |
| Whipping Cream (1 cup) | 5-6 | 2 min. |
| Basic Cake Batter | ||
| Combine all ingredients | 3 | 1/2 min. |
| Recipe mix | 4-5 | 2 min. |
| Whisks / Dough Hook | ||
| Cookie Dough | ||
| Cream soft butter | 5 | 2 min. |
| Adding flour | 2 | 1 min. |
| Switch to dough hook to combine nuts, chocolate chips, etc. | ||
| Dough Hook | ||
| Yeast Dough | ||
| Combine all wet ingredients | 3 | 1/2 min. |
| Add flour in portions | 2 or 3 | 5 min. |
Speed 1 should be used for initial stirring and combining.
BUTTER, OR OTHER FATS MUST BE SOFT/ROOM TEMPERATURE.
Important Notice:
The Artiste® Mixer shares some similarities with the Bosch® Universal Plus Kitchen Machine. Purposely it was designed to have parts that interchange between the two mixers. The two mixers differ in power and capacity for some functions; particularly for kneading bread dough.
- Maximum load for bread dough is 6 Lbs.
*This differs from the Bosch® Mixer capacity. - If your machine becomes overloaded, it may turn off automatically as a motor protection until the motor has sufficient time to cool.
Most other functions are similar to the Bosch® Mixer.
Baking Bread
INGREDIENTS
Use instant yeast or bread machine yeast. This may be added with dry ingredients and does not need to be dissolved in water (if it is know to be fresh). Store yeast in an airtight container and refrigerate or freeze to maintain freshness. When a recipe calls for oil and honey, put oil in measuring cup first and then honey. This allows honey to slide out more easily.
KNEADING
Start counting kneading time as soon as you have added the last of the flour. It is always best to stop kneading early, rather than to over knead. Typical kneading time for bread is 5-8 minutes using Speed 2 or 3 depending on the batch size.
RISING
To test if dough has risen enough, press finger lightly and quickly into dough. If indentation springs back, let rise additional time. If indentation remains or comes back slowly, dough has risen enough. If bread cracks on the sides, it may be that the dough has not risen long enough or too much dough has been put in the pan.
BAKING
Using a meat thermometer is extremely helpful in determining when bread is done. Bread is done when internal temperature is 190ºF-200ºF and the top is golden brown. When baking sweet bread or braided filled breads, it may be necessary to tent the top with foil the last 5-10 minutes to avoid over browning.
Artiste Mixer Bread Steps
- Add ingredients to the bowl in this order: liquids first, next 1/2 the recommended flour, and other dry ingredients, (yeast on top). Pulse "P" switch a few times. Mix on speed 2-3 until just combined. Optional: before continuing kneading let the dough rest 15-30 minutes, until bubbly. (This will enhance the flavor and texture).
- Gradually add more flour until dough pulls from sides and bottom of the bowl and forms a ball.
- Knead dough 5-8 minutes, until smooth and elastic, so a small piece can be gently stretched to form a translucent "window," without tearing.
- Remove dough from the bowl and place it on a lightly oiled surface (for whole wheat dough) or a lightly floured surface (for white dough). Divide into equal portions depending on pan size. Shape as desired and place in greased pans. Dough should fill the pan about half way.
- Cover and let rise until doubled, 20-60 minutes, depending on size and shape of dough and room temperature. You may wish to double rise your dough. This is best done by letting the dough rise in the bowl with the cover on and then kneading for 1 additional minute before shaping into loaves.
- Bake until golden brown. Filled loaf breads such as jalapeño cheese or cinnamon swirl typically take up to 5 minutes longer to bake than standard loaves.
Whole Wheat Bread
Ingredients
Small Batch (3 Loaves)
3 Cups Warm Water
1/3 Cup Vegetable Oil
1/3 Cup Honey
1 Tbsp Salt
7-9 Cups Whole Wheat Flour
1 1/2 Tbsp Instant Yeast
1 Tbsp Vital Wheat Gluten*
1 Tbsp Dough Enhancer*
*Optional ingredient
- With dough hook in place, add water, oil, honey, salt, about half of the flour, and the yeast into the mixing bowl. Use the "P" switch to incorporate.
- Optional step: for enhanced flavor and texture, allow the batter to sit for 15-30 minutes, until it becomes bubbly.
- Slowly increase to Speed 3 or 4 and continue adding remaining flour, a little at a time, until the dough pulls away from the sides of the bowl. You may need all of the flour.
- Continue kneading at Speed 2 or 3 for 6-8 minutes until the dough is smooth and elastic.
- Lightly oil your hands and the counter. Divide dough into equal portions and shape into loaves. Place in greased loaf pans and let rise until doubled in size.
- Bake at 350ºF for 30-40 minutes or until internal temperature reaches 190ºF.
Baker's Pack Includes
Cake Paddles #MUZ6KP1

Great for pourable batters without adding extra air.
Cookie Paddles #MUZ6CP1

Perfect for thick batters and soft doughs.
Bowl Scraper #MUZ6BS1

Does the work for you by scraping both the inner post and sides of your bowl while mixing.
Important Safeguards
Please Read All of These Instructions Throughly
When using electrical appliances, basic safety precautions should always be followed
including the following:
- To protect against risk of electrical shock DO NOT put motor base or power cord in water or other liquid.
- Close supervision is necessary when any appliance is used by or near children.
- Unplug from outlet when not in use, before putting on or taking off parts, and before cleaning.
- DO NOT operate any appliance with a damaged cord or plug or after the appliance malfunctions, is dropped, or damaged in any manner. Return appliance to the nearest authorized service facility for examination, repair, electrical or mechanical adjustment.
- The use of attachments not recommended or sold by the manufacturer may cause fire, electric shock, or injury.
- DO NOT use outdoors.
- DO NOT let cord hang over edge of work surface.
- DO NOT let cord or unit contact hot surfaces, including the stove.
- DO NOT unplug from electrical outlet by pulling on the cord. To unplug, grasp the plug and pull.
- Avoid contacting moving parts. Keeps hands, hair, clothing, as well as spatulas and other utensils away from whisks, beaters, blades, or dough hook and/or other moving parts during operation to reduce risk of injury to persons, and /or damage to the appliance or its attachments.
- DO NOT leave mixer unattended while in use.
- Only operate the appliance with covers in place.
- This appliance has a polarized plug (one blade is wider than the other). To reduce the risk of electric shock, this plug will fit in a polarized outlet only one way. If the plug does not fit fully in the outlet, reverse the plug. If it still does not fit, contact a qualified electrician. DO NOT modify the plug in any way.

@nutrimill
Documents / Resources
References
Download manual
Here you can download full pdf version of manual, it may contain additional safety instructions, warranty information, FCC rules, etc.
Advertisement


Need help?
Do you have a question about the Artiste and is the answer not in the manual?
Questions and answers