Advertisement
- 1 In the Package
- 2 Product Overview
- 3 LED Display Introduction
- 4 Assemble the Feeder
- 5 Connect to APP
- 6 Manual Feeding Setting
- 7 Feeding Schedule Settings
- 8 View the Feeding Log
- 9 Slow Feed Setting
- 10 Share and Remove Devices
- 11 Statement for WIFI Indicator
- 12 The Desired Amount of Kibbles
- 13 Tips for Cleaning
- 14 Specification
- 15 Use Precautions
- 16 Troubleshooting
- 17 Issues of connection
- 18 Contact Us
- 19 Documents / Resources
In the Package

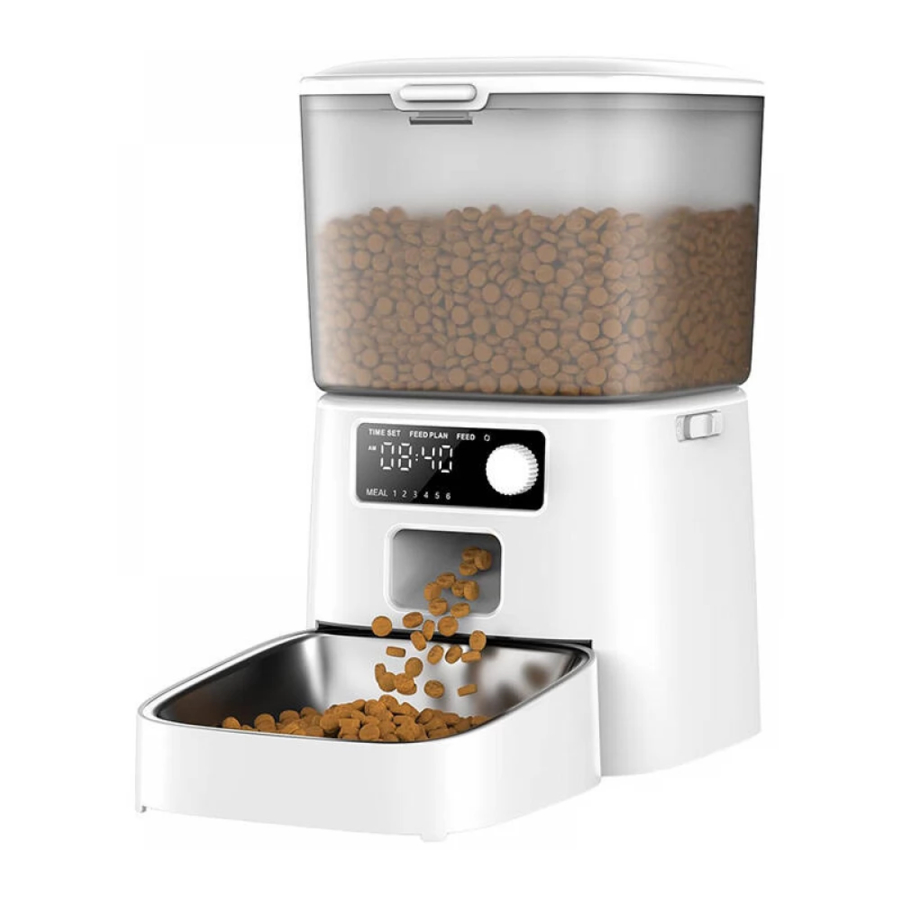
Product Overview

LED Display Introduction

Assemble the Feeder
Please scan the QR code below to obtain detailed assembly video for the cat feeder.

Video Tutorial
Connect to APP
The feeder supports 2.4GHz WiFi
 Note: When powered by batteries only, the feeder can dispense food on time according to the set schedule even during a power outage, but you won't be able to use the app unless it is plugged in.
System requirements
iPhone on iOS 10.0 or later. Smartphone on Android 5.0 or later.
- Download and install the Smart Life app.
![warning]() Note: To proceed with the installation and sign-up process, please grant the necessary authorization. Upon entering your email address, you will receive a verification code. It is essential to enter this code before proceeding to set your account password.
Note: To proceed with the installation and sign-up process, please grant the necessary authorization. Upon entering your email address, you will receive a verification code. It is essential to enter this code before proceeding to set your account password.

- Turn on the Bluetooth feature on your mobile phone is turned on.
Next, connect your phone to a Wi-Fi network and enable GPS location services.
![]()
- To activate the feeder, first, turn it on. Press and hold the dial button for approximately 5 seconds to unlock it. Then, rotate the dial to the RESET icon and hold it for 5 seconds. You will notice that the WIFI icon will turn red and start flashing.

![warning]() Note:
Note:
If you are using batteries as the sole power supply for the feeder, a battery icon will be displayed on the device. - On the app, locate the "+" symbol on the right side and click on it to add a new feeder to your account.
![]()
- Within the app, utilize the "Add Device" feature to detect the device as depicted in the provided image. The model name of the device should be
PFD-OOIPro. Once the device is identified, click on the "Add" button to proceed.
![]()
- When connecting the feeder for the first time or switching to a new Wi-Fi network, you will be prompted to enter the Wi-Fi password. Please enter the password in the provided field and click on the "Next" button to continue.
![]()
- Please wait patiently for the connection to be established and succeed. This may take a few moments.
![]()
- Once the connection is successfully established, click on the "Done" button to finalize the setup. You will notice that the WIFI icon on the device will turn white and stop blinking.


Note:
- When connecting the feeder to the power outlet, please note that the middle menubar on the device will disappear automatically after 5 seconds of no user interaction.
- When using batteries as the sole power supply, it's important to be aware that the entire screen will turn black after 30 seconds of inactivity. To reactivate the screen, simply turn the dial as desired, and it will light up again.
Manual Feeding Setting
- Once the connection process is completed, the mobile phone will automatically open the settings menu.
![]()
- Choose the desired number of portions by selecting the appropriate value, and then click on the "Manual" option. In accordance with the provided image, the feeder will dispense 5 portions.
![]()


Feeding Schedule Settings
- Click on the "Meal Plan" option to access the feeding plan setting interface. Tap on "Add" option to set feeding schedule.
![]()
- Select the desired number of days of the week for feeding. Then, choose the feeding time and specify the number of portions for each feeding.
![]()


Once the settings are properly configured, you will obtain a schedule as illustrated below:

You have the flexibility to set up to 10 meals in total, with a maximum of 36 portions per meal.
View the Feeding Log
- Click on the "Feed Record" option to view the log for the current week, which will display the feeding records after each feeding session has been completed.
![]()

Slow Feed Setting
Click on the settings icon. From there, you have the option to switch off the indicator. Additionally, you can enable the Slow Feed switch, which will adjust the grain interval to 10 seconds per portion.

Share and Remove Devices
Share the device
- To enter the modification page, click on the pencil icon located in the upper right corner of the feeding interface within the app.
![]()
- Tap on "Share Device" to share this feeder with your family and friends.
![]()


Remove devices
On the device list screen, press and hold the desired device for 5 seconds to access the "Remove Device" screen. From there, select the device you wish to remove and click on the "Remove Device" button.

Statement for WIFI Indicator
| State of the icon | Indicates |
| Red+Flash | Connecting to network |
| White+Stay on | Connected to network |
| White+Flash quickly | Disconnected from the network, the device retained the memory of the last mobile phone it was connected to. |
| White+Flash slowly | Disconnected from the network and does not have memory of the last mobile phone. |
The Desired Amount of Kibbles
Based on our laboratory experiment, the size of the kibble we used measured approximately 0.3 inches.
Here's the data from our experiment
| Cup | Portion | Gram |
| 1/8 | 2 | 15 |
| 1/4 | 3 | 29 |
| 1/3 | 4 | 38 |
| 1/2 | 6 | 57 |
| 1 | 12 | 114 |
Please note that the provided data is for reference purposes only. It is essential to conduct your own testing to determine the appropriate amount of dry food for your specific pet, considering the particular brand and type of dry food you are using.
Here are the steps:
- The number above the PORTION means the portion of the kibbles.
- For example, 1/2 cup equals to 6 portions, so 1/4 cup would equals to 3 portions.

- Set the portion number to 3.
- Measure the delivered kibbles. If the kibbles are measured as the amount you need, it means this setting is OK.

- Otherwise, adjust the portion number to let it get close to the desired amount.


Tips for Cleaning
Please scan the QR code below for a detailed cleaning video of the cat feeder.

Video Tutorial
Specification
| Model: | PFD-001Pro |
| Product Size: | 11.4 x 6.6 x 6.6in |
| Capacity: | 12Cups (2.7 lb dry food) |
| Portion Size: | 6 Portions=1/2 Cup=57 G |
| Material: | ABS+304 stainless steel |
| Input: | 5V DC/1A |
| Food: | Dry food, less than 0.5 inch in diameter |
| Power Supply: | Cord suggested/batteries for backup |
Use Precautions
- Recommend for pets over 6 months old.
- Indoor use. Avoid direct sunlight. Keep away from fire.
- Use the attached adapter. Otherwise, the feeder may be damaged or fail to work.
- DO NOT soak the main machine in water.
- To prevent pets from pushing over the feeder, were commend to use against the wall.
- Children should use it under guidance.
- Stop to use the desiccant bag if you find it is broken.
- Please unplug the power cord and remove the batteries at the bottom if you would like to stop using the feeder.
Troubleshooting
For troubleshooting assistance and inquiries related to your order, please contact us via email at support@oneisall.com. To ensure a prompt resolution to your issue, kindly provide your order ID along with the details of the problem you are experiencing. Our support team will be dedicated to helping you find a fast and satisfactory solution.
| Problems | Solutions |
| The feeder can not work | Check if the cord connected well. |
| Do not use batteries, use another type-C charging cord to see if the feeder works. | |
| Unplug the cord and use new batteries to see if it works. | |
| Desiccant Replacement | Email us: support@oneisall.com |
| The dial do not work | Try to press and hold it for 3 seconds to unlock the feeder. |
| Food stuck or show E-01 error code | Make sure the kibble size less than 0.5 inch in diameter. |
| Check if the tank and food outlet keeps dry. | |
| Check if the food keeps dry and fresh. | |
| If the food stop in the outlet, clean it. | |
| If you use without cord, replace the batteries. | |
| LED Display is off | When using the battery as the only power source, the screen would be off to save electricity. But the feeder would work normally. |
Issues of connection
A: Fail to connect to network.
- Ensure that you are not in tourist mode. Register an APP account for the initial login.
- Make sure the feeder is properly connected to a power source.
- Double check the accuracy of the entered WIFI account and password.
- Ensure that the WIFI signal is strong. For optimal performance, keep the distance between the router and feeder under 10 meters to avoid a weak network signal.
- Confirm that the red WIFI icon is blinking slowly.
B: The device cannot be found.
- Verify that WIFI and Bluetooth are enabled on your mobile phone.
- If the device cannot be found during the network distribution process after a prolonged time, perform a device reset. Turn the dial to RESET,press and hold the dial for 5 seconds to reset the WIFI connection. You will hear two beeps, and the WIFI indicator will flash, indicating the reset is complete. You can now proceed to add the device.
C: The feeder display is offline.
- Check if your mobile phone is properly connected to the network.
- Ensure that the distance between the feeder and the home router is less than 10 meters, without any walls obstructing the signal. WIFI signals weaken significantly when passing through partition walls, leading to unstable offline connections.
- Verify that the home network is functioning correctly. If you are away from home, rest assured that the feeder will continue to operate according to its schedule even if the network is disconnected. Your pet's feeding routine will be maintained, so there is no need to worry about them going hungry.
- Plan and set the feeding schedule in advance before going on a trip to prevent any interruptions caused by internet disconnections or offline equipment.
Contact Us
WE ARE READY TO HELP
+1877-522-8578 (US) Mon-Fri 8am-5pm (PST)
For more information, you can visit our website www.oneisall.com
If any accessories are missing, there are quality issues, or you have any questions about this feeder's usage, please feel free to contact us. via support@oneisall.com
We showcase buyer's voice on our website regularly. You are welcome to record and share your own experience of our products.

oneisall support

Scan to Download APP

oneisall Official Community

@Oneisall Official
Documents / Resources
References
Download manual
Here you can download full pdf version of manual, it may contain additional safety instructions, warranty information, FCC rules, etc.
Advertisement


Need help?
Do you have a question about the PFD-001 Pro and is the answer not in the manual?
Questions and answers