Table of Contents
Advertisement
Advertisement
Table of Contents

Related Manuals for oneisall PFD-002 Pro


Summary of Contents for oneisall PFD-002 Pro
- Page 1 Automatic Pet Feeder with WIFl PFD-002 Pro User Manual ON-D97...
- Page 2 Scan to oneisall Official oneisall support Video Tutorial Download APP Community Thank you for choosing us! To use the feeder correctly, please take a moment to read this User Manual before you use the product. If any accessories are missing, there are quality issues, or you have any questions about this feeder’s usage, please feel free to contact us.
-
Page 3: Table Of Contents
Contents In the Package Product Overview LED Display Introduction Assemble the Feeder Connect to APP Manual Feeding Setting Feeding Schedule Settings View the Feeding Log Slow Feed Setting Share and Remove Devices Statement for WIFI Indicator Statement for Battery Icon Record A Message The Desired Amount of Kibbles Tips for Cleaning... -
Page 4: In The Package
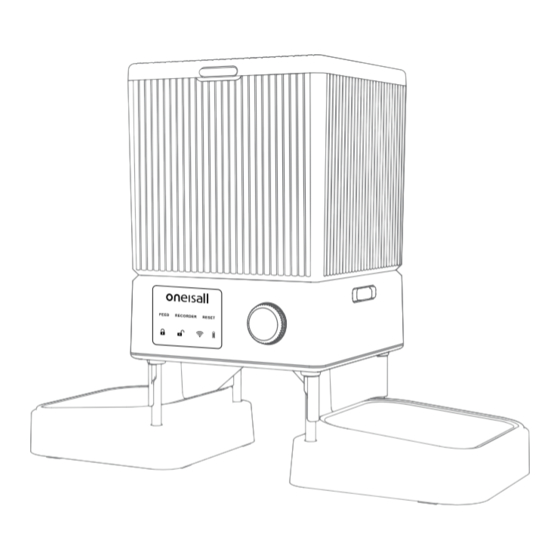
In the Package 1xAutomatic 2xStainless Steel 1xPower Cord 1xDesiccant Bag Pet Feeder Bowl and Holder with Adapter Quick Guide 1xUser Manual 1xQuick Guide 1xSponge 4xMetal Post 2xFood Slides Product Overview Lid button Food tank Desiccant box Battery compartment Switch for the tank LED Display Dial... -
Page 5: Led Display Introduction
LED Display Introduction FEED: Manual feed RECORDE: Record a message RESET: Clean all settings Battery icon Locked/Unlock WIFI indicator... -
Page 6: Assemble The Feeder
Assemble the Feeder 1. Take out the machine, press the 2. Invert the machine and install 4 AA button in front of the top lid, open batteries. the tank and take out all Note: accessories. The back-up batteries are not included in the package. - Page 7 5. Take out 4 metal posts and insert them 6. Align the 2 holes at the bottom of the into four holes at the bottom of the bowl holder with 2 metal posts and install machine. them properly. Do the same on the other side.
-
Page 8: Connect To App
Connect to APP The feeder supports 2.4GHz and 5GHz WiFi System requirements iPhone on iOS 10.0 or later. Smartphone on Android 5.0 or later. 1. Download and install the Smart Life app. Smart Life Note: To proceed with the installation and sign-up process, please grant the necessary authorization. - Page 9 2. Turn on the Bluetooth feature on your mobile phone is turned on. Next, connect your phone to a Wi-Fi network and enable GPS location services. 3. To activate the feeder, first, turn it on. Press and hold the dial button for approximately 3 seconds to unlock it.
- Page 10 5. Within the app, utilize the “Add Device” feature to detect the device as depicted in the provided image. The model name of the device should be PFD-002 PRO. Once the device is identified, click on the "Add" button to proceed.
- Page 11 6. When connecting the feeder for the first 7. Please wait patiently for the connection time or switching to a new Wi-Fi network, to be established and succeed. This may you will be prompted to enter the Wi-Fi take a few moments. password.
-
Page 12: Manual Feeding Setting
Manual Feeding Setting 1. Once the connection process is 2. Choose the desired number of portions by completed, the mobile phone will selecting the appropriate value, and then automatically open the settings menu. click on the "Manual" option. In accordance with the provided image, the feeder will dispense 5 portions. -
Page 13: Feeding Schedule Settings
Feeding Schedule Settings 1. Click on the "Meal Plan" option to 2. Select the desired number of days of the access the feeding plan setting week for feeding. Then, choose the feeding interface.Tap on “Add” option to set time and specify the number of portions for feeding schedule. - Page 14 Once the settings are properly configured, you will obtain a schedule as illustrated below: You have the flexibility to set up to 10 meals in total, with a maximum of 60 portions per meal.
-
Page 15: View The Feeding Log
View the Feeding Log 1. Click on the "Feed Record" option to view the log for the current week, which will display the feeding records after each feeding session has been completed. Slow Feed Setting Click on the settings icon. From there, you have the option to switch off the indicator. Additionally, you can enable the Slow Feed switch, which will adjust the grain interval to 10 seconds per portion. -
Page 16: Share And Remove Devices
Share and Remove Devices Share the device. 1. To enter the modification page, click on 2. Tap on "Share Device" to share this the pencil icon located in the upper right feeder with your family and friends. corner of the feeding interface within the app. -
Page 17: Statement For Wifi Indicator
Remove devices On the device list screen, press and hold the desired device for 3 seconds to access the "Remove Device" screen. From there, select the device you wish to remove and click on the "Remove Device" button. Statement for WIFI Indicator State of the icon Indicates Red+Flash... -
Page 18: Statement For Battery Icon
Statement for Battery Icon When the battery is fully charged, the battery icon will be displayed in white. However, if the battery level becomes low, the icon will turn red and start blinking as a warning indicator. If you notice the battery icon turning red and blinking, it is an indication that the battery needs to be replaced. -
Page 19: The Desired Amount Of Kibbles
The Desired Amount of Kibbles Based on our laboratory experiment, the size of the kibble we used measured approximately 0.3 inches. Here's the data from our experiment Portion Gram Please note that the provided data is for reference purposes only. It is essential to conduct your own testing to determine the appropriate amount of dry food for your specific pet, considering the particular brand and type of dry food you are using. -
Page 20: Tips For Cleaning
Tips for Cleaning 1. Before cleaning, make sure to unplug 2. Unlock the tank by following the the charging cord from the feeder. instructions provided, and carefully remove it from the feeder. Pour out any remaining cat food from the tank. 3. -
Page 21: Specification
Specification Model: PFD-002 PRO FCC ID: 2BBAWPFD-002 Size: 7.4 x 7.2 x 9.9 in Capacity: 20 Cups (4.7 lb dry food) Portion Size: 6 Portions=1/2 Cup=55 G Material: ABS+304 stainless steel Input: 5V DC/1A Food: Dry food, less than 0.5 inch in diameter... -
Page 22: Troubleshooting
Troubleshooting For troubleshooting assistance and inquiries related to your order, please contact us via email at support@oneisall.com. To ensure a prompt resolution to your issue, kindly provide your order ID along with the details of the problem you are experiencing. -
Page 23: Issues Of Connection
Issues of connection A: Fail to connect to network. Ensure that you are not in tourist mode. Register an APP account for the initial login. Make sure the feeder is properly connected to a power source. Double-check the accuracy of the entered WIFI account and password. Ensure that the WIFI signal is strong. -
Page 24: Warranty
To initiate a warranty claim, please contact our customer support team at [support@oneisall.com] if your appliance is experiencing improper operation under normal household conditions during the warranty period. Please note that all rights are reserved by oneisall official website. For further information, please visit www.oneisall.com. Scan to oneisall Official... - Page 25 Any problems you have, please contact us : support@oneisall.com Scan to Download oneisall Official oneisall support Video Tutorial Community...
Need help?
Do you have a question about the PFD-002 Pro and is the answer not in the manual?
Questions and answers
How do you set the date and time on this **** feeder. It was preset to a different date and time and now the feeding schedule is off. I have the home app and can't find where I can change the date and time