Alpine iXE-W400E - MULTIMEDIA STATION Manual
- Owner's manual (25 pages) ,
- Software update instruction manual (4 pages)
Advertisement
- 1 Getting Started
- 2 Function description of remote control button
- 3 Function Summary
- 4 Radio
- 5 USB
- 6 iPod
- 7 AUX
- 8 Hands Free Phone Control
- 9 Bluetooth Audio
- 10 HDMI
- 11 Setting
- 12 Description of reversing function
- 13 Supported USB file list
- 14 Connections
- 15 Installation and Connections
- 16 SAFETY INSTRUCTIONS
- 17 Documents / Resources
Getting Started
Accessory list
- Main unit: x1
- Owner's Manual: x1
- Power Cable: x1
- Camera Cable: x1
- USB1 Cable: x1
- USB2 Cable: x1
- Video Cable: x1
- HDMI Cable: x1
- AUX/MIC Connector Cable: x1
- Remote Control: x1
- Microphone cable: x1
Location of Controls

- Power key: Short Press, Power Off + Mute ON Long Press, Screen Off + Sound Play
- Return key
- Main menu
- Volume Down
- Volume Up
- Backup camera
Power on or power off
Some functions of the main unit shall not work while the car is moving. Please make sure to park your car in a safe place and pull up the parking brake before you perform these operations.
- The unit will be Power on while vehicle ignition switch to on.
- The unit will be Power off while vehicle ignition switch to off.
Function description of remote control button

- Power Off/On
- Mute
- Volume Up
- Volume Down
- REW: Frequency backward step by step (Radio mode); last folder catalog (USB mode).
- FF: Frequency forward step by step (Radio mode); next folder catalog (USB mode).
- Play/Pause
- Previous Track
- Next Track
- Home
- Back
- SRC: switch source (Radio→USB→iPod→AUX→BT Audio→HDMI→Radio)
- Local/DX: switch Local and DX for radio
- FM1
- FM2
- AM
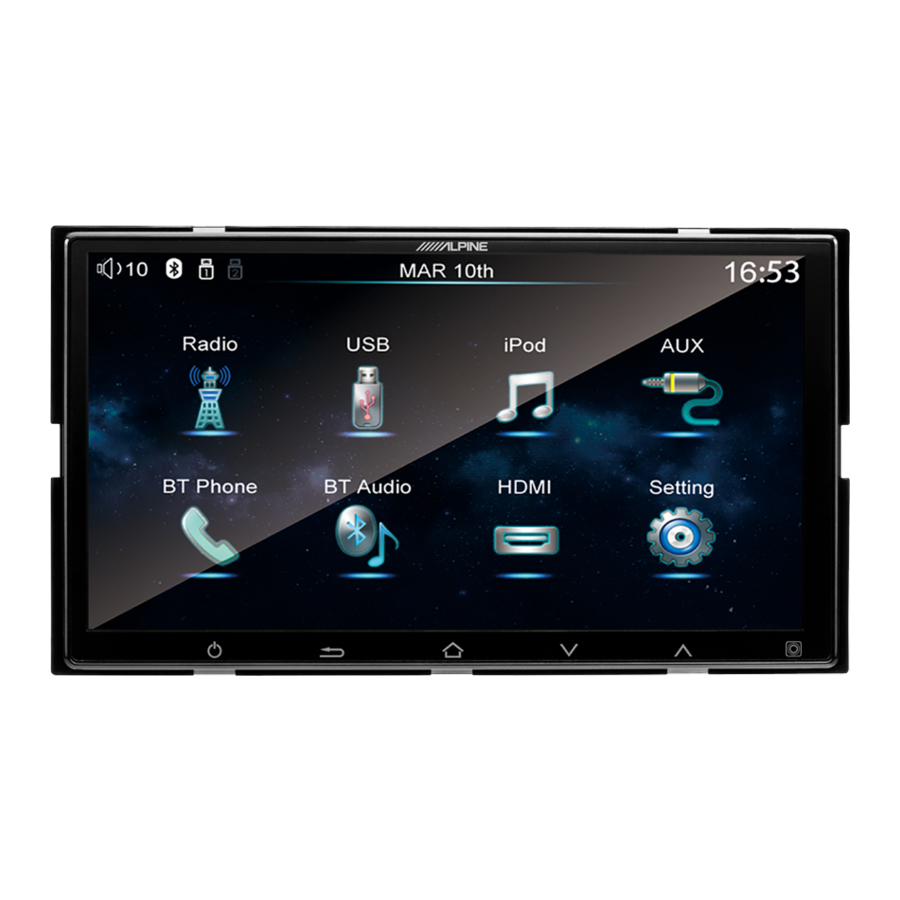
Function Summary
Multimedia is designed to present multiple functions possessed by multiple connected devices, and provide users with diversified utility functions.

- Radio
- USB
- iPod
- AUX
- BT Phone
- BT Audio
- HDMI
- Setting
- Volume status
- Bluetooth status
- DATE
- TIME
* Long press ICON to change the locating place by dragging.
Radio
Click  to enter radio interface.

- Display the radio frequency.
- Step backward: Move up to a frequency.
- Step forward: Move down to a frequency.
- Search back to a frequency accompanying valid radio signal.
- Search forward to a frequency accompanying valid radio signal.
- Switch radio band: Conduct cyclic switching in sequence of FM1-FM2-AM.
- Preset scan: Browse the preset radio stations on current radio band; click any effective button to relieve the "seek" action.
- Switch Local and DX for Radio.
- Automatic saving of radio station: Automatically search and save 6 radio stations transmitting most powerful signals on each radio band, amounting to 18 stations in total. Click any button to cease automatic saving; all automatically saved radio stations will be reserved into the button 【Pre-stored Station】.
- Display of band frequency being listened to.
RDS function: While the vehicle is moving, the host machine will reveal relevant information on receiving RDS data in case RDS signal is available in local region. 8 English letters will display on the screen (corresponding to local RDS data).
* Double-finger operation:
Swipe up/down: Volume up/down.
Swipe left/right: Last reserved station/next reserved station.
USB
Click  to play music, video and picture files via USB.
Choose file type through buttons on the left side of USB interface (blue highlight represents current type):

- Music
- Video
- Picture
Introduction of USB play mode:
Order: Orderly play all the catalog of corresponding file type (AV) contained in currently selected U-Disk.
Loop: Play all the files of corresponding type contained in the selected catalog on a loop.
Random: Play all the files of corresponding type contained in the selected catalog in a random order.
Single: Play a single currently selected file on a loop.
Supportive file format
Supportive file format of USB Audio: MP3/WMA /AAC/WAV/FLAC.
Supportive file format of USB Video: AVI/RM/RMVB /MP4.
Supportive file format of USB image: JPG/JPEG.
For more information, please refer to Appendix.
USB Port
- iPod/USB Device
- USB Device
* Double-finger operation (no operation under full screen mode)
Swipe up/down: Volume up/down.
Swipe left/right: Last music/next music.
USB/Music
Click to enter USB music (list) interface.

- Display the song album cover.
- Display the name of song along with album and singer information.
- Playing progress bar: Indicates the song's playing progress; you can set the song's playing position by sliding.
- Current folder directory: Click it to get back to upper-level catalog containing audio files.
- File list: Slide up and down to shift the list for displaying the music file providing the listed files can not be displayed in one page at one time.
Blue letters stand for the current file in play. - List scroll bar: Indicates the progress of file list; you can shift the list position by dragging.
- Previous folder.
- Play last song.
- Play/pause the song.
- Play next song.
- Next folder.
- Play mode: Click it to unfold the playing mode menu, and select your favorite playing mode.


- Click it to go into video playing interface/list.
- Click it to go into picture display interface/list.
USB/Video
Click  to enter USB video (list) interface.

- Current folder directory: Click it to get back to upper-level catalog containing video files.
- File list: Slide up and down to shift the list for displaying the video file providing the listed files can not be displayed in one page at one time.
- Blue letters stand for the current file in play.
- List scroll bar: Indicates the progress of file list; you can shift the list position by dragging.
- Playing progress bar: Indicates the playing course of video; set the playing position of video by dragging.
- Last folder.
- Play last video.
- Play/pause the video.
- Play next video.
- Next folder.
- Play mode: Click it to unfold the playing mode menu, and select your favorite playing mode.
(Blue color indicates the current mode)
![warning]() Notice:
Notice:
For your safety, the USB video cannot be played during driving. - Shrinkage play: Single click this area to turn to fullscreen play or wait 6 seconds to get to fullscreen automatically.
- Fullscreen play: Single 2 click this area or press the return key on the front pannel to get back to shrinkage play interface (list); single click to return to shrinkage play menu.
![]()
- Click it to go into music play interface/list.
- Click it to go into picture display interface/list.

USB/Picture
Click ![]() to enter USB picture (list) interface.
to enter USB picture (list) interface.

- Display current playing status.
- Current folder directory: Click it to get back to upper-level directory containing picture files.
- File list: Slide up and down to shift the list for displaying the picture file providing the listed files can not be displayed in one page at one time.
- Blue letters stand for the current file in play.
- List scroll bar: Indicates the progress of file list; you can shift the list position by sliding.
- Display previous picture.
- Display/pause picture.
- Display next picture.
- Turn the picture 90° clockwise.
- Shrinkage display: Single click this area to turn to fullscreen play or wait 6 seconds to get to fullscreen automatically.
- Fullscreen play: click area or press the return key on the front pannel to get back to shrinkage play interface (list).
![]()

iPod
Click  to enter iPod interface.

- Play list
- Performer
- Album
- Song
- Genre
- Track Down
- Play/Pause the song
- Track up
- Random play and stop
- Loop play, single play on a loop, stop loop.
- Display the album cover photo of the song in play
- Display the name of song along with album and singer info
- Playing progress bar: Indicates the song's playing progress; set the song's playing position by sliding.
* Double-finger operation
Swipe up/down: Volume up/down.
Swipe left/right: Last music/next music.
AUX
Click  to enter AUX interface; audio output will operate after connection of audio device.

* Double-finger operation
Swipe up/down: Volume up/down.
Hands Free Phone Control
Bluetooth connection
Functions of BT phone are only usable under the status of bluetooth connection.
Click icon  select 【Bluetooth Setting】, and click 【Enter】 to choose connected device for pairing:

- Name of bluetooth device which has been connected.
- Disconnect bluetooth device to iXE-W400E.
- Delete the corresponding bluetooth device which is already paired.
- Connect the corresponding bluetooth device to iXE-W400E.
- Click it to move to pairing-start page (unusable during conversation).
Start pairing
Locate a new bluetooth device to pair with iXE-W400E.
Step 1: Click 【 】 to get local bluetooth found by the mobile phone (mobile device) through search.
Step 2: Using mobile phone (mobile device) to search local bluetooth.
Step 3: Bluetooth connection got success, and new bluetooth device has been added to the list prepared for all connected devices.

- Display the pairing information of local bluetooth.
- Cancel pairing, and return to the list prepared for all connected devices.
To enter BT phone
Click icon  to enter BT phone.
iXE-W400E can set up point-to-point connection with the mobile phone's bluetooth to enjoy handfree communication.

- Display currently edited phone number, name and phone number of contact person during conversation.
- Display the name of telephone equipment or call status during conversation.
- Short press to delete a single number one by one, and long press to clear all numbers.
- Hang up or reject calls.
- Make a call or answer a call.
- Switch the voice conversation between iXE-W400E and mobile phone.
- Mic mute, displaying during conversation, open and close Mic. mute of iXE-W400E.
- Digital dialing button.
- move to the page of phone book (unusable at the time of conversation).
- move to the page of call records (unusable at the time of conversation).
* Double-finger operation
Swipe up/down: Volume up/down.
Phone book
Click ![]() to enter the page of Phone Book.
to enter the page of Phone Book.

- 26 initial letters and 1 character # (# stands for the character except for 26 letters)are available for search; blue highlight indicates the initial letter of contact person being searched. Slide up and down for page turning to display the position of identified letter in the list.
- The phone number of contact person corresponding to the searching letter; click the call key on the right side to call the corresponding number/contact person. Slide up and down for page turning to display the phone number of contact person.
- Click it to download phone book.
- Click it to delete the downloaded phone book.
Call records
Click  to enter the page of History list.

- Click it to display the phone number contained in call records. Click 【
![]() 】 to call the corresponding phone number/contact person, and Slide up and down to display the call records.
】 to call the corresponding phone number/contact person, and Slide up and down to display the call records. - Click it to display received call list.
- Click it to display dialed numbers list.
- Click it to display missed call list.
- Click it to clear the call records.
 】 to call the corresponding phone number/contact person, and Slide up and down to display the call records.
Bluetooth Audio
Click ![]() to enter bluetooth music play.
to enter bluetooth music play.

- Display the name of connected bluetooth device.
- Display the song name being played, along with singer info and album.
- Display current playing progress and status.
- Play last song.
- Play/pause the song.
- Play next song.
* Double-finger operation
Swipe up/down: Volume up/down.
Swipe left/right: Last music/next music.
HDMI
The system support HDMI mirroring when you connect the unit and the device which supports HDMI output function, such as DTV, Android, smartphone. HDMI mirroring will be operated with HDMI Supported devices only.
HDMI Supportive video resolution: 1080P.

DA LINK
Step 1: The mobile phone starts connection with the main unit by HDMI cable.
Step 2: Set up connection with blue tooth. (Please refer to P5-P7 of blue tooth setting to get more details about blue booth connection.)
Attention: You need to download DA interconnection software to your mobile phone for the first connection of DA LINK. Please click to reconnect after successful download and installation.
After completion of above steps, the main unit will display the picture of your mobile phone and synchronize your smart phone as well as the sound to realize bi-directional control, see the picture below:

 Notice:
- Please use the standard connection cable and adapter that match your mobile phone to assure your normal use.
- It is batter that using Samsung S5 to connect for DA LINK, may be there are some compatible issue due to different cell phone.
- Notice: For your safety, the HDMI mirroring will cannot be displayed during driving. In the DA LINK mode, some navigation and music application can work as normal while your are driving.
- Some equipments may show somewhat discrepancies on account of different system software/ version, and the actual situation shall prevail.
Setting
Click  to enter setting menu.

- Brightness Setting: Click the button 【Enter】on the right side to enter brightness adjustment interface.
AUTO: Set the backlight brightness into automatic, meaning that it will adjust automatically based on the detection by small lamps
Day: Set the backlight brightness into daytime mode, and 7 levels are available for adjustment.
The intermediate value is defaulted.
Night: Set the backlight brightness into night mode, and 7 levels are available for adjustment.
The intermediate value is defaulted.
![]()
- Key Sound: Beep available on operation panel and direction control button with high, mid and low volume level and defaults to "mid", OFF: Close beep on the button.
- FM Frequency: Stepping setting of radio.
50KHz: 50KHz for FM stepping;
100KHz: 100KHz for FM stepping (defaulted). - Bluetooth Setting: Click 【Enter】 on the right side to enter bluetooth setting interface. See details of bluetooth setting function.
- Microphone Vol: High, mid and low volume setting and defaults to "mid".
- Sound Setting: Click 【Enter】 on the right side to enter sound effect adjustment page at default. You can choose sound effect adjustment and sound field adjustment at the top of the page.


- Sound effect setting (8 types), and sound effect value can be set under respective sound mode.
- There are 7 sound effect modes to choose with "standard" being defaulted.
- Display the position of acoustics and sound effect inside your vehicle.
- Click
![]() to adjust the position of acoustics and sound effect, and click
to adjust the position of acoustics and sound effect, and click ![]() to restore the position of acoustics and sound effect to centre point (default).
to restore the position of acoustics and sound effect to centre point (default).
 to adjust the position of acoustics and sound effect, and click
  to restore the position of acoustics and sound effect to centre point (default).
- Audio Pre-out: Speaker output setting,
ON: Audio output from Pre-out (no output of host speaker)
OFF: Audio output from host speaker (defaulted) - Clock When Standby: Click button 【ON】 to make digital clock display on the screen while standby; click button 【OFF】 to make black screen while standby.
- Demo Mode: Click button 【ON】 and not hit "OK" in the attention interface, then it will enter Demo Mode (default) after 20s; click button 【OFF】 and no operation in the attention interface, then it will keep the attention interface after 20s.
- HDMI Setting:
HDMI IN (defaulted)
DTV IN - Camera Setting: DIRECT IN, RCA IN, and OFF setting, defaults to "DIRECT IN", only set on/ off, no picture shift.
When selecting DIRECT IN, press the button on the lower right corner to enter into reversing setting screen.
![]()
Setting: Enter Camera setting screen(only Setting button available when Camera setting is RCA IN) Rear:Switch reversing video to visual angle of Rear. (reversing line on display)
Panorama: Switch reversing video to visual angle of Panorama. (no reversing line on display)
Corner: Switch reversing video to visual angle of Corner.
TOP: Switch reversing video to visual angle of TOP. (no reversing line on display)

When selecting RCA IN, press the button  on lower right corner to enter camera setting screen.

- Camera Guide Line: Click the button on the right side and select 【ON】 to open the adjusting page of reversing trajectory, and select 【OFF】 to cancel the adjusting page of reversing trajectory.
- When you select 【ON】 under Camera Guide Line, you may hit 【Enter】 on the right of Guide Line Setting to enter the adjusting page of reversing trajectory for setting:

- Directional button comprising up, down, left, right: You may operate these four buttons to shift the reversing trajectory separately or in terms of 5 pixels, and the range of movement is among the screen borderlines.
- Clockwise, counterclockwise button with respect to rotation direction: You may operate these two buttons to rotate the reversing guideline clockwise or counterclockwise. There are 5 grades available for your choice, including -3 degree, -1.5 degree, 0 degree, 1.5 degree and 3 degree.
- Reset: Hit this button to restore the reversing trajectory to the default location.
Note: The reversing trajectory and the reversing video footage shall display on the screen simultaneously when adjusting is going on.
- Visual Setting: Click 【Enter】 on the right side to enter the adjusting page of video picture quality, see the picture as below:

- Camera Interrupt: When clicking 【MUTE】 under reversing mode, there is no sound output from other mode in the backstage; but if clicking 【UNMUTE】, there will be sound output from other mode in the backstage.
When selecting OFF, no video input for camera.

- Date & Time: Click 【Enter】 on the right side to enter date & time setting page; After selection, slide up and down to set the right date and time, and click to confirm.
![]()
- Visual Setting: Click 【Enter】 on the right side to enter image quality setting page where the brightness, contrast, saturation and tint may get adjusted.
![]()
- Language: Click button on right side to choose English (Defaulted), Thai and Arab
- Steering Key Setting: Click "Enter" on right side to open direction control screen; click "Enter" again to enter direction control learning screen; long press direction control button to start learning by choosing the function button on the screen; the corresponding function button will exhibit water blue color after learning; 8 function buttons available for learning (volume+, volume-, last music, next music, mode switch, mute, answer, hang up)

- Version Info: Click 【Enter】 on the right side to open version info page, and hit 【Factory data reset】 to start operation.

Scroll bar of list: Select the position of list by dragging.


Description of reversing function
- When Camera Setting is RCA IN in
![]() , then camera video screen will appear when the vehicle rolls back, see the following figure:
, then camera video screen will appear when the vehicle rolls back, see the following figure:

The display of reversing video is assigned highest priority under any Source, along with voice warning to hint. Please pay attention to the real situation behind your car while reversing.
Reference line on the screen
Color line is reference only, Distance is depending on camera fitment. - When Camera Setting is DIRECT IN in
![]() , then camera video screen will appear when the vehicle rolls back, see the following figure:
, then camera video screen will appear when the vehicle rolls back, see the following figure:

Four visual angles including Rear, Panorama, Corner, Top can switch over. - When Camera Setting is OFF, no display of reversing video is accepted by the hose machine.
 , then camera video screen will appear when the vehicle rolls back, see the following figure:

Note:
- In case the car body is inclined based on the fact that there have several passengers sitting in the car and/or the luggage in the trunk is too heavy or placed unevenly and/or the road surface is poor, the reference line displayed in the visual system of reversing shall not be identical to the real position on the road surface.
- The reference line indicating the distance and width on the screen is designed based on a horizontal and flat road surface. The distance of the object displayed on the screen will be far more than its real distance in the following situation.
- The reference line displayed on the screen can only be used to estimate the object on the same horizontal level when the second half of car body is pressed down by the weight of passengers and luggage put together. So, please do not estimate the distance between your car and the obstacle entirely counting on the visual system of reversing as the distance of object displayed on the screen may have discrepancy with the real situation.
Supported USB file list
Video File
| File Format | AVI |
| WMV | |
| MP4 | |
| Supported file extension | *.avi |
| *.wmv | |
| *mp4 | |
| Supported video codec | MPEG-1;MPEG-2;MPEG-4;H.264;H.263;Sorenson H263 |
| MPEG-1;MPEG-2;MPEG-4;H.264;H.263 | |
| MPEG-1;MPEG-2;MPEG-4;H.264;H.263;Sorenson H263 | |
| Supported audio codec | MPEG,MP3,PCM,AAC.FLAC |
| Mp3, PCM,AAC,MPEG,AAC_PURE | |
| ACC,MPEG,MP3,PCM,AAC_PURE | |
| Video bitrate limitation | BitRate: 40MpbsFrameRate: 30fpsResolution: 1080P |
| Video profile lever | MPEG-1N/AMPEG-2simple(L0,L1,L2,L3)advancedsimple(L0,L1,L2,L3,L4,L5)MPEG-4simple (L0,L1,L2,L3)advancedsimple(L0,L1,L2,L3,L4,L5)H.264baseline(<=L4.1)Extend(<=L4.1)mian (<=L4.1)High(<=L4.1)High 10(<=L4.1)H.263BaselineSorenson H263N/ARVN/A |
| Audio bitrate limitation | MP38K~320KCOOK8K ~ 96KAPE800K~1.MKFLAC64K ~ 16.2MAAC<320KVORVISunlimited MP232K~912KLPCM(WAV)64K~9.216M |
| Audio sample rate limitation | MP38KHz/16KHz/1/32KHz11KHz/22K/44KHz12KHz/24K/48KHzAPE8K/16K/32K11.025K /22.05K/44.1K/88.2K12K/24K/48K/96KFLAC88.2K/176.4K/192K8K/16K/22.05K24K/32K /44.1K48K/96KAAC(HE-AAC) 8 ~ 96KHzVORBIS 8 ~ 96KHzMPEG-1 layer 1/232KHz/44.1KHz 48KHzMPEG-2 layer 1/232KHz/44.1KHz/48KHzWAV(PCM)8KHz/16KHz/32KHz11KHz/22KHz /44KHz12KHz/24KHz/48KHz48KHz/96KHz/192KHz |
Audio Files
| File Format | Mp3 |
| ACC | |
| WAV | |
| FLAC | |
| WMA | |
| Supported file extension | *.mp3 |
| *.aac | |
| *.wav | |
| *.flac | |
| *.wma | |
| Supported video codec | MP1;MP2;MP3;WMA |
| ACC | |
| PCM;Microsoft ADPCM;IMA ADPCM | |
| flac | |
| Audio bitrate limitation | 96KAPE800K~1.MKFLAC64K ~ 16.2MAAC<320KVORVISunlimitedMP232K~912KLPCM(WAV) 64K~9.216M |
| Sample rate limitation | 8KHZ/16KHZ/32KHZ/11KHZ/22KHZ/44KHZ/12KHZ/24KHZK/48KHZ |
| 8 ~ 96KHZ | |
| 8KHZ/16KHZ/32KHZ/11KHZ/22KHZ/44KHZ/12KHZ/24KHZ/48KHZ48KHZ/96KHZ/192KHZ | |
| 8 ~ 96KHZ |
Image Files
| File Format | JPEG |
| GIF | |
| Supported file extension | *.jpg,*jpeg |
| *.gif | |
| Limitation | baseline: unlimitation, progressive: wide x heigh<4096 x 4096,file size < 20M |
| static GIF size < 20M,resolution: wide x heigh<4096 x 4096 |
Connections

- Illumination
To illumination - REMO (Remote Turn-On) Lead (Blue/White)
Connect this lead to the remote turn-on lead of your amplifier or signal processor. - Steering AD In-put 1(Purple)
- Steering AD In-put 2(Yellow)
- Steering Ground(Black)
- Remote Control Output Lead (W hite / Brown)
Connect this lead to the remote control input lead. This lead outputs the controlling signals from the remote control. - Reverse Lead (Orange/White)
Connect to the plus side of the car's reverse lamp. This lamp illuminates when the transmission is shifted into reverse (R).
With this lead properly wired, the video picture automatically switches to the rear camera whenever the caris put into reverse (R). - P.ANT (Power Antenna) Lead (Blue)
Connect this lead to the +B terminal of your power antenna, if applicable. This lead should be used only for controlling the vehicle's power antenna. Do not use this lead to turn on an amplifier or a signal processor, etc. - Parking Brake Lead (Yellow/Blue)
Connect this lead to the power supply side of the parking brake switch to transmit the parking brake status signals to the. - ACC (IGNITION) Lead (Red)
Connect this lead to an open terminal on the vehicle's fuse box or another unused power source which provides (+)12V only when the ignition is turned on or in the accessory position. - BATT (BATTERY) Lead (Yellow)
Connect this lead to the positive (+) post of the vehicle's battery. - Ground Lead (Black)
Connect this lead to a good chassis ground on the vehicle. Make sure the connection is made to bare metal and is securely fastened using the sheet metal screw provided. - Left Rear (+) Speaker Output Lead (Green)
- Left Rear (–) Speaker Output Lead (Green/Black)
- Left Front (+) Speaker Output Lead (White)
- Left Front (–) Speaker Output Lead (White/Black)
- Right Front (–) Speaker Output Lead (Grey/Black)
- Right Front (+) Speaker Output Lead (Grey)
- Right Rear (–) Speaker Output Lead (Violet/Black)
- Right Rear (+) Speaker Output Lead (Violet)
- Radio Antenna Receptacle
- AUX Input Connector
AUX audio signal - MIC Input Connector
To Microphone - Video Output Connector (AUX OUTPUT)
- Rear Output RCA Connectors
It can be used as Rear Output RCA Connectors. - Front Output RCA Connectors
It can be used as Front Output RCA Connectors. - Subwoofer/CENTER RCA Connectors
- HDMI Connector
- USB2 Connector
To USB Memory - CAMERA Input RCA Connector (Yellow)
Use when connecting a camera with RCA Input Connector. - USB1 Connector
To USB Memory or iPod/iPhone. - Fuse Holder (15A)
Installation and Connections
Before installing or connecting the unit, please read the following thoroughly for proper use.

MAKE THE CORRECT CONNECTIONS.
Failure to make the proper connections may result in fire or product damage.
USE ONLY IN CARS WITH A 12 VOLT NEGATIVE GROUND.
(Check with your dealer if you are not sure.) Failure to do so mayresult in fire, etc.
BEFORE WIRING, DISCONNECT THE CABLE FROM THE NEGATIVE BATTERY TERMINAL.
Failure to do so may result in electric shock or injury due to electrical shorts.
DO NOT ALLOW CABLES TO BECOME ENTANGLED IN SURROUNDING OBJECTS.
Arrange wiring and cables in compliance with the manual to prevent obstructions when driving. Cables or wiring that obstruct or hang up on places such as the steering wheel, gear lever, brake pedals, etc. can be extremely hazardous.
DO NOT SPLICE INTO ELECTRICAL CABLES.
Never cut away cable insulation to supply power to other equipment. Doing so will exceed the current carrying capacity of the wire and result in fire or electric shock.
DO NOT DAMAGE PIPE OR WIRING WHEN DRILLING HOLES.
When drilling holes in the chassis for installation, take precautions so as not to contact, damage or obstruct pipes, fuel lines, tanks or electrical wiring. Failure to take such precautions may result in fire.
DO NOT USE BOLTS OR NUTS IN THE BRAKE OR STEERING SYSTEMS TO MAKE GROUND CONNECTIONS.
Bolts or nuts used for the brake or steering systems (or any other safety-related system), or tanks should NEVER be used for installations or ground connections. Using such parts could disable control of the vehicle and cause fire etc.
KEEP SMALL OBJECTS SUCH AS SCREWS OUT OF THE REACH OF CHILDREN.
Swallowing them may result in serious injury. If swallowed, consult a physician immediately.
DO NOT INSTALL IN LOCATIONS WHICH MIGHT HINDER VEHICLE OPERATION, SUCH AS THE STEERING WHEEL OR SHIFT LEVER.
Doing so may obstruct forward vision or hamper movement etc.and results in serious accident.

HAVE THE WIRING AND INSTALLATION DONE BY EXPERTS.
The wiring and installation of this unit requires special technical skill and experience. To ensure safety, always contact the dealer where you purchased this product to have the work done.
USE SPECIFIED ACCESSORY PARTS AND INSTALL THEM SECURELY.
Be sure to use only the specified accessory parts. Use of other than designated parts may damage this unit internally or may not securely install the unit in place. This may cause parts to become loose resulting in hazards or product failure.
ARRANGE THE WIRING SO IT IS NOT CRIMPED OR PINCHED BY A SHARP METAL EDGE.
Route the cables and wiring away from moving parts (like the seat rails) or sharp or pointed edges. This will prevent crimping and damage to the wiring. If wiring passes through a hole in metal, use a rubber grommet to prevent the wire's insulation from being cut by the metal edge of the hole.
DO NOT INSTALL IN LOCATIONS WITH HIGH MOISTURE OR DUST.
Avoid installing the unit in locations with high incidence of moisture or dust. Moisture or dust that penetrates into this unit may result in product failure.
Precautions
Be sure to disconnect the cable from the (–) battery post before installing your iXE-400E. This will reduce any chance of damage to the unit in case of a short circuit.
- Be sure to connect the colour coded leads according to the diagram. Incorrect connections may cause the unit to malfunction or damage to the vehicle's electrical system.
- When making connections to the vehicle's electrical system, be aware of the factory installed components (e.g. on-board computer). Do not tap into these leads to provide power for this unit. When connecting the iXE-400E to the fuse box, make sure the fuse for the intended circuit of the iXE-400E has the appropriate amperage. Failure to do so may result in damage to the unit and/or the vehicle. When in doubt, consult your Alpine dealer.
- The iXE-400E uses female RCA-type jacks for connection to other units (e.g. amplifier) having RCA connectors. You may need an adaptor to connect other units. If so, please contact your authorised Alpine dealer for assistance.
- Be sure to connect the speaker (–) leads to the speaker (–) terminal. Never connect left and right channel speaker cables to each other or to the vehicle body.

Please record the serial number of your unit and keep it as a permanent record. The serial number plate is located on the bottom of the unit.
SAFETY INSTRUCTIONS
This symbol means important instructions. Failure to heed them can result in serious injury or death.
INSTALL THE PRODUCT CORRECTLY SO THAT THE DRIVER CANNOT WATCH TV/VIDEO UNLESS THE VEHICLE IS STOPPED AND THE EMERGENCY BRAKE IS APPLIED.
It is dangerous for the driver to watch TV/Video while driving a vehicle. Installing this product incorrectly enables the driver to watch TV/Video while driving. This may cause a distraction, preventing the driver from looking ahead, thus causing an accident.
The driver or other people could be severely injured.
DO NOT WATCH VIDEO WHILE DRIVING.
Watching the video may distract the driver from looking ahead of the vehicle and cause an accident.
DO NOT OPERATE ANY FUNCTION THAT TAKES YOUR ATTENTION AWAY FROM SAFELY DRIVING YOUR VEHICLE.
Any function that requires your prolonged attention should only be performed after coming to a complete stop. Always stop the vehicle in a safe location before performing these functions. Failure to do so may result in an accident.
KEEP THE VOLUME AT A LEVEL WHERE YOU CAN STILL HEAR OUTSIDE NOISES WHILE DRIVING.
Excessive volume levels that obscure sounds such as emergency vehicle sirens or road warning signals (train crossings, etc.) can be dangerous and may result in an accident. LISTENING AT LOUD VOLUME LEVELS IN A CAR MAY ALSO CAUSE HEARING DAMAGE.
MINIMIZE DISPLAY VIEWING WHILE DRIVING.
Viewing the display may distract the driver from looking ahead of the vehicle and cause an accident.
DO NOT DISASSEMBLE OR ALTER.
Doing so may result in an accident, fire or electric shock.
USE ONLY IN CARS WITH A 12 VOLT NEGATIVE GROUND.
(Check with your dealer if you are not sure.) Failure to do so may result in fire, etc.
KEEP SMALL OBJECTS SUCH AS SCREWS OUT OF THE REACH OF CHILDREN.
Swallowing them may result in serious injury. If swallowed, consult a physician immediately.
USE THE CORRECT AMPERE RATING WHEN REPLACING FUSES.
Failure to do so may result in fire or electric shock.
DO NOT BLOCK VENTS OR RADIATOR PANELS.
Doing so may cause heat to build up inside and may result in fire.
USE THIS PRODUCT FOR MOBILE 12V APPLICATIONS.
Use for other than its designed application may result in fire, electric shock or other injury.
DO NOT PLACE HANDS, FINGERS OR FOREIGN OBJECTS IN INSERTION SLOTS OR GAPS.Doing so may result in personal injury or damage to the product.
This symbol means important instructions. Failure to heed them can result in injury or material property damage.
HALT USE IMMEDIATELY IF A PROBLEM APPEARS.
Failure to do so may cause personal injury or damage to the product. Return it to your authorized Alpine dealer or the nearest Alpine Service Centre for repairing.
NOTICE
Product Cleaning
Use a soft dry cloth for periodic cleaning of the product. For more severe stains, please dampen the cloth with water only. Anything else has the chance of dissolving the paint or damaging the plastic.
Temperature
Be sure the temperature inside the vehicle is between +45°C (+113°F) and 0°C (+32°F) before turning your unit on.
Installation Location
Make sure the iXE-W400E will not be installed in a location subjected to:
- Direct sun and heat
- High humidity and water
- Excessive dust
- Excessive vibrations
Alpine accepts no responsibility for lost data, etc., even if data, etc.,is lost while using this product.
On Handling USB Memory
- This unit can control a memory storage device that supports the USB Mass Storage Class (MSC) protocol. Playable audio file formats are MP3, WMA and AAC.
- USB memory function is not guaranteed. Use USB memory according to the terms of agreement. Read the USB memory Owner's Manual thoroughly.
- Avoid usage or storage in the following locations: Anywhere in the car exposed to direct sunlight or high temperatures. Anywhere the possibility of high humidity or corrosive substances are present.
- Fix the USB memory in a location where driver operation will not be hindered.
- USB memory may not function correctly at high or low temperature.
- Use only certified USB memory. Note that even certified USB memory, may not function correctly depending on its type or state.
- Depending on the settings of the USB memory type, memory state or encoding software, the unit may not play back or display properly.
- Files protected by DRM (Digital Rights Management),cannot be played back on this unit. These include AAC formatted files purchased from the iTunes Store and WMA or other files with some form of copyright protection.
- USB memory may take time to start playback. If there is a particular file other than audio in the USB memory, it may take considerable time before the file is played back or searched.
- The unit can play back "mp3," "wma" or "m4a" file extensions.
- Do not add the above extensions to a file other than audio data. This non-audio data will not be recognised. The resulting playback may contain noise that can damage speakers and/or amplifiers.
- It is recommended to back up important data on a personal computer.
- Do not remove the USB device while playback is in progress. Change SOURCE to something other than USB, then remove the USB device to prevent possible damage to its memory. This item incorporates copy protection technology that is protected by U.S. patents and other intellectual property rights of Rovi Corporation. Reverse engineering and disassembly are prohibited.
- Manufactured under licence from Dolby Laboratories. Dolby and the double-D symbol are trademarks of Dolby Laboratories.
- Windows Media, and the Windows logo are trade-marks, or registered trademarks of Microsoft Corporation in the United States and/or other countries.
- iPhone, iPod, iPod classic, iPod nano, iPod touch, and iTunes are trademarks of Apple Inc., registered in the U.S. and other countries.
- "Made for iPod," and "Made for iPhone," mean that an electronic accessory has been designed to connect specifically to iPod, or iPhone, respectively, and has been certified by the developer to meet Apple performance standards. Apple is not responsible for the operation of this device or its compliance with safety and regulatory standards. Please note that the use of this accessory with iPod, or iPhone may affect wireless performance. The Bluetooth® word mark and logos are registered trademarks owned by the Bluetooth SIG, Inc. and any use of such marks by Alpine Electronics, Inc. is under licence. Other trademarks and trade names are those of their respective owners.
- "MPEG Layer-3 audio coding technology licenced from Fraunhofer IIS and Thomson."
- "Supply of this product only conveys a licence for private, noncommercial use and does not convey a licence nor imply any right to use this product in any commercial (i.e. revenue generation) real time broadcasting (terrestrial, satellite, cable and/or any other media), broadcasting/streaming via internet, intranets and/or other networks or in other electronic content distribution systems, such as pay-audio or audio-on-demand applications. An independent licence for such use is required.For details, please visit http://www.mp3licensing.com&rdquo
- Android is a trademark of Google Inc.
Documents / ResourcesDownload manual
Here you can download full pdf version of manual, it may contain additional safety instructions, warranty information, FCC rules, etc.
Advertisement


Need help?
Do you have a question about the iXE-W400E and is the answer not in the manual?
Questions and answers