Advertisement
Unit Description
Rear Side

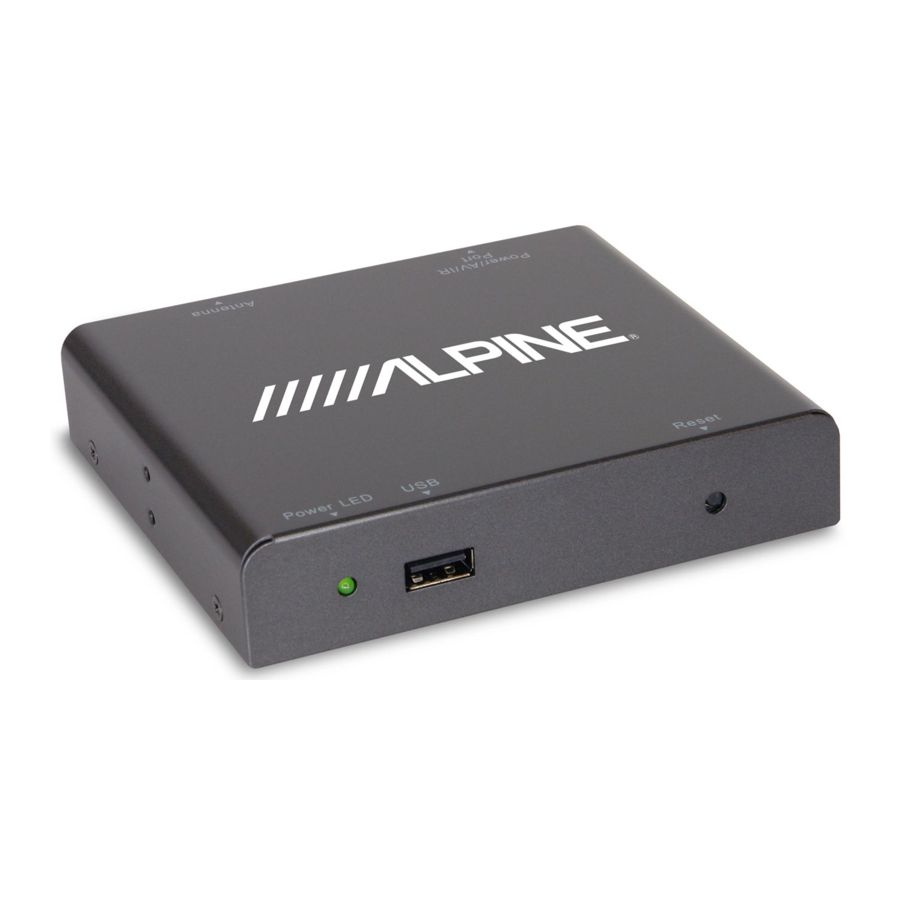
Front Side

- System Connector: Combination of power input, ACC input, Remote Control, Video and Audio output
- Antenna Connector: Antenna connection port
(![warning]() NOTE: This DAB unit provides +5V antenna power on these inputs for 5V active antennas)
NOTE: This DAB unit provides +5V antenna power on these inputs for 5V active antennas) - Power: The 'Power' LED indicates if the 12V or 24V power supply has been successfully applied to the device
- USB Port: Plug the USB memory stick for updating the software
- Reset: System reset button
Reminder: Please connect the antenna before switching the unit on.
If you turn the unit on before connecting the antennas, the receiver may not receive any signal. Please connect the antenna first and then turn on the unit.
DAB Antenna Installation
DAB reception will vary from vehicle to vehicle and you may have to try several mounting positions to determine which position provides the strongest signal in your vehicle. Please refer to the Diagram below for some of our recommendations:

- Near A Pillar of Front Windscreen
- Top of Front Windscreen
- Bottom of Front Windscreen
- Behind the Front Bumper. (providing that it's not Metal)
Once a suitable position is found, carefully route the antenna cable to the receiver unit and then connect to the Antenna Input.
Remote Control Operation

| Button name | Function | |
| 1 |  | Select power-on or stand-by |
| 2 |  | Go to menu screen |
| 3 | INFO | Display channel information |
| 4 | SCAN | To scan channels automatically |
| 5 | EXIT | Back |
| 6 | CH ▲ | Channel up |
| 7 | CH ▼ | Channel down |
| 8 | VOL ► | Volume up |
| 9 | VOL ◄ | Volume down |
| 10 | OK | List view/OK |
| 11 |  | List View ABC sort |
| 12 |  | List View 123 sort |
| 13 |  | List view page – |
| 14 |  | List view page + |
Before attempting to operate your remote control, install the supplied battery.
If the battery in remote controller is low on power, please replace the battery as described below.
- Remove the battery cover on rear of the remote controller.
- Replace old battery with new one.
- Replace the cover back based on the indentation.
Getting Started
Connect the DAB antenna and make sure all other connections are done according to the system connection chart in the back of this manual.
Turn on the unit
- Turn on the vehicles ACC or IGN. (Or Start the vehicle)
- When the unit has power, the POWER LED indicator will illuminate green.
![]()
- Select the AUX input on your Alpine AV or AVN unit.

Automatic Station Scan
The TUE-DAB1U will automatically start a scan for available stations. Once the scan is done, playback of the first station in the list of stations will start. If there are only few stations found, please check if your antenna needs 5V phantom feed. The default setting for phantom feed is 'OFF'.

Setting Supply for Active Antenna
Push the MENU button on the playback screen.

Select Antenna from the Menu Screen.

Select Phantom Supply 'ON' only when you are sure that your antenna needs 5V supply from the receiver. If you are in doubt, please consult with your dealer.

Confirm the warning message by selecting 'YES'.

Use the return button to go back to the Menu screen. Select 'Search' to initiate a new scan.

After the Auto Searching process, the broadcasting service will start automatically if there are stations found.
Press [CH+]/[CH–] buttons to select your preferred DAB/DAB+ channel.

Sorting The Station List
Press the 'LIST' button to see a list of all available stations.

After an automatic scan, the stations will appear in the sequence as they are broadcasted in their ensemble or multiplex. In this mode you may not have a sorting order that allows easy navigation, but you can switch fast from station to station.

Should you prefer all stations to be sorted alphabetically, push the 'ABC' button. After a short while, you can access stations by their alphabetic sequence. Switching from one station to another can mean that the ensemble/ multiplex is also changed. This will cause a short delay until the playback continues as frequencies change.
The Info Screen
Pushing the 'INFO' key in the playback screen will allow you to see additional technical information about the received station.

Settings
All necessary settings can be accessed from the Menu screen.

The volume setting is intended to adjust the volume to match the other sources when using an Alpine screen with direct touch controls. Nevertheless there can be volume differences between the broadcasts.

There are six choices for the OSD language.

System Info lets you see the software version of the product and start a software upgrade (if applicable).

In case the factory settings should be restored, 'Reset Default' will perform this task after a confirmation.

Troubleshooting
| Problem | Possible Reason | Solution |
| No picture, no audio. | The power cord is not properly inserted into the unit. | Check the power wire connection. |
| The TUE-DAB1U is not switched on. | Press [POWER] button on the remote control. | |
| In DAB/DAB+ mode, the number of radio channels is not as much as we expected. | The number of available channels is limited due to the local broadcasting system. The available channels can vary depending on the area. | Perform "Scan" re-scan all the channels. |
| The signal quality of some DAB channels is too low. | Please use active antenna instead of passive antenna for better reception quality | |
| The signal quality of some DAB channels is too low. | The Phantom Feed for an active antenna is not switched on. Select Phantom Supply 'ON' in the Antenna Menu. | |
| In DAB/DAB+ mode, all of the channels show low signal quality | The antennas are not properly connected. | Please check the connection of the antennas and place the antenna at different location. |
| No radio service is provided in the area. | Check your country DAB radio coverage map. It is not possible to listen to digital radio in non-covered areas. | |
| The video is fine but there is no sound. | The audio is muted. | Press [VOL+] button to increase the volume |
| The Audio is fine, but the screen is black | The screen is disabled while driving. | Depending on the specifications of your screen, video image may be disabled while driving. Contact your authorized dealer for more information. |
Features and Specifications
| Features | |
| DAB/DAB+ Reception | DAB/ DAB+ reception with SLI and VIS support |
| Control Options | Full touch control with compatible Alpine products. Infrared remote control |
| RF Input | |
| Antenna | Passive and active antenna supported (SMB connector, 5 VDC) |
| Frequency range | VHF Band III (170-240 MHz) |
| RF input impedance | 75 Ohm |
| Radio broadcasting System | |
| Transmission standard | ETSI EN 300 401 DAB compliant ETSI TS 102 563 DAB+ compliant |
| Video/Audio decoder | Video: JPEG Audio: MPEG Audio Layer II, AAC |
| S/W Features | |
| OSD Language | English, German, French, Italian, Danish, Norwegian |
| Features | DAB slide show, Channel Management, Auto Channel Search |
| Interface | |
| AV I/O port | DC input, ACC input, IR input, wired remote, video and stereo audio output |
| USB Port | Host USB 2.0 supported |
| Infrared Remote Control | Supported through remote sensor of screen or optional remote eye |
| Power | |
| Input voltage | +12 VDC – +24 VDC |
| Power consumption | 2.4 W |
| Operating Temperature | |
| Operating Temperature | -10°C – +70°C |
| Dimension and Weight | |
| Dimension | 115 x 95 x 25 mm |
| Weight | 295 g |
Compatible Alpine Units
The following Alpine products can operate the TUE-DAB1U fully from the touch screen: ICS-X7, ICS-X8, INA-W910R, INE-W92xR, INE-W97xBT, IVA-D511R/RB, IVA-D800R, IVE-W530BT, IVE-W535BT.
System Connections
Using an Alpine Screen with direct touch:

 Note: See the 'Setting the AUX mode' section in the manual of your Alpine Headunit for details on how to enable the touch controls. The mode should be set to 'USB Video'.
SAFETY INSTRUCTIONS

This symbol means important instructions. Failure to heed them can result in serious injury or death.
MAKE THE CORRECT CONNECTIONS.
When making connections to the vehicle's electrical system, be aware of the factory installed components (e.g. on-board computer). Do not tap into these leads to provide power for this unit. When connecting the device to the fuse box, make sure the fuse for the intended circuit of the device has the appropriate amperage. Failure to do so may result in fire or damage to the unit and/or the vehicle. When in doubt, consult your Alpine dealer.
BEFORE WIRING, DISCONNECT THE CABLE FROM THE NEGATIVE BATTERY TERMINAL.
Failure to do so may result in electric shock or injury due to electrical shorts.
DO NOT ROUTE ELECTRICAL CABLES NEAR HOT OR MOVING PARTS.
Route the cables and wiring away from hot or moving parts, and fix them securely to avoid heat/mechanical damage to the cable insulation, which may result in a short circuit, fire or electric shock.
DO NOT SPLICE INTO ELECTRICAL CABLES.
Never cut away cable insulation to supply power to other equipment. Doing so will exceed the current carrying capacity of the wire and result in fire or electric shock.
DO NOT INSTALL IN LOCATIONS WHICH MIGHT HINDER VEHICLE OPERATION, SUCH AS THE STEERING WHEEL OR SHIFT LEVER.
Doing so may obstruct forward vision or hamper movement etc. and results in serious accident.
DO NOT DAMAGE PIPE OR WIRING WHEN DRILLING HOLES.
When drilling holes in the chassis for installation, take precautions so as not to contact, damage or obstruct pipes, fuel lines, tanks or electrical wiring. Failure to take such precautions may result in fire.
DO NOT USE BOLTS OR NUTS IN THE BRAKE OR STEERING SYSTEMS TO MAKE GROUND CONNECTIONS.
Bolts or nuts used for the brake or steering systems (or any other safety-related system), or tanks should NEVER be used for installations or ground connections. Using such parts could disable control of the vehicle and cause fire etc.
USE ONLY IN CARS WITH A 12 OR 24 VOLT NEGATIVE GROUND.
(Check with your dealer if you are not sure.) Failure to do so may result in fire, etc.
WHEN USING A DRILL TO MAKE A HOLE, TAKE PRECAUTIONS SUCH AS WEARING GOGGLES SO FRAGMENTS DO NOT GET INTO THE EYES.
Failure to do so may result in injury.
HAVE THE WIRING AND INSTALLATION DONE BY EXPERTS.
The wiring and installation of this unit requires special technical skill and experience. To ensure safety, always contact the dealer where you purchased this product to have the work done.
ARRANGE THE WIRING SO IT IS NOT CRIMPED OR PINCHED BY A SHARP METAL EDGE.
Route the cables and wiring away from moving parts (like the seat rails) or sharp or pointed edges. This will prevent crimping and damage to the wiring.
HALT USE IMMEDIATELY IF A PROBLEM APPEARS.
Failure to do so may cause personal injury or damage to the product. Return it to your authorized Alpine dealer or the nearest Alpine Service Centre for repairing.
CHECK WIRING WHEN ATTACHING.
Double-check your wiring to ensure all connections are correct and secure. Also, do not apply unnecessary force to the harness. This can result in battery failure, performance failure, connector damage, or wire breakage.
Documents / ResourcesDownload manual
Here you can download full pdf version of manual, it may contain additional safety instructions, warranty information, FCC rules, etc.
Advertisement


Need help?
Do you have a question about the TUE-DAB1U and is the answer not in the manual?
Questions and answers