Advertisement
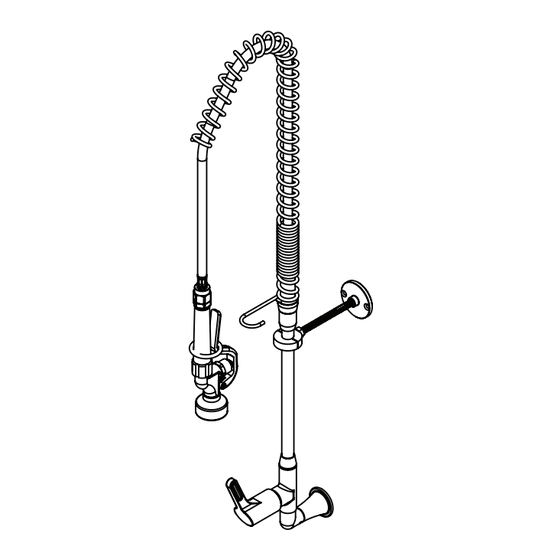
Wall Mounted Pre-Rinse Riser Assembly
with Single Control
Installation and Maintenance Instructions
FWS011
FS021
technical data
Working Pressure Range
Maximum Static Pressure
Maximum Working Temperature
Inlet Connection
Flow Rate
Enware products are to be installed in accordance with the Plumbing Code of Australia (PCA) and AS/NZS3500.
Installations not complying with PCA and AS/NZS 3500 may void the product and performance warranty provisions.
Reference should also be made to the Australasian Health Facility Guidelines (AHFG), ABCB and Local Government
regulations when considering the choice of, and the installation of these products.
This product must be installed and commissioned by a qualified plumber.
For use with potable water only.
NOTE: Enware Australia advises:
1. Due to ongoing Research and Development, specifications may change without notice.
2. Component specifications may change on some export models.
I00591_31 Oct 2023
1300 369 273 | info@enware.com.au | enware.com.au
Min 50 kPa
Max 500 kPa
1200 kPa
95°C (Jumper Valve)
85°C (Spring loaded valve / Pre-Rinse spray gun)
1/2" BSP
4 L/min (Pre-rinse spray gun)
Advertisement
Table of Contents

Subscribe to Our Youtube Channel
Related Manuals for Watts ENWARE FWS011


Summary of Contents for Watts ENWARE FWS011
- Page 1 Wall Mounted Pre-Rinse Riser Assembly with Single Control Installation and Maintenance Instructions FWS011 FS021 technical data Working Pressure Range Min 50 kPa Max 500 kPa Maximum Static Pressure 1200 kPa Maximum Working Temperature 95°C (Jumper Valve) 85°C (Spring loaded valve / Pre-Rinse spray gun) Inlet Connection 1/2”...
-
Page 2: Before Installation
installation BEFORE INSTALLATION • Ensure all operating and dimensional specifications are suitable for the intended installation. Check that there is no shelf or obstruction above. Shorter riser, hose & spring guard options are available from Enware • Check that wall bracket can be installed on a stable wall surface. If not, extra measures may need to be taken so that the bracket can be supported by a firm wall backing. -
Page 3: Installing The Frame
INSTALLING THE FRAME 1. Prepare 1/2" BSP male inlet thread on wall. Allow for 13mm of thread to protrude from finished wall. SEE IMAGE 03 2. Seal any gaps between thread and wall with silicone sealant. 1/2” BSP /2” BSP 3. - Page 4 FITTING LEVER HANDLES Fit colour indicator ring onto lever handle. To do this, place an indicator ring on flat surface with the rebated edge facing up. Fit spline adaptor onto Press the lever handle down onto TOOTH spindle. WASHER the indicator ring evenly until it clips into place.
- Page 5 INSTALLING RISER, POT FILLER & SPRAY ARM 1. Note that each component of the pre-rinse assembly uses a double O-ring spigot connection. The O-rings on the male spigot are pre-greased. Re-grease them if required. 2. Take grub screws out from female joints of all parts (riser, pot filler adaptor, base, body) and keep them at hand.
-
Page 6: Water Connections
9. Fit spring retainer/ hose/ spray gun assembly onto riser. SEE IMAGE 13 10. Fit all grub screws back onto fittings. Check that each grub screw has engaged into the groove of the male spigot, then tighten using 2.5mm Allen key. SEE IMAGE 14 Before fully tightening the grub screw, check that the pot filler is facing the preferred direction. - Page 7 operating instructions PRE-RINSE TRIGGER SPRAY OPERATION Squeeze spray trigger. Pull down hose to desired angle and position to wash. Squeeze Trigger to Turn ON Use Holding To make the water flow stay on, slide the Ring to holding ring over the trigger. Keep ON Release Trigger to...
-
Page 8: Maintenance
maintenance CLEANING Enware products should be cleaned with a soft damp cloth using only mild liquid detergent or soap and water. Do not use cleaning agents containing a corrosive acid, scouring agent or solvent chemicals. Do not use cream cleaners, as they are abrasive. Use of unsuitable cleaning agents may damage the surface. -
Page 9: Troubleshooting
troubleshooting Refer to the following troubleshooting guide for specific problems and solutions. PROBLEM CAUSE RECITIFICATION No water flow from trigger Water supply turned off or Connect and turn on water supply spray outlet or pot filler spout disconnected Check valves are blocked by Remove check valves and clean debris Replace check valves (Located inside... -
Page 10: Spare Parts
spare parts Description Enware Part Code Ultra-Rinse Pre-Rise Trigger Spray (Standard) FS729 Ultra-Spray Soft Rinse outlet (Non-adjustable spray outlet FS729SS-KIT attachment kit) Trigger spray spring loaded SBA (cartridge) FS721S Trigger Spray Service Kit FS077NS Trigger Spray Handle & Screw FS790 Trigger Spray guard and nozzle FS795 O-rings (8), grub screws (4), &... -
Page 11: Product Warranty Statement
- WATTS AUSTRALIA Effective 27 October 2023 This Warranty Statement applies to products supplied by Australian Valve 3. Our responsibilities Group Pty Ltd (ACN 068 227 270) (AVG) or Enware Pty Ltd (ACN 662 (a) In the event that the Supplier is reasonably satisfied that there is a... - Page 12 1300 369 273 info@enware.com.au enware.com.au...
Need help?
Do you have a question about the ENWARE FWS011 and is the answer not in the manual?
Questions and answers