Table of Contents
Advertisement
Quick Links
Advertisement
Table of Contents

Related Manuals for EPH Controls CP4D


Summary of Contents for EPH Controls CP4D
- Page 1 CP D CP D Programmable RF Thermostat & Receiver Installation and Operation Guide...
-
Page 2: Table Of Contents
Table of contents RFRPD Room Thermostat Installation Instructions Factory Default Settings Frost Protection Speci cations How your programmable thermostat works Mounting & Installation Important notes RF1B Wireless Receiver Installation Instructions Speci cations & Wiring Important notes Mounting & Installation RFRPD Room Thermostat Operating Instructions LCD Symbol Description Button Description... - Page 3 Programming Modes Adjust the program setting in 5/2 Day mode Copy Function Temporary Override Auto Mode Permanent Override Boost Function Battery low warning Frost Protection Replacing the batteries Installer menu P0 1 Operating Mode Normal Optimum Start P0 2 Setting High & Low Limits P0 3 Hysteresis P0 4 Calibrate the thermostat P0 5 Frost Protection...
- Page 4 P11 DHOP P12 Set OpenTherm® Parameters Exit System Architecture Controlling an OpenTherm® Boiler with multiple CP4D Making your RF1B receiver either a Hub or Branch receiver Identifying if a receiver is a Hub receiver Pairing the RF1B receivers together Disconnecting the RF1B receiver from other receivers...
-
Page 5: Rfrpd Room Thermostat
RFRPD Room Thermostat Installation Instructions... -
Page 6: Factory Default Settings
When frost protection is activated the thermostat will switch on the boiler when the temperature drops below the setpoint. This symbol will show on the screen when frost protection is active. Frost protection is only active in OFF and Holiday mode. RFRPD Room Thermostat CP4D... -
Page 7: Speci Cations
Temp. control range: 5…35˚C Ambient temperature: 0…45˚C Dimensions: 130 x 95 x 23mm Temperature sensor: NTC 100K Ohm @ 25˚C Temperature indication: ˚C Frost protection: Only operational in OFF and Holiday mode Pollution degree: Pollution degree 2 RFRPD Room Thermostat CP4D... -
Page 8: How Your Programmable Thermostat Works
Example: If P1 is set to be 21˚C at 6am, and if P2 is set to be 10˚C at 8am, the thermostat will look for the temperature to be 21˚C between 6am and 8am. RFRPD Room Thermostat CP4D... -
Page 9: Mounting & Installation
For accurate temperature control it is recommended to mount the thermostat as per the installation drawing on Page 11. *If installing multiple CP4D please see page 15 & 50. Note: If installing multiple CP4D please ensure to keep a minimum of 25cm distance between receivers. RFRPD Room Thermostat CP4D... - Page 10 Lower the ap at the front of the thermostat. There is a battery compartment located below the buttons. Apply downward pressure to remove the cover. Insert the 2 x AA batteries and the thermostat will turn on. Close the battery compartment. RFRPD Room Thermostat CP4D...
-
Page 12: Important Notes
- Can cause the thermostat to reset. ƒ - Can cause the thermostat to display the incorrect information. ƒ • When the battery low symbol appears on the CP4D or EMBER App. ƒ The batteries should be changed immediately. • If a Symbol appears on your thermostat screen, please see page 21 ƒ... -
Page 13: Rf1B Wireless Receiver
RF1B Wireless Receiver Installation Instructions... -
Page 14: Speci Cations & Wiring
Internal wiring diagram for RF1B Switching Options Mains Switching - Link L to 1. Low Voltage Switching - Remove the external controls link 200-240V~ from the boiler PCB. 50/60Hz - Connect 1 and 4 to these terminals. RF1B Wireless Receiver CP4D... -
Page 15: Important Notes
25cm between each receiver. If they are too close, they will not be able to pair with each other. Where possible, keep the receivers in the same area of the premises to ƒ allow for stable communication. RF1B Wireless Receiver CP4D... -
Page 16: Mounting & Installation
Push the receiver ush to the surface and tighten the screws of the backplate from the bottom. (See page 17) If installing more than one RF1B receiver ensure they are 25cm apart. RF1B Wireless Receiver CP4D... -
Page 18: Rfrpd Room Thermostat
RFRPD Room Thermostat Operating Instructions... -
Page 19: Lcd Symbol Description
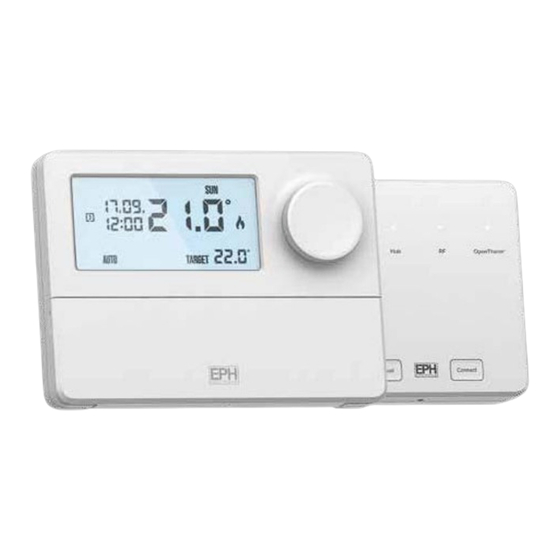
LCD Symbol Description Current program Room Temperature Day of the week Frost symbol Battery low symbol Wireless symbol Day / Month Heating on symbol Current Time (Boost to time) Keypad lock symbol Operating mode Target Temperature RFRPD Room Thermostat CP4D... -
Page 20: Button Description
Wireless connect button Reset button Automatic Boost mode mode (Back) Manual mode Set Date / Time OFF mode Program mode Automatic mode Program mode Handwheel Reset button Manual mode Time Wireless connect O mode Boost mode button RFRPD Room Thermostat CP4D... -
Page 21: Resetting The Thermostat
Press and hold for 10 seconds. will appear on the screen. The keypad is now locked. To unlock the thermostat Press and hold for 10 seconds. will disappear from the screen. The keypad is now unlocked. RFRPD Room Thermostat CP4D... -
Page 22: Setting The Date, Time And Programming Mode
5/2d to 7d or 24h mode. Press Rotate to turn DST (Day Light Saving time) On or O . Press or wait 5 seconds and the thermostat will return to normal AUTO operation. RFRPD Room Thermostat CP4D... -
Page 23: Factory Program Setting
22:00 Mon-Fri 21˚C 10˚C 10˚C 10˚C 21˚C 10˚C 08:00 10:00 12:00 14:00 17:30 23:00 Sat-Sun 21˚C 10˚C 10˚C 10˚C 21˚C 10˚C 24 Hour 06:30 08:00 12:00 14:00 17:30 22:00 Everyday 21˚C 10˚C 10˚C 10˚C 21˚C 10˚C RFRPD Room Thermostat CP4D... -
Page 24: Programming Modes
If 7 D mode is selected, you can program each day of the week with 6 individual times and temperatures. If 24H mode is selected, you can only program each day of the week with the same 6 times and temperatures. See page 22 to select 5/2D, 7d or 24hr mode. RFRPD Room Thermostat CP4D... -
Page 25: Adjust The Program Setting In 5/2 Day Mode
AUTO While in PROG Mode pressing will jump from P1 - P2 etc without PROG changing the temperature. While in PROG Mode pressing will jump to the next day (block of TIME days). RFRPD Room Thermostat CP4D... -
Page 26: Copy Function
‘OVERRIDE’ will appear on the screen. Press or after 5 seconds the thermostat will operate to this temperature, until the next switching time. To cancel temporary override, press to return to the automatic mode. AUTO RFRPD Room Thermostat CP4D... -
Page 27: Auto Mode
‘MAN’ will appear on the screen. Rotate to adjust the temperature setpoint. Press or after 5 seconds the thermostat will operate in this permanent override. To cancel permanent override, press to return to the automatic AUTO mode. RFRPD Room Thermostat CP4D... -
Page 28: Boost Function
Rotate to select required temperature. Press to con rm. ‘BOOST TO’ will now be displayed on the screen with the time that it is activated to displayed above this text. Press to deactivate the boost. BOOST RFRPD Room Thermostat CP4D... -
Page 29: Battery Low Warning
Lower the ap at the front of the thermostat. There is a battery compartment located below the buttons. Apply downward pressure to remove the cover. Insert the 2 x AA batteries and the thermostat will turn on. Close the battery compartment. RFRPD Room Thermostat CP4D... -
Page 30: Installer Menu
Operating Mode (Normal / Optimum Start / TPI) P0 2: Hi Lo (limiting the thermostat) P0 3: Hysteresis (di erential) P0 4: Calibration P0 5: Frost Protection P0 6: Holiday mode P0 7: Backlight P0 8: Exit: Exit from menu RFRPD Room Thermostat CP4D... - Page 31 Installer menu OpenTherm® Instructions P0 9: Setting DHW temperature P 10: OpenTherm® Information P 11: DHOP P 12: Set OpenTherm® Parameters Exit RFRPD Room Thermostat CP4D...
-
Page 32: P0 1 Operating Mode
Example: Program 1 on the thermostat is 21°C for 06:30am and the room temperature is 18°C. The thermostat will start the heating at 06:30am and the room temperature will start to increase. RFRPD Room Thermostat CP4D... -
Page 33: Optimum Start
Optimum Start Time (OST) and its maximum value is 3 hours = 180 mins. This is subtracted from the start time. As the temperature increases the thermostat will recalculate the OST if the temperature is increasing too quickly. RFRPD Room Thermostat CP4D... - Page 34 Example when Ti = 10 Program 1 on the thermostat is 21°C for 06:30am and the room temperature is 18°C. The thermostat will start the heating at 06:00am to reach 21°C for 06:30am @ Ti=10. Target Temperature Di erence ˚C RFRPD Room Thermostat CP4D...
-
Page 35: Tpi
TPI Control. You can You can select 2/3/6 or 12. set this temperature from 1.5˚C to 3.0˚C in 0.1˚C increments. RFRPD Room Thermostat CP4D... - Page 36 – this cycle may begin again if the thermostat isn’t reaching temperature. RFRPD Room Thermostat CP4D...
-
Page 37: P0 2 Setting High & Low Limits
‘LO’ appears on the screen, the temperature will begin to ash. Rotate to select the low limit for the thermostat. Press once to return to the menu or twice to return to normal AUTO operation. RFRPD Room Thermostat CP4D... -
Page 38: P0 3 Hysteresis
‘H On’ temperature between 0.2°...1°C. Press to con rm. ‘H OFF’ temperature will begin to ash. to adjust the ‘H OFF’ temperature between 0.0°...1°C. Press once to return to the menu or twice to return to normal AUTO operation. RFRPD Room Thermostat CP4D... -
Page 39: P0 4 Calibrate The Thermostat
Press to select. The current actual temperature will appear on screen. Rotate to adjust the temperature reading. Press to con rm and you will return to the menu. Press to return to the home screen. AUTO RFRPD Room Thermostat CP4D... -
Page 40: P0 5 Frost Protection
2. Rotate anticlockwise to turn the frost protection OFF. Press to con rm and you will return to the menu. Press to return to the home screen. AUTO RFRPD Room Thermostat CP4D... -
Page 41: P0 6 Holiday Function
Press Press to return to the home screen. AUTO The thermostat will now return to the mode it was in before the Holiday settings were entered. To cancel Holiday mode, press once. RFRPD Room Thermostat CP4D... -
Page 42: Frost Protection P0 7 Backlight
‘P07 & bL’ appears on the screen. Rotate ‘AUTO’ will appear on the screen. Press to select the AUTO setting or rotate to select the OFF setting. Press to return to the home screen. AUTO RFRPD Room Thermostat CP4D... -
Page 43: P0 8 Pin Lock
. ‘0000’ will ash on the screen. Press Rotate to set the value for the rst digit. Press to con rm and move to the next PIN digit. When the last digit of the PIN is set, press RFRPD Room Thermostat CP4D... - Page 44 If the veri cation PIN is entered incorrectly the user is brought back to the menu. When the PIN lock is active, the lock symbol will appear on the screen. When the thermostat is PIN locked, pressing any button will take the user to the PIN unlock screen. RFRPD Room Thermostat CP4D...
- Page 45 Access PIN in the installer menu. Press , ‘ON’ will appear on the screen. Rotate to select ‘OFF’ . Press . ‘0000’ will ash on the screen. Enter the PIN. Press The PIN is now disabled. RFRPD Room Thermostat CP4D...
-
Page 46: Exit
Exit: Exit from Menu This menu allows the installer to return to the main interface. It is also possible to exit the installer menu by pressing AUTO whilst in the installer menu. RFRPD Room Thermostat CP4D... -
Page 47: P0 9 Setting Dhw Temperature
PO 9 Setting DHW temperature This function allows the installer to change the DHW temperature of the boiler. The temperature can be set in 0.5°C increments by rotating Press to select the desired temperature. This menu is only available when the thermostat is connected to OpenTherm®... -
Page 48: P10 Opentherm® Information
P10 OpenTherm® Information This function allows the installer to view information received from the OpenTherm® boiler. It may take a few seconds to load information relating to each parameter. The information that can be shown from the boiler is outlined in the table below. Displayed on screen Description Remark... -
Page 49: P11 Dhop
P11 DHOP This function allows the installer to activate or deactivate DHW target temperature control from the thermostat. This menu is only available when the thermostat is connected to OpenTherm® P12 Set OpenTherm® Parameters This function allows the installer to con gure the OpenTherm® parameters. - Page 50 P12 Set OpenTherm® Parameters Continued Param Description Range Default HHCH t-1 Maximum setpoint heating 45 - 85˚C 85˚C LLCH Minimum setpoint heating 10 - HHCH˚C 45˚C This allows user to select di erent climatic curves for weather compensation. This 0.2 - 3.0 only applies to Boilers with an outside sensor connected.
-
Page 51: Exit
Climatic Curve Exit This function allows the installer to return to the main interface. It is also possible to exit the installer menu by pressing AUTO whilst in the installer menu. RFRPD OpenTherm® Instructions... -
Page 52: System Architecture
System architecture Example A CP4D controlling OT Boiler RFRPD Thermostat RFRPD Thermostat RF1B Receiver OpenTherm® Boiler This function allows the installer to con rm if the thermostat is receiving OpenTherm® information from the boiler. Press and hold for 5 seconds. - Page 53 RF1B Hub Receiver RF1B Hub Receiver RF1B Branch Receiver RF1B Branch Receiver Motorised Valve Motorised Valve Motorised Valve Note: A maximum of 6 Auxiliary switch wire CP4D can be used in the from motorised valve system. OpenTherm® Boiler RFRPD OpenTherm® Instructions...
-
Page 54: Controlling An Opentherm® Boiler With Multiple Cp4D
Controlling an OpenTherm® Boiler with multiple CP4D It is possible to have up to six CP4D thermostats controlling one OpenTherm® boiler. To do this it is necessary to make one of the RF1B receivers into a Hub Receiver. This Hub Receiver will receive data from all of the RFRPD thermostats and relay this information to the boiler via OpenTherm®. -
Page 55: Identifying If A Receiver Is A Hub Receiver
Identifying if a receiver is a Hub Receiver: 1. If the Hub LED is illuminated the RF1B is a Hub receiver. Pairing the RF1B receivers together: 1. Hold on the Hub receiver for 3 seconds. Connect The RF LED will begin to ash. 2. -
Page 56: Rf1B Wireless Receiver
RF1B Wireless Receiver Operating Instructions... -
Page 57: Button / Led Description
Reset button may be held to initialise the pairing process Press to reset the with the wireless thermostat. Once receiver pressed the RF LED will begin to ash. Note: Please refer to Page 14 for wiring information. RF1B Wireless Receiver CP4D... -
Page 58: Led Description
The RF light will blink once every second when in RF pairing by holding Note: Connect. Press Manual to exit from this state. Opentherm® Solid White LED indicating that Opentherm® is connected. The Opentherm® LED will blink when there is an Opentherm® communication error. RF1B Wireless Receiver CP4D... -
Page 59: To Connect The Rfrpd Thermostat To An Rf1B Receiver
To connect the RFRPD Thermostat to an RF1B receiver When installing a CP4D, the RFRPD thermostat and the RF1B receiver will have a pre-established RF connection so it is not necessary to carry out the RF connection process below. On the RF1B receiver: Hold for 3 seconds. -
Page 60: Pairing You Rf1B Receiver To Your Gw04 Gateway
Pairing your RF1B Receiver to your GW04 Gateway Note: Your CP4D can be controlled remotely via the EMBER app with the addition of a GW04 Gateway. Ensure that your RFRPD thermostat(s) are paired to your RF1B receiver(s). Ensure that the receiver you’re connecting to the boiler is... -
Page 61: To Disconnect The Rfrpd Thermostat From An Rf1B Receiver
2 times to return to the normal screen – the thermostat is now disconnected. On the RF1B receiver: Press for 3 seconds to enter pairing mode, Connect Press for 10 seconds and System LED will turn on, Connect Press to exit, the thermostat is now disconnected. Manual CP4D... -
Page 62: Service Interval
When the Service Interval is activated ‘SErv’ will appear on the screen which will alert the user that their annual boiler service is due. For details on how to enable or disable the Service Interval, please contact customer service. CP4D... - Page 63 Notes...
- Page 64 EPH Controls IE technical@ephcontrols.com www.ephcontrols.com/contact-us +353 21 471 8440 Cork, T12 W665 EPH Controls UK technical@ephcontrols.co.uk www.ephcontrols.co.uk/contact-us +44 1933 322 072 Harrow, HA1 1BD...
Need help?
Do you have a question about the CP4D and is the answer not in the manual?
Questions and answers