Table of Contents
Advertisement
Advertisement
Table of Contents

Related Manuals for EPH Controls CP4B


Summary of Contents for EPH Controls CP4B
- Page 1 CP4B Battery Powered Programmable Thermostat Installation and Operation Guide...
-
Page 2: Table Of Contents
Table of contents Installation Instructions Factory Default Settings Frost Protection Specifications Wiring Diagram How your programmable thermostat works Mounting & Installation Operating Instructions LCD Symbol Description Button Description Resetting the thermostat Keypad lock and unlock Setting the date, time, programming mode and daylight saving time Factory Program Setting Programming Modes Adjust the program setting in 5/2 Day mode... - Page 3 Holiday Function Backlight mode selection Battery low warning Frost Protection Replacing the batteries Installer menu PO 1 Operating Mode Normal Optimum Start PO 2 Setting high & low limits PO 3 Hysteresis H On and H Off PO 4 Calibrate the thermostat PO 5 Frost Protection PO 6 Exit Installer menu - OpenTherm...
-
Page 4: Installation Instructions
CP4B Room Thermostat Installation Instructions... -
Page 5: Factory Default Settings
RFRP-OT Room Thermostat Factory Default Settings Contacts: Volt Free Temperature indicator: ˚C Switching differential: 0.4˚C In built frost protection: 5˚C - Not adjustable Clock: 24 hours Keypad lock: Operating mode: 5/2 day Frost Protection 5˚C Frost protection is built into this thermostat. It is set at 5°C and is not adjustable. -
Page 6: Specifications
Ambient temperature: 0 … 45˚C Contact rating: 8A 230Vac Dimensions: 130 x 99 x 25mm Temperature sensor: NTC 100K Ohm @ 25˚C Temperature indication: ˚C Switching differential: 0.4˚C Frost protection: Only operational in Off mode Pollution degree: Pollution degree 2 CP4B Room Thermostat... -
Page 7: Wiring Diagram
Wiring Diagram Internal Wiring Diagram for CP4B OFF COM (OpenTherm) If mains voltage output is required, 230V must be connected to terminal COM. Important: Do not connect Mains Voltage to OpenTherm®terminals. www.ephcontrols.com... -
Page 8: How Your Programmable Thermostat Works
ON if the room temperature is lower than the setpoint for the current period. Example: If P1 is set to be 21˚C at 6am, and if P2 is set to be 10˚C at 8am, the thermostat will look for the temperature to be 21˚C between 6am and 8am. CP4B Room Thermostat... -
Page 9: Mounting & Installation
Mounting & Installation Caution! Installation and connection should only be carried out by a qualified ƒ person. Only qualified electricians or authorised service staff are permitted to ƒ open the thermostat. If the thermostat is used in a way not specified by the manufacturer, its ƒ... - Page 10 Fix the backplate to the wall and ensure electrical connections are terminated correctly. Attach the front housing to the backplate and insert the 2 x AA batteries and the thermostat will turn on. Close the battery compartment. CP4B Room Thermostat...
- Page 11 www.ephcontrols.com...
-
Page 12: Operating Instructions
CP4B Room Thermostat Operating Instructions... -
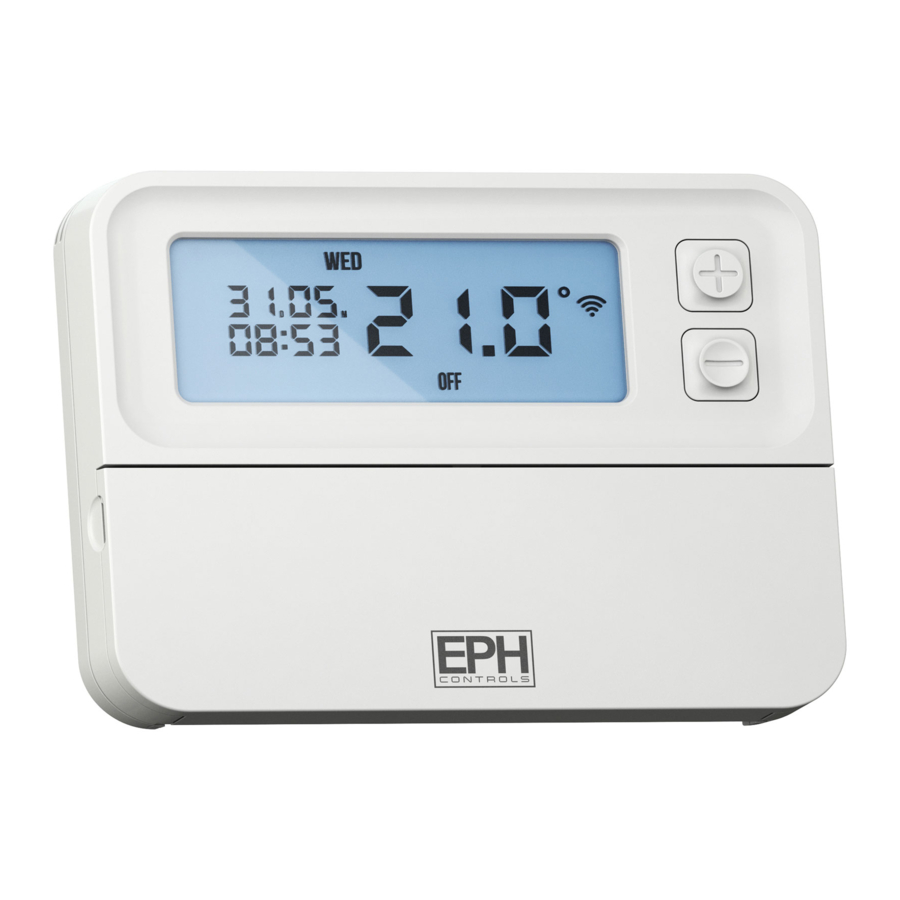
Page 13: Lcd Symbol Description
LCD Symbol Description Current program Temperature Day of the week Battery low symbol Day / Month Current Time Heating on symbol (Boost to time) Keypad lock symbol Operating mode www.ephcontrols.com... -
Page 14: Button Description
Program mode Set Date/ Time Automatic mode Set Date / Time Set point increase AUTO TIME Manual mode Holiday mode Set point decrease Off mode Copy function Confirm button COPY Program mode Boost mode Reset button PROG BOOST CP4B Room Thermostat... -
Page 15: Resetting The Thermostat
RFRP-OT Room Thermostat Resetting the thermostat Press the button on the side of the thermostat. ‘rst no’ will appear on the screen. Press the button. ‘rst yes’ will appear on the screen. Press the button to reset the thermostat. The thermostat will now be reset to the default settings. Keypad lock and unlock To lock the keypad, press and hold the buttons for 10 seconds. -
Page 16: Setting The Date, Time, Programming Mode And Daylight Saving Time
5/2d to 7d or 24h mode. Press the buttons to turn DST (Day Light Saving time) On or Off. Press the button or wait 5 seconds and the thermostat will return to AUTO normal operation. CP4B Room Thermostat... -
Page 17: Factory Program Setting
Factory Program Setting 5/2d 5/2 Day 06:30 08:00 12:00 14:00 17:30 22:00 Mon-Fri 21˚C 10˚C 10˚C 10˚C 21˚C 10˚C 08:00 10:00 12:00 14:00 17:30 23:00 Sat-Sun 21˚C 10˚C 10˚C 10˚C 21˚C 10˚C 7 Day 06:30 08:00 12:00 14:00 17:30 22:00 Mon-Fri 21˚C 10˚C... -
Page 18: Programming Modes
Programming Modes The CP4B Room Thermostat has the following programming modes available: 5/2 Day mode Programming Monday to Friday as one block and Saturday and Sunday as a second block. Each block can have 6 different times and temperatures. 7 Day mode Programming all 7 days individually with six different times and temperatures per day. -
Page 19: Adjust The Program Setting In 5/2 Day Mode
Adjust the program setting in 5/2 Day mode Press the button once. PROG Programming for Monday to Friday is now selected. Press the buttons to adjust the P1 time. Press Press the buttons to adjust the P1 temperature. Press Repeat this process to adjust P2 to P6 times and temperatures. Press Programming for Saturday to Sunday is now selected. -
Page 20: Copy Function
The next day will begin to flash on the top of the screen. Press the button to copy the times and temperatures to that day. Press the button to skip that day. You can copy to multiple days using the button. Press the button when copying has been completed. CP4B Room Thermostat... -
Page 21: Temporary Override
Temporary Override When in AUTO mode, press the buttons to adjust the temperature setpoint. ‘OvEr’ will appear on the screen. Press or after 5 seconds the thermostat will operate to this temperature setpoint, until the next switching time. To cancel temporary override, press the buttton and then press the button to return to the automatic mode. -
Page 22: Boost Function
Press the button again to deactivate the boost. BOOST If you do not press any button after pressing the boost button, the boost will activate to a default boost setting of 21C. CP4B Room Thermostat... -
Page 23: Holiday Function
Holiday Function This will switch your heating system off between the start and end times you select . button, ‘HOLIDAY FROM’ will appear on screen. Press the Press the buttons to adjust the year. Press Press the buttons to adjust the month. Press Press the buttons to adjust the day. -
Page 24: Backlight Mode Selection
OFF or AUTO mode. Press the button. Battery low warning When the batteries are almost empty, the symbol will appear on the screen. The batteries must now be replaced or the unit will shut down. CP4B Room Thermostat... -
Page 25: Frost Protection Replacing The Batteries
Replacing the batteries Lower the flap on the front of the thermostat. There is a battery compartment located below the buttons. Apply downward pressure to remove the cover. Insert the 2 x AA batteries and the thermostat will turn on. Close the battery compartment. -
Page 26: Installer Menu
P0 4: Calibration P0 5: Frost Protection P0 6: Exit Installer menu OpenTherm® Instructions (Only for use with OT boilers) P0 6: Setting DHW Temperature P0 7: OpenTherm® Information P0 8: DHOP P0 9: Set OpenTherm® Parameters Exit CP4B Room Thermostat... -
Page 27: Po 1 Operating Mode
PO 1 Operating Mode (Normal / Optimum Start / TPI) Nor (Normal Mode) When the thermostat is in Normal mode, the thermostat will try to reach the target temperature after the program changes. Example: Program 1 on the thermostat is 21°C for 06:30am and the room temperature is 18°C. -
Page 28: Normal Optimum Start Tpi
Optimum Start Time (OST) and its maximum value is 3 hours = 180 mins. This is subtracted from the start time. As the temperature increases the thermostat will recalculate the OST if the temperature is increasing too quickly. CP4B Room Thermostat... - Page 29 Optimum Start Control Graph with Ti = 20 Optimum Start Control Graph with Ti = 15 Target Temperature Di erence ˚C Target Temperature Di erence ˚C Optimum Start Control Graph with Ti = 10 Example when Ti = 20 Program 1 on the thermostat is 21°C for 06:30am and the room temperature is 18°C.
- Page 30 TPI Control. You can set this temperature from 1.5˚C to You can select 2/3/6 or 12. 3.0˚C in 0.1˚C increments. CP4B Room Thermostat...
- Page 31 TPI Control Temp 22˚C 21˚C Setpoint Temperature 20˚C Proportional Bandwidth 19˚C 18˚C 17˚C Time Minutes Heating On Heating O Example: Program 1 on the thermostat is 21°C for 06:30am and the room temperature is 18°C. The thermostat will start the heating at 06:30am and the room temperature will start to increase then but will switch itself off before it reaches temperature and allow the room temperature to increase naturally –...
-
Page 32: Po 2 Setting High & Low Limits
HOn is the fall in temperature – Default – 0.4°C. This will allow a fall of 0.4°C from the setpoint before the thermostat turns on again. Hoff is the rise in temperature – Default – 0.0°C. This will allow the temperature to rise 0°C above its setpoint. CP4B Room Thermostat... -
Page 33: Po 4 Calibrate The Thermostat
PO 4 Calibrate the thermostat This menu allows the installer to re-calibrate the thermostat. The current temperature will be displayed on the screen and can be adjusted by pressing the buttons . PO 5 Frost Protection 5˚C This menu allows the installer to activate or de-activate frost protection. When frost protection is activated the thermostat will switch on the boiler when the temperature drops below 5˚C. -
Page 34: Po 6 Setting Dhw Temperature
The temperature can be set in 0.5°C increments by pressing the buttons. Press the button to select the desired temperature. This menu is only available when the thermostat is connected to OpenTherm® and DHOP is ON (P08 OT installer menu). CP4B OpenTherm® Instructions... -
Page 35: Po 7 Opentherm® Information
PO 7 OpenTherm® Information This menu allows the installer to view information received from the OpenTherm® boiler. It may take a few seconds to load information relating to each parameter. The information that can be shown from the boiler is outlined in the table below. Displayed on screen Description Remark... -
Page 36: Po 8 Dhop
This menu allows the installer to configure the OpenTherm® parameters. To access the menu please enter the password “08” with the buttons. Press to confirm. The parameters that can be set are outlined in the table below. CP4B OpenTherm® Instructions... - Page 37 Parameter Description Range Default HHCH t-1 Maximum set point heating 45 - 85˚C 85˚C LLCH Minimum set point heating 10 - HHCH˚C 45˚C This allows users to select different climatic curves for weather compensation. 0.2 - 3.0 This only applies to boilers with an outside sensor connected.
-
Page 38: Exit
PO 9 Set OpenTherm® parameters Climatic Curve Exit This menu allows the installer to return to the main interface. It is also possible to exit the installer menu by pressing AUTO, MAN or OFF whilst in the installer menu. CP4B OpenTherm® Instructions... -
Page 39: System Architecture
System architecture Example A 1 no. Thermostat controlling OT Boiler CP4B Thermostat OpenTherm® Boiler www.ephcontrols.com... - Page 40 EPH Controls IE sales@ephcontrols.com www.ephcontrols.com T +353 21 434 6238 F +353 21 454 5890 EPH Controls UK sales@ephcontrols.com www.ephcontrols.com T +44 1933 626 396 F +44 1933 626 218...
Need help?
Do you have a question about the CP4B and is the answer not in the manual?
Questions and answers
I have put new batteries in and I cant reset tdate, times programme. date shows 0101 whats my problem
The issue with resetting the date and time on the EPH Controls CP4B after replacing the batteries is that the date and time must be manually re-entered. The thermostat does not retain date and time settings when the batteries are removed or replaced.
This answer is automatically generated
Is there any need to connect EPH CP4B to the mains
No, the EPH Controls CP4B is a battery-operated programmable thermostat and does not need to be connected to the mains. However, if mains voltage output is required, 230V must be connected to terminal COM. It is important not to connect mains voltage to the OpenTherm terminals.
This answer is automatically generated