Table of Contents
Advertisement
Quick Links
Advertisement
Table of Contents

Related Manuals for Bernina 990


Summary of Contents for Bernina 990
- Page 1 USER MANUAL BERNINA 990...
- Page 2 This is because we truly want you to enjoy the creative process to the fullest - after all, creativity is turning your ideas into something that makes you and others happy. With this in mind, I wish you many joyous moments with your BERNINA 990. Sincerely, yours Hanspeter Ueltschi...
-
Page 3: Table Of Contents
6.3 Buttonholes ............64 My BERNINA 6.4 Tapering Stitches ..........66 6.5 Darning Program ..........67 1 Welcome to the World of BERNINA ....10 6.6 Stitch Pattern Combination ....... 68 6.7 Save..............70 2 Introduction ............11 2.1 Machine ............11 7 Securing ............. - Page 4 Table of Contents Appendix 18 Stitch Patterns..........110 18.1 Practical Stitches ..........110 18.2 Decorative Stitches ......... 110 18.3 Buttonholes ............ 117 18.4 Quilting Stitches ..........117 19 Embroidery Designs........119 19.1 Inspirations ............. 119 19.2 Quilting ............128 19.3 Accents ............144 19.4 Borders............
-
Page 5: Safety Instructions
LED lamp checked or repaired at ► work properly, have the machine checked your local BERNINA dealer. or repaired by your local BERNINA dealer. Switch off the machine before working in ► Keep all ventilation openings of the the needle area. - Page 6 Safety SAFETY INSTRUCTIONS Always use an original BERNINA Stitch Special care should be taken when the ► Plate. machine is operated by or in the presence An incorrect stitch plate can result in of children. needle breakage. Only use the machine with the supplied ►...
- Page 7 Contact your BERNINA dealer or an experienced radio/television technician. Any change or modification to the device that has not been expressly approved by BERNINA can invalidate the electromagnetic compatibility (EMC) and result in the revocation of the operating license for this device.
-
Page 8: General Information
The symbol may also be marked on the product. Proper Use Your BERNINA machine is conceived and designed for private household use. It is intended for sewing fabrics Environmental Protection and other materials as described in this instruction manual and on the machine. - Page 9 CAUTION Designates a low-risk hazard which can lead to minor or moderate injuries if not avoided. NOTICE Designates a hazard which can lead to material damage if not avoided. Tips from the BERNINA sewing experts.
-
Page 10: My Bernina
My BERNINA 1 Welcome to the World of BERNINA The purpose of your BERNINA 990 is for sewing, BERNINA Blog embroidering and quilting. Delicate silk or satin fabrics Sophisticated instructions, free sewing patterns as well as heavyweight linen, fleece and denim can be and embroidery designs as well as many new sewn easily with this machine. -
Page 11: Introduction
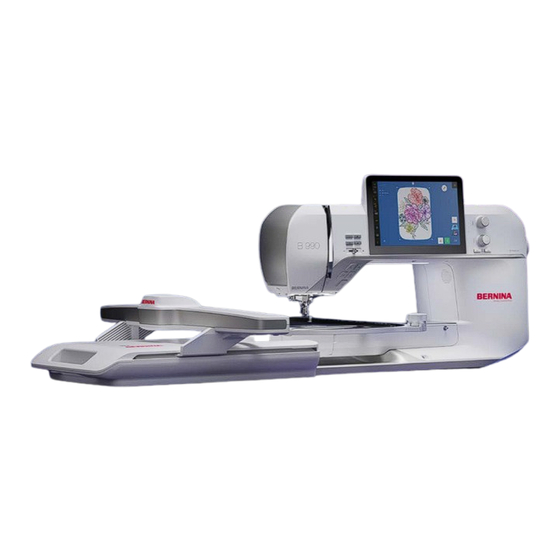
My BERNINA 2 Introduction 2.1 Machine Front 1 Embroidery Module Connection 2 Bobbin Cover 3 Needle Area 4 Thread Cutter 5 Thread Take-up Lever Cover 6 Speaker 7 Connection for Slide-on Table 8 Knee Lifter Connection Needle Area Bobbin Area 1 Needle Threader 2 Lighting 3 Needle Holder 1 Bobbin Case 2 Thread Cutter 3 Bobbin Case 4 Needle ... - Page 12 1 Air Vents 2 Connection for Multiple Spool Holder 3 Spool Pin Unit, Vertical 4 Spool Pin, Horizontal 5 Bobbin Winding Unit with Thread Cutter 6 Retractable Thread Guide 7 Carry Handle 8 Thread Guide, Winder 9 Opening for Thread Lubrication Unit 10 Thread Guide, Rear 11 Connection for Accessory 12 BSR Connection 13 BERNINA Dual Feed 14 Connection for Darning Hoop ...
- Page 13 My BERNINA 2 Introduction Controls 1 External Buttons above the Needle 2 Left Controls 3 Display 4 Right Controls Automatic Needle Threader External Buttons above the Needle You can use the Automatic Needle Threader button to thread the needle automatically. The Start/Stop button is deactivated and lights up red.
- Page 14 My BERNINA 2 Introduction Quick Reverse With some functions, e.g., buttonholes, darning, tapering, the machine starts the pattern at the first You can use the Quick Reverse button to sew in segment. reverse while the button is pressed. In the Settings, you can program whether the Reverse Pattern End option or the Backstep option should be executed.
-
Page 15: Accessories
My BERNINA 2 Introduction Needle Position Left/Right Accessories Purpose You can use the Needle Position Left/Right buttons to move the needle to the left or to the right. Foot Control To start and stop the machine. The needle position is shown on the sewing screen. - Page 16 Spool Cap D43 Secures the thread spool in place and allows it to unwind consistently while sewing. 5.5 mm BSR Stitch For sewing with the BERNINA Plate with Sensor Integrated Stitch Regulator (BISR). 4× Foam Pad The foam pad prevents the thread from slipping, tangling or breaking on the spool pin.
- Page 17 My BERNINA 2 Introduction Accessories Purpose Accessories Purpose Seam Ripper Screwdriver, gray, To undo seams and to cut To change the needle. Torx buttonholes open. Right Seam Guide To align even seam distances. Thread Lubrication For sewing and embroidering Unit metallic threads.
- Page 18 For practical and decorative For sewing on braids, piping and Foot #1C stitches. To sew forward and in hook and loop fastener. reverse. Use only with the BERNINA Dual For materials such as corduroy, Feed. denim or wool. Blindstitch Foot #5 For sewing blindstitch hems, edgestitching and topstitching on either side of the foot.
- Page 19 My BERNINA 2 Introduction Presser Foot Purpose Accessories Purpose BERNINA Stitch Giant Hoop (incl. Regulates the stitch length while To embroider embroidery designs, Regulator embroidery free-motion quilting, thread embroidery design combinations (BSR) #42 template) painting and free-motion or endless embroidery. embroidery on all fabrics.
-
Page 20: User Interface Overview
My BERNINA 2 Introduction Accessories Purpose Accessories Purpose 6x Template Holder Embroidery Thread To fix the template in the For embroidering. embroidery hoop. 4x Fabric Clamp For fixing the fabric to the outer frame of the Giant Hoop. 2.3 User Interface Overview... - Page 21 My BERNINA 2 Introduction Tap Icons Gestures with Application Two Fingers Blue: Function is switched on. Gray: Function is not available. Move Apart Zoom the preview in, e.g. Yellow Bar: Function or value deviates from the in the Stitch Designer default value.
- Page 22 Upper Thread Tension page 49] Programmed Buttonhole Length Darning Program Settings BERNINA Integrated Stitch Regulator Tapering Stitches In BERNINA Integrated Stitch Regulator mode, Backstepping you can sew and quilt with the integrated stitch Stitches with Stitch Counter regulation. [} see page 72]...
- Page 23 4. Tap the Options Copy or Options Cut ► ► icons. With the BERNINA Integrated Stitch Regulator menu entry, you can open the BISR Mode. [} see 5. Navigate to the target folder. page 72] 6. Tap the Options Paste icon.
-
Page 24: Help And Consultant
My BERNINA 2 Introduction Instruction Manual 2.4 Help and Consultant Main Menu Help Center Instruction ► ► Manual Quick Help Main Menu Quick Help ► 1 Search 2 Navigation Bar 3 Table of Contents You can use the Quick Help ... - Page 25 My BERNINA 2 Introduction If your tablet is on the same WiFi network as your machine, you can display the content on the tablet by tapping the QR Code icon and scanning the QR code on the machine's screen.
-
Page 26: Set Up The Machine
Removing the Protective Film on the Battery Your BERNINA 990 contains a battery, which ensures that the clock continues to run, even if the machine is switched off and disconnected from the power supply. The protective film must be removed before the battery 2. -
Page 27: Preparing The Machine For Embroidery
My BERNINA 3 Set Up the machine with your heel, you can raise or lower the needle or execute further functions. You can configure the For special sewing techniques and fabrics, the functions in the Sewing Settings. [} see page 46] Consultant will recommend a presser foot, stitch plate and needles as well as fabrics and sewing settings. -
Page 28: Slide-On Table
My BERNINA 3 Set Up the machine 1. Unfold the feet and stand up the accessories box. 2. Open the doors. 1 Adjustable Leg with Adjusting Screw 2 Viewing Window 3 Ruler 4 Release Button Attaching the Slide-on Table 1. Raise the needle. 2. Raise the presser foot. -
Page 29: Knee Lifter / Free Hand System
My BERNINA 3 Set Up the machine 6. Adjust the height by turning the screw at the feet. 1. To attach the Seam Guide, press the release button Ensure the table is flat and supported on the and engage the Seam Guide from the front to the surface below without raising it above the freearm. -
Page 30: Stitch Plate
3 Set Up the machine Changing the Stitch Plate The lateral position of the lever can be adjusted by Prerequisite: your local BERNINA dealer if required. The needle and the presser foot are raised. 1. Lock screen and sewing functions. Raising the Presser Foot 2. -
Page 31: Needle
With a medium ball sewing, embroidery. Detailed information on needles and their applications point. can be found in the BERNINA Needle Brochure. For woven fabrics (light, Jersey/ Needles become worn over time. Needles should be Embroidery medium, heavy-weight),... - Page 32 My BERNINA 3 Set Up the machine Needle Purpose Needle Purpose Sharp Microtex For woven fabrics (light, Topstitch Needle For woven fabrics (light, Needle medium, heavy), plastics, medium and heavy-weight). 130/705 H-N materials that are difficult to 130/705 H-M For hems and topstitching, 80/12 –...
- Page 33 My BERNINA 3 Set Up the machine Stitch Plate and Sewing Needle Needle Purpose Sewing Stitch Plate and Sewing Needle ► Hemstitch Twin For special effects with Needle hemstitch embroidery. 130/705 H ZWIHO Needle distance: For visible hems in stretch Universal Triple Needle fabrics, decorative sewing.
-
Page 34: Attaching The Retractable Thread Guide
: Modify the needle position when the machine is stopped. 3.12 Attaching the Retractable Thread Guide BERNINA recommends using the two left vertical spool pins for sewing and stitching in conjunction with the 3.13 Upper Thread retractable thread guide. The retractable thread guide... - Page 35 My BERNINA 3 Set Up the machine A foam pad is attached to each of the vertical spool 8. Guide the thread on the right downward past the pins. thread tension disc. 1. Raise the presser foot so that the thread tension discs are open and the thread can slide easily between them.
- Page 36 My BERNINA 3 Set Up the machine 11. Guide the thread behind the two thread guides in Punch Tool #45 the needle area. Walking Foot #50 Leather Roller Foot #55 Adjustable Ruler Foot #72 Binder Attachment #85 Ruffler #86 Foot for Cut ‘n’ Sew Attachment #90 Threading the Twin Needle...
- Page 37 My BERNINA 3 Set Up the machine 2. Insert the thread between the felt surfaces of the Threading the Triple Needle Thread Lubrication Unit. To thread a triple needle, thread the three threads one after the other according to the instructions for the single needle.
-
Page 38: Bobbin Thread
My BERNINA 3 Set Up the machine 4. For slippery threads put a spool net over the spool 2. Place the spool on the right vertical spool pin. as an additional measure. 3. Pull the thread upward and insert it from back to front in the two thread guide eyelets directly above. - Page 39 My BERNINA 3 Set Up the machine 6. Wind the thread 2 – 3 times around the bobbin in 5. Press the latch on the right of the bobbin case and the direction of the arrow and cut it using the remove the bobbin case.
-
Page 40: Presser Foot
6. Unlock sewing functions and screen. 7. Tap the Presser Foot icon and select in the Presser Foot Overview the attached presser foot. [} see page 41] 13. Close the bobbin cover. Attach the BERNINA Stitch Regulator (BSR) Prerequisite: The screen and sewing functions are locked. - Page 41 My BERNINA 3 Set Up the machine 1. Attach the BSR Presser Foot. Presser Foot Selection in the Status Bar recommends the appropriate Presser Foot based on the currently selected stitch pattern or embroidery design. The presser feet compatible with the machine are displayed in the Presser Foot Overview section.
-
Page 42: Fabric Feed
Embroidery Module Knits and Fleece Patchwork: Accurate piecing, quilting and binding Connecting the Embroidery Module Note: The BERNINA Dual Feed can only be used with Prerequisite: presser feet with the designation D. The work area is large enough and has sufficient... - Page 43 Hoop ► Preparing the Embroidery Hoop Prepare the embroidery hoop according to the hoop instructions. You can download the instructions for embroidery hoops at www.bernina.com. Attaching and Removing the Hoop Attaching the Hoop 1 Selected Hoop 2 Hoop Relocation 3 Hoop Selection ...
-
Page 44: Basic Settings
With the setting Data Usage you can agree or object Sewing Position : For sewing without having to the use of anonymized usage data by BERNINA for to remove the embroidery module. If a hoop is product improvement. attached, you will be prompted to remove the hoop. -
Page 45: Sewing Settings
The maximum sewing speed is 1200 stitches per BERNINA Embroidery Software onto the machine, to minute. track the progress of the stitching on the BERNINA With the Sewing Speed function, you can limit the Stitchout App or display content from the Help Center maximum sewing speed. - Page 46 My BERNINA 3 Set Up the machine Securing Stitches Thread Cutter When the Securing function is switched on, you Settings Sewing External Buttons Thread ► ► ► can use the Securing Stitches function, to select Cutter how securing stitches are sewn.
-
Page 47: Embroidery Settings
(default) or at the saved position. The saved position corresponds either to the position of Upper Thread Tension the embroidery design when saved in your Personal Folder or to the position saved in BERNINA Embroidery Settings Embroidery ... - Page 48 My BERNINA 3 Set Up the machine Securing Stitches Calibrating the Hoop When the Securing function is switched on, you Settings Embroidery Hoop Calibration ► ► can use the Securing Stitches function, to select how securing stitches are sewn. The following...
-
Page 49: Sewing
Sewing 4 Sewing Screen Main Menu Sewing ► 1 Status Bar 2 Undo/Redo 3 Stitch Length 4 Presser Foot Preview 5 Stitch Width 6 Needle Position 7 Stitch Preview 8 Edit 9 File Manager 10 Save 11 Reset 12 Combi Mode 13 View Undo Edit With the Undo function, you can undo the most With the Edit ... -
Page 50: Status Bar
Sewing 4 Sewing Screen Reset You can set the needle position to stop up or down by toggling the icon. With the Reset you can reset the saved settings of the loaded stitch to the factory default. [} see page 70] Upper Thread Tension The function is only displayed if you have loaded a The Upper Thread Tension ... -
Page 51: File Manager
Sewing 4 Sewing Screen Toolbar Toggle the light on/off to make it easier to insert the In the toolbar, you will find functions for searching for Bobbin Case when the Slide-on Table is attached. files, adjusting the view and managing your own files in your Personal Folder and on a USB stick. - Page 52 Sewing 4 Sewing Screen Fullscreen Stitch Designer With the Fullscreen function, you can expand the With the Stitch Designer icon, you can open the File Manager to fill the entire screen and show Stitch Designer function and modify existing stitch additional functions.
-
Page 53: Stitch Overview
Sewing 5 Stitch Overview 5.1 Practical Stitches Sewing Practical Stitches ► Stitch Stitch Name Purpose patterns number Straight Stitch For joining seams, for topstitching and basting. Zigzag For finishing, sewing knit seams, sewing on lace inserts and elastic bands. Vari-Overlock For finishing edges, sewing together and finishing knit fabrics. - Page 54 Sewing 5 Stitch Overview Stitch Stitch Name Purpose patterns number Gathering Stitch For gathering with heavier threads and for flat joining seams on medium-weight fabrics. Stretch Overlock For sewing together and finishing knit fabrics as well as for flat joining seams. Tricot Stitch For visible hems and seams in lingerie and sweaters and for mending tricot fabric.
- Page 55 Sewing 5 Stitch Overview Stitch Stitch Name Purpose patterns number Narrow Blind Stitch For blind hems and shell edging in fine and soft fabrics. Triple Straight Stitch with For durable seams in heavy fabrics, e.g. visible Long Stitch and decorative seams. Single Straight Stitch As a connecting stitch in a combination of one straight stitch.
-
Page 56: Decorative Stitches
Sewing 5 Stitch Overview 5.2 Decorative Stitches Category Name Sewing Decorative Stitches ► 1000 Children Sideways Motion 1100 Special 1200 Filigree 1400 Tapering Category Name 1500 Banner Nature 1600 Quilt Stitches Sideways Nature Sideways Motion Motion 1700 International Cross Stitches 1900 Geometric Sideways Motion Satin... -
Page 57: Alphabets
Sewing 5 Stitch Overview 5.3 Alphabets Stitch Patterns Name Sewing Alphabets ► Comic Calibri Italic Agency Hand of Sean Monogram Long Thin Stitch Patterns Name Block Hiragana Double Block Katakana Script Italic Cyrillic Quilt Cyrillic Italic Art Deco Kanji 5.4 Buttonholes Sewing ... - Page 58 Sewing 5 Stitch Overview Stitch Stitch Name Purpose patterns number Standard Buttonhole For light to medium-weight fabrics. e.g. blouses, dresses and bed linen. Narrow Standard For light to medium-weight fabrics, e.g. blouses, Buttonhole dresses, children's and baby clothes, crafts. Stretch Buttonhole For all knit fabrics.
-
Page 59: Quilt Stitches
Sewing 5 Stitch Overview Stitch Stitch Name Purpose patterns number Decorative Buttonhole For decorative buttonholes in firmer woven with Double Pointed fabrics. Bartack Decorative Stretch For decorative buttonholes in light to medium- Buttonhole weight knit fabrics. Button Sew-on Program Sews buttons with 2 or 4 holes. Small Zigzag Eyelet Openings for cords or narrow ribbons and for decorative work. - Page 60 Sewing 5 Stitch Overview Stitch Number Name Purpose No. 1313 – Blanket Stitch For sewing on the edge between two areas in No. 1314 crazy patchwork. No. 1315 Satin Stitch For appliqué with more distinct seams. No. 1316 Narrow Blind Stitch For edging and appliqué with minimally visible seams.
-
Page 61: Prepare And Edit Stitch Pattern
Sewing 6 Prepare and Edit Stitch Pattern Bar with the Presser Foot icon. If the stitch cannot 6.1 Load Stitch Pattern be sewn with the selected presser foot and the attached stitch plate, the stitch is shown in red. You can also modify the stitch width during sewing with the Upper Multi-function Knob. - Page 62 Sewing 6 Prepare and Edit Stitch Pattern Editing Functions This function is particularly suitable for topstitching Sewing Edit ► with decorative seams if you do not have a thicker thread available. If you are using a thick thread in a contrasting color, this will produce a striking, decorative seam.
- Page 63 Sewing 6 Prepare and Edit Stitch Pattern 1. Tap the Stitch Counter icon. ð In the info bar the Stitch Counter Stabilize the fabric. Repeat icons are shown and the Quick Guide the fabric lightly with your fingertips. Reverse ...
-
Page 64: Buttonholes
Sewing 6 Prepare and Edit Stitch Pattern Stitch Density Optimization Functions Sewing Edit Optimize Stitch Density ► ► ► With the Stitch Density function, you can modify the stitch density for some decorative satin stitches (e.g. No. 401). If you increase the stitch density, the stitch spacing is reduced and the threads become closer. - Page 65 Sewing 6 Prepare and Edit Stitch Pattern Prerequisite: Record the Buttonhole Length in mm A buttonhole is loaded. Buttonhole Foot #3A is attached. Sewing Edit Buttonhole Options ► ► Length Record mm ► ► 1. Tap the Auto Length icon.
-
Page 66: Tapering Stitches
Sewing 6 Prepare and Edit Stitch Pattern 4. Stop the left bead at the height of the first stitch Slit Width and press the Quick Reverse button. Sewing Edit Buttonhole Options Slit ► ► ► ð The machine sews the upper bartack. Width ... -
Page 67: Darning Program
Sewing 6 Prepare and Edit Stitch Pattern sewn at the same length. The setting remains saved Tips until it is overwritten, cleared or the machine is Sewing Edit Tapering Options Tips ► ► ► switched off. With the Tips function, you can adjust the tips of Adjust Length the tapering stitches. -
Page 68: Stitch Pattern Combination
Sewing 6 Prepare and Edit Stitch Pattern Record the Darning Length in mm 6.6 Stitch Pattern Combination Sewing Edit Darning Options Darning ► ► ► Length Record mm ► Combi Mode With the Record mm function, the machine measures the sewn length of the first row and saves it. - Page 69 Sewing 6 Prepare and Edit Stitch Pattern Unify Length Sewing Combi Mode Edit Combi- ► ► ► nation Options Unify Length ► With the Unify Length function, you can set the length of all stitch patterns in the combination to match the longest stitch pattern.
-
Page 70: Save
Sewing 6 Prepare and Edit Stitch Pattern You can also drag and drop selected stitch patterns out of the combination bar to the left to remove them. 6.7 Save With the Save function, you can save a modified stitch pattern as follows: New Stitch ... -
Page 71: Securing
Sewing 7 Securing The machine offers various options for securing the thread at the beginning and end of the seam. At the Beginning of the Seam Thread with the needle threader or press the Thread Cutter button. If the Securing Stitches function is switched on in the sewing settings, the machine secures. -
Page 72: Free-Motion Quilting With Stitch Regulation
BERNINA Integrated Stitch Regulator (BISR) and various The zigzag option can be used in free-motion presser feet or the BERNINA Stitch Regulator (BSR) #42. embroidery or thread painting. Mode Detailed step-by-step instructions on this topic can In the Mode area, you can select the desired BSR also be found in the Consultant on your machine. - Page 73 Sewing 8 Free-motion Quilting with Stitch Regulation Revolutions per Minute (RPM) Please Note With the Revolutions per Minute (RPM) setting, you As long as the KickStart function is active, the can set the speed at which the machine sews when the function programmed for the back-kick will be fabric is not being moved.
-
Page 74: Stitch Designer
Sewing 9 Stitch Designer 9.1 Stitch Designer Screen Sewing Stitch Designer ► 1 Edit 2 Stitch Design Area 3 Stitch Preview 4 Forward/Backward 5 Cancel 6 Apply 7 View 8 Move 9 Draw 10 Selection Options 11 Stitch Information 12 Undo/Redo You can use the Stitch Designer to modify existing All points selected: Width of the stitch pattern. stitch patterns or create your own stitch patterns. -
Page 75: Editing Functions
Sewing 9 Stitch Designer Draw With the Draw function, you can draw a new stitch Sewing Stitch Designer Edit New ► ► ► pattern directly on the screen. The points are automat- When you start the Stitch Designer, the selected stitch ically set in the Stitch Design Area. - Page 76 Sewing 9 Stitch Designer Sew Virtually Sewing Stitch Designer Edit Sew ► ► ► Virtually With the Sew Virtually function, you can virtually sew the created stitch pattern. Sew Virtually enables you to recognize potential errors or problems such as uneven stitch lengths or overlapping stitches in order to rectify them.
-
Page 77: Embroidery
To reduce thread breakage, you can use the Thread In addition to the BERNINA embroidery file format, your Lubrication Unit. machine can also read the following embroidery file formats: BQM, HQF, PAT, PLI, QLI, TAP, SEW, PES, PEC, Bobbin Thread XXX, PCS, JEF and DST. - Page 78 Embroidery 10 General Embroidery Information Stabilizer Scope of Application Fabric/Application Topping Fabrics with a pile or texture Velvet, fleece, plush, knit fabrics, corduroy, broadcloth Adhesive Stabilizer Fabrics or projects that Leather, imitation leather, cork, velvet, velour, cannot be hooped neoprene, fur, corduroy Collar corners, pockets, cuffs Hydro Stabilizer For most embroidery appli-...
-
Page 79: Embroidery Screen
Embroidery 11 Embroidery Screen Main Menu Embroidery ► 1 Status Bar 2 Undo/Redo 3 Info Box 4 Design Preview 5 Edit 6 Layer Bar 7 Stitchout 8 Save 9 View Undo Edit With the Undo function, you can undo the most With the Edit function, you can show editing recent actions. -
Page 80: Status Bar
Embroidery 11 Embroidery Screen Zoom In/Zoom Out : Zoom view in or out. You can open presser foot selection by tapping the icon. In the presser foot selection, you can select the Default: Reset the view to the default. attached presser foot and display details about the presser foot. -
Page 81: Layer Bar
Embroidery 11 Embroidery Screen Laser 11.3 File Manager The Laser icon shows the status of the laser. White: Laser off. In the File Manager, you can load and manage embroidery designs. The File Manager is shown when Yellow: Laser on. the Add Design function is tapped in the layer bar. - Page 82 Embroidery 11 Embroidery Screen The Options menu is only available for objects in USB Stick the Personal Folder and USB Stick folders. In the folder USB Stick , you can save or load your own embroidery designs on a USB stick. You can organize the embroidery designs in folders.
-
Page 83: Prepare And Edit Embroidery Designs
Embroidery 12 Prepare and Edit Embroidery Designs The thread is removed from the needle and is 12.1 Loading the Embroidery outside the embroidery area. Design 1. Select the Scanned Image option in the Background function. ð The last scanned image is displayed. 1 Add Design ... -
Page 84: Embroidery Design Editing
Embroidery 12 Prepare and Edit Embroidery Designs Resize 12.3 Embroidery Design Editing Embroidery Edit Edit Resize ► ► ► Embroidery Edit ► With the Resize function, you can modify the size of the selected layers. With the default setting, the With the Edit ... - Page 85 Embroidery 12 Prepare and Edit Embroidery Designs Colors Group Embroidery Edit Edit Colors Embroidery Edit Arrange Group ► ► ► ► ► ► With the Colors function, you can display and With the Group function, you can group together modify the colors and thread brands of the selected the selected layers.
- Page 86 Embroidery 12 Prepare and Edit Embroidery Designs Positioning Functions Match Start/Stop The positioning functions for embroidery designs are Embroidery Edit Arrange Match Start/ ► ► ► grouped together in the Position submenu. Stop With the Match Start/Stop function, you can Center Design combine two embroidery designs, e.g. BQM Quilt...
- Page 87 Embroidery 12 Prepare and Edit Embroidery Designs the embroidery design while doing so in order to There are the following options available for changing ensure that it is correctly stitched, even if the fabric is a color in an embroidery design: not clamped straight.
- Page 88 Embroidery 12 Prepare and Edit Embroidery Designs 2. To change the thread marker for an individual Check Design color, select the color, tap the Change Color Embroidery Edit Position Check Change Palette icon, select the thread ►...
- Page 89 Embroidery 12 Prepare and Edit Embroidery Designs 1. Tap the Free Point icon. 2. To maintain the size of the embroidery design, activate the Retain Size function. 3. Select any point on the embroidery design as the rotation point. 4.
- Page 90 Embroidery 12 Prepare and Edit Embroidery Designs 4. Select the Morph or Fit option. Creating Borders ð The design is placed inside a bounding box. Prerequisite: 5. To maintain the size of the embroidery design, A hoop with the hooped project is attached. activate the Retain Size ...
-
Page 91: Lettering
Embroidery 12 Prepare and Edit Embroidery Designs 12.4 Lettering Lettering Embroidery Lettering ► Font Name Children's Slab Chivalry Condensed Sans Curved Block Font Name Cyrillic Calligraphic Art Deco Block Flare Artemis Script Full Block Outline Astra Full Block Athletic Block Happy Times Atlantic Script Micro Block... - Page 92 Embroidery 12 Prepare and Edit Embroidery Designs Edit Text Creating Lettering Embroidery Edit Lettering Edit Text ► ► ► With the Edit Text function, you can edit the lettering. This enables you to correct text, insert line breaks or modify the alignment.
-
Page 93: Saving Embroidery Designs
Embroidery 12 Prepare and Edit Embroidery Designs 12.5 Saving Embroidery Designs Embroidery Save ► You can save modified embroidery designs in the Personal Folder or on a USB stick. 1. Tap the Save icon. 2. Enter and confirm the embroidery design name. 3. -
Page 94: Embroidering The Embroidery Design
Embroidery 13 Embroidering the Embroidery Design applies when working with appliqué, water-soluble 13.1 Stitchout Summary non-woven materials or other raised decorations such as buttons. Embroidery Stitchout ► The Thread Away function should not be used if the Thread Cutting function is switched off. -
Page 95: Stitchout
Embroidery 13 Embroidering the Embroidery Design Thread Cutting If this option is selected, you can define the length of the connecting stitch at which the thread is to With the Thread Cutting function, you can switch be cut. automatic cutting of the thread on and off. The following options are available: Fabric Thickness Off: The thread is not automatically cut. - Page 96 Embroidery 13 Embroidering the Embroidery Design Color Change If you wish to return to a specific stitch, you can enter the number of the stitch. With the Color Change function, you can define how thread changes are handled during embroidery. This setting overwrites the setting on the Stitchout Summary Summaryscreen.
-
Page 97: Maintenance
2. Update the firmware according to the instructions on the screen. Maintenance Intervals To ensure that your machine remains in proper working Reset Settings order for many years to come, BERNINA recommends regular maintenance and care of your machine. Settings Machine ... - Page 98 In case of unusual noises in the bobbin area. Adjusting, cleaning and lubri- For intensive use: Every year Contact your BERNINA dealer. ► cating machine components For normal use: Every two years inside the machine If the relevant message is displayed.
- Page 99 Maintenance 14 Care and maintenance 3. Push the release lever to the left. Cleaning the Screen 1. Lock screen and sewing functions. 2. Wipe down the screen with a soft, slightly damp microfiber cloth. Cleaning the Feed Dog Thread residue accumulates under the stitch plate over time.
- Page 100 Maintenance 14 Care and maintenance 13. Insert a bobbin case and close the bobbin cover. 7. Add a drop of BERNINA sewing machine oil to the bottom of the hook race. Lubricating the Hook Lubricating the hook keeps the machine running smoothly and quietly.
- Page 101 3. Carefully set down the machine on its back. Log files help service personnel to find errors in the firmware. If you are requested to do so by BERNINA Service, you can export a log file. 1. Insert the USB stick into the machine.
-
Page 102: Troubleshooting
Wrong Touchscreen Pen Use the supplied touchscreen pen or finger. ► Error during Firmware Update USB stick is not recognized. Use a BERNINA USB stick. ► Update process is blocked and the animation on the Remove the USB stick. ►... - Page 103 Settings. [} see page 47] Camera image is blurred or contains dirt particles Camera lens dirty. Have the lens cleaned by a BERNINA dealer. ► The Laser Dot is not visible or is at the wrong position The laser is concealed or deflected by the presser foot Raise the needle.
- Page 104 Place the machine in a warm room one hour before ► use. Connect the machine and switch it on. ► The machine is damaged. Contact your BERNINA dealer. ► Needle Breaks The needle is incorrectly inserted. Insert the needle with the flat side to the back as ►...
- Page 105 ► Poor quality thread. Use quality thread. ► The stitch plate or the hook tip is damaged. Contact your BERNINA dealer to have the damages ► repaired. Replace the stitch plate. ► The thread is caught in the area of the thread take-up Slide the cover at the front of the sewing machine ►...
- Page 106 Adjust the upper thread tension. [} see page 50] ► Check the thread feed from the thread spool. ► Needle blunt or bent. Replace the needle, make sure that a new BERNINA ► quality needle is used. [} see page 33] Poor quality needle. Use a new BERNINA quality needle.
- Page 107 Maintenance 15 Troubleshooting USB stick is not detected USB stick is incompatible. Use a BERNINA USB stick or compatible USB stick. ► USB stick not with correct file system. Use a USB stick with the FAT32 file system. ►...
-
Page 108: Storage And Disposal
Maintenance 16 Storage and Disposal 16.1 Storing the Machine BERNINA recommends that you store the machine in its original packaging. If the machine is stored in a cold room, place the machine in a warm room for one hour before use. 1. Switch off the machine and disconnect it from the power supply. -
Page 109: Technical Data
Maintenance 17 Technical Data Designation Value Unit Maximum Speed 1200 Stitches per Minute Needle System 130/705 Measurements without the Spool Pin (W × H × D) 675 × 420 × 245 (26.6 × 16.5 × 9.7) (in) Measurements incl. Embroidery Module without 1175 ×... -
Page 110: Stitch Patterns
Appendix 18 Stitch Patterns 18.1 Practical Stitches 18.2 Decorative Stitches Nature... - Page 111 Appendix 18 Stitch Patterns Nature Sideways Motion Cross Stitches Satin...
- Page 112 Appendix 18 Stitch Patterns Satin Sideways Motion Geometric...
- Page 113 Appendix 18 Stitch Patterns Heirloom Heirloom Sideways Motion Children...
- Page 114 Appendix 18 Stitch Patterns Children Sideways Motion 1001 1002 1003 1004 1005 1006 1007 1008 1009 1010 1011 1012 1013 1014 1015 1016 1017 1018 1019 1020 1021 1022 1023 1024 1025 1026 1027 1028 Special 1101 1102 1103 1104 1105 1106 1107 1108...
- Page 115 Appendix 18 Stitch Patterns 1431 1437 1438 1440 1446 1447 1448 1449 1450 1454 1455 1459 1460 1461 1462 Banner 1501 1502 1503 1504 1505 1506 1507 1508 1509 1510 1511 1512 1513 1514 1515 1516 1517 1518 1519 1520 1521 1522 1524 1525...
- Page 116 Appendix 18 Stitch Patterns 1718 1719 1720 1721 1722 1723 1729 1730 1731 1732 1733 1734 1735 1736 1737 1738 1739 Geometric Sideways Motion 1901 1902 1903 1904 1905 1906 1907 1908 1909 1910 1911 1912 1915 1916 1917 1918 1919 1920 1921 1922...
-
Page 117: Buttonholes
Appendix 18 Stitch Patterns Constellations 2501 2502 2503 2504 2505 2506 2507 2508 2509 2510 2511 2512 Emojis 2601 2602 2603 2604 2605 2606 2607 2608 2609 2610 2611 2612 2613 2614 2615 2616 2617 Emojis Sideways Motion 2701 2702 2703 2704 2705 2706... - Page 118 Appendix 18 Stitch Patterns 1344 1345 1346 1363 1364 1365 1366 1367 1368 1369 1370 1371 1372 1373 1374 1375 1376 1377 1378 1379 1380 1381 1382 1383 1384 1385 1386 1387 1388 1389 1390 1391 1393 1394...
-
Page 119: Embroidery Designs
After registering your machine, the included Appliqué Puffy Fonts embroidery designs are available as downloads in an editable format at the BERNINA Customer Portal. CutWork Quilting If you see one of the following pictograms below a number of the embroidery design, you can find... - Page 120 Appendix 19 Embroidery Designs Q107 Q108 1. Isacord 40 0020 1. Isacord 40 0020 Q109 Q110 1. Isacord 40 0020 1. Isacord 40 0020 Q111 Q112 1. Isacord 40 0020 1. Isacord 40 0020 ...
- Page 121 Appendix 19 Embroidery Designs Q117 Q118 1. Isacord 40 0020 1. Isacord 40 0020 Q119 Q120 1. Isacord 40 0020 1. Isacord 40 0020 Q121 Q122 1. Isacord 40 0020 1. Isacord 40 0020 ...
- Page 122 Appendix 19 Embroidery Designs Q127 Q128 1. Isacord 40 0020 1. Isacord 40 0020 Q129 Q130 1. Isacord 40 0020 1. Isacord 40 0020 Q131 Q132 1. Isacord 40 0020 1. Isacord 40 0020 ...
- Page 123 Appendix 19 Embroidery Designs 305 x 305 mm Q137 Petal LG 5.139 12 x 12 inch 1. Isacord 40 0020 1. Isacord 40 3210 2. Applique 1 3. Applique 2 4. Applique 3 5. Isacord 40 3210 165 x 165 mm 305 x 305 mm Petal SM Circle LG 2.877 3.296 6.5 x 6.5 inch 12 x 12 inch 1.
- Page 124 Appendix 19 Embroidery Designs CutWork Circle CutWork Half 152 x 152 mm 149 x 302 mm 1.844 2.697 6 x 6 inch 5.9 x 11.9 inch Circle 1. Isacord 40 3210 1. Isacord 40 3210 2. Cut 0001 2. Cut 0001 3. Cut 0002 3. Cut 0002 4. Cut 0003 4. Cut 0003 5.
- Page 125 Appendix 19 Embroidery Designs 110 x 117 mm 207 x 200 mm D109 D110 5.557 29.950 4.3 x 4.6 inch 8.1 x 7.9 inch 1. Isacord 40 0672 1. Isacord 40 0672 2. Isacord 40 0672 2. Isacord 40 0672 3. Isacord 40 0672 3. Isacord 40 0672 4. Isacord 40 0101 4. Isacord 40 0101 120 x 118 mm 100 x 80 mm D111...
- Page 126 Appendix 19 Embroidery Designs 59 x 129 mm 64 x 147 mm D119 D120 2.268 2.746 2.3 x 5.1 inch 2.5 x 5.8 inch 1. Isacord 40 6043 1. Isacord 40 6043 104 x 79 mm 105 x 107 mm D121 D122 3.294 5.672 4.1 x 3.1 inch 4.1 x 4.2 inch 1. Isacord 40 0442 1. Isacord 40 0352 2. Isacord 40 0345 2. Isacord 40 6133 65 x 126 mm 74 x 110 mm D123...
- Page 127 Appendix 19 Embroidery Designs 301 x 374 mm 305 x 404 mm D127 D128 46.715 74.181 11.9 x 14.7 inch 12 x 15.9 inch 1. Isacord 40 3962 1. Isacord 40 0132 2. Isacord 40 3644 2. Isacord 40 5233 3. Isacord 40 0134 3. Isacord 40 5233 4. Isacord 40 5233 4. Isacord 40 0170 5.
-
Page 128: Quilting
Appendix 19 Embroidery Designs 19.2 Quilting 80202-01 80202-02 1. Isacord 40 0020 1. Isacord 40 0020 80202-03 80202-04 1. Isacord 40 0020 1. Isacord 40 0020 80202-05 80202-05s 1. Isacord 40 0020 1. Isacord 40 0020 ... - Page 129 Appendix 19 Embroidery Designs 80257-04 80257-05 1. Isacord 40 0020 1. Isacord 40 0020 80257-05s 80257-06 1. Isacord 40 0020 1. Isacord 40 0020 80258-02 80258-03 1. Isacord 40 0020 1. Isacord 40 0020 ...
- Page 130 Appendix 19 Embroidery Designs 80259-02 80259-03 1. Isacord 40 0020 1. Isacord 40 0020 80259-04 80259-05 1. Isacord 40 0020 1. Isacord 40 0020 80259-06 80260-02 1. Isacord 40 0020 1. Isacord 40 0020 ...
- Page 131 Appendix 19 Embroidery Designs 80210-05 80210-06 1. Isacord 40 0020 1. Isacord 40 0020 80210-08 80210-09 1. Isacord 40 0020 1. Isacord 40 0020 32196-01 32196-02 1. Isacord 40 0020 1. Isacord 40 0020 ...
- Page 132 Appendix 19 Embroidery Designs 32196-07 32196-08 1. Isacord 40 0020 1. Isacord 40 0020 32196-09 32196-10 1. Isacord 40 0020 1. Isacord 40 0020 32196-11 32196-12 1. Isacord 40 0020 1. Isacord 40 0020 ...
- Page 133 Appendix 19 Embroidery Designs 32196-17 32196-18 1. Isacord 40 0020 1. Isacord 40 0020 32196-19 32196-19-1 1. Isacord 40 0020 1. Isacord 40 0020 32196-20 32196-21 1. Isacord 40 0020 1. Isacord 40 0020 ...
- Page 134 Appendix 19 Embroidery Designs 32196-26 32196-27 1. Isacord 40 0020 1. Isacord 40 0020 32196-28 32196-29 1. Isacord 40 0020 1. Isacord 40 0020 32196-30 80210-01 1. Isacord 40 0020 1. Isacord 40 0020 ...
- Page 135 Appendix 19 Embroidery Designs Basics_01 Basics_02 1. Isacord 40 0020 1. Isacord 40 0020 Basics_03 Basics_04 1. Isacord 40 0020 1. Isacord 40 0020 Basics_04_corner Basics_05 1. Isacord 40 0020 1. Isacord 40 0020 ...
- Page 136 Appendix 19 Embroidery Designs 12591-14_2 12607-28q 1. Isacord 40 0020 1. Isacord 40 0020 12607-33q 12756-01q 1. Isacord 40 0020 1. Isacord 40 0020 12756-02q 12756-03q 1. Isacord 40 0020 1. Isacord 40 0020 ...
- Page 137 Appendix 19 Embroidery Designs 80185-01q 80185-03q 1. Isacord 40 0020 1. Isacord 40 0020 80185-07q 12380-04q 1. Isacord 40 0020 1. Isacord 40 0020 12380-08q 12380-09q 1. Isacord 40 0020 1. Isacord 40 0020 ...
- Page 138 Appendix 19 Embroidery Designs BD299q BD308q 1. Isacord 40 0020 1. Isacord 40 0020 Quilt project_1 Quilt project_2 1. Isacord 40 0020 1. Isacord 40 0020 BD394 BD412 1. Isacord 40 0020 1. Isacord 40 0020 ...
- Page 139 Appendix 19 Embroidery Designs BD554 BD567 1. Isacord 40 0020 1. Isacord 40 0020 BD659 BD665 1. Isacord 40 0020 1. Isacord 40 0020 BD800 BD801 1. Isacord 40 0020 1. Isacord 40 0020 ...
- Page 140 Appendix 19 Embroidery Designs LoopedFlowers_ Panto_Candle Panto2 1. Isacord 40 0020 1. Isacord 40 0020 PebblesShell_ PebblesShells_ Square Border 1. Isacord 40 0020 1. Isacord 40 0020 PebblesShells_ PebblesShells_ Corner Panto 1. Isacord 40 0020 1.
- Page 141 Appendix 19 Embroidery Designs SwirlsPaisley_ SwirlsPaisley_ Corner Panto 1. Isacord 40 0020 1. Isacord 40 0020 SwirlsPaisley_ SwirlsPaisley_ Segment Segment1 1. Isacord 40 0020 1. Isacord 40 0020 SwirlsPaisley_ SwirlsPaisley_ Square1 Square2 1. Isacord 40 0020 1.
- Page 142 Appendix 19 Embroidery Designs VinesBerries_ VinesBerries_ Border2 Corner 1. Isacord 40 0020 1. Isacord 40 0020 VinesBerries_ VinesBerries_ Panto triangle 1. Isacord 40 0020 1. Isacord 40 0020 VinesBerries_ Wreath 1. Isacord 40 0020 Template ...
- Page 143 Appendix 19 Embroidery Designs QS105 QS106 1. Isacord 40 0020 1. Isacord 40 0020 QS107 QS108 1. Isacord 40 0020 1. Isacord 40 0020 QS109 QS110 1. Isacord 40 0020 1. Isacord 40 0020 ...
-
Page 144: Accents
Appendix 19 Embroidery Designs 19.3 Accents 100 x 37 mm 172 x 50 mm 12436-29 12440-19 2.464 3.005 3.9 x 1.4 inch 6.8 x 2 inch 1. YLI variations 8016 1. Isacord 40 1543 2. YLI variations 8015 2. Isacord 40 1521 3. Yenmet 7030 3. Isacord 40 2761 4. Isacord 40 1543 124 x 124 mm 127 x 120 mm 12445-11 12445-13... - Page 145 Appendix 19 Embroidery Designs 30 x 75 mm 121 x 105 mm 12523-05 12523-06 3.717 17.120 1.2 x 3 inch 4.8 x 4.1 inch 1. Isacord 40 0151 1. Isacord 40 0015 2. Isacord 40 0151 2. Isacord 40 0015 3. Isacord 40 0151 3. Isacord 40 0151 4. Isacord 40 4111 4. Isacord 40 0311 5.
- Page 146 Appendix 19 Embroidery Designs 117 x 148 mm 122 x 122 mm 21021-10 21021-14 14.469 18.063 4.6 x 5.8 inch 4.8 x 4.8 inch 1. Isacord 40 1252 1. Isacord 40 1252 2. Isacord 40 1161 2. Isacord 40 1161 3. Isacord 40 1565 3. Isacord 40 1565 28 x 172 mm 23 x 27 mm 51204-15 51204-22 5.304 1.1 x 6.8 inch 0.9 x 1.1 inch 1.
- Page 147 Appendix 19 Embroidery Designs 52 x 60 mm 242 x 242 mm 82001-20 82001-40 3.448 22.712 2 x 2.4 inch 9.5 x 9.5 inch 1. Isacord 40 0933 1. Isacord 40 1252 186 x 249 mm 138 x 145 mm 82005-15 82005-22 38.983 12.325 7.3 x 9.8 inch 5.4 x 5.7 inch 1. Isacord 40 1032 1. Isacord 40 1032 2. Isacord 40 0870 2. Isacord 40 0870 3.
- Page 148 Appendix 19 Embroidery Designs 104 x 99 mm 82 x 82 mm 51222-15 51222-16 8.078 4.507 4.1 x 3.9 inch 3.2 x 3.2 inch 1. Isacord 40 0721 1. Isacord 40 1260 2. Yenmet 7012 2. Isacord 40 0721 3. Isacord 40 1260 3. Yenmet 7012 108 x 75 mm 90 x 134 mm 51232-14 51232-15 18.932 22.628 4.3 x 3 inch 3.5 x 5.3 inch 1.
-
Page 149: Borders
Appendix 19 Embroidery Designs 132 x 138 mm 96 x 108 mm 82026-16 82026-31 17.746 5.023 5.2 x 5.4 inch 3.8 x 4.2 inch 1. Isacord 40 0721 1. Isacord 40 0721 2. Yenmet 7012 2. Yenmet 7012 3. Isacord 40 1161 4. Isacord 40 5743 5. Isacord 40 3762 6. Isacord 40 3953 7. - Page 150 Appendix 19 Embroidery Designs 30 x 152 mm 25 x 141 mm 12398-24 12418-25 8.275 2.980 1.2 x 6 inch 1 x 5.5 inch 1. Isacord 40 4220 1. Isacord 40 6141 2. Isacord 40 0722 2. Isacord 40 5822 3. Isacord 40 2250 115 x 18 mm 39 x 39 mm 12428-32 12428-33 2.192 1.232 4.5 x 0.7 inch 1.5 x 1.5 inch 1. Isacord 40 0015 1.
- Page 151 Appendix 19 Embroidery Designs 107 x 22 mm 24 x 103 mm Fb038 Fs114_48 3.544 3.963 4.2 x 0.9 inch 1 x 4.1 inch 1. Isacord 40 0352 1. Isacord 40 6011 2. Isacord 40 1532 2. Isacord 40 6133 3. Isacord 40 1730 3. Isacord 40 2550 4. Isacord 40 2520 21 x 153 mm 71 x 45 mm Hg792_48 Nz819...
-
Page 152: Frames
Appendix 19 Embroidery Designs 89 x 89 mm 33 x 169 mm 82028-33 Cm575_48 3.244 7.514 3.5 x 3.5 inch 1.3 x 6.6 inch 1. Isacord 40 1521 1. Isacord 40 5230 2. Isacord 40 1725 2. Isacord 40 5933 3. Isacord 40 1352 3. Isacord 40 5610 4. Isacord 40 4152 5. Isacord 40 4610 89 x 68 mm 71 x 50 mm Cm576_48... -
Page 153: Lace
Appendix 19 Embroidery Designs 124 x 135 mm 182 x 126 mm 51285-08 Ck983 10.513 12.962 4.9 x 5.3 inch 7.2 x 4.9 inch 1. Isacord 40 0152 1. Isacord 40 2166 2. Isacord 40 2650 3. Isacord 40 2721 4. Isacord 40 0020 5. Isacord 40 0020 183 x 117 mm 139 x 162 mm Ck993 82020-54 13.772 9.797 7.2 x 4.6 inch 5.5 x 6.4 inch... - Page 154 Appendix 19 Embroidery Designs 222 x 76 mm 84 x 85 mm 12609-03 12609-04 33.502 8.968 8.7 x 3 inch 3.3 x 3.3 inch 1. Isacord 40 0015 1. Isacord 40 0015 2. Isacord 40 0015 2. Isacord 40 0015 3. Isacord 40 0015 3. Isacord 40 0015 4. Isacord 40 0015 4. Isacord 40 0015 5.
- Page 155 Appendix 19 Embroidery Designs 141 x 218 mm 133 x 224 mm 12788-01 12889-09 48.677 51.499 5.6 x 8.6 inch 5.3 x 8.8 inch 1. Isacord 40 4071 1. Isacord 40 0017 2. Isacord 40 4071 2. Isacord 40 3652 3. Isacord 40 4071 3. Isacord 40 2650 4. Isacord 40 0010 4. Isacord 40 3030 116 x 117 mm 45 x 76 mm 12896-05...
-
Page 156: Mini
Appendix 19 Embroidery Designs 130 x 130 mm 196 x 394 mm 12667-08 12794-02-06 48.177 163.459 5.1 x 5.1 inch 7.7 x 15.5 inch 1. Isacord 40 0504 1. Isacord 40 0015 2. Isacord 40 2115 19.7 Mini 27 x 31 mm 24 x 31 mm 12491-23 12819-01 1.439 1.797 1.1 x 1.2 inch 1 x 1.2 inch 1. Isacord 40 3815 1. Isacord 40 0934 2. - Page 157 Appendix 19 Embroidery Designs 33 x 34 mm 32 x 34 mm 12819-08 12819-10 1.3 x 1.3 inch 1.3 x 1.4 inch 1. Isacord 40 0132 1. Isacord 40 2530 2. Isacord 40 2530 2. Isacord 40 1725 3. Isacord 40 0020 4. Isacord 40 1010 5. Isacord 40 5531 6. Isacord 40 3045 34 x 32 mm 30 x 32 mm 12819-11...
- Page 158 Appendix 19 Embroidery Designs 32 x 38 mm 22 x 48 mm 12822-07 12822-10 1.781 1.115 1.3 x 1.5 inch 0.9 x 1.9 inch 1. Isacord 40 3901 1. Isacord 40 3150 2. Isacord 40 5822 2. Isacord 40 3251 3. Isacord 40 4114 3. Isacord 40 5531 4. Isacord 40 0015 28 x 30 mm 28 x 28 mm 12822-12 12822-13...
- Page 159 Appendix 19 Embroidery Designs 30 x 29 mm 24 x 42 mm 51215-18 51253-07 1.008 1.2 x 1.1 inch 0.9 x 1.7 inch 1. Isacord 40 6011 1. Isacord 40 0506 2. Isacord 40 1904 2. Isacord 40 2160 3. Isacord 40 5912 3. Isacord 40 2530 4. Isacord 40 5633 4. Isacord 40 2520 26 x 41 mm 34 x 33 mm 51253-08...
-
Page 160: Flowers
Appendix 19 Embroidery Designs 19 x 22 mm 25 x 25 mm Cj866 Cj868 1.171 0.7 x 0.9 inch 1 x 1 inch 1. Isacord 40 2764 1. Isacord 40 3761 2. Isacord 40 0630 2. Isacord 40 3331 3. Isacord 40 4071 3. Isacord 40 0713 4. Isacord 40 2920 32 x 24 mm 34 x 31 mm Cj870 Nv104 1.854... - Page 161 Appendix 19 Embroidery Designs 96 x 156 mm 104 x 160 mm 12379-49 12417-08 14.900 13.421 3.8 x 6.1 inch 4.1 x 6.3 inch 1. Isacord 40 3350 1. Isacord 40 0442 2. Isacord 40 3130 2. Isacord 40 0721 3. Isacord 40 2650 3. Isacord 40 0532 4. Isacord 40 2920 4. Isacord 40 0345 5.
- Page 162 Appendix 19 Embroidery Designs 110 x 151 mm 122 x 153 mm 12914-06 12914-07 15.331 11.873 4.3 x 5.9 inch 4.8 x 6 inch 1. Isacord 40 5722 1. Isacord 40 5643 2. Isacord 40 5912 2. Isacord 40 0853 3. Isacord 40 0465 3. Isacord 40 5912 4. Isacord 40 0465 106 x 159 mm 89 x 176 mm 12914-08 12931-04...
- Page 163 Appendix 19 Embroidery Designs 88 x 77 mm 117 x 125 mm 51202-13 51203-13 10.693 19.514 3.5 x 3 inch 4.6 x 4.9 inch 1. Isacord 40 5833 1. Isacord 40 5832 2. Isacord 40 6043 2. Isacord 40 5643 3. Isacord 40 5933 3. Isacord 40 0945 4. Isacord 40 5643 4. Isacord 40 2220 5.
- Page 164 Appendix 19 Embroidery Designs 139 x 145 mm 124 x 167 mm Fq986_48 Fs316_48 23.426 9.758 5.5 x 5.7 inch 4.9 x 6.6 inch 1. Isacord 40 5650 1. Isacord 40 3853 2. Isacord 40 5833 3. Isacord 40 0352 4. Isacord 40 5934 5. Isacord 40 0465 6. Isacord 40 5822 7. Isacord 40 0015 8.
- Page 165 Appendix 19 Embroidery Designs 123 x 176 mm 88 x 202 mm 51322-05 51322-06 22.119 23.883 4.8 x 6.9 inch 3.5 x 8 inch 1. Isacord 40 5531 1. Isacord 40 5833 2. Isacord 40 0250 2. Isacord 40 5743 3. Isacord 40 5633 3. Isacord 40 5542 4. Isacord 40 5643 4. Isacord 40 5944 5.
-
Page 166: Stylized Flowers
Appendix 19 Embroidery Designs 126 x 179 mm 124 x 150 mm 82022-13 82033-07 52.543 6.752 4.9 x 7 inch 4.9 x 5.9 inch 1. Isacord 40 1140 1. Isacord 40 5500 2. Isacord 40 0781 2. Isacord 40 2532 3. Isacord 40 1172 3. Isacord 40 5230 4. Isacord 40 5643 4. Isacord 40 2532 5. - Page 167 Appendix 19 Embroidery Designs 67 x 173 mm 99 x 117 mm 12627-22 12633-03 9.172 11.235 2.6 x 6.8 inch 3.9 x 4.6 inch 1. Isacord 40 2320 1. Isacord 40 0015 76 x 124 mm 82 x 119 mm 12633-13 12633-14 8.728 7.406 3 x 4.9 inch 3.2 x 4.7 inch 1. Isacord 40 0015 1. Isacord 40 0015 86 x 138 mm 203 x 260 mm 12633-16 12802-02l 10.182 15.158 3.4 x 5.4 inch 8 x 10.2 inch...
- Page 168 Appendix 19 Embroidery Designs 197 x 176 mm 197 x 205 mm 12812-02L 12812-03L 29.132 38.896 7.8 x 6.9 inch 7.8 x 8.1 inch 1. Isacord 40 0020 1. Isacord 40 0020 146 x 199 mm 193 x 150 mm 12812-08M 12852-01 23.815 17.004 5.7 x 7.8 inch 7.6 x 5.9 inch 1. Isacord 40 0020 1. Isacord 40 0010 122 x 126 mm 86 x 108 mm 12852-07 12852-15 10.996 6.566 4.8 x 4.9 inch 3.4 x 4.3 inch...
- Page 169 Appendix 19 Embroidery Designs 66 x 94 mm 128 x 117 mm 21017-13 21017-16 4.253 12.222 2.6 x 3.7 inch 5 x 4.6 inch 1. Isacord 40 0702 1. Isacord 40 0453 2. Isacord 40 0453 2. Isacord 40 0442 3. Isacord 40 0442 3. Isacord 40 0702 4. Isacord 40 0345 4. Isacord 40 1102 5.
- Page 170 Appendix 19 Embroidery Designs 118 x 120 mm 108 x 109 mm 82010-12 82010-19 18.177 15.359 4.7 x 4.7 inch 4.3 x 4.3 inch 1. Isacord 40 0721 1. Isacord 40 0672 2. Isacord 40 0672 2. Isacord 40 0721 3. Isacord 40 4620 3. Isacord 40 0352 4. Isacord 40 0352 4. Isacord 40 4620 5.
- Page 171 Appendix 19 Embroidery Designs 95 x 174 mm 69 x 136 mm Fs332_48 Fs337_48 12.081 7.998 3.8 x 6.8 inch 2.7 x 5.4 inch 1. Isacord 40 1725 1. Isacord 40 1730 121 x 122 mm 197 x 268 mm 12812-06s 12812-08l 14.413 31.963 4.8 x 4.8 inch 7.7 x 10.6 inch 1. Isacord 40 0020 1. Isacord 40 0020 140 x 212 mm 139 x 208 mm Pk50017-01 Pk50017-02 25.629 21.837 5.5 x 8.4 inch 5.5 x 8.2 inch...
-
Page 172: Animals
Appendix 19 Embroidery Designs 19.10 Animals 129 x 71 mm 158 x 217 mm 12375-04 12375-09 8.191 18.055 5.1 x 2.8 inch 6.2 x 8.6 inch 1. Isacord 40 0811 1. Isacord 40 3251 2. Isacord 40 0020 2. Isacord 40 2532 3. Isacord 40 3630 3. Isacord 40 1906 4. Isacord 40 5722 4. - Page 173 Appendix 19 Embroidery Designs 141 x 112 mm 137 x 214 mm 12878-01 12729-02 8.899 18.286 5.6 x 4.4 inch 5.4 x 8.4 inch 1. Isacord 40 3852 1. Isacord 40 1010 2. Isacord 40 1362 2. Isacord 40 0124 3. Isacord 40 1030 3. Isacord 40 0132 4. Isacord 40 4250 5. Isacord 40 4430 109 x 122 mm 128 x 179 mm 12745-01...
- Page 174 Appendix 19 Embroidery Designs 115 x 117 mm 142 x 118 mm 12824-05s 12910-03 12.463 18.848 4.5 x 4.6 inch 5.6 x 4.6 inch 1. Isacord 40 0945 1. Isacord 40 0853 2. Isacord 40 1134 2. Isacord 40 0870 3. Isacord 40 1172 3. Isacord 40 0832 4. Isacord 40 0922 4. Isacord 40 1755 5.
- Page 175 Appendix 19 Embroidery Designs 106 x 178 mm 134 x 76 mm 51212-05 51212-15 28.067 12.900 4.2 x 7 inch 5.3 x 3 inch 1. Isacord 40 1114 1. Isacord 40 1140 2. Isacord 40 1030 2. Isacord 40 0945 3. Isacord 40 0761 3. Isacord 40 0442 4. Isacord 40 0442 4. Isacord 40 1351 5.
- Page 176 Appendix 19 Embroidery Designs 75 x 144 mm 92 x 115 mm 80126-02 80126-09 25.466 22.536 2.9 x 5.7 inch 3.6 x 4.5 inch 1. Isacord 40 1755 1. Isacord 40 0101 2. Isacord 40 0670 2. Isacord 40 0105 3. Isacord 40 0771 3. Isacord 40 3265 4. Isacord 40 0853 4. Isacord 40 0112 5.
- Page 177 Appendix 19 Embroidery Designs 72 x 94 mm 52 x 91 mm Wo379 Wp358_48 14.396 5.774 2.8 x 3.7 inch 2.1 x 3.6 inch 1. Isacord 40 3951 1. Isacord 40 1375 2. Isacord 40 5643 3. Isacord 40 5912 4. Isacord 40 0520 5. Isacord 40 5866 6. Isacord 40 5500 7. Isacord 40 5422 8.
-
Page 178: Children
Appendix 19 Embroidery Designs 19.11 Children 140 x 122 mm 81 x 100 mm 12435-22 12440-01 18.579 7.339 5.5 x 4.8 inch 3.2 x 3.9 inch 1. Isacord 40 1755 1. Isacord 40 1543 2. Isacord 40 2250 2. Isacord 40 2761 3. Yenmet 7028 3. Isacord 40 1876 4. Isacord 40 2640 4. Isacord 40 1521 5. - Page 179 Appendix 19 Embroidery Designs 66 x 152 mm 111 x 107 mm 51201-01 51201-02 18.346 12.343 2.6 x 6 inch 4.4 x 4.2 inch 1. Isacord 40 3150 1. Isacord 40 4752 2. Isacord 40 3810 2. Isacord 40 0015 3. Isacord 40 4752 3. Isacord 40 3810 4. Isacord 40 2152 4. Isacord 40 0020 5.
- Page 180 Appendix 19 Embroidery Designs 106 x 172 mm 82 x 169 mm 51211-04 51211-14 18.131 12.945 4.2 x 6.8 inch 3.2 x 6.7 inch 1. Isacord 40 0138 1. Isacord 40 1141 2. Isacord 40 0138 2. Isacord 40 1141 3. Isacord 40 0138 3. Isacord 40 1141 4. Isacord 40 0138 4. Isacord 40 1141 5.
- Page 181 Appendix 19 Embroidery Designs 76 x 142 mm 89 x 83 mm 51240-32 51240-35 3.835 2.628 3 x 5.6 inch 3.5 x 3.3 inch 1. Isacord 40 0010 1. Isacord 40 0020 2. Isacord 40 0811 2. Isacord 40 3641 3. Isacord 40 5450 3. Isacord 40 3641 4. Isacord 40 4752 4. Isacord 40 3963 5.
- Page 182 Appendix 19 Embroidery Designs 91 x 99 mm 92 x 99 mm Ck254 Ck255 15.229 15.339 3.6 x 3.9 inch 3.6 x 3.9 inch 1. Isacord 40 5833 1. Isacord 40 5833 2. Isacord 40 0640 2. Isacord 40 5770 3. Isacord 40 3150 3. Isacord 40 5740 4. Isacord 40 3241 4. Isacord 40 5833 5.
-
Page 183: Baby
Appendix 19 Embroidery Designs 88 x 145 mm 71 x 212 mm Cm420_48 12426-01 20.513 6.671 3.5 x 5.7 inch 2.8 x 8.3 inch 1. Isacord 40 0970 1. Isacord 40 1972 2. Isacord 40 0124 2. Isacord 40 0015 3. Isacord 40 0670 3. Isacord 40 3901 4. Isacord 40 0015 4. Isacord 40 3920 5. - Page 184 Appendix 19 Embroidery Designs 117 x 147 mm 96 x 106 mm 51272-07 Cj346 21.530 21.486 4.6 x 5.8 inch 3.8 x 4.2 inch 1. Isacord 40 2153 1. Isacord 40 0015 2. Isacord 40 4250 2. Isacord 40 2152 3. Isacord 40 3750 3. Isacord 40 0640 4. Isacord 40 3971 4. Isacord 40 0552 5.
- Page 185 Appendix 19 Embroidery Designs 93 x 98 mm 88 x 89 mm Ck533 Ck742 9.424 7.575 3.6 x 3.9 inch 3.5 x 3.5 inch 1. Isacord 40 2155 1. Isacord 40 4430 2. Isacord 40 4240 3. Isacord 40 6011 4. Isacord 40 3150 5. Isacord 40 3151 6. Isacord 40 2560 7. Isacord 40 2764 8.
- Page 186 Appendix 19 Embroidery Designs 88 x 98 mm 95 x 96 mm Cm021_48 Cm028_48 11.964 9.639 3.5 x 3.8 inch 3.7 x 3.8 inch 1. Isacord 40 0640 1. Isacord 40 0640 2. Isacord 40 1755 2. Isacord 40 5730 3. Isacord 40 2920 3. Isacord 40 4220 4. Isacord 40 3040 4. Isacord 40 3820 5.
-
Page 187: Food And Drink
Appendix 19 Embroidery Designs 19.13 Food and Drink 73 x 110 mm 85 x 90 mm 12611-17 12611-29 4.622 3.766 2.9 x 4.3 inch 3.3 x 3.6 inch 1. Isacord 40 1154 1. Isacord 40 4220 2. Isacord 40 1154 2. Isacord 40 1154 3. Isacord 40 1154 3. Isacord 40 1902 4. Isacord 40 5440 5. - Page 188 Appendix 19 Embroidery Designs 127 x 178 mm 82 x 139 mm 12932-07 51202-14 13.885 21.603 5 x 7 inch 3.2 x 5.5 inch 1. Isacord 40 1010 1. Isacord 40 0622 2. Isacord 40 1010 2. Isacord 40 2153 3. Isacord 40 0101 3. Isacord 40 0310 4. Isacord 40 1921 4. Isacord 40 5555 5.
-
Page 189: Hobbies
Appendix 19 Embroidery Designs 92 x 158 mm 165 x 78 mm Pk10009-04 Pk10009-09 4.843 4.224 3.6 x 6.2 inch 6.5 x 3.1 inch 1. Isacord 40 0020 1. Isacord 40 0020 19.14 Hobbies 100 x 152 mm 92 x 142 mm 12378-16 12449-08 11.964 8.409 3.9 x 6 inch 3.6 x 5.6 inch 1. Isacord 40 0861 1. Isacord 40 0640 2. Isacord 40 1874 2. - Page 190 Appendix 19 Embroidery Designs 52 x 144 mm 60 x 136 mm 12774-02 12774-04 11.330 7.588 2.1 x 5.7 inch 2.4 x 5.4 inch 1. Isacord 40 3963 1. Isacord 40 5115 2. Isacord 40 3650 3. Isacord 40 3951 4. Isacord 40 0017 5. Isacord 40 3853 194 x 278 mm 204 x 259 mm 12796-03L 12796-04L 31.215 18.337 7.6 x 10.9 inch 8 x 10.2 inch...
- Page 191 Appendix 19 Embroidery Designs 84 x 154 mm 114 x 170 mm 12919-01 51216-11 5.864 19.771 3.3 x 6.1 inch 4.5 x 6.7 inch 1. Isacord 40 5210 1. Isacord 40 3971 2. Isacord 40 0934 2. Isacord 40 5050 3. Isacord 40 3962 3. Isacord 40 1532 4. Isacord 40 2560 4. Isacord 40 0020 5.
- Page 192 Appendix 19 Embroidery Designs 127 x 126 mm 83 x 216 mm 12370-01 12370-04 6.263 3.407 5 x 5 inch 3.3 x 8.5 inch 1. Isacord 40 5613 1. Isacord 40 2101 17 x 203 mm 101 x 162 mm 12370-12 12952-02 3.427 12.934 0.7 x 8 inch 4 x 6.4 inch 1. Isacord 40 3210 1. Isacord 40 0861 2. Isacord 40 0520 3. Isacord 40 1061 4.
-
Page 193: Seasons
Appendix 19 Embroidery Designs 119 x 172 mm 45 x 164 mm Pk50011-03 Pk50026-02 8.185 7.244 4.7 x 6.8 inch 1.8 x 6.5 inch 1. Isacord 40 5513 1. Isacord 40 4250 2. Isacord 40 5832 2. Isacord 40 4410 3. Isacord 40 5650 3. Isacord 40 3743 4. Isacord 40 3611 4. Isacord 40 0822 5. - Page 194 Appendix 19 Embroidery Designs 150 x 268 mm 70 x 166 mm 51248-14L 51266-06 8.496 13.036 5.9 x 10.5 inch 2.7 x 6.5 inch 1. Isacord 40 2715 1. Isacord 40 0622 2. Isacord 40 3902 2. Isacord 40 0622 3. Isacord 40 0922 3. Isacord 40 0622 4. Isacord 40 3630 4. Isacord 40 0520 5.
- Page 195 Appendix 19 Embroidery Designs 97 x 122 mm 72 x 83 mm Cm547_48 Fp232 18.516 7.517 3.8 x 4.8 inch 2.8 x 3.3 inch 1. Isacord 40 0182 1. Isacord 40 0101 2. Isacord 40 0015 2. Yenmet 7029 3. Isacord 40 5531 3. Isacord 40 4071 4. Isacord 40 0142 5. Isacord 40 6031 6.
- Page 196 Appendix 19 Embroidery Designs 107 x 146 mm 117 x 142 mm 51232-02 51260-01 38.676 12.989 4.2 x 5.8 inch 4.6 x 5.6 inch 1. Isacord 40 0608 1. Isacord 40 5743 2. Isacord 40 5230 2. Isacord 40 1260 3. Isacord 40 1900 3. Isacord 40 3644 4. Isacord 40 0010 4. Isacord 40 0311 5.
-
Page 197: Holidays
Appendix 19 Embroidery Designs 19.16 Holidays 41 x 126 mm 66 x 141 mm 12408-07 12408-08 2.641 2.127 1.6 x 5 inch 2.6 x 5.6 inch 1. YLI variations 8008 1. Yenmet 7030 2. Isacord 40 4122 2. YLI variations 8015 3. YLI variations 8015 3. Isacord 40 1730 4. Isacord 40 1730 4. Isacord 40 5500 5. - Page 198 Appendix 19 Embroidery Designs 243 x 282 mm 226 x 294 mm 12793-04 12793-10 57.006 29.319 9.6 x 11.1 inch 8.9 x 11.6 inch 1. Isacord 40 1902 1. Isacord 40 3631 2. Isacord 40 2776 2. Isacord 40 3652 3. Isacord 40 0020 3. Isacord 40 3652 4. Isacord 40 5633 4. Isacord 40 3743 81 x 174 mm 112 x 165 mm 12793-14...
- Page 199 Appendix 19 Embroidery Designs 65 x 112 mm 96 x 146 mm Hg298_48 12907-20 1.878 19.073 2.6 x 4.4 inch 3.8 x 5.7 inch 1. Isacord 40 2101 1. Isacord 40 1134 2. Isacord 40 5555 3. Isacord 40 5743 4. Isacord 40 4752 5. Isacord 40 4133 6. Isacord 40 1600 7. Isacord 40 1755 8.
-
Page 200: Celebrations
Appendix 19 Embroidery Designs 19.17 Celebrations 62 x 64 mm 36 x 49 mm 12436-23 12478-01 5.510 1.746 2.5 x 2.5 inch 1.4 x 1.9 inch 1. YLI variations 8004 1. Isacord 40 0150 2. Isacord 40 1950 2. Isacord 40 1902 3. YLI variations 8019 3. Isacord 40 0015 39 x 48 mm 39 x 37 mm 12478-03 12478-07 2.859 1.694 1.5 x 1.9 inch... - Page 201 Appendix 19 Embroidery Designs 97 x 125 mm 122 x 152 mm 51252-02 51252-03 24.063 23.665 3.8 x 4.9 inch 4.8 x 6 inch 1. Isacord 40 2152 1. Isacord 40 2152 2. Isacord 40 0015 2. Isacord 40 0015 3. Isacord 40 4430 3. Isacord 40 4430 4. Isacord 40 2152 4. Isacord 40 0020 5.
-
Page 202: Travel
Appendix 19 Embroidery Designs 100 x 150 mm 95 x 151 mm 51252-15 51252-16 19.368 19.661 3.9 x 5.9 inch 3.7 x 5.9 inch 1. Isacord 40 0020 1. Isacord 40 4421 2. Isacord 40 0132 2. Isacord 40 4430 3. Isacord 40 4430 3. Isacord 40 0702 4. Isacord 40 0702 4. Isacord 40 0250 5. - Page 203 Appendix 19 Embroidery Designs 33 x 33 mm 54 x 79 mm 12773-10 12773-11 1.323 2.764 1.3 x 1.3 inch 2.1 x 3.1 inch 1. Isacord 40 0020 1. Isacord 40 0020 54 x 44 mm 40 x 19 mm 12773-17 12773-18 2.192 2.1 x 1.7 inch 1.6 x 0.8 inch 1. Isacord 40 0020 1. Isacord 40 0020 67 x 48 mm 77 x 49 mm 12773-19 12773-20 2.750 8.666 2.6 x 1.9 inch 3 x 1.9 inch 1.
- Page 204 Appendix 19 Embroidery Designs 93 x 33 mm 46 x 32 mm 12773-25 12773-26 2.364 2.055 3.6 x 1.3 inch 1.8 x 1.3 inch 1. Isacord 40 0020 1. Isacord 40 0020 78 x 38 mm 33 x 33 mm 12773-29 12773-30 1.941 3.1 x 1.5 inch 1.3 x 1.3 inch 1. Isacord 40 0020 1. Isacord 40 0020 83 x 23 mm 40 x 40 mm 12773-33 12773-34 2.234 3.3 x 0.9 inch 1.6 x 1.6 inch 1.
-
Page 205: Words And Sayings
Appendix 19 Embroidery Designs 128 x 119 mm 126 x 168 mm 12792-10 12804-01s 9.777 32.368 5.1 x 4.7 inch 5 x 6.6 inch 1. Isacord 40 1800 1. Isacord 40 0020 2. Isacord 40 1800 3. Isacord 40 1800 4. Isacord 40 1800 5. Isacord 40 1800 6. Isacord 40 2101 126 x 132 mm 152 x 252 mm 12804-04s 51217-12l... - Page 206 Appendix 19 Embroidery Designs 123 x 153 mm 126 x 121 mm 12697-02 12738-01 19.576 16.138 4.9 x 6 inch 5 x 4.8 inch 1. Isacord 40 3713 1. Isacord 40 4152 2. Isacord 40 0555 2. Isacord 40 0643 3. Isacord 40 4220 3. Isacord 40 5610 4. Isacord 40 4240 4. Isacord 40 2500 5.
- Page 207 Appendix 19 Embroidery Designs 171 x 196 mm 110 x 214 mm 51209-02 51209-03 43.385 35.124 6.7 x 7.7 inch 4.3 x 8.4 inch 1. Isacord 40 0020 1. Isacord 40 0020 2. Isacord 40 4410 2. Isacord 40 2920 3. Isacord 40 4643 3. Isacord 40 3150 4. Isacord 40 4610 4. Isacord 40 3030 5.
- Page 208 Appendix 19 Embroidery Designs 127 x 155 mm 135 x 155 mm 51300-01 51300-02 12.912 13.846 5 x 6.1 inch 5.3 x 6.1 inch 1. Isacord 40 4740 1. Isacord 40 4740 2. Isacord 40 1362 2. Isacord 40 1220 3. Isacord 40 0520 3. Isacord 40 4220 4. Isacord 40 1860 4. Isacord 40 0520 5.
-
Page 209: Monograms
Appendix 19 Embroidery Designs 19.20 Monograms 113 x 119 mm 113 x 119 mm 12863-01 12863-02 10.297 10.441 4.4 x 4.7 inch 4.4 x 4.7 inch 1. Isacord 40 0020 1. Isacord 40 0020 2. Isacord 40 0020 2. Isacord 40 0020 3. Isacord 40 0020 3. Isacord 40 0020 113 x 119 mm 113 x 119 mm 12863-03 12863-04 10.224 10.360 4.4 x 4.7 inch... - Page 210 Appendix 19 Embroidery Designs 113 x 119 mm 113 x 119 mm 12863-11 12863-12 10.644 10.019 4.4 x 4.7 inch 4.4 x 4.7 inch 1. Isacord 40 0020 1. Isacord 40 0020 2. Isacord 40 0020 2. Isacord 40 0020 3. Isacord 40 0020 3. Isacord 40 0020 113 x 119 mm 113 x 119 mm 12863-13 12863-14 10.896 10.622 4.4 x 4.7 inch 4.4 x 4.7 inch...
- Page 211 Appendix 19 Embroidery Designs 113 x 119 mm 113 x 119 mm 12863-21 12863-22 10.410 10.169 4.4 x 4.7 inch 4.4 x 4.7 inch 1. Isacord 40 0020 1. Isacord 40 0020 2. Isacord 40 0020 2. Isacord 40 0020 3. Isacord 40 0020 3. Isacord 40 0020 113 x 119 mm 113 x 119 mm 12863-23 12863-24 10.738 10.728 4.4 x 4.7 inch 4.4 x 4.7 inch...
-
Page 212: In The Hoop
Appendix 19 Embroidery Designs 19.21 In the Hoop You can find the detailed embroidery instructions at bernina.com/990-designs. 100 x 192 mm 114 x 133 mm 12751-03 19999-019 5.132 2.451 3.9 x 7.6 inch 4.5 x 5.3 inch 1. Isacord 40 2550 1. Isacord 40 0020 2. Isacord 40 2550 2. Isacord 40 2550 3. Isacord 40 2550 3. - Page 213 Appendix 19 Embroidery Designs 38 x 230 mm 83 x 82 mm 51298-04 51298-05 17.556 4.439 1.5 x 9.1 inch 3.3 x 3.2 inch 1. Isacord 40 0630 1. Isacord 40 1565 2. Isacord 40 0630 2. Isacord 40 1565 3. Isacord 40 0630 3. Isacord 40 1565 4. Isacord 40 1220 5. Isacord 40 1565 6.
-
Page 214: Index
Controls .............. 13 Precise .............. 63 Copying Basting .............. 94 File.............. 23 BERNINA Dual Feed.......... 42 Folder .............. 23 BERNINA Stitch Regulator (BSR)........ 72 Create Text .............. 92 BISR Setting Functions .......... 72 BISR Mode ............... 23 Darning Program Bobbin Thread ............ 38 Editing .............. 67 Spooling ............. - Page 215 Index Delete Change Thread Brand ......... 87 Embroidery Design.......... 85 Check .............. 86 Folder .............. 23 Check Position ............ 88 Personal Data ............. 97 Delete .............. 85 Design Duplicate ............ 84 Own Stitch Pattern .......... 74 Edit Colors ............ 85 Stitch Pattern............ 52 Editing ............ 79, 84 Design Preview Endless.............. 87 Adjust..............
- Page 216 Index File Manager............ 51, 81 Lettering Embroidery Design.......... 82 Creating.............. 92 Navigation Bar .......... 52, 82 Editing .............. 92 Quick Access Bar Embroidery Mode .... 82 Line Spacing............ 92 Sewing Mode Quick Access Bar ...... 52 Spacing............... 92 Toolbar............ 51, 81 Styling.............. 92 File Manger Transform ............ 92 Stitch Pattern............
- Page 217 Index Needle Stop Securing Stitches.......... 46 Display.............. 50 Programming External Buttons ......... 45 Setting.............. 50 Programming the Button Up/Down............ 34 Pattern End ............ 45 Needle Threader ............ 34 Presser Foot Up/Down......... 46 Quick Reverse ............. 46 Securing Stitches.......... 46 Thread Cutter ............. 46 Optimize Balance ............. 64 Overview of Embroidery Designs ......
- Page 218 Index Securing Stitches Settings Settings .............. 45 Embroidery Speed .......... 47 Select Hover Function, Presser Foot ....... 45 Alphabets ............ 52 Presser Foot Hover .......... 45 Buttonholes ............ 52 Securing Stitches.......... 45 Decorative Stitches .......... 52 Sewing Speed ............. 45 Embroidery Alphabets......... 82 Upper Thread Tension, Embroidery...... 47 Embroidery Design........
- Page 219 Index Stitch Patterns Threading the Twin Needle........ 36 Combining ............ 68 Time .............. 50, 80 Optimizing............ 64 Setting .............. 44 Stitch Plate............... 30 Touch Gestures ............ 20 Attaching ............ 30 Triple Stitch .............. 62 Changing ............ 30 Troubleshooting ............. 102 Display............ 50, 80 Selecting............. 33 Stitch Preview Update Firmware............ 97 Adjust..............
- Page 220 BERNINA recommends threads from 1038925.00A.04 2024-05 EN BERNINA International AG | CH-8266 Steckborn Switzerland | www.bernina.com | © Copyright by BERNINA International AG...
Need help?
Do you have a question about the 990 and is the answer not in the manual?
Questions and answers
What are all the Formats that the 990 will read?