Bernina Industrial 950 Instruction Manual
Hide thumbs
Also See for Industrial 950:
- Instruction manual (22 pages) ,
- Specifications (3 pages) ,
- At-a-glance reference manual (84 pages)

Related Manuals for Bernina Industrial 950


Summary of Contents for Bernina Industrial 950
- Page 1 -�-- ----- - · - - - - - - - - - - -�- lndustrial 950 BERNI� lnstruction Manual Bedienungsanleitung Manual d' instructions Manuale d' instruzione de instrucciones...
- Page 3 Safety instructions IMPORTANT! SAFETY INSTRtJCTIONS The following safety instructions should always be followed: Before using the machine, read the safety instructions The needle and other moving parts (thread take-up, and the instruction manual carefully. hook and handwheel) are sources of injury (injury to fingers).
-
Page 4: Table Of Contents
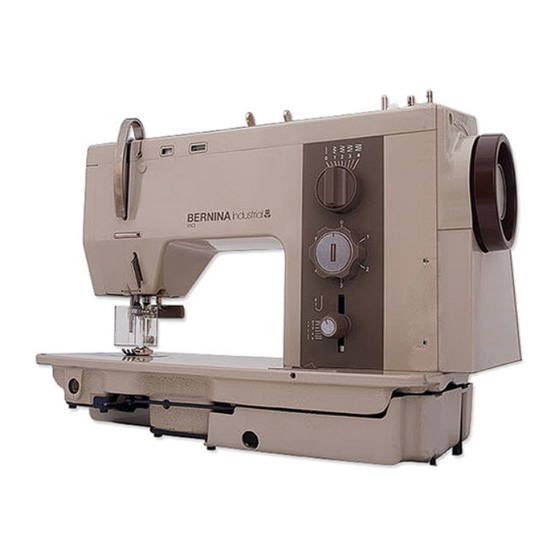
Contents Safety lnstructions Content Details of the machine Setting up the machine Removing and inserting the bobbin case Winding the bobbin lnserting the bobbin Selecting needle and thread lnserting the needle Changing the presser foot Threading the upper thread Bringing up the lower thread Thread tension Lowering the feed-dog Presser foot lifter (FHS-Free Hand System) - Page 5 Details of the machine BERNINA lndustrial 950 Details of the BERNINA 950 Base plate Slide plate Stitch plate Presser foot Needle holder clamp Thread regulator Thread take-up lever Thread tension slit Top frame cover Pre-tension stud (bayonet fixing) Thread tension disc...
-
Page 6: Removing And Inserting The Bobbin Case
Setting up the machine Removing and inserting the bobbin case Removing the bobbin case Open the slide plate. Hold the bobbin case by the latch with the thumb and forefinger of the left hand and take it out. lnserting the bobbin case Hold the bobbin case latch with the thumb and fore... -
Page 7: Lnserting The Bobbin
Setting up the machine lnserting the bobbin lnserting Threading Lower thread tension Adjustment Insert the babbin with the Draw the thread through Normal tensian: Adjusting the bobbin thread running in an anti thread tensian: the slat and belaw the Sharp hand movement = clackwise directian. -
Page 8: Changing The Presser Foot
Setting up the machine Changing the presser foot Good sewing results depend on the correct � choice of presser foot (see page 9). Raise the presser foot Release the presser foot Attach the presser foot Check that the needle is in its highest position. -
Page 9: Thread Tension
Setting up the machine Th read tension The tension for normal sewing work is correct when the red line corresponds with the mark. Use the wheel to adjust the tension for special tasks and fabrics. The upper thread tension will be looser when the figure 2.5 is in the centre. -
Page 10: Standard Accessories
Good results depend on the correct choice of presser foot. The presser feet supplied with the machine may differ from country to country. The BERNINA „Special Accessories" brochure contains information on around 100 special feet and their uses. Zig-zag foot All straight stitch and zig... - Page 11 Standard accessories Standard presser feet Overlock foot Overlock seams Overlock hems Neatening seams Narrow satin stitch 315 470 046 6 (030) Embroidery foot Embroidery with decorative stitches Satin stitch Applique Couching cord/perle yarn 001 6854 7000 (315 030 042) 9 (285) Darning foot Darning 001 675 7000 (315 285 144)
-
Page 12: Practical Stitches
Applications Practical stitches < ... > Sewn-out zig-zag Blind stitch Universal stitch > for most types of fabric Formost types of fabric For fir m er knits and wovens > as weil as feit, /eather etc. Neatening loosely woven Blind hem, shell hem for >... -
Page 13: Basic Settings
Basic settings Straight stitch, zig-zag: � 20 - _-,--.-- 19 - �- - - 1 7 - 1-20 ,-,..,w 16- WWW WWW 15 - '-'-"-1 4 - "'-"'-"'- 13- /'\./"-A 12 - �11- ze:s 'V' 10- ..__._ 9 - ,-..__/-,_✓- -wvvvvvv 7 - .�...
Need help?
Do you have a question about the Industrial 950 and is the answer not in the manual?
Questions and answers