
Related Manuals for Schumacher DSR PRO DSR115


Summary of Contents for Schumacher DSR PRO DSR115
- Page 1 User Manual of Product 1: Schumacher DSR115 DSR ProSeries Rechargeable Pro Jump Starter - 12V - Works with Semis Class 8 Vehicles - Includes DC/USB Power for Charging Phones and Tablets...
- Page 2 MODELS / MODELOS / MODÈLES : DSR114, DSR115 Jump Starter and DC Power Source Arrancador y Fuente de Poder de CC Aide de Démarrage et Source d’Énergie CC OWNERS MANUAL / MANUAL DEL USUARIO / MANUEL D’UTILISATION DSR114 DSR115 PLEASE SAVE THIS OWNER’S MANUAL AND READ BEFORE EACH USE. This manual will explain how to use your jump starter safely and effectively.
-
Page 3: Table Of Contents
CONTAINS SEALED, NON-SPILLABLE LEAD-ACID BATTERY. MUST BE DISPOSED OF PROPERLY. CONTIENE UNA BATERÍA SELLADA DE ÁCIDO-PLOMO NO DERRAMABLE QUE DEBE DESECHARSE APROPIADAMENTE. CONTIENT UNE BATTERIE À L’ACIDE QUI DOIT ÊTREDISPOSÉ CORRECTEMENT. WARNING: Possible explosion hazard. Contact with battery acid may cause severe burns and blindness. - Page 4 CONTENIDOS INSTRUCCIONES IMPORTANTES DE SEGURIDAD ..........15 PRECAUCIONES PERSONALES ................15 CONECTAR EL ARRANCADOR ................16 CARACTERÍSTICAS ....................17 PARA CARGAR LA BATERIA INTERNA DEL ARRANCADOR ........18 INSTRUCCIONES DE OPERACIÓN ................19 INSTRUCCIONES DE MANTENIMIENTO ..............21 INSTRUCCIONES PARA EL MANEJO Y ALMACENAMIENTO .........21 LOCALIZACIÓN Y SOLUCIÓN DE PROBLEMAS .............21 ANTES DE DEVOLVER A REPARACIONES .............23 ESPECIFICACIONES ....................23 REPUESTOS / ACCESORIOS ...................24...
- Page 5 TABLE DES MATIÈRES CONSIGNES DE SÉCURITÉ IMPORTANTES ............25 PRÉCAUTIONS PERSONNELLES ................25 CONNECTE LE AIDE AU DÉMARRAGE ..............26 CARACTÉRISTIQUES ....................27 CHARGEMENT DE LA BATTERIE INTERNE DE L’AIDE AU DÉMARRAGE .... 28 CONSIGNES D’UTILISATION ..................29 INSTRUCTIONS D’ENTRETIEN ................31 INSTRUCTIONS DE STOCKAGE ET EMPLACEMENT ..........31 DÉPANNAGE ......................31 AVANT DE RETOURNER POUR LES RÉPARATIONS ..........33 SPÉCIFICATIONS ......................33...
-
Page 6: Important Safety Instructions
1. IMPORTANT SAFETY INSTRUCTIONS SAVE THESE INSTRUCTIONS. WARNING – RISK OF EXPLOSIVE GASES WORKING IN THE VICINITY OF A LEAD-ACID BATTERY IS DANGEROUS. BATTERIES GENERATE EXPLOSIVE GASES DURING NORMAL OPERATION. IT IS IMPORTANT THAT YOU FOLLOW THESE INSTRUCTIONS EACH TIME YOU USE THE UNIT. -
Page 7: Connecting The Jump Starter
protective clothing. Avoid touching your 2.14 Add distilled water to each cell until the eyes while working near the battery. battery acid reaches the level specified by the battery manufacturer. Do not 2.11 If battery acid contacts your skin or overfill. -
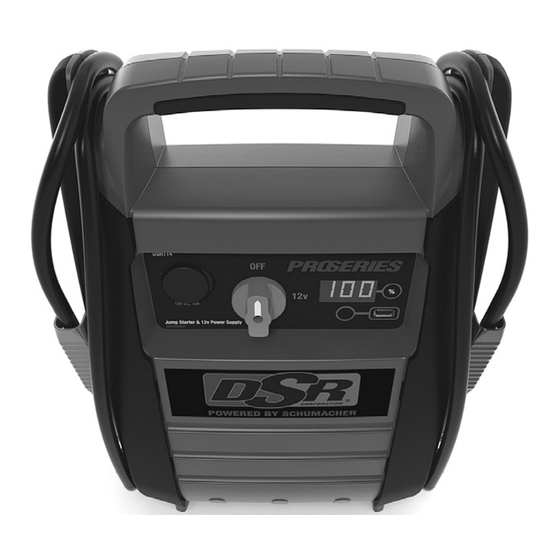
Page 8: Features
4. FEATURES Jump Starter 1. Heavy-duty battery clamps 2. 12V DC socket 3. Jump starter ON/OFF switch 4. Digital display 5. Display button 6. USB port 7. USB button Charger 1. Charging status LED 2. Bad Battery LED 3. Power LED 4.1 Digital Display DSR115). -
Page 9: Charging The Internal Battery Of The Jump Starter
5. CHARGING THE INTERNAL BATTERY OF THE JUMP STARTER IMPORTANT! 5.2 Charging the Jump Starter CHARGE IMMEDIATELY AFTER with included Charger PURCHASE, AFTER EACH USE AND 1. Make sure the charger and jump starter EVERY 30 DAYS, TO KEEP THE UNIT’S are placed on a dry, nonflammable INTERNAL BATTERY FULLY CHARGED surface. -
Page 10: Operating Instructions
Maintain Mode (Float Mode Monitoring) CAUSING PROPERTY DAMAGE OR When the internal battery is fully charged PERSONAL INJURY. and the jump starter display shows “100”, 1. Make sure the car is running. the charger has started maintain mode. In 2. Insert one end of the accessory cable this mode, the charger keeps the battery into the 12V DC power outlet. -
Page 11: Maintenance Instructions
circuit breaker of the jump starter Electric tool 24 watts 11 hrs. 22 hrs. will trip and disconnect the power to Electric cooler 48 watts 5.5 hrs. 11 hrs. the device. Disconnect the 12V DC Car vacuum, 80 watts 3.3 hrs. 6.6 hrs. -
Page 12: Troubleshooting
9. TROUBLESHOOTING Jump Starter PROBLEM POSSIBLE CAUSE SOLUTION The jump starter won’t Clamps are not making a good Check for poor connection to jump start my car. connection to the battery. battery and frame. Make sure connection points are clean. The jump starter’s battery is not Check the battery charge status charged. -
Page 13: Before Returning For Repairs
1-800-621-5485 Monday-Friday 7:00 to 5:00 For REPAIR OR RETURN, contact Customer Service at 1-800-621-5485. DO NOT SHIP UNIT until you receive a RETURN MERCHANDISE AUTHORIZATION (RMA) number from Customer Service at Schumacher Electric Corporation. • 12 •... -
Page 14: Specifications
11. SPECIFICATIONS DSR114 Internal Battery Type ........Sealed, Maintenance Free, AGM, Lead-Acid Nominal Voltage ......................12V DC Capacity ........................22Ah DC Power Output (Maximum Continuous Load)..........12V DC/15A Peak Amps ........................2200 Cranking Amps......................525 Cold Cranking Amps ..................... 350 Battery Hookup Cables ..............4 AWG, 60˝ (152 cm) Dimensions (H x W x D)........ -
Page 15: Limited Warranty
Manufacturer does not provide any warranty for any accessories used with this product that are not manufactured by Schumacher Electric Corporation and approved for use with this product. This Limited Warranty is void if the product is misused, subjected to careless handling, repaired, or modified by anyone other than Manufacturer or if this unit is resold through an unauthorized retailer. -
Page 16: Instrucciones Importantes De Seguridad
1. INSTRUCCIONES IMPORTANTES DE SEGURIDAD GUARDE ESTAS INSTRUCCIONES. ADVERTENCIA – RIESGO DE GASES EXPLOSIVOS TRABAJAR CERCA DE UNA BATERÍA DE PLOMO-ÁCIDO ES PELIGROSO. LAS BATERÍAS GENERAN GASES EXPLOSIVOS DURANTE SU FUNCIONAMIENTO NORMAL. ES IMPORTANTE QUE SIGA LAS INSTRUCCIONES CADA VEZ QUE UTILICE LA UNIDAD. -
Page 17: Conectar El Arrancador
2.7 Tenga especial cuidado para reducir el ADVERTENCIA: RIESGO DE CONTACTO riesgo de dejar caer una herramienta CON EL ÁCIDO DE LA BATERÍA. EL de metal sobre la batería. Esto podría ÁCIDO DE LA BATERÍA ES UN ÁCIDO provocar chispas o un cortocircuito en la SULFÚRICO ALTAMENTE CORROSIVO. -
Page 18: Características
3.7 En un vehículo con descarga a tierra combustible o cuerpos metálicos. Conecte por borne positivo, conecte la pinza a una pieza metálica de calibre grueso del NEGATIVO (NEGRO) del arrancador al marco o del bloque motor. borne NEGATIVO (NEG, N, -) sin descarga 3.8 Al desconectar la unidad apague todos a tierra de la batería. -
Page 19: Para Cargar La Bateria Interna Del Arrancador
4.2 Indicadores LED de Cargador INDICADOR DE ESTADO DE CARGA: LED (amarillo/ LED ALIMENTACIÓN (verde) naranja) pulsando rápidamente: encendido: El cargador está El cargador ha detectado un conectado a la red eléctrica. problema con la batería. INDICADOR DE ESTADO Consulte Localización y Solución DE CARGA: LED (verde) de Problemas para obtener más pulsando lentamente:... -
Page 20: Instrucciones De Operación
5. Cuando la pantalla del arrancador mantiene la batería totalmente cargada muestra 100 (%), la batería interna está mediante una pequeña corriente cuando completamente cargada y el arrancador corresponda. Si el cargador tiene que está listo para usar. La carga completa proporcionar su máxima corriente de puede tardar hasta 24 horas. - Page 21 ADVERTENCIA: 2. También asegúrese de que las pinzas RIESGO DE EXPLOSIÓN. queden sujetas en su lugar. Si ha conectado las pinzas al revés, 3. Abra la tapa protectora de entrada escuchará un sonido de alarma. NO del aparato de CD en el frente de la gire el botón-interruptor a la posición unidad.
-
Page 22: Instrucciones De Mantenimiento
7. INSTRUCCIONES DE MANTENIMIENTO 7.1 Después de usar y antes de realizar cables y carcasa de la unidad. mantenimiento, desenchufe y desconecte 7.3 Asegúrese de que todas las piezas de la la unidad (ver secciones 3 y 4). unidad estén bien instaladas y en buenas 7.2 Utilice un paño seco para limpiar la condiciones para su función. - Page 23 PROBLEMA CAUSA POSIBLE SOLUCIÓN La unidad no pone a El aparato de 12V no enciende. Encienda el aparato de 12V. funcionar mi aparato de 12V. La batería de la unidad no está Compruebe el estado de carga cargada. de la batería presionando el botón Display en la parte frontal de la unidad.
-
Page 24: Antes De Devolver A Reparaciones
Lunes-viernes 7:00 to 5:00 Para REPARACIÓN O DEVOLUCIÓN, comuníquese con Servicios al Cliente al 1-800-621-5485. NO ENVÍE LA UNIDAD hasta que usted reciba AUTORIZACIÓN DE DEVOLUCIÓN DE MERCANCÍA (RMA) de Servicios al Cliente de Schumacher Electric Corporation. 11. ESPECIFICACIONES DSR114 Tipo de batería interna ... -
Page 25: Repuestos / Accesorios
COMPRADOR MINORISTA ORIGINAL DE ESTE PRODUCTO. LA PRESENTE GARANTÍA LIMITADA NO PUEDE TRANSFERIRSE NI CEDERSE. Schumacher Electric Corporation (el “Fabricante”) otorga garantía por esta unidad por un (1) año contados a partir de la fecha de compra, contra cualquier material defectuoso o de mano de obra de la unidad que pudieran surgir durante su uso y bajo cuidado normal. -
Page 26: Consignes De Sécurité Importantes
1. CONSIGNES DE SÉCURITÉ IMPORTANTES CONSERVER CES INSTRUCTIONS. AVERTISSEMENT : RISQUE DE GAZ EXPLOSIFS TRAVAILLER À PROXIMITÉ D’UNE BATTERIE AU PLOMB EST DANGEREUX. LES BATTERIES PRODUISENT DES GAZ EXPLOSIFS EN MARCHE NORMALE. POUR CETTE RAISON, IL EST IMPORTANT QUE VOUS SUIVIEZ LES INSTRUCTIONS CHAQUE FOIS QUE VOUS UTILISEZ L’UNITÉ. -
Page 27: Connecte Le Aide Au Démarrage
2.7 Ne laissez pas tomber un outil en métal laissez pas les particules de corrosion entrer sur la batterie. Cela pourrait produire une en contact avec vos yeux, votre nez et votre étincelle ou un court-circuit à la batterie bouche. Utilisez du bicarbonate de sodium ou à... -
Page 28: Caractéristiques
à la masse. Connectez la pince POSITIVE métal de la carrosserie ou du bloc moteur. (ROUGE) au chassis du véhicule ou au 3.8 Lorsque vous déconnectez le aide de bloc moteur à l’écart de la batterie. Ne démarrage, positionnez tous les sélecteurs pas connecter la pince au carburateur, à... -
Page 29: Chargement De La Batterie Interne De L'aide Au Démarrage
4.2 Indicateurs de Chargeur LED INDICATEUR LED DE ÉTAT DE CHARGE (jaune / orange) VOYANT D’ALIMENTATION (vert) clignote rapidement : allumée : le chargeur est connecté Le chargeur a détecté un problème à une prise de courant alternatif. avec la batterie. Voir Dépannage INDICATEUR LED DE ÉTAT pour plus d’informations. -
Page 30: Consignes D'utilisation
5. Lorsque l’écran du dispositif d’aide au Mode de Maintien démarrage indique 100 (%), la batterie (Surveillance du mode de flottement) interne est complètement chargée et le Lorsque la batterie est complètement dispositif d’aide au démarrage est prêt chargée et que l’écran du dispositif d’aide à... - Page 31 Si vous avez raccordé les pinces à 2. S’assurer que les pinces de la batterie l’envers, une alarme audio retentira. soient bien posées sur les supports de NE RÉGLEZ PAS le commutateur stockage. rotatif à 12 V (12 V ou 24 V pour 3.
-
Page 32: Instructions D'entretien
7. INSTRUCTIONS D’ENTRETIEN 7.1 Après avoir utilisé lunité et avant une 7.3 Assurez-vous que tous les composants opération d’entretien, débranchez et de l’unité soient en bon état et prêts à être déconnectez l’unité. utilisés. 7.2 Utilisez un chiffon sec pour nettoyer toute 7.4 Toutes les réparations doivent être corrosion de la batterie ainsi que la saleté... - Page 33 PROBLÈME CAUSE POSSIBLE SOLUTION Le bloc Le dispositif de 12V n’est pas Allumez l’appareil 12V. d’alimentation activé. n’allume pas mon appareil de 12V. La batterie Interne n’est pas Vérifiez l’état de charge de la chargée. batterie en appuyant sur le bouton d’état de la batterie.
-
Page 34: Avant De Retourner Pour Les Réparations
Du lundi au Vendredi 07h00-17h00 CST Pour RÉPARATION OU RETOUR, contactez le service téchnique au 1-800-621-5485. NE PAS ENVOYER L’UNITÉ jusqu’à ce que vous receviez une AUTORISATION DE RETOUR DE MARCHANDISE (RMA) auprès du service clientèle au Schumacher Electric Corporation. 11. SPÉCIFICATIONS DSR114 Type de batterie interne ........Étanche, AGM plomb-acide sans entretien... -
Page 35: Pièces De Rechange / Accessoires
ACHETEUR DE CE PRODUIT. CETTE GARANTIE LIMITÉE N’EST PAS TRANSFÉRABLES NI CESSIBLES. Schumacher Electric Corporation (le « Fabricant ») garantit ce unité pour un (1) an à compter de la date d’achat au détail contre les défauts de matériaux ou de fabrication qui peuvent se produire dans des conditions normales d’utilisation et de soins. -
Page 36: Warranty Card
ORIGINAL receipt because it will be required for any warranty claims. This warranty is not transferable. Send warranty card only. DO NOT SEND UNIT TO THIS ADDRESS FOR REPAIR. Mail this card to: Schumacher Electric Corporation 801 Business Center Drive Mount Prospect, IL 60056-2179 Name ______________________________________________________________... -
Page 37: Carte De Garantie
éventuelle réclamation au titre de la garantie. Cette garantie n’est pas transférable. Envoyer la carte de garantie seulement. NE PAS ENVOYER L’UNITÉ À CETTE ADRESSE POUR RÉPARATION. Envoyer cette carte à : Schumacher Electric Corporation 801 Business Center Drive Mount Prospect, IL 60056-2179 (É.-U ) Nom _______________________________________________________________...
Need help?
Do you have a question about the DSR PRO DSR115 and is the answer not in the manual?
Questions and answers