Table of Contents
Advertisement
Available languages
Available languages
Quick Links
Advertisement
Chapters
Table of Contents

Related Manuals for Briggs & Stratton 316649GS


Summary of Contents for Briggs & Stratton 316649GS
- Page 1 Portable Generator Operator’s Manual This generator is rated to be compliant with CSA (Canadian Standards Association) standard C22.2 No. 100-04 (motors and generators). BRIGGS & STRATTON POWER PRODUCTS GROUP, LLC MILWAUKEE, WISCONSIN, U.S.A. Manual No. 316649GS Revision -...
- Page 2 Thank you for purchasing this quality-built Briggs & Stratton® generator. We are pleased that you’ve placed your confidence in the Briggs & Stratton brand. When operated and maintained according to the instructions in this manual, your Briggs & Stratton generator will provide many years of dependable service. This manual contains safety information to make you aware of the hazards and risks associated with generator products and how to avoid them.
-
Page 3: Table Of Contents
Table of Contents Operator Safety ....... . . 4 Equipment Description......... 4 Important Safety Information. -
Page 4: Operator Safety
Operator Safety Important Safety Information The manufacturer cannot possibly anticipate every possible circumstance that might involve a hazard. The warnings in Equipment Description this manual, and the tags and decals affixed to the unit are, Read this manual carefully and become familiar therefore, not all-inclusive. - Page 5 WARNING Starter cord kickback (rapid retraction) will pull hand and arm toward engine faster than you can let go which could cause broken bones, fractures, bruises, or sprains resulting in serious injury. • When starting engine, pull cord slowly until resistance is felt and then pull rapidly to avoid kickback.
- Page 6 WARNING Generator voltage could cause electrical CAUTION Excessively high operating speeds could result in minor injury and/or generator damage. shock or burn resulting in death or serious Excessively low speeds impose a heavy load. injury. • DO NOT tamper with governor spring, links or other parts to •...
-
Page 7: Assembly
Assembly 3. Insert retaining pin (B) through hole on axle stud. 4. Slide a wheel (C) over axle stud. Your generator requires some assembly and is ready for use NOTICE Be sure to install wheel with raised hub inboard. after it has been properly serviced with the recommended oil 5. -
Page 8: Add Engine Oil
To install: • Gasoline with up to 10% ethanol (gasohol) or up to 15% MTBE (methyl tertiary butyl ether) is acceptable. 1. Cut off tie wrap securing loose end of negative (black) cable. NOTICE Avoid generator damage. 2. Using 8 mm or 5/16” wrenches, remove nut (A), lock Failure to follow Operator’s Manual for fuel washer (B) and flat washer (C) on negative battery recommendations voids warranty. -
Page 9: System Ground
System Ground Generator Location The generator has a system ground that connects the Clearances and Air Movement generator frame components to the ground terminals on the WARNING Exhaust heat/gases could ignite AC output receptacles. The system ground is connected to combustibles, structures or damage fuel tank the AC neutral wire (the neutral is bonded to the generator causing a fire, resulting in death, serious injury... -
Page 10: Features And Controls
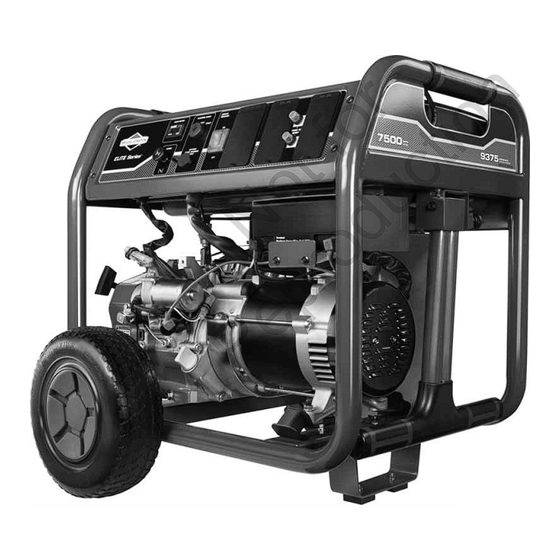
Features and Controls Read this Operator’s Manual and safety rules before operating your generator. Compare the illustrations with your generator, to familiarize yourself with the locations of various controls and adjustments. Save this manual for future reference. H - Oil Fill Cap/Dipstick — Check and add engine oil here. A - Start Switch —... -
Page 11: Cord Sets And Receptacles
Cord Sets and Receptacles 120 Volt AC, 20 Amp, GFCI Duplex Receptacles Each duplex receptacle is protected against overload by a Use only high quality, well-insulated, grounded extension cords with the generator’s receptacles. Inspect extension push–to–reset circuit breaker. cords before each use. Check the ratings of all extension cords before you use them. -
Page 12: Battery Charger
Testing the GFCI Battery Charger Test your GFCI outlet prior to each use, as follows: Use battery float charger jack to keep the starting battery charged and ready for use. Battery charging should be done • Push the “Test” button. The “Reset” button should pop in a dry location, such as inside a garage. -
Page 13: Operation
Operation 4B. For manual starting, turn key in start switch to run (I) position, grasp recoil handle and pull slowly until slight resistance is felt. Then pull rapidly one time only to Starting the Engine start engine. NOTICE Always unplug the battery float charger before •... -
Page 14: Connecting Electrical Loads
Connecting Electrical Loads Stopping the Engine 1. Let engine stabilize and warm up for a few minutes 1. Turn OFF and unplug all electrical loads from generator after starting. panel receptacles. NEVER start or stop engine with electrical devices plugged in and turned ON. 2. -
Page 15: Cold Weather Operation
Cold Weather Operation WARNING Running engine gives off carbon Under certain weather conditions (temperatures below 40°F monoxide, an odorless, colorless, poison gas. Breathing carbon monoxide could result in death, [4°C] combined with high humidity), your generator may serious injury, headache, fatigue, dizziness, experience icing of the carburetor and/or the crankcase vomiting, confusion, seizures, nausea or fainting. -
Page 16: Don't Overload Generator
Don’t Overload Generator Wattage Reference Guide Running* Additional Capacity Starting Tool or Appliance (Rated) You must make sure your generator can supply enough (Surge) Watts rated (running) and surge (starting) watts for the items you Watts will power at the same time. Follow these simple steps: Essentials 1. -
Page 17: Maintenance
Maintenance Emissions Control Maintenance, replacement, or repair of the emissions control devices and systems may be performed by any Maintenance Schedule non-road engine repair establishment or individual. Follow the hourly or calendar intervals, whichever occurs However, to obtain ”no charge” emissions control service, first. -
Page 18: Fuel Valve Maintenance
Fuel Valve Maintenance The fuel valve is equipped with a fuel sediment cup, screen, and o-ring that need to be cleaned. 1. Move fuel valve to “Off” position. 2. Remove sediment cup (A) from fuel valve. Remove o-ring (B) and screen (C) from fuel valve. * Below 40°F (4°C) the use of SAE 30 will result in hard starting. - Page 19 Changing Engine Oil To service the air cleaner, follow these steps: If you are using your generator under extremely dirty or 1. Loosen screws (A) and remove air cleaner cover (B). dusty conditions, or in extremely hot weather, change the oil more often.
- Page 20 Inspect Muffler and Spark Arrester Clean Cooling System Inspect the muffler for cracks, corrosion, or other damage. Over time debris may accumulate in cylinder cooling fins and Remove the spark arrester, if equipped, and inspect for cannot be observed without partial engine disassembly. For damage or carbon blockage.
-
Page 21: Storage
Storage Change Oil While engine is still warm, drain oil from crankcase. Refill The generator should be started at least once every seven with recommended grade. See Changing Engine Oil in Engine days and allowed to run at least 30 minutes. If this cannot be Maintenance. -
Page 22: Troubleshooting
Troubleshooting Problem Cause Correction 1. One of the circuit breakers is open. 1. Reset circuit breaker. 2. Fault in generator. 2. Contact authorized service facility. Engine is running, but no AC 3. Poor connection or defective cord set. 3. Check and repair. output is available. -
Page 23: Warranties
Warranties Briggs & Stratton Emissions Control Warranty Provisions The following are specific provisions relative to your Emissions Control Warranty Coverage. It is in addition to the California, U.S. EPA, and Briggs & Stratton B&S engine warranty for non-regulated engines found in the Corporation Emissions Control Warranty Operator’s Manual. - Page 24 The warranty on emissions-related parts is as follows: Look For Relevant Emissions Durability Period and Air Index Information On Your Small Off-Road Engine • Any warranted part that is not scheduled for Emissions Label replacement as required maintenance in the owner’s manual supplied, is warranted for the warranty period Engines that are certified to meet the California Air stated above.
- Page 25 BRIGGS & STRATTON POWER PRODUCTS GROUP, LLC PORTABLE GENERATOR OWNER WARRANTY POLICY Effective May 1, 2010 replaces all undated Warranties and all Warranties dated before May 1, 2010 LIMITED WARRANTY Briggs & Stratton Power Products Group, LLC will repair or replace, free of charge, any part(s) of the portable generator that is defective in material or workmanship or both.
-
Page 26: Specifications
Portable Generator Product Specifications Starting Wattage ......8,750 Watts Wattage* ......7,500 Watts AC Voltage . - Page 27 Generador portátil Manual del Operario Este generador está clasificado conforme a la norma C22.2 No. 100-04 (motores y generadores) de la CSA (Canadian Standards Association [Asociación canadiense de normalización]). BRIGGS & STRATTON POWER PRODUCTS GROUP, LLC MILWAUKEE, WISCONSIN, U.S.A.
- Page 28 Muchas gracias por comprar este generador Briggs & Stratton® de gran calidad. Nos alegra que haya depositado su confianza en la marca Briggs & Stratton. Siempre que sea utilizado de acuerdo con las instrucciones de este manual, su generador Briggs & Stratton le proporcionará muchos años de buen funcionamiento. Este manual contiene información sobre seguridad para hacerle consciente de los riesgos asociados a los generadores y mostrarle cómo evitarlos.
- Page 29 Tabla de Contenido Seguridad de operario ......4 Descripción del equipo ........4 Información importante de seguridad .
-
Page 30: Seguridad De Operario
Seguridad de operario Símbolos sobre la seguridad y significados Descripción del equipo Lea atentamente este manual y familiarícese con el generador. Conozca sus aplicaciones, Gases Tóxicos Contragolpe Descarga Eléctrica limitaciones y riesgos. Este generador funciona en base a un motor de campo eléctrico giratorio y de corriente alterna (CA). - Page 31 ADVERTENCIA El combustible y sus vapores son extremadamente inflamables y explosivos, lo que podría provocar quemaduras, incendios o explosiones; así como daños materiales, lesiones graves o incluso la muerte. CUANDO ANADA COMBUSTIBLE O VACÍE EL DEPÓSITO • DETENGA el motor del generador y déjelo enfriar durante al menos 2 minutos antes de quitar el tapón de combustible.
- Page 32 ADVERTENCIA Los gases y el calor de escape PRECAUCIÓN Las velocidades de funcionamiento podrían inflamar los materiales excesivamente altas podrían provocar lesiones leves y/o combustibles y las estructuras o dañar daños al generador. el depósito de combustible y provocar Las velocidades excesivamente bajas incrementan la incendios, así...
-
Page 33: Montaje
Montaje 3. Inserte el pasador de retención (B) a través del orificio del extremo del eje. Su generador requiere de ciertos procedimientos de montaje y 4. Inserte una rueda (C) en el extremo del eje. solo estará listo para ser utilizado después de haberle AVISO Compruebe que instala la rueda con el cubo elevado suministrado servicio con el combustible y aceite recomendados. -
Page 34: Agregar Aceite Al Motor
Para instalar: • El motor admite gasolina con hasta un 10% de etanol (gasohol) o hasta un 15% de MTBE (éter metil terbutílico). 1. Corte el cablecito que está aguantando el cable negro, para poderlo usar. AVISO Evite el daño del generador. 2. -
Page 35: Tierra Del Sistema
Gran altitud Ubicación del generador En altitudes superiores a 1.524 metros (5.000 pies), se deberá Espacio libre alrededor del generador utilizar gasolina con un mínimo de 85 octanos / 85 AKI (89 RON). Para seguir cumpliendo la normativa sobre emisiones, ADVERTENCIA Los gases y el calor de escape es necesario ajustar la unidad para su uso a gran altitud. -
Page 36: Controles Y Características
Controles y características Lea este Manual del Operario y reglas de seguridad antes de poner en marcha su generador. Compare las ilustraciones con su generador, para familiarizarse con la ubicación de los diversos controles y ajustes. Guarde este manual para futuras consultas. H - Tapón de llenado/varilla de nivel de aceite —... -
Page 37: Juegos De Cordones Y Enchufes Conectores
Juegos de cordones y enchufes conectores 120 Volt AC, 20 Amp, GFCI Receptáculos Dobles Cada receptáculo está protegido en contra de sobrecargas Utilice únicamente cables prolongadores de alta calidad, bien por un corto-circuitos de, del tipo "empuje para reposicionar". aislados y conectados a tierra con las tomas del generador. Examine los cables prolongadores antes de cada uso. -
Page 38: Cargador De Batería
Comprobación del GFCI Cargador de batería Pruebe el enchufe del GFCI antes de cada uso como se Utilice el enchufe hembra del cargador de flotación (carga indica a continuación: lenta y continua) de la batería para mantener la batería de arranque cargada y preparada para el uso. -
Page 39: Operando
Operando ADVERTENCIA El retroceso (repliegue rápido) del cable del arrancador impedirá que el usuario suelte el cable a tiempo y tirará de su mano y brazo hacia el Encienda el motor motor, lo que podría provocar fracturas, AVISO Desenchufe siempre el cargador de flotación de la contusiones o esguinces;... -
Page 40: Conexión De Cargas Eléctricas
Conexión de cargas eléctricas ADVERTENCIA El combustible y sus vapores son 1. Deje que el motor se estabilice y se caliente por dos extremadamente inflamables y explosivos, lo que podría provocar minutos después del arranque. quemaduras, incendios o explosiones; 2. Asegúrese de que el disyuntor del panel de control esté así... - Page 41 Creación de una estructura de protección provisional para 6. Arranque el generador como se describe en la sección climas fríos Arranque del motor y cúbralo con la caja de cartón. Deje un espacio mínimo de 1.5 cm (5 pies) alrededor 1.
-
Page 42: No Sobrecargar El Generador
No sobrecargar el generador 6. Repita los pasos 4 y 5 para cada carga adicional que usted tenga. Capacidad NUNCA añada cargas que sobrepasen la capacidad del Debe asegurarse de que su generador puede proveer los generador. Tenga especial cuidado en contar con las cargas suficientes vatios de potencia continua (vatiaje nominal) y adicionales en la capacidad del generador, como se describe vatios de salida para los elementos que desee alimentar al... -
Page 43: Mantenimiento
Mantenimiento Control de emisiones Cualquier establecimiento o individuo especializado en la Plan de mantenimiento reparación de motores que no sean de automoción puede encargarse del mantenimiento, la sustitución y la Siga los intervalos de horas o de calendario, los que sucedan reparación de los dispositivos y sistemas de control de antes. -
Page 44: Mantenimiento De La Batería
Mantenimiento de la batería Mantenimiento del motor La batería inicial no requiere ningún mantenimiento a ADVERTENCIA Las chispas involuntarias podrían excepción de la carga de flotación, que se describe en otro provocar incendios o electrocución que pueden provocar lesiones graves o la apartado. - Page 45 Comprobación del Nivel de Aceite 3. Limpie la zona de alrededor del tapón de vaciado de aceite, situado en la base del motor, al otro lado del Compruebe el nivel de aceite antes de cada uso o cada 8 horas carburador.
- Page 46 4. Cambie la bujía si los electrodos están picados o quemados o si la porcelana está agrietada. Utilice la bujías de repuesto recomendada. Consulte Especificaciones. 5. Instale la bujía y apriete firmemente. Inspeccione el silenciador y la pantalla apagachispas 3. Inspeccione la pantalla y reemplácela si está rota, perforada Inspeccione que el silenciador no presente fisuras, corrosión o dañada.
-
Page 47: Almacenamiento
Almacenamiento Cambio de aceite El generador deberá ser encendido al menos una vez cada Con el motor todavía caliente, drene el aceite de la caja del siete días y deberá dejarlo funcionar al menos durante cigüeñal. Vuelva a llenarlo con el grado de aceite 30 minutos. -
Page 48: Resolución De Problemas
Resolución de problemas Problemo Causa Accion 1. El interruptor automático de circuito está 1. Reposicione el interruptor. abierto. El motor está funcionando pero 2. Conexión mal o defectuosa del juego de 2. Revise y repare. cables. no existe salida de AC 3. -
Page 49: Garantías
Garantías Disposiciones de la garantía contra defectos del sistema de control de emisiones de Briggs & Stratton A continuación se detallan las disposiciones concretas Garantía de control de emisiones de California, relativas a la Cobertura de la garantía contra defectos del U.S. - Page 50 La garantía de los componentes relacionados con las B&S. B&S no será responsable de la cobertura de la emisiones es la siguiente: garantía de fallos de componentes relacionados con el sistema de emisiones cubiertos por la garantía • Los fallos de todo componente cubierto por la garantía provocados por el uso de componentes que no se deba sustituir como parte del plan de complementarios o modificados.
- Page 51 POLÍTICA DE GARANTÍA PARA EL PROPIETARIO DE GENERADOR PORTÁTIL BRIGGS & STRATTON POWER PRODUCTS GROUP, LLC 1Fcha de entrada en vigor: 1 de Mayo de 2010. Sustituye a todas las garantías sin fecha y a las de fecha anterior al 1 de Mayo de 2010 GARANTÍA LIMITADA Briggs &...
-
Page 52: Especificaciones Del Producto
Generador Portátil Especificaciones del producto Vataje que Empieza ..... .8,750 Vatios Vataje* .......7,500 Vatios Corriente valorada de Carga de C.A.: a 240 Voltios .
Need help?
Do you have a question about the 316649GS and is the answer not in the manual?
Questions and answers