Table of Contents
Advertisement
Available languages
Available languages
Advertisement
Chapters
Table of Contents

Related Manuals for VALBERG VH 2 T 007C


Summary of Contents for VALBERG VH 2 T 007C
- Page 2 WARRANTY CONDITION This product has a 2-year warranty as of the date of purchase*, covering any fault resulting from a manufacturing or material defect. This warranty does not cover defects or damage resulting from incorrect installation, improper use or abnormal wear of the appliance.
- Page 3 11/2023-V2 Ceramic Hob Plaque vitrocéramique Keramische kookplaat Placa vitrocerámica 983047 - VH 2 T 007C INSTRUCTIONS FOR USE .....02 CONSIGNES D'UTILISATION .....26 GEBRUIKSAANWIJZINGEN .....52 INSTRUCCIONES DE USO .....78...
- Page 9 Thanks! T h a n k y o u f o r c h o o s i n g t h i s VA L B E R G p ro d u c t . Chosen, tested and recommended by ELECTRO DEPOT, t h e p ro d u c t s o f t h e VA L B E R G b r a n d a re e a s y t o u s e , re l i a b le a n d o f a n i m p e c c a b le s t a n d a rd .
-
Page 10: Table Of Contents
Table of contents Description of the appliance Preview of the appliance Quick start guide Using the appliance Installation Operation instructions Cleaning and maintenance Useful information Troubleshooting The instructions are also available on the site http://www.electrodepot.fr/sav/notices/ http://www.electrodepot.fr/sav/notices... -
Page 11: Preview Of The Appliance
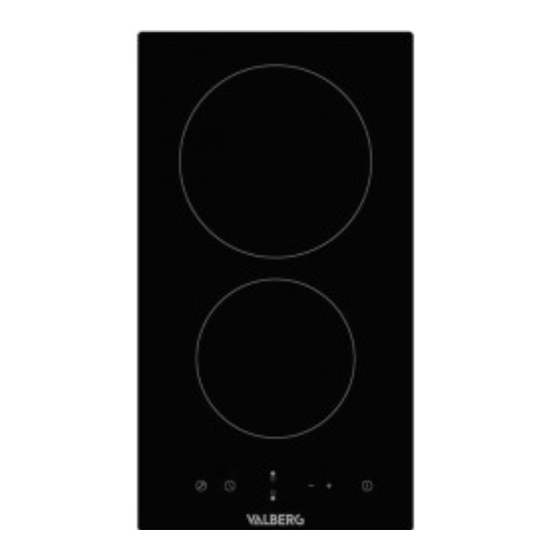
Preview of the appliance Description of the appliance Top View Max. 1800W zone ON / OFF Glass plate Control panel Max. 1200W zone Control Panel Power / Timer regulating controls Heating zone selection controls Key lock control ON/OFF control Timer control NOTE: All the pictures in this manual are for explanation purpose only. -
Page 12: Using The Appliance
Using the appliance Quick start guide WARNING: Take care when frying as the oil and fat heat up very quickly, particularly if you’re using PowerBoost. At extremely high temperatures oil and fat will ignite spontaneously and this presents a serious fire risk. Cooking Tips •... - Page 13 Using the appliance For Stir-frying 1. Choose a ceramic compatible flat-based wok or a large frying pan. 2. Have all the ingredients and equipment ready. Stir-frying should be quick. If cooking large quantities, cook the food in several smaller batches. 3.
-
Page 14: Installation
Using the appliance Installation Selection of installation equipment • Cut out the work surface according to the sizes shown in the drawing. • For the purpose of installation and use, a minimum of 50mm space shall be preserved around the hole. •... - Page 15 Using the appliance • The ceramic cooker hob can be used on the table top of cabinet. The ceramic hob should be placed horizontally. As shown below: 50mm mini 50mm mini Under any circumstances, make sure the ceramic cooker hob is well ventilated and the air inlet and outlet are not blocked.
- Page 16 Using the appliance A(mm) B(mm) C(mm) 50 mini 20 mini Air intake Air exit 5mm WARNING: Ensuring Adequate Ventilation Make sure the induction cooker hob is well ventilated and that air inlet and outlet are not blocked. In order to avoid accidental touch with the overheating bottom of the hob, or getting unexpectable electric shock during working, it is necessary to put a wooden insert, fixed by screws, at a...
- Page 17 Using the appliance Before locating the fixing brackets • The unit should be placed on a stable, smooth surface (use the packaging). Do not apply force onto the controls protruding from the hob. • Fix the hob on the work surface by screw four brackets on the bottom of hob (see picture) after installation.
- Page 18 Using the appliance 4. The wall and induced heating zone above the work surface shall withstand heat. 5. To avoid any damage, the sandwich layer and adhesive must be resistant to heat. 6. A steam cleaner is not to be used. 7.
- Page 19 Using the appliance • The cable must not be bent or compressed. • The cable must be checked regularly and only replaced by a properly qualified person. WARNING: The bottom surface and the power cord of the hob are not accessible after installation.
-
Page 20: Operation Instructions
Using the appliance Operation instructions Touch Controls • The controls respond to touch, so you don’t need to apply any pressure. • Use the ball of your finger, not its tip. • You will hear a beep each time a touch is registered. •... - Page 21 Using the appliance How to use Start cooking After power on, the buzzer beeps once, all the indicators light up for 1 second then go out, indicating that the ceramic hob has entered the stat of standby mode. 1. Touch the ON/OFF control. all the indicators show “-” 2.
- Page 22 Using the appliance 4. Select a heat setting by touching the “-” or “+” control. • If you don’t choose a heat setting within 1 minute, the ceramic hob will automatically switch off. You will need to start again at step 1. •...
- Page 23 Using the appliance WARNING: Beware of hot surfaces “H” will show which cooking zone is hot to touch. It will disappear when the surface has cooled down to a safe temperature. It can also be used as an energy saving function if you want to heat further pans, use the hotplate that is still hot.
- Page 24 Using the appliance a) Using the Timer as a Minute Minder If you are not selecting any cooking zone Make sure the cooktop is turned on. NOTE: You can use the minute minder even if you’re not selecting any cooking zone. 1.
- Page 25 Using the appliance NOTE: • Touch the “-” or “+” control of the timer once to decrease or increase by 1 minute. • Touch and hold the “-” or “+” control of the timer to decrease or increase by 10 minutes. •...
- Page 26 Using the appliance 3. Set the time by touching the “-” or “+” control of the timer. 4. Touching the “-” and “+” together, the timer is cancelled, and the will show “--” in the minute display. 5. When the time is set, it will begin to count down immediately. The display will show the remaining time and the timer indicator flash for 5 seconds 6.
- Page 27 Using the appliance NOTE: • If you want to change the time after the timer is set, you have to start from step 1. • The method for setting two zones is the same as mentioned above. Setting the timer to turn more than one cooking zones off •...
- Page 28 Using the appliance NOTE: • The red dot next to power level indicator will illuminate indicating that zone is selected. • If you want to change the time after the timer is set, you have to start from step 1. Over-Temperature Protection A temperature sensor equipped can monitor the temperature inside the ceramic hob.
-
Page 29: Cleaning And Maintenance
Useful information Cleaning and maintenance What? How? Important! • When the power to the cooktop isswitched off, there will be no ‘hotsurface’ indication but the cooking 1. Switch the power to the zonemay still be hot! Take cooktop off. extreme care. 2. - Page 30 Useful information What? How? Important! 1. Switch the power to the cooktop off. 2. Soak up the spill. • The cooktop may beep and turn itself off, and the touch 3. Wipe the touch control controls may not function Spillovers on the touch area with a clean damp while there is liquid on controls.
- Page 31 Useful information Troubleshooting Operation of your appliance can lead to errors and malfunctions. The following tables contain possible causes and notes for resolving an error message or malfunction. It is recommended to read the tables carefully below in order to save your time and money that may cost for calling to the service center.
- Page 32 Useful information Failure Display, Hints and Tips The hob is equipped with a self diagnostic function. With this test the technician is able to check the function of several components without disassembling or dismounting the hob from the working surface. Failure code occur during customer using &...
- Page 33 Merci ! N o u s v o u s r e m e r c i o n s d ' a v o i r c h o i s i c e p r o d u i t VA L B E R G .
- Page 34 Table des matières Description de l’appareil Aperçu de l'appareil Guide de démarrage rapide Utilisation de Installation l'appareil Consignes d'utilisation Nettoyage et entretien Informations Dépannage pratiques Les instructions sont également disponibles sur le site http://www.electrodepot.fr/sav/notices/ http://www.electrodepot.fr/sav/notices...
-
Page 35: Aperçu De L'appareil
Aperçu de l’appareil Description de l’appareil Vue de dessus Zone max. 1800 W MARCHE / ARRÊT Plateau en verre Panneau de commande Zone max. 1200 W Panneau de commande Commandes de réglage de Sélection des zones de cuisson l'alimentation/du minuteur Commande de verrouillage Marche/arrêt Minuterie REMARQUE :... -
Page 36: Utilisation De L'appareil
Utilisation de l’appareil Guide de démarrage rapide AVERTISSEMENT : Faites attention lorsque vous faites frire des aliments, parce que l'huile et la graisse chauffent très vite, en particulier si vous utilisez le booster. À des températures extrêmement hautes, l'huile et la graisse peuvent s'enflammer spontanément, et provoquer de sérieux risques d'incendie. - Page 37 Utilisation de l’appareil 4. Tournez le steak une seule fois pendant la cuisson. Le temps de cuisson exact dépend de l'épaisseur du steak et du degré de cuisson souhaité. Le temps peut varier d'approximativement 2 à 8 minutes par côté. Appuyez sur le steak pour avoir une idée de la cuisson –...
- Page 38 Utilisation de l’appareil Réglages de la puissance Les réglages ci-dessous ne sont qu'indicatifs. Le réglage exact dépend de plusieurs facteurs, y compris votre matériel de cuisson et les quantités cuisinées. Faites des expériences avec la plaque pour trouver les réglages qui vous conviennent le mieux. Réglage de la puissance Convient pour •...
-
Page 39: Installation
Utilisation de l’appareil Installation Sélection de l'équipement d'installation • Découpez le plan de travail conformément aux dimensions montrées sur le schéma. • Pour l'installation et l'utilisation, il faut préserver un espace d'au moins 50 cm autour de la découpe. • Assurez-vous que l'épaisseur du plan de travail est d'au moins 30 mm. Veuillez choisir un plan de travail dans un matériau isolant et résistant à... - Page 40 Utilisation de l’appareil • La plaque vitrocéramique peut être posée sur un meuble. La plaque vitrocéramique doit être posée à plat. Comme montré ci-dessous : Min 50 mm Min 50 mm En toutes circonstances, assurez-vous que la plaque de cuisson vitrocéramique est bien ventilée et que l'entrée d'air et la ventilation ne sont pas bloquées.
- Page 41 Utilisation de l’appareil A(mm) B(mm) C(mm) Sortie d'air 50 min. 20 min. Entrée d'air 5 mm AVERTISSEMENT : Assurer une ventilation adéquate Assurez-vous que la plaque de cuisson à induction est bien aérée et que l'entrée et la sortie d'air ne sont pas bloquées.
- Page 42 Utilisation de l’appareil Avant de placer les crochets de fixation • L'appareil doit être placé sur une surface stable et lisse (utilisez le carton d'emballage). Ne forcez pas sur les commandes dépassant de la plaque. • Fixez la plaque sur le plan de travail en vissant les 4 crochets en bas de la plaque (voir le schéma) après l'installation.
- Page 43 Utilisation de l’appareil 3. La plaque vitrocéramique doit être installée de manière à ce que la chaleur se dissipe facilement afin d'améliorer sa fiabilité. 4. Le mur et la zone au-dessus de la surface de travail doivent pouvoir supporter la chaleur. 5.
- Page 44 Utilisation de l’appareil • L'installateur doit s'assurer que le raccordement électrique a été correctement réalisé, en conformité avec les règles de sécurité. • Le câble ne doit pas être tordu ou compressé. • Le câble doit être vérifié régulièrement et ne peut être remplacé que par une personne qualifiée.
-
Page 45: Consignes D'utilisation
Utilisation de l’appareil Consignes d'utilisation Commandes tactiles • Les commandes répondent au toucher, vous n'avez donc pas besoin d'exercer de pression sur celles-ci. • Utilisez la pulpe de votre doigt, pas sa pointe. • Vous entendrez un bip à chaque fois qu'un contact est enregistré. •... - Page 46 Utilisation de l’appareil Consignes d'utilisation Commencez la cuisson Après allumage, le buzzer émet un bip, tous les témoins s'allument pendant 1 seconde puis s'éteignent pour indiquer que la plaque vitrocéramique est passée en mode veille. 1. Touchez la commande Marche/arrêt. Tous les témoins affichent « - » 2.
- Page 47 Utilisation de l’appareil 4. Sélectionnez le niveau de puissance en touchant les commandes « - » ou « + ». • Si vous ne choisissez pas de réglage de puissance, au bout d'une minute, la plaque vitrocéramique s'éteindra automatiquement. Vous devrez recommencer à partir de l'étape 1. •...
- Page 48 Utilisation de l’appareil AVERTISSEMENT : Faites attention aux surfaces chaudes “La lettre H montre quelles surfaces de cuisson sont chaudes. Elle disparaît quand ces zones ont refroidi jusqu'à une température sûre. Elle peut aussi servir à économiser de l'énergie : si vous souhaitez continuer à réchauffer des ustensiles, utilisez la zone de cuisson encore chaude.
- Page 49 Utilisation de l’appareil Minuteur Vous pouvez utiliser le minuteur de deux manières différentes. • Vous pouvez l'utiliser comme un simple indicateur de temps. Dans ce cas, le minuteur n'éteindra pas de zone de cuisson une fois le temps réglé écoulé. •...
- Page 50 Utilisation de l’appareil 3. Une fois le minuteur réglé, il commence le compte à rebours immédiatement. L'écran affiche le temps restant et le témoin du minuteur clignote pendant 5 secondes. 4. Quand le temps réglé est écoulé, le buzzer émet un bip pendant 30 secondes et le témoin du minuteur affiche «...
- Page 51 Utilisation de l’appareil 2. Touchez la commande du minuteur, le témoin du minuteur affiche « 10 ». 3. Programmez le temps en touchant les commandes « - » ou « + » du minuteur. 4. Touchez les commandes « - » et « + » simultanément, le minuteur s'annule et l'écran du minuteur affiche «...
- Page 52 Utilisation de l’appareil REMARQUE : • Le point rouge près du témoin de niveau de puissance indique quelle zone est sélectionnée. REMARQUE : • Si vous souhaitez changer le temps après avoir réglé le minuteur, il vous faut redémarrer à l'étape 1. •...
- Page 53 Utilisation de l’appareil • Une fois le temps écoulé, la zone correspondante s'éteint. Le minuteur montre alors le réglage suivant, et le point de la zone correspondant à ce réglage clignote. zone 1 zone 2 • Quand le temps de cuisson est terminé, la zone de cuisson correspondante s'éteint automatiquement.
- Page 54 Utilisation de l’appareil Durée de fonctionnement par défaut L'arrêt automatique est une autre fonction de sécurité de la plaque. Il a lieu lorsque vous oubliez d'éteindre une zone de cuisson. Les temps d'arrêt par défaut sont visibles dans le tableau ci-dessous : Niveau de puissance Durée de...
-
Page 55: Nettoyage Et Entretien
Informations pratiques Nettoyage et entretien Quoi ? Comment ? Important ! • Quand la plaque est éteinte, il n'y a pas d'indication de « surface 1. Éteignez la plaque de chaude », mais la zone de cuisson. cuisson peut rester chaude ! Faites très attention. - Page 56 Informations pratiques Quoi ? Comment ? Important ! Retirez ces résidus immédiatement avec une spatule, un couteau plat ou un grattoir adapté aux • Éliminez les taches plaques vitrocéramiques, laissées par les aliments en faisant attention aux fondus ou sucrés le plus vite surfaces de cuisson possible.
-
Page 57: Dépannage
Informations pratiques Dépannage L'utilisation de votre appareil peut entraîner des erreurs et des dysfonctionnements. Les tableaux suivant contiennent des causes possibles et des suggestions de solutions en cas de message d'erreur ou de dysfonctionnement. Il est recommandé de lire attentivement les tableaux ci-dessous, de façon à... - Page 58 Informations pratiques Affichage des pannes, Conseils et astuces La plaque vitrocéramique est équipée d'une fonction auto-diagnostic. Avec ce test, le technicien peut vérifier le fonction de plusieurs composants sans désassembler ni démonter la plaque de la surface de travail. Code d'erreur apparaissant pendant l'utilisation et solution : Code d’erreur Problème Solution...
- Page 59 Dank u! B e d a n k t o m d i t VA L B E R G - p ro d u c t t e k i e z e n . D e p ro d u c t e n v a n h e t m e r k VA L B E R G , d i e g e k o z e n , g e t e s t e n a a n b e v o le n w o rd e n d o o r E L E CT R O D E P OT , z i j n e e n v o u d i g t e g e b r u i k e n , b e t r o u w b a a r e n v a n o n b e r i s p e l i j k e k w a l i t e i t .
- Page 60 Inhoudstafel Beschrijving van het toestel Overzicht van het toestel Snelstartgids Gebruik van het Installatie toestel Gebruiksaanwijzing Reiniging en onderhoud Praktische informatie Probleemoplossing De instructies zijn ook terug te vinden op de site http://www.electrodepot.fr/sav/notices/ http://www.electrodepot.fr/sav/notices...
- Page 61 Overzicht van het toestel Beschrijving van het toestel Uitzicht bovenkant Zone max. 1800 W AAN/UIT Glasplaat Bedieningspaneel Zone max. 1200 W Bedieningspaneel Knoppen om het vermogen en de Knoppen om verwarmde zone te timer in te stellen selecteren Knop voor vergrendeling AAN/UIT-knop Bediening timer OPMERKING:...
- Page 62 Gebruik van het toestel Snelstartgids WAARSCHUWING: Wees voorzichtig wanneer u bakt. Olie en vet warmen namelijk heel snel op, vooral wanneer u PowerBoost gebruikt. Bij buitengewoon hoge temperatuur vatten olie en vet spontaan vlam. Dit brengt een hoog risico op brand met zich mee.
- Page 63 Gebruik van het toestel 5. Plaats de steak enkele minuten op een warm bord zodat hij zacht wordt voor u hem opdient. Roerbakken 1. Kies een wokpan met een vlakke boden die geschikt is voor keramische kookplaten of een grote bakpan. 2.
- Page 64 Gebruik van het toestel Warmte-instellingen De instellingen hieronder zijn slechts richtlijnen. De precieze instelling hangt van verschillende factoren af, inclusief uw kookgerei en de hoeveelheid die u bereidt. Experimenteer met de inductiekookplaat om te zien welke instellingen voor u het best werken.
- Page 65 Gebruik van het toestel Installatie Selectie van de uitrusting voor de installatie • Snijd het werkoppervlak uit volgens de afmetingen in de tekening. • Houd minstens 50 cm rond de holte voor de installatie en het gebruik. • Zorg ervoor dat het werkoppervlak minstens 30 mm dik is. Kies een hittebestendig en geïsoleerd materiaal voor het werkoppervlak (hout en gelijkaardig vezelachtig of hygroscopisch materiaal kan niet gebruikt worden voor het werkoppervlak tenzij het geïmpregneerd is) om elektrische schokken en grotere vervorming door de hitte van de...
- Page 66 Gebruik van het toestel • De keramische kookplaat kan bovenop een keukenkast gebruikt worden. De keramische kookplaat dient horizontaal geïnstalleerd te worden. Zoals hieronder weergegeven: 50 mm min. 50 mm min. Zorg er in alle omstandigheden voor dat de keramische kookplaat goed geventileerd wordt en dat de luchttoevoer en -afvoer niet geblokkeerd is.
- Page 67 Gebruik van het toestel A (mm) B (mm) C (mm) D (mm) 50 mini 20 mini Luchttoevoer Luchtafvoer 5 mm WAARSCHUWING: Zorg voor voldoende ventilatie Zorg ervoor dat de inductiekookplaat goed geventileerd is en dat de luchttoevoer en -afvoer niet geblokkeerd is. Om toevallige aanraking van de hete onderkant van de kookplaat en onverwachte elektrische schokken bij het werken te vermijden, dient u een houten inzetstuk, vastgezet...
- Page 68 Gebruik van het toestel Voor u de bevestigingsbeugels plaatst • Het toestel moet op een stabiel, glad oppervlak geplaatst worden (gebruik de verpakking). Oefen geen druk uit op de toetsen die van de kookplaat uitsteken. • Bevestig de kookplaat op het werkoppervlak met vier schroefbeugels aan de onderkant van de kookplaat (zie foto) na de installatie.
- Page 69 Gebruik van het toestel 4. De muur en de zone boven het oppervlak moeten hittebestendig zijn. 5. Om beschadiging te vermijden dienen de tussenlaag en de lijm hittebestendig te zijn. 6. Gebruik geen stoomreiniger. 7. De keramische kookplaat kan enkel aangesloten worden op een systeem met niet meer dan 0.427 ohm.
- Page 70 Gebruik van het toestel • De installateur moet ervoor zorgen dat de elektrische aansluiting juist gemaakt wordt en dat de installatie voldoet aan de veiligheidsvoorschriften. • De kabel mag niet gebogen of samengedrukt worden. • De kabel moet regelmatig gecontroleerd worden en mag enkel worden vervangen door een naar behoren gekwalificeerd persoon.
- Page 71 Gebruik van het toestel Gebruiksaanwijzing Aanraaktoetsen • De toetsen reageren op een aanraking. U hoeft dus geen druk uit te oefenen. • Gebruik het ronde deel van uw vinger, niet de top. • Wanneer een aanraking geregistreerd wordt, hoort u een pieptoon. •...
- Page 72 Gebruik van het toestel Hoe gebruik ik het toestel Beginnen met koken Wanneer de kookplaat aangesloten is, hoort u een pieptoon. Alle lampjes lichten 1 seconde op en gaan dan uit. De keramische kookplaat staat dan in stand-by. 1. Raak de AAN/UIT-knop aan. Alle lampjes tonen “-” 2.
- Page 73 Gebruik van het toestel 4. Stel de warmte in door op “-” of “+” te drukken. • Indien u niet binnen 1 minuut de warmte instelt, wordt de keramische kookplaat automatisch uitgeschakeld. U moet dan opnieuw vanaf stap 1 beginnen. •...
- Page 74 Gebruik van het toestel WAARSCHUWING: Wees voorzichtig voor hete oppervlakken Wanneer u "H" ziet, is het kookvuur te warm om aan te raken. Dit verdwijnt wanneer de plaat afgekoeld is tot een veilige temperatuur. U kan dit ook gebruiken om energie te besparen: de kookplaat is nog warm en blijft dus uw pannen verwarmen.
- Page 75 Gebruik van het toestel Bediening van de timer U kan de timer op twee verschillende manieren gebruiken: • U kan de timer gebruiken om het aantal minuten in de gaten te houden. In dit geval worden er geen kookvuren uitgeschakeld wanneer de ingestelde tijd afgelopen is. •...
- Page 76 Gebruik van het toestel 3. Wanneer de tijd ingesteld is, begint het aftellen onmiddellijk. Het scherm geeft de resterende tijd weer en het lampje van de timer knippert 5 seconden. 4. De zoemer laat 30 seconden lang een pieptoon horen en het lampje van de timer toont “- -”...
- Page 77 Gebruik van het toestel 2. Raak de knop van de timer aan. Het lampje van de timer toont "10”. 3. Stel de tijd in door de knop "-" of "+" van de timer aan te raken. 4. Wanneer u tegelijkertijd op “-” en “+” drukt, wordt de timer geannuleerd en ziet u “--” op het weergavescherm.
- Page 78 Gebruik van het toestel OPMERKING: • Het rode puntje naast het lampje van de stand geeft aan dat dit vuur geselecteerd is. OPMERKING: • Wanneer u de tijd wil veranderen nadat de timer ingesteld is, dient u vanaf stap 1 te beginnen. Om twee zones in te stellen volgt u dezelfde methode als hierboven uitgelegd.
- Page 79 Gebruik van het toestel • Wanneer de ingestelde tijd voorbij is, wordt het vuur in kwestie uitgeschakeld. Dan toont het de nieuwe instelling van de timer en het stipje van het vuur in kwestie knippert. zone 1 zone 2 • Wanneer de kooktijd afgelopen is, wordt het kookvuur in kwestie automatisch uitgeschakeld.
- Page 80 Gebruik van het toestel Standaard werkingstijden Een ander veiligheidsmechanisme van de kookplaat is de automatische uitschakeling. Dit gebeurt wanneer u vergeet om een kookvuur uit te schakelen. U vindt de standaard tijden voor uitschakeling in de onderstaande tabel: Stand Standaard werkingstijd (timer)
- Page 81 Praktische informatie Reiniging en onderhoud Wat? Hoe? Belangrijk! • Wanneer de kookplaat uitgeschakeld is, is er geen aanduiding dat de plaat nog warm is, maar ze kan nog 1. Schakel de kookplaat uit. steeds heet zijn! Wees heel voorzichtig! 2. Breng een •...
- Page 82 Praktische informatie Wat? Hoe? Belangrijk! Verwijder dit onmiddellijk met een visspatel, paletmes, scheermesje of krabber die geschikt is voor • Verwijder vlekken van keramische kookplaten, gesmolten of suikerrijke maar wees voorzichtig voor voeding of morsen zo snel hete oppervlakken van de mogelijk.
- Page 83 Praktische informatie Probleemoplossing De werking van uw toestel kan fouten en gebrekkig functioneren met zich meebrengen. De volgende tabellen tonen mogelijke oorzaken en opmerkingen om een foutmelding of gebrekkig functioneren op te lossen. Het is aanbevolen om de tabellen hieronder zorgvuldig door te nemen om tijd en geld te besparen in plaats van de technische dienst te bellen.
- Page 84 Praktische informatie Weergave van fouten, Hints en tips De kookplaat heeft een functie om zelf fouten te diagnosticeren. Met deze test kan de technicus het functioneren van verschillende onderdelen nagaan zonder de kookplaat uit elkaar te moeten halen of los te moeten maken van het werkvlak. Foutcode tijdens gebruik door de klant en oplossing;...
- Page 85 ¡Muchas gracias! G r a c i a s p o r e le g i r e s t e p ro d u c t o VA L B E R G . Elegido, probado y recomendado por ELECTRO DEPOT, l o s p ro d u c t o s d e l a m a rc a VA L B E R G s o n f á...
- Page 86 Índice Descripción del aparato Descripción del aparato Guía de inicio rápido Utilización del Instalación aparato Instrucciones de funcionamiento Limpieza y mantenimiento Información práctica Resolución de problemas Las instrucciones también están disponibles en el sitio http://www.electrodepot.fr/sav/notices/ http://www.electrodepot.fr/sav/notices...
- Page 87 Utilización del aparato Descripción del aparato Vista superior Máx. 1800W zona ON/OFF Placa de vidrio Panel de control Máx. 1200W zona Panel de control Botones de regulación del Botones de selección de la zona de temporizador / encendido calentamiento Botón de bloqueo de tecla Botón de encendido/apagado Temporizador NOTA:...
- Page 88 Utilización del aparato Guía de inicio rápido ADVERTENCIA: Tenga cuidado al freír, a que el aceite y la grasa se calientan muy rápido, especialmente si utiliza la función de aumento de potencia (PowerBoost). A temperaturas extremadamente altas, el aceite y la grasa prenden espontáneamente y esto constituye un riesgo grave de incendio.
- Page 89 Utilización del aparato 5. Deje reposar el bistec en un plato templado durante unos minutos para que se suavice y esté tierno al servirse. Salteado oriental 1. Utilice un wok de base plana compatible con la vitrocerámica o una sartén grande. 2.
- Page 90 Utilización del aparato Configuración del calentamiento La configuración siguiente solo es una pauta. El ajuste exacto dependerá de diversos factores, incluyendo el tipo de cacerola y la cantidad que vaya a cocinar. Explore con la placa de inducción para averiguar la configuración que mejor se adapta a usted. Configuración del Usos calentamiento...
- Page 91 Utilización del aparato Instalación Selección del equipo de instalación • Corte la superficie de trabajo de acuerdo con los tamaños mostrados en el dibujo. • Para la instalación y el uso, debe mantenerse un espacio mínimo de 50mm alrededor del orificio.
- Page 92 Utilización del aparato • La placa vitrocerámica se puede utilizar sobre el tablero del mueble. La placa vitrocerámica se debe colocar horizontalmente. Como se muestra más abajo: 50 mm mín. 50 mm mín. En cualquier circunstancia, asegúrese de que la placa de cocina vitrocerámica esté bien ventilada y que la entrada y la salida de aire no estén bloqueadas.
- Page 93 Utilización del aparato A (mm) B (mm) C (mm) 50 mín. 20 mín. Entrada de aire Salida de aire de 5mm ADVERTENCIA: Asegurar una ventilación adecuada Asegúrese de que la placa de la cocina de inducción esté bien ventilada y de que la entrada y la salida de aire no estén bloqueadas.
- Page 94 Utilización del aparato ADVERTENCIA: • Hay orificios de ventilación alrededor del exterior de la placa. DEBE asegurarse de que dichos orificios no estén bloqueados por la encimera cuando coloque la placa en su sitio. • Tenga en cuenta que el adhesivo que une el material de plástico o de madera al mueble debe resistir temperaturas no inferiores a 150 °C, con el fin de evitar que los paneles se despeguen.
- Page 95 Utilización del aparato Antes de ubicar los soportes de fijación • La unidad debe colocarse en una superficie estable y plana (utilice el embalaje). No ejerza fuerza sobre los controles que sobresalen de la placa. • Fije la placa en la encimera atornillando cuatro soportes en la base de la placa (véase la imagen) después de la instalación.
- Page 96 Utilización del aparato 4. La pared y la zona de calor inducido encima de la superficie de la encimera deben resistir el calor. 5. Para evitar daños, la capa en sándwich y el adhesivo deben ser resistentes al calor. 6. No se debe utilizar un limpiador de vapor. 7.
- Page 97 Utilización del aparato • El cable no debe estar doblado ni comprimido. • El cable debe ser revisado regularmente y reemplazado únicamente por una persona debidamente cualificada. ADVERTENCIA: La superficie inferior y el cable de alimentación de la placa no son accesibles después de la instalación.
- Page 98 Utilización del aparato Instrucciones de funcionamiento Botones táctiles • Los botones responden al tacto, por lo que no es necesario aplicar ninguna presión. • Utilice la yema del dedo, no la punta. • Oirá un pitido cada vez que se registre un contacto. •...
- Page 99 Utilización del aparato Modo de empleo Empezar a cocinar Después de encenderla, el indicador acústico pitará una vez, todos los indicadores se encenderán durante 1 segundo y después se apagarán, indicando que la placa vitrocerámica ha entrado en modo de espera. 1.
- Page 100 Utilización del aparato 4. Seleccione un ajuste de calor tocando el control «-» o «+».. • Si no selecciona un ajuste de calor en el plazo de 1 minuto, la placa vitrocerámica se apagará automáticamente. Deberá volver a empezar de nuevo con el paso 1. •...
- Page 101 Utilización del aparato ADVERTENCIA: Tenga cuidado con las superficies calientes «H» indica qué zona de cocción está caliente y no puede tocarse. Desaparecerá cuando la superficie se haya enfriado hasta una temperatura segura. También puede utilizarse como forma de ahorrar energía si desea calentar más cacerolas, utilizándose la placa que aún esté...
- Page 102 Utilización del aparato Temporizador Puede utilizar el temporizador de dos formas distintas: • Puede utilizarlo como aviso. En este caso, el temporizador no apagará ninguna zona de cocción cuando el tiempo haya transcurrido. • Puede configurarlo para que apague una o más zonas de cocción cuando el tiempo ajustado haya transcurrido.
- Page 103 Utilización del aparato 3. Cuando la hora se haya configurado, empezará a contar de inmediato. La pantalla mostrará el tiempo restante y el indicador del temporizador parpadeará durante 5 segundos. 4. El indicador acústico pitará durante 30 segundos y el temporizador mostrará “- -” cuando el tiempo ajustado haya finalizado.
- Page 104 Utilización del aparato 2. Toque el botón de temporizador, el indicador del temporizador mostrará «10». 3. Configure el tiempo tocando el botón «-» o «+» del temporizador. 4. Al tocar juntos «-» y «+», el temporizador se cancela y se mostrará «--» en la pantalla de minutos.
- Page 105 Utilización del aparato NOTA: • El punto rojo junto al indicador del nivel de potencia se iluminará indicando que la zona se ha seleccionado. NOTA: • Si desea cambiar el tiempo después de configurar el temporizador, tiene que empezar desde el paso 1. •...
- Page 106 Utilización del aparato • Una vez que el temporizador de cuenta atrás expira, la zona correspondiente se apagará. Después mostrará el nuevo temporizador de min. y el punto de la zona correspondiente parpadeará. zona 1 zona 2 • Cuando el temporizador de la cocción termine, la zona de cocción correspondiente se apagará...
- Page 107 Utilización del aparato Tiempos de funcionamiento predeterminados Otra característica de seguridad de la placa es el apagado automático. Esto ocurre si se le olvida apagar una zona de cocción. Los tiempos de apagado predeterminados se muestran en la siguiente tabla: Nivel de potencia Temporizador de trabajo...
- Page 108 Información práctica Limpieza y mantenimiento ¿Qué? ¿Cómo? ¡Importante! • Al desconectar la placa, no habrá ninguna indicación de “superficie caliente”, ¡pero la zona de cocción 1. Desconecte la placa. podría seguir estando caliente! Tenga mucho 2. Aplique un limpiador de cuidado.
- Page 109 Información práctica ¿Qué? ¿Cómo? ¡Importante! Quítelos de inmediato con un cubierto de pescado, una espátula o un rascador de hoja adecuado para • Quite las manchas placas de vitrocerámica, dejadas por los licuados pero tenga cuidado con las y la comida azucarada o superficies calientes de la las salpicaduras lo antes zona de cocción:...
- Page 110 Información práctica Resolución de problemas El funcionamiento de su aparato puede provocar errores y fallos. Las siguientes tablas incluyen las posibles causas y notas para resolver un mensaje de error o un fallo. Se recomienda leer las tablas de abajo detenidamente con el fin de ahorrar tiempo y dinero en llamar al servicio de atención.
- Page 111 Información práctica Pantalla de errores, Trucos y consejos La placa está equipada con una función de autodiagnóstico. Con esta prueba, el técnico puede comprobar la función de diversos componentes sin necesidad de desarmar ni desmontar la placa de la superficie de trabajo. Código de error durante el uso y solución: Código de error Problema...
- Page 112 Notas...
Need help?
Do you have a question about the VH 2 T 007C and is the answer not in the manual?
Questions and answers