Table of Contents
Advertisement
Available languages
Available languages
Advertisement
Table of Contents

Subscribe to Our Youtube Channel
Related Manuals for VALBERG IH 4 TB2FZS 007C


Summary of Contents for VALBERG IH 4 TB2FZS 007C
- Page 2 WARRANTY CONDITION This product is guaranteed for a period of 2 years from the date of purchase* against any failure resulting from a manufacturing or material defect. This warranty does not cover defects or damage resulting from incorrect installation, improper use or abnormal wear of the product.
- Page 3 01/2022-V2 Induction Hob Plaque à induction Inductiekookplaat Placa de inducción Piastra a induzione 971743 - IH 4 TB2FZS 007C INSTRUCTIONS FOR USE .....02 CONSIGNES D'UTILISATION .....48 GEBRUIKSAANWIJZINGEN .....96 INSTRUCCIONES DE USO ....144 ISTRUZIONI PER L'USO ....192...
- Page 9 Thanks! T h a n k y o u f o r c h o o s i n g t h i s VA L B E R G p ro d u c t . Chosen, tested and recommended by ELECTRO DEPOT, VA L B E R G b ra n d e d p ro d u c t s a re e a s y to u s e , re l i a b le , a n d o f a n i m p e c c a b le s t a n d a rd .
- Page 10 Table of contents Foreword Overview of the Description of the appliance appliance Installation Using the appliance Control panel Operation of product How to use Care and cleaning Useful information Cooking guidelines Heat settings Hints and tips Failure display and inspection Packaging and the environment Disposing of your old appliance...
- Page 11 Preview of the appliance Foreword Safety warnings • Your safety is important to us. Please read this information before using your cooktop. Installation Electrical shock hazard • Disconnect the appliance from the mains electricity supply before carrying out any work or maintenance on it. •...
- Page 12 Preview of the appliance your installation costs. • In order to avoid a hazard, this appliance must be installed according to these instructions for installation. • This appliance is to be properly installed and earthed only by a suitably qualified person. •...
- Page 13 Preview of the appliance • A steam cleaner is not to be used. • Metallic objects such as knives, forks, spoons and lids should not be placed on the hob surface since they can get hot. • Do not use a steam cleaner to clean your cooktop. •...
- Page 14 Preview of the appliance CAUTION • The cooking process has to be supervised. A short term cooking process has to be supervised continuously. • Danger of fire: do not store any object on the cooking surfaces. WARNING Only use hotplates designed by the manufacturer of the cooking appliance or recommended by the manufacturer of the appliance in the instructions for use as suitable protection plates or hotplate protectors incorporated into...
- Page 15 Preview of the appliance • Switch the cooktop off at the wall before cleaning or maintenance. • Failure to follow this advice may result in electrical shock or death. Health hazard • This appliance complies with electromagnetic safety standards. • However, persons with cardiac pacemakers or other electrical implants (such as insulin pumps) must consult with their doctor or implant manufacturer before using this appliance to make sure that their implants will not be...
- Page 16 Preview of the appliance Cut hazard • The razor-sharp blade of a cooktop scraper is exposed when the safety cover is retracted. Use with extreme care and always store safely and out of reach of children. • Failure to use caution could result in injury or cuts. Important safety instructions •...
- Page 17 Preview of the appliance • Do not leave children alone or unattended in the area where the appliance is in use. • Children or persons with a disability which limits their ability to use the appliance should have a responsible and competent person to instruct them in its use.
- Page 18 Preview of the appliance Congratulations on the purchase of your new Induction Hob. We recommend that you spend some time to read this Instruction / Installation Manual in order to fully understand how to install correctly and operate it. For installation, please read the installation section. Read all the safety instructions carefully before use and keep this Instruction / Installation Manual for future reference.
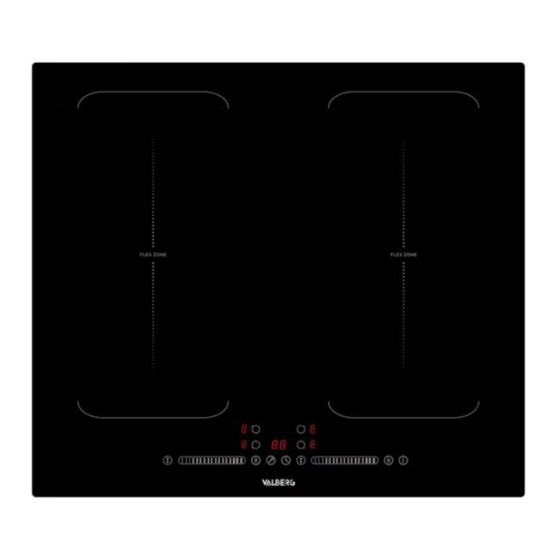
- Page 19 Preview of the appliance Description of the appliance Top view Max. 1800/2000W zone Max. 1900/2000W zone Max. 3000/3600W zone Max. 1900/2000W zone Max. 1800/2000W zone Max. 3000/3600W zone Control panel Glass plate...
- Page 20 Preview of the appliance Working theory Induction cooking is a safe, advanced, efficient, and economical cooking technology. It works by electromagnetic vibrations generating heat directly in the pan, rather than indirectly through heating the glass surface. The glass becomes hot only because the pan eventually warms it up.
-
Page 21: Using The Appliance
Using the appliance Installation Selection of installation equipment • Cut out the work surface according to the sizes shown in the drawing. • For the purpose of installation and use, a minimum of 5 cm space shall be preserved around the hole. •... - Page 22 Using the appliance NOTE The safety distance between the hotplate and the cupboard above the hotplate should be at least 760 mm. wall Min. 30mm (mm) (mm) (mm) 50 min. 20 min. Air intake Air exit 5mm WARNING Ensuring Adequate Ventilation Make sure the induction cooker hob is well ventilated and that air inlet and outlet are not blocked.
- Page 23 Using the appliance Min. 50mm Max. 5mm Max. 5mm WARNING There are ventilation holes around outside of the hob. YOU MUST ensure these holes are not blocked by the worktop when you put the hob into position. WARNING • Be aware that the glue that join the plastic or wooden material to the furniture, has to resist to temperature not below 150°C, to avoid the unstuck of the paneling.
- Page 24 Using the appliance • The isolating switch must be of an approved type and provide a 3 mm air gap contact separation in all poles (or in all active [phase] conductors if the local wiring rules allow for this variation of the requirements). •...
- Page 25 Using the appliance WARNING Under any circumstances, the brackets cannot touch with the inner surfaces of the worktop after installation (see picture). CAUTION 1. The induction hotplate must be installed by qualified personnel or technicians. We have professionals at your service.
- Page 26 Using the appliance Connecting the hob to the mains power supply WARNING This hob must be connected to the mains power supply only by a suitably qualified persol. Before connecting the hob to the mains power supply, check that: 1. The domestic wiring system is suitable for the power drawn by the hob.
- Page 27 Using the appliance Yellow / Green Black Brown Blue WARNING If the total number of heating unit of the appliance you choose is not less than 4, the appliance can be connected directly to the mains by single-phase electric connection, as shown below.
- Page 28 Using the appliance • If the cable is damaged or to be replaced, the operation must be carried out the by after- sale agent with dedicated tools to avoid any accidents. • If the appliance is being connected directly to the mains an omnipolar circuit-breaker must be installed with a minimum opening of 3mm between contacts.
-
Page 29: Control Panel
Using the appliance Control panel On/Off control Boost Flexible Area control Power / Timer slider touch control Timer control Keylock control Heating zone selection controls... -
Page 30: Operation Of Product
Using the appliance Operation of product Touch Controls • The controls respond to touch, so you don’t need to apply any pressure. • Use the ball of your finger, not its tip. • You will hear a beep each time a touch is registered. •... - Page 31 Using the appliance • Do not use cookware with jagged edges or a curved base. • Make sure that the base of your pan is smooth, sits flat against the glass, and is the same size as the cooking zone. Use pans whose diameter is as large as the graphic of the zone selected.
-
Page 32: How To Use
Using the appliance How to use Start cooking • Touch the ON/OFF control. After power on, the buzzer beeps once, all displays show “–” or “– –”, indicating that the induction hob has entered the state of standby mode. • Place a suitable pan on the cooking zone that you wish to use. - Make sure the bottom of the pan and the surface of the cooking zone are clean and dry. - Page 33 Using the appliance • Select a heat setting by touching the slider control - If you don’t choose a heat setting within 1 minute, the Induction hob will automatically switch off. You will need to start again at step 1. - You can modify the heat setting at any time during cooking.
- Page 34 Using the appliance • Turn the whole cooktop off by touching the ON/OFF control. • Beware of hot surfaces H will show which cooking zone is hot to touch. It will disappear when the surface has cooled down to a safe temperature. It can also be used as an energy saving function if you want to heat further pans, use the hotplate that is still hot.
- Page 35 Using the appliance Cancel the Boost function • Touching the heating zone selection control that you wish to cancel the boost function • Touching the "Boost" control to cancel the Boost function, then the cooking zone will revert to its original setting. •...
- Page 36 Using the appliance 2. As a big zone, we suggest the used as the follow: Cookware: 250mm or 280mm diameter cookware (Square or Oval cookware are acceptable) 250mm 280mm We don’t recommend other operations except for above mentioned three operations because it might effect the heating of appliance As two independent zones To use the flexible area as two different zones, you can have two choices of heating.
- Page 37 Using the appliance Locking the controls • You can lock the controls to prevent unintended use (for example children accidentally turning the cooking zones on). • When the controls are locked, all the controls except the ON/OFF control are disabled. To lock the controls Touch the lock control The timer indicator will show “...
- Page 38 Using the appliance • Set the time by touching the slider control. (e.g. 5) • Touch timer control again, the “1” will flash • Set the time by touching the slider control (e.g.9), now the timer you set is 95 minutes. •...
- Page 39 Using the appliance • Buzzer will beep for 30 seconds and the timer indicator shows “- -” when the setting time finished. b) Setting the timer to turn one cooking zone off Set one zone • Touching the heating zone selection control that you want to set the timer for. •...
- Page 40 Using the appliance • Touch timer control again, the “1” will flash. • Set the time by touching the slider control (e.g.9), now the timer you set is 95 minutes. • When the time is set, it will begin to count down immediately. The display will show the remaining time.
- Page 41 Using the appliance The pictures shown above are for reference only, and the final product shall prevail. Set more zones The steps for setting more zones are similar to the steps of setting one zone; When you set the time for several cooking zones simultaneously, decimal dots of the relevant cooking zones are on.
- Page 42 Using the appliance c) Cancel the timer • Touching the heating zone selection control that you want to cancel the timer. • Touching the timer control, the indicator flash. • Touch the slider control to set the timer to “00”, the timer is cancelled Default working times Auto shut down is a safety protection function for your induction hob.
-
Page 43: Useful Information
Useful information Care and cleaning What? How? Important! • When the power to the cooktop is switched off, there will be no ‘hot 1. Switch the power to the surface’ indication but the cooktop off. cooking zone may still be hot! Take extreme care. - Page 44 Useful inf Useful information What? How? Important! 1. Switch the power to the cooktop off. 2. Soak up the spill • The cooktop may beep and turn itself off, and the touch 3. Wipe the touch control controls may not function Spillovers on the touch area with a clean damp while there is liquid on...
-
Page 45: Cooking Guidelines
Useful information Cooking guidelines WARNING Take care when frying as the oil and fat heat up very quickly, particularly if you’re using PowerBoost. At extremely high temperatures oil and fat will ignite spontaneously and this presents a serious fire risk. Cooking Tips •... - Page 46 Useful information 4. Turn the steak only once during cooking. The exact cooking time will depend on the thickness of the steak and how cooked you want it. Times may vary from about 2 – 8 minutes per side. Press the steak to gauge how cooked it is – the firmer it feels the more ‘well done’ it will be. 5.
-
Page 47: Heat Settings
Useful information Heat settings The settings below are guidelines only. The exact setting will depend on several factors, including your cookware and the amount you are cooking. Experiment with the induction hob to find the settings that best suit you. Heat setting Suitability •... -
Page 48: Hints And Tips
Useful information Hints and tips Problem Possible causes What to do • Make sure the induction hob is connected to the power supply and that it is switched on. The induction hob cannot be No power. • Check whether there is a turned on. - Page 49 Useful inf Useful information Problem Possible causes What to do A cooling fan built into your induction hob has come on • This is normal and needs to prevent the electronics no action. Do not switch the Fan noise coming from the from overheating.
-
Page 50: Failure Display And Inspection
Useful inf Useful information Failure display and inspection The induction hob is equipped with a self diagnostic function. With this test the technician is able to check the function of several components without disassembling or dismounting the hob from the working surface. Troubleshooting 1) Failure code occur during customer using &... - Page 51 Useful information 2) Specific failure & solution Failure Problem Solution A Solution B Check to see if plug is secured tightly in No power supplied. outlet and that outlet is working. The accessorial power board and Check the The LED does not the display board connection.
- Page 52 Useful information Failure Problem Solution A Solution B The power board and the display Check the board connected connection. Heating zones of the failure; same side ( Such as the first and the The display board Replace the display second zone ) would of communicate board.
-
Page 53: Packaging And The Environment
Useful information Packaging and the environment DISPOSING OF PACKAGING MATERIALS Packaging materials protect your appliance from damage that may occur during transport. These materials are environmentally friendly since they are recyclable. Recycling materials both saves raw materials and reduces waste production. Disposing of your old appliance SELECTIVE COLLECTION OF ELECTRICAL AND ELECTRONIC WASTE This device bears the WEEE symbol (Waste Electrical and Electronic... - Page 54 Note...
- Page 55 Merci ! N o u s v o u s r e m e r c i o n s d ' a v o i r c h o i s i c e p r o d u i t VA L B E R G .
- Page 56 Table des matières Avant-propos Aperçu de l'appareil Description de l’appareil Installation Utilisation de Panneau de commande l'appareil Fonctionnement du produit Consignes d'utilisation Entretien et nettoyage Informations Instructions de cuisson pratiques Réglages de la puissance Conseils et astuces Affichage des pannes et inspection Emballage et environnement Jeter votre ancien appareil...
-
Page 57: Avant-Propos
Aperçu de l’appareil Avant-propos Consignes de sécurité • Votre sécurité compte pour nous. Veuillez lire ces informations avant d'utiliser votre plaque de cuisson. Installation Risque de choc électrique • Débranchez l'appareil du secteur avant de réaliser tous travaux ou entretien sur celui-ci. •... - Page 58 Aperçu de l’appareil • Veuillez mettre ces informations à disposition de la personne responsable de l'installation de l'appareil, car cela pourrait réduire les coûts d'installation. • Afin d'éviter tout danger, cet appareil doit être installé conformément à ces instructions d'installation. •...
- Page 59 Aperçu de l’appareil AVERTISSEMENT Si la surface est fissurée, éteignez l'appareil pour éviter tout risque de choc électrique, car la surface en vitrocéramique ou autre protège les parties actives de l'appareil. • N'utilisez pas de nettoyeur à vapeur. • Les objets métalliques comme les couteaux, les fourchettes, les cuillères et les couvercles ne doivent pas être placés sur la surface de la plaque parce qu'ils peuvent devenir chauds.
- Page 60 Aperçu de l’appareil AVERTISSEMENT • Les parties accessibles de l'appareil peuvent devenir chaudes pendant l'utilisation. • Il convient de veiller à ne pas toucher les parties chaudes. • Les enfants âgés de moins de 8 ans doivent être tenus à l'écart sauf en cas de surveillance continue. •...
- Page 61 Aperçu de l’appareil AVERTISSEMENT N’utilisez que des protections de plaques de cuisson conçues par le fabricant de l’appareil de cuisson ou indiquées par le fabricant de l’appareil dans les instructions d’utilisation en tant que plaques de protection appropriées ou protections de plaques de cuisson incorporées dans l’appareil.
- Page 62 Aperçu de l’appareil Danger pour la santé • Cet appareil est conforme aux normes de sécurité électromagnétique. • Cependant, les personnes portant un pacemaker cardiaque ou d'autres implants électriques (comme des pompes à insuline) doivent consulter leur médecin ou leur fabricant d'implant avant d'utiliser cet appareil, afin de vérifier que leur implant ne sera pas affecté...
- Page 63 Aperçu de l’appareil Risque de coupure • La lame acérée d'un grattoir est exposé lorsque le couvercle de sécurité est rétracté. Utilisez-le avec le plus grand soin et conservez-le toujours hors de portée des enfants. • Un défaut d'attention peut provoquer des blessures ou des coupures.
- Page 64 Aperçu de l’appareil • Ne laissez pas les enfants jouer avec l'appareil, ou s'asseoir, se mettre debout ou grimper dessus. • Ne rangez pas d'objets qui intéressent les enfants dans les placards au-dessus de l'appareil. S'ils grimpent sur la plaque, les enfants peuvent être gravement blessés. •...
- Page 65 Aperçu de l’appareil • Cet appareil est destiné à être utilisé dans des applications domestiques et similaires, telles que : - les coins-cuisine réservés au personnel dans des magasins, des bureaux et d'autres environnements professionnels ; - les fermes ; - une utilisation par des clients dans des hôtels, motels et d'autres établissements à...
- Page 66 Aperçu de l’appareil Description de l’appareil Vue de dessus Zone 1800/2000 W maximum. Zone 1900/2000 W maximum. Zone 3000/3600 W maximum. Zone 1900/2000 W maximum. Zone 1800/2000 W maximum. Zone 3000/3600 W maximum. Panneau de commande Plateau en verre...
- Page 67 Aperçu de l’appareil Principe de fonctionnement La cuisson par induction est un mode de cuisson sûr, moderne, efficace et économique. Il fonctionne avec des vibrations électromagnétiques générant de la chaleur directement dans l'ustensile de cuisson, plutôt qu'indirectement en chauffant la surface en verre. Le verre devient chaud uniquement parce que l'ustensile finit par le chauffer.
-
Page 68: Utilisation De L'appareil
Utilisation de l’appareil Installation Sélection de l'équipement d'installation • Découpez le plan de travail conformément aux dimensions montrées sur le schéma. • Pour l'installation et l'utilisation, il faut préserver un espace d'au moins 5 cm autour de la découpe. • Assurez-vous que l'épaisseur du plan de travail est d'au moins 30 mm. Veuillez choisir un plan de travail dans un matériau isolant et résistant à... - Page 69 Utilisation de l’appareil REMARQUE La distance de sécurité entre la plaque et le placard au- dessus de la plaque doit être d'au moins 760 mm. Mini 30 mm (mm) (mm) (mm) 50 mini 20 mini Entrée d'air Sortie d'air 5 AVERTISSEMENT Assurer une ventilation adéquate Assurez-vous que la plaque de cuisson à...
- Page 70 Utilisation de l’appareil Mini 50 mm Maxi 5 mm Maxi 5 mm AVERTISSEMENT Il y a des trous de ventilation à l'extérieur de la plaque. VOUS DEVEZ vous assurer que ces trous ne sont pas bloqués par le plan de travail une fois la plaque installée. AVERTISSEMENT •...
- Page 71 Utilisation de l’appareil de 3 mm sur tous les pôles (ou sur tous les conducteurs [de phase] actifs si les règles de câblage locales permettent cette variation des exigences). • Le disjoncteur est facilement accessible pour l'utilisateur une fois la plaque installée. •...
- Page 72 Utilisation de l’appareil AVERTISSEMENT En toutes circonstances, les crochets ne doivent pas toucher la surface intérieure du plan de travail après installation (voir le schéma). ATTENTION 1. La plaque à induction doit être installée par un technicien ou un installateur qualifié. Nous avons des professionnels à...
- Page 73 Utilisation de l’appareil Raccorder la plaque à l'alimentation électrique du secteur AVERTISSEMENT Cette plaque doit être raccordée à l'alimentation secteur uniquement par une personne qualifiée. Avant de raccorder la plaque au secteur, vérifiez que : 1. Le système de câblage domestique est adapté à l'alimentation de la plaque.
- Page 74 Utilisation de l’appareil Jaune / Vert Noir Marron Bleu AVERTISSEMENT Si le nombre total de zones de cuisson de l'appareil que vous avez choisi est supérieur ou égal à 4, l'appareil peut être raccordé directement au secteur via une connexion électrique monophasée, comme montré...
- Page 75 Utilisation de l’appareil • Si le câble est endommagé ou doit être remplacé, l'opération doit être effectuée par le service après-vente avec des outils spécifiques pour éviter tout accident. • Si l'appareil est raccordé directement au secteur, un disjoncteur différentiel doit être installé, avec une ouverture d'au moins 3 mm entre les contacts.
-
Page 76: Panneau De Commande
Utilisation de l’appareil Panneau de commande Marche/arrêt Booster Zone flexible Curseur tactile de puissance / minuterie Minuterie Verrouillage Sélection des zones de cuisson... -
Page 77: Fonctionnement Du Produit
Utilisation de l’appareil Fonctionnement du produit Commandes tactiles • Les commandes répondent au toucher, vous n'avez donc pas besoin d'exercer de pression sur celles-ci. • Utilisez la pulpe de votre doigt, pas sa pointe. • Vous entendrez un bip à chaque fois qu'un contact est enregistré. •... - Page 78 Utilisation de l’appareil • N'utilisez pas d'ustensile avec des bords ébréchés ou un fond incurvé. • Assurez-vous que le fond de votre ustensile est lisse, qu'il repose à plat sur le verre, et fait la même taille que la zone de cuisson. Utilisez des ustensiles dont le diamètre est aussi large que le dessin de la zone choisie.
-
Page 79: Consignes D'utilisation
Utilisation de l’appareil Consignes d'utilisation Commencer la cuisson • Touchez la commande Marche/arrêt. Une fois la plaque allumée, le bip retentit une fois, tous les témoins affichent « – » ou « – – », ce qui indique que la plaque est entrée en mode veille. •... - Page 80 Utilisation de l’appareil • Sélectionnez le niveau de puissance en touchant le curseur - Si vous ne choisissez pas de réglage de puissance, au bout d'une minute, la plaque à induction s'éteindra automatiquement. Vous devrez recommencer à partir de l'étape 1. - Vous pouvez modifier le réglage de la puissance à...
- Page 81 Utilisation de l’appareil • Éteignez la zone de cuisson en faisant passer le curseur sur « | ». Assurez-vous qu'il est bien affiché « 0 ». • Éteignez toute la plaque en touchant la commande Marche/arrêt. • Faites attention aux surfaces chaudes La lettre H montre quelles surfaces de cuisson sont chaudes.
- Page 82 Utilisation de l’appareil • Touchez la commande booster , le témoin de la zone affichera « P » et la puissance sera maximale. Annuler la fonction booster • Touchez la commande de sélection de la zone de cuisson pour laquelle vous souhaitez annuler la fonction booster •...
- Page 83 Utilisation de l’appareil En grande zone 1. Pour activer la zone flexible comme une seule grande zone, touchez la commande zone flexible. 2. En mode grande zone, nous vous conseillons d'utiliser les ustensiles de cuisson suivants ustensile de cuisson de 250 ou 280 mm de diamètre (de forme ronde ou ovale) 250mm 280mm Nous recommandons de ne pas utiliser de configurations autres que les trois présentées...
- Page 84 Utilisation de l’appareil (b) Placez un ustensile sur chacun des côtés de la zone flexible. Avertissement : Assurez-vous que l'ustensile mesure plus de 120 mm de diamètre. Verrouillage des commandes • Vous pouvez verrouiller les commandes pour empêcher un usage imprévu (par exemple pour éviter que des enfants allument les zones de cuisson accidentellement).
- Page 85 Utilisation de l’appareil a) Utiliser le minuteur comme indicateur de temps Si vous ne sélectionnez pas de zone de cuisson • Assurez-vous que la plaque est allumée. REMARQUE Pour utiliser le minuteur, il faut qu'au moins une zone de cuisson soit active. •...
- Page 86 Utilisation de l’appareil • Réglez les dizaines de minutes en touchant le curseur, par exemple sur 9, et vous aurez réglé le minuteur sur 95 minutes. • Une fois le minuteur réglé, il commence le compte à rebours immédiatement. Le temps restant est affiché.
- Page 87 Utilisation de l’appareil • Réglez les minutes en touchant le curseur, par exemple sur 5. • Touchez à nouveau la commande du minuteur, le « 1 » clignotera. • Réglez les dizaines de minutes en touchant le curseur, par exemple sur 9, et vous aurez réglé...
- Page 88 Utilisation de l’appareil • Quand le temps de cuisson est terminé, la zone de cuisson correspondante s'éteint automatiquement. AVERTISSEMENT Les autres zones de cuisson continueront à fonctionner si elles étaient allumées. Les images ci-dessous sont pour référence uniquement, et le produit final prévaut. Régler plusieurs zones Pour régler plusieurs zones, les étapes sont les mêmes que pour en régler une seule.
- Page 89 Utilisation de l’appareil Si vous touchez la commande de sélection de la zone de cuisson, le temps réglé s'affichera dans le témoin du minuteur. c) Annuler le minuteur • Touchez la commande de sélection de la zone de cuisson pour laquelle vous voulez annuler le minuteur.
-
Page 90: Informations Pratiques
Informations pratiques Entretien et nettoyage Quoi ? Comment ? Important ! • Quand la plaque est éteinte, il n'y a pas d'indication de « surface 1. Éteignez la plaque à chaude », mais la zone de induction. cuisson peut rester chaude ! Faites très attention. - Page 91 Informations pratiques Informations pratiques Quoi ? Comment ? Important ! Retirez ces résidus immédiatement avec une spatule, un couteau plat ou un grattoir adapté • Éliminez les taches aux plaques à induction, laissées par les aliments en faisant attention aux fondus ou sucrés le plus surfaces de cuisson vite possible.
- Page 92 Informations pratiques Instructions de cuisson AVERTISSEMENT Faites attention lorsque vous faites frire des aliments, parce que l'huile et la graisse chauffent très vite, en particulier si vous utilisez le booster. À des températures extrêmement hautes, l'huile et la graisse peuvent s'enflammer spontanément, et provoquer de sérieux risques d'incendie.
- Page 93 Informations pratiques 3. Enduisez au pinceau les deux faces du steak d'un peu d'huile. Versez une petite quantité d'huile dans la poêle chaude, puis placez-y la viande. 4. Tournez le steak une seule fois pendant la cuisson. Le temps de cuisson exact dépend de l'épaisseur du steak et du degré...
- Page 94 Informations pratiques Réglages de la puissance Les réglages ci-dessous ne sont qu'indicatifs. Le réglage exact dépend de plusieurs facteurs, y compris votre matériel de cuisson et les quantités cuisinées. Faites des expériences avec la plaque pour trouver les réglages qui vous conviennent le mieux. Réglage de la Convient pour puissance...
-
Page 95: Conseils Et Astuces
Informations pratiques Conseils et astuces Problème Causes possibles Que faire • Vérifiez que la plaque à induction est connectée à l'alimentation électrique et sous tension. La plaque à induction ne Pas de courant. • Vérifiez s'il y a une panne s'allume pas. - Page 96 Informations pratiques Informations pratiques Problème Causes possibles Que faire Le ventilateur intégré de • C'est normal et cela ne votre plaque à induction nécessite pas d'action de sert à empêcher les Bruit de ventilateur votre part. N'éteignez pas composants électroniques provenant de la plaque à...
-
Page 97: Dépannage
Informations pratiques Informations pratiques Affichage des pannes et inspection La plaque à induction est équipée d'une fonction auto-diagnostic. Avec ce test, le technicien peut vérifier le fonction de plusieurs composants sans désassembler ni démonter la plaque de la surface de travail. Dépannage 1) Code d'erreur apparaissant pendant l'utilisation et solution : Code... - Page 98 Informations pratiques Code Problème Solution d’erreur La tension d'alimentation est inférieure à la tension Veuillez vérifier si la tension d'alimentation nominale. est normale. Rallumez une fois que l'alimentation est La tension d'alimentation normale. est supérieure à la tension nominale. Réinsérez la connexion entre la carte d'affichage et la carte d'alimentation.
- Page 99 Informations pratiques Erreur Problème Solution A Solution B La température ambiante est peut- Température élevée être trop élevée. de la plaque. L'entrée d'air ou la ventilation sont peut- être bloquées. Le témoin de mode de cuisson est Vérifiez que allumé, mais la zone Quelque chose ne le ventilateur ne chauffe pas.
- Page 100 Informations pratiques Erreur Problème Solution A Solution B Défaut de connexion entre la carte Vérifiez la connexion. d'alimentation et la Les zones de cuisson carte d'affichage. de la même taille (la première et La carte d'affichage la deuxième par pour la partie Remplacez la carte exemple) affichent communication est...
- Page 101 Informations pratiques Emballage et environnement JETER LES MATÉRIAUX D’EMBALLAGE Les matériaux d’emballage protègent votre appareil des dégâts pouvant s u r ve n i r p e n d a n t le t ra n s p o r t . C e s m a té r i a u x s o n t re s p e c t u e u x d e l’environnement car recyclables.
- Page 102 Notes...
- Page 103 Bedankt! B e d a n k t o m vo o r d i t p ro d u c t va n VA L B E R G te h e b b e n g e k o z e n . E L E CT R O D E P OT k i e s t , t e s t e n b e v e e l t d e p ro d u c t e n v a n h e t m e r k VA L B E R G a a n , deze staan garant voor eenvoud in gebruik, betrouwbare...
-
Page 104: Overzicht Van Het Toestel
Inhoudstafel Voorwoord Overzicht van het Beschrijving van het toestel toestel Installatie Gebruik van het Bedieningspaneel toestel Werking van het product Gebruiksaanwijzingen Onderhoud en reiniging Praktische informatie Kookinstructies Instellingen van het vermogen Tips Weergave van defecten en inspectie Verpakking en milieu Uw oud toestel wegwerpen... - Page 105 Overzicht van het toestel Voorwoord Veiligheidsinstructies • Uw veiligheid is belangrijk voor ons. Gelieve deze informatie te lezen alvorens uw inductiekookplaat te gebruiken. Installatie Risico op elektrische schokken • Trek de stekker van het toestel uit het stopcontact alvorens er onderhoudswerken aan uit te voeren. •...
- Page 106 Overzicht van het toestel product op dit toestel worden geplaatst. • Stel deze informatie ter beschikking van de persoon die verantwoordelijk is voor de installatie van het toestel omdat hierdoor de installatiekosten kunnen verlagen. • Om elk gevaar te vermijden, moet dit toestel worden geïnstalleerd overeenkomstig deze installatie-instructies.
- Page 107 Overzicht van het toestel WAARSCHUWING Wanneer het oppervlak gescheurd is, schakel het toestel dan uit om elk risico op elektrische schokken te vermijden, aangezien het vitrokeramisch of ander oppervlak de werkende onderdelen van het toestel beschermen. • Gebruik geen stoomreiniger. •...
- Page 108 Overzicht van het toestel WAARSCHUWING • De toegankelijke onderdelen van het toestel kunnen heet worden tijdens het gebruik. • Zorg ervoor de hete onderdelen niet aan te raken. • Kinderen jonger dan 8 jaar moeten uit de buurt worden gehouden behalve wanneer ze voortdurend onder toezicht staan.
- Page 109 Overzicht van het toestel WAARSCHUWING Gebruik de beschermingen van de kookplaten die ontworpen zijn door de fabrikant van het kooktoestel of die door de fabrikant van het toestel aangegeven staan in de gebruiksinstructies enkel als geschikte beschermingsplaten of beschermingen van kookplaten die ingebouwd zijn in het toestel.
- Page 110 Overzicht van het toestel Gevaar voor de gezondheid • D i t t o e s t e l i s i n o v e r e e n s t e m m i n g m e t d e elektromagnetische veiligheidsnormen.
- Page 111 Overzicht van het toestel Risico op snijwonden • Het stalen lemmet van een schraper komt bloot wanneer het beveiligingsdeksel wordt verwijderd. Gebruik het met de grootste voorzichtigheid en bewaar het altijd buiten het bereik van kinderen. • Een gebrek aan aandacht kan aanleiding geven tot blessures of snijwonden.
- Page 112 Overzicht van het toestel • Laat kinderen niet met het toestel spelen, laat ze er niet gaan opzitten, op staan of er op klimmen. • Berg geen voorwerpen die intéressant zijn voor kinderen in de kasten boven het toestel. Wanneer ze op de plaat klimmen, kunnen ze ernstig geblesseerd raken.
- Page 113 Overzicht van het toestel • Dit toestel is bestemd om te worden gebruikt in huishoudelijke of gelijkaardige toepassingen, zoals: - keukenhoeken voorbehouden voor personeel in winkels, kantoren en andere professionele omgevingen; - boerderijen; - een gebruik door klanten in hotels, motels en andere omgevingen met residentieel karakter;...
- Page 114 Overzicht van het toestel Beschrijving van het toestel Bovenaanzicht Zone maximaal 1800/2000 W. Zone maximaal 1900/2000 W. Zone maximaal 3000/3600 W. Zone maximaal 1900/2000 W. Zone maximaal 1800/2000 W. Zone maximaal 3000/3600 W. Bedieningspaneel Glazen plaat...
- Page 115 Overzicht van het toestel Werkingsprincipe Koken door middel van inductie is een veilige, moderne, doeltreffende en zuinige kookwijze. Ze werkt met elektromagnetische trillingen die rechtstreeks in het kookgereedschap warmte genereren in plaats voor onrechtstreeks het glazen oppervlak te verwarmen. Het glas wordt warm enkel omdat uiteindelijk het kookgerei het opwarmt.
-
Page 116: Gebruik Van Het Toestel
Gebruik van het toestel Installatie Deel over de installatie-uitrusting • Snij het werkblad uit overeenkomstig de afmetingen die weergegeven staan op het schema. • Voor de installatie en het gebruik moet een ruimte worden voorzien van minstens 5 cm rond de uitsnijding. •... - Page 117 Gebruik van het toestel OPMERKING De veiligheidsafstand tussen de plaat en de kast boven de plaat moet minstens 760 mm bedragen. muur Mini 30 mm (mm) (mm) (mm) 50 mini 20 mini Luchtinlaat Luchtuitlaat5 WAARSCHUWING Een adequate ventilatie waarborgen Vergewis u ervan dat de inductiekookplaat goed verlucht is en dat de luchtin- en -uitlaat niet geblokkeerd zijn.
- Page 118 Gebruik van het toestel Mini 50 mm Maxi 5 mm Maxi 5 mm WAARSCHUWING Er bevinden zich ventilatiegaten aan de buitenkant van de plaat. U moet zich ervan vergewissen dat deze gaten niet door het werkblad geblokkeerd worden eenmaal de plaat is geïnstalleerd. WAARSCHUWING •...
- Page 119 Gebruik van het toestel • De stroomonderbreker van een goedgekeurd type is en beschikt over een contactscheiding met luchtvacuüm van 3 mm voor alle polen (of op alle actieve [fase]geleiders wanneer de lokale bekabelingsregels deze afwijking van de vereisten toelaten). •...
- Page 120 Gebruik van het toestel WAARSCHUWING De haken mogen in geen geval het binnenoppervlak van het werkblad na installatie raken (zie het schema). OPGELET 1. De inductiekookplaat moet door een technicus of een gekwalificeerd installateur worden geïnstalleerd. Er staan professionals ten dienste van u. Gelieve deze handeling nooit zelf uit te voeren.
- Page 121 Gebruik van het toestel Sluit de plaat aan op de elektrische voeding van het net WAARSCHUWING Deze plaat mag enkel door een gekwalificeerd persoon op de netvoeding worden aangesloten. Alvorens de plaat op het net aan te sluiten, controleer of: 1.
- Page 122 Gebruik van het toestel Geel/groen Zwart Bruin Blauw WAARSCHUWING Ingeval het totaal aantal kookzones van het toestel dat u heeft gekozen, groter is dan of gelijk is aan 4, kan het toestel rechtstreeks op het net worden aangesloten via een éénfasige elektrische verbinding, zoals hieronder weergegeven.
- Page 123 Gebruik van het toestel • Wanneer de kabel beschadigd is of moet worden vervangen, moet deze handeling door de dienst na verkoop worden uitgevoerd met specifiek gereedschap om elk ongeval te vermijden. • Wanneer het toestel rechtstreeks op het net is aangesloten, moet een differentieelschakelaar worden aangesloten met een opening van minstens 3 mm tussen de contactpunten.
- Page 124 Gebruik van het toestel Bedieningspaneel Start/stop Booster Flexibele zone Aanraakschuifbalk voor het vermogen/de timer Timer Vergrendeling Selectie van de kookzones...
-
Page 125: Werking Van Het Product
Gebruik van het toestel Werking van het product Aanraakbedieningstoetsen • De bedieningstoetsen reageren op aanraking. U hoeft er dus geen druk op uit te oefenen. • Gebruik de onderkant van uw vinger, niet de top. • U hoort een biep telkens wanneer een contact wordt geregistreerd. •... - Page 126 Gebruik van het toestel • Gebruik geen kookgerei met gekartelde randen of een gekromde bodem. • Zorg ervoor dat de bodem van uw kookgerei glad is, dat het plat op het glas rust en dezelfde grootte heeft als de kookzone. Gebruik kookgerei waarvan de diameter even groot is als de tekening van de gekozen zone.
- Page 127 Gebruik van het toestel Gebruiksaanwijzingen Het koken beginnen • Raak de bedieningsknop Aan/Uit aan. Eenmaal de plaat is aangezet, weerklinkt één keer een biep. Op alle controlelampjes verschijnt “– ” of “ – – ”, wat betekent dat de plaat in waakstand is gegaan.
- Page 128 Gebruik van het toestel • Selecteer het vermogensniveau door de schuifbalk aan te raken - Indien u geen vermogensinstelling kiest zal de inductiekookplaat na één minuut automatisch worden uitgeschakeld. Dan moet u herbeginnen vanaf stap 1. - U kunt de instelling van het vermogen op elk moment tijdens het koken wijzigen. het vermogen verhogen het vermogen...
- Page 129 Gebruik van het toestel • Schakel de kookzone uit door de schuifbalk naar “|” te bewegen. ». Vergewis u ervan dat “0” staat weergegeven. • Schakel de volledige plaat uit door de bedieningstoets Aan/Uit aan te raken. • Opgelet voor de hete oppervlakken De letter H geeft aan welke kookoppervlakken heet zijn.
- Page 130 Gebruik van het toestel • Raak de bedieningstoets Booster aan , op het controlelampje van de zone verschijnt “P” en het vermogen zal maximaal zijn. De functie Booster annuleren • Raak de bedieningstoets voor het selecteren van de kookzone aan waarvoor u de functie Booster wenst te annuleren •...
- Page 131 Gebruik van het toestel In de grote zone 1. Om de flexibele zone als één enkele grote zone te activeren, raak de bedieningstoets flexibele zone aan. 2. In de modus grote zone raden we u aan het volgende kookgerei te gebruiken: kookgerei met een diameter van 250 of 280 mm (ronde of ovale vorm) 250mm 280mm...
- Page 132 Gebruik van het toestel (b) Plaats kookgerei op elk van de zijden van de flexibele zone. Waarschuwing: Vergewis u ervan dat de diameter van het kookgerei groter is dan 120 mm. Vergrendeling van de bedieningstoetsen • U kunt de bedieningstoetsen vergrendelen om een onvoorzien gebruik te verhinderen (bijvoorbeeld om te vermijden dat kinderen de kookzones per ongeluk aanzetten).
- Page 133 Gebruik van het toestel a) De timer als tijdindicator gebruiken Indien u geen kookzone selecteert • Vergewis u ervan dat de plaat aan staat. OPMERKING Om de timer te gebruiken, moet er minstens één kookzone actief zijn. • Raak de bedieningstoets van de timer aan, het cijfer “10” verschijnt ter hoogte van de timer en het cijfer “0”...
- Page 134 Gebruik van het toestel • Stel de tientallen minuten in door de schuifbalk aan te raken, bijvoorbeeld naar 9 en u hebt de timer ingesteld op 95 minuten. • Eenmaal de timer is ingesteld, begint hij onmiddellijk af te tellen. De resterende tijd wordt weergegeven.
- Page 135 Gebruik van het toestel • Stel de minuten in door de schuifbalk aan te raken, bijvoorbeeld naar 5. • Raak opnieuw de bedieningstoets van de timer aan, het cijfer “1” zal knipperen. • Stel de tientallen minuten in door de schuifbalk aan te raken, bijvoorbeeld naar 9 en u hebt de timer ingesteld op 95 minuten.
- Page 136 Gebruik van het toestel • Wanner de kooktijd beëindigd is, wordt de overeenkomstige kookzone automatisch uitgeschakeld. WAARSCHUWING De andere kookzones zullen blijven werken wanneer ze werden aangezet. De onderstaande afbeeldingen zijn enkel ter referentie en het eindproduct heeft voorrang. Meerdere zones instellen Om meerdere zones in te stellen, zijn de stappen dezelfde als voor het instellen van één enkele zone.
- Page 137 Gebruik van het toestel Wanneer u de bedieningstoets voor het selecteren van de kookzone aanraakt, zal de ingestelde tijd worden weergegeven in het controlelampje van de timer. c) De timer annuleren • Raak de bedieningstoets voor het selecteren van de kookzone aan waarvoor u de timer wilt annuleren.
-
Page 138: Praktische Informatie
Praktische informatie Onderhoud en reiniging Wat? Hoe? Belangrijk ! • Wanneer de kookplaat uitgeschakeld is, is er geen indicatie “warm oppervlak”, 1. Schakel de maar kan de kookzone inductiekookplaat uit. warm blijven! Let zeer goed 2. Breng een schoonmaakmiddel voor •... - Page 139 Praktische informatie Wat? Hoe? Belangrijk ! Verwijder deze restanten onmiddellijk met een spatel, een plat mes of een • Verwijder zo snel mogelijk schraper die geschikt is de vlekken die gemaakt voor inductiekookplaten, zijn met gesmolten en maar let op voor de hete gesuikerde voedingswaren.
- Page 140 Praktische informatie Kookinstructies WAARSCHUWING Let op wanneer u voedingswaren frituurt, omdat de olie en het vet zeer snel verhitten, vooral wanneer u de booster gebruikt. Bij extreem hoge temperaturen kunnen de olie en het vet spontaan vlam vatten, en ernstige risico’s op brand veroorzaken.
- Page 141 Praktische informatie 3. Strijk de beide kanten van de steak met een borsteltje in met een beetje olie. Giet een kleine hoeveelheid olie in de hete pan en leg er vervolgens het vlees in. 4. Draai de steak één enkele keer om tijdens het bereiden. De precieze bereidingstijd hangt af van de dikte van de steak en van de gewenste bakwijze.
- Page 142 Praktische informatie Instellingen van het vermogen De instellingen hieronder zijn louter indicatief. De precieze instelling hangt af van meerdere factoren, zoals uw kookmateriaal en de bereide hoeveelheden. Doe ervaring op met de plaat om de instellingen te vinden die u het best passen. Instellen van Geschikt voor...
- Page 143 Praktische informatie Tips Probleem Mogelijke oorzaken Wat te doen • Controleer of de inductiekookplaat aangesloten is op de elektrische stroomvoorziening en onder spanning staat. De inductiekookplaat kan Geen stroom. niet worden aangezet. • Controleer of er geen stroompanne is bij u of in uw wijk.
- Page 144 Praktische informatie Probleem Mogelijke oorzaken Wat te doen • Dit is normaal, maar het De inductiekookplaat laat Dit is te wijten aan de lawaai moet verminderen een brommend geluid horen technologie van koken door of volledig verwijderen wanneer ze wordt ingesteld middel van inductie.
- Page 145 Prakische informatie Weergave van defecten en inspectie De inductiekookplaat is uitgerust met een zelfdiagnosefunctie. Met deze test kan de technicus de werking van verschillende componenten controleren zonder de plaat van het werkoppervlak te demonteren. Probleemoplossing 1) Foutcode die verschijnt tijdens het gebruik en oplossing: Foutcode Probleem Oplossing...
- Page 146 Praktische informatie Foutcode Probleem Oplossing De voedingsspanning is lager Controleer of de voedingsspanning normaal dan de nominale spanning. Zet het toestel opnieuw aan eenmaal de De voedingsspanning is hoger voeding normaal is. dan de nominale spanning. Maak opnieuw de verbinding tussen de grafische kaart en het moederbord.
- Page 147 Praktische informatie Fout Probleem Oplossing A Oplossing B omgevingstemperatuur Hoge temperatuur van is misschien te de plaat. hoog. De luchtinlaat of de ventilatie zijn Het controlelampje misschien geblokkeerd. voor de kookwijze brandt maar de zone Controleer of de verwarmt niet. Er werkt iets niet met ventilator goed werkt;...
- Page 148 Praktische informatie Fout Probleem Oplossing A Oplossing B Defecte verbinding Controleer de tussen het moederbord verbinding. en de grafische kaart. De kookzones van dezelfde grootte (de De grafische eerste en de tweede kaart voor het Vervang de grafische bijvoorbeeld) geven communicatiegedeelte kaart.
- Page 149 Praktische informatie Verpakking en milieu DE VERPAKKINGSMATERIALEN WEGGOOIEN De verpakkingsmaterialen beschermen uw toestel tegen schade die kan optreden tijdens het transport. Deze materialen zijn milieuvriendelijk omdat ze recycleerbaar zijn. Door materialen te recycleren kan op grondstoffen bespaard worden en wordt er minder afval geproduceerd. Uw oud toestel wegwerpen SELECTIEF SORTEREN VAN ELEKTRISCH EN ELEKTRONISCH AFVAL Dit toestel is voorzien van het WEEE-symbool (afval van elektrische...
- Page 150 Notities...
- Page 151 ¡Muchas gracias! G r a c i a s p o r h a b e r e le g i d o e s t e p ro d u c t o VA L B E R G . S e l e c c i o n a d o s , t e s t a d o s y r e c o m e n d a d o s p o r E L E C T R O D E P O T , l o s p r o d u c t o s d e l a m a r c a V A L B E R G l e a s e g u r a n...
-
Page 152: Utilización Del Electrodoméstico
Índice Preliminar Descripción del Descripción del aparato aparato Instalación Utilización del Panel de control electrodoméstico Funcionamiento del producto Instrucciones de uso Mantenimiento y limpieza Información práctica Instrucciones de cocción Ajustes de alimentación Consejos y trucos Visualización e inspección de averías Embalaje y medio ambiente Cómo deshacerse de su antiguo aparato... -
Page 153: Instalación
Descripción del aparato Preliminar Instrucciones de seguridad • Su seguridad es importante para nosotros. Lea esta información antes de utilizar la placa. Instalación ¡Riesgo de descarga eléctrica! • Desenchufe el aparato de la red eléctrica antes de realizar cualquier trabajo o mantenimiento en él. •... - Page 154 Descripción del aparato • Haga que esta información esté disponible para la persona responsable de la instalación del dispositivo, ya que esto puede reducir los costes de instalación. • Para evitar peligros, este dispositivo debe instalarse de acuerdo con estas instrucciones de instalación. •...
- Page 155 Descripción del aparato ADVERTENCIA Si la superficie está agrietada, apague el aparato para evitar cualquier riesgo de descarga eléctrica, ya que la vitrocerámica u otra superficie protege las piezas activas del aparato. • No utilice nunca un limpiador a vapor. •...
- Page 156 Descripción del aparato ADVERTENCIA • Las piezas accesibles del aparato pueden calentarse durante su uso. • Es conveniente no tocar ninguna parte de los elementos calefactores. • Los niños menores de 8 años deben mantenerse alejados del aparato salvo si están bajo vigilancia continua. •...
- Page 157 Descripción del aparato • Se debe prever un medio de desconexión de la red de alimentación con una distancia de apertura de los contactos de todos los polos en las canalizaciones fijas conforme a las reglas de instalación. • En cuanto a la información sobre la instalación, consulte el apartado siguiente del manual Manejo y mantenimiento Riesgo de descarga eléctrica...
- Page 158 Descripción del aparato Peligro por superficie caliente • Durante el uso, las piezas accesibles de este dispositivo se calentarán lo suficiente como para causar quemaduras. • No ponga su cuerpo, ropa u otros artículos que no sean utensilios de cocina adecuados en contacto con la placa hasta que la superficie se haya enfriado.
-
Page 159: Descripción Del Aparato
Descripción del aparato • No utilice nunca el aparato como superficie de trabajo o de almacenamiento. • No deje objetos ni utensilios en el aparato. • No coloque ni deje objetos magnetizables (por ejemplo, tarjetas de crédito, tarjetas de memoria) ni dispositivos electrónicos (por ejemplo, ordenadores, MP3 reproductores) cerca del dispositivo, ya que pueden verse afectados por su campo electromagnético. - Page 160 Descripción del aparato puede utilizar el aparato sin peligro para sí misma ni para otras personas a su alrededor. • No repare ni sustituya ninguna pieza del aparato a menos que se recomiende específicamente en este manual. Todas las demás reparaciones deben ser realizadas por un técnico cualificado.
- Page 161 Descripción del aparato Le felicitamos por la compra de su nueva placa de inducción. Le recomendamos que dedique un tiempo a leer este manual de instrucciones e instalación con el fin de comprender completamente cómo instalar y utilizar su equipo correctamente. Para la instalación, lea el capítulo Instalación.
- Page 162 Descripción del aparato Descripción del aparato Vista superior Zona 1800/2000 W máximo. Zona 1900/2000 W máximo. Zona 3000/3600 W máximo. Zona 1900/2000 W máximo. Zona 1800/2000 W máximo. Zona 3000/3600 W máximo. Panel de control Plato de vidrio...
- Page 163 Descripción del aparato Principio de funcionamiento La cocción por inducción es un modo de cocción seguro, moderno, eficiente y económico. Funciona con vibraciones electromagnéticas que generan calor directamente en los utensilios de cocina, en lugar de hacerlo indirectamente calentando la superficie de cristal. El cristal se calienta únicamente debido al calentamiento del propio utensilio.
-
Page 164: Utilización Del Aparato
Utilización del aparato Instalación Selección del equipo de instalación • Cortar la encimera de acuerdo con las dimensiones mostradas en el diagrama. • para la instalación y el uso, se debe mantener un espacio de al menos 5 cm alrededor del recorte. - Page 165 Utilización del aparato NOTA La distancia de seguridad entre la placa y el armario por encima de la placa debe ser de al menos 760 mm. pared Mini 30 mm (mm) (mm) (mm) 50 mini 20 mini Entrada de aire Salida de aire 5 mm ADVERTENCIA Asegurar una ventilación adecuada...
- Page 166 Utilización del aparato Mini 50 mm Maxi 5 mm Maxi 5 mm ADVERTENCIA Hay orificios de ventilación en el exterior de la placa. DEBE asegurarse de que estos orificios no queden bloqueados por la encimera después de instalar la placa. ADVERTENCIA •...
- Page 167 Utilización del aparato • el disyuntor es de tipo aprobado y tiene una separación de contacto de vacío de 3 mm en todos los polos (o en todos los conductores activos [fase] si las reglas de cableado locales permiten esta variación en los requisitos). •...
- Page 168 Utilización del aparato ADVERTENCIA Bajo todas las circunstancias, los ganchos no deben tocar la superficie interior de la encimera después de la instalación (consulte la figura). ATENCIÓN 1. La placa de inducción debe ser instalada por un técnico o instalador cualificado. Tenemos profesionales a su servicio. Por favor, nunca haga esto usted mismo.
- Page 169 Utilización del aparato Conecte la placa a la fuente de alimentación ADVERTENCIA Esta placa sólo debe conectarla a la red eléctrica por parte de una persona cualificada. Antes de conectar la placa a la red, asegúrese de que: 1. El sistema de cableado doméstico está adaptado a la fuente de alimentación de la placa.
- Page 170 Utilización del aparato Amarillo / Verde Negro Marrón Azul ADVERTENCIA Si el número total de zonas de cocción del aparato que ha elegido es de 4 o más, el aparato se puede conectar directamente a la red a través de una conexión eléctrica monofásica, como se muestra a continuación.
- Page 171 Utilización del aparato • Si el cable está dañado o necesita ser reemplazado, la operación debe ser realizada por el departamento de servicio con herramientas específicas para evitar cualquier accidente. • Si la unidad está conectada directamente a la red eléctrica, debe instalarse un RCD, con una abertura de al menos 3 mm entre los contactos.
-
Page 172: Panel De Control
Utilización del aparato Panel de control Puesta en marcha/parada Booster (calentamiento rápido) Área flexible Control deslizante táctil de potencia/temporizador Temporizador Bloqueo Selección de zonas de cocción... -
Page 173: Funcionamiento Del Producto
Utilización del aparato Funcionamiento del producto Controles tactiles • los controles responden al tacto, por lo que no es necesario ejercer presión sobre ellos. • use la pulpa de su dedo, no su punta. • escuchará un pitido cada vez que se guarde un contacto. •... - Page 174 Utilización del aparato • No utilice utensilio con bordes desconchados o con un fondo curvado. • asegúrese de que la parte inferior del utensilio esté lisa, plana sobre el cristal y del mismo tamaño que la zona de cocción. Utilice utensilios con un diámetro tan ancho como el dibujo del área elegida.
-
Page 175: Instrucciones De Uso
Utilización del aparato Instrucciones de uso Comience a cocinar • Toque el control de encendido/apagado. Una vez que la placa está encendida, el pitido suena una vez, todos los indicadores mostrarán “– ” o bien “ – – que indica que la plancha ha entrado en modo de reposo. - Page 176 Utilización del aparato • Seleccione el nivel de potencia tocando el control deslizante - Si no selecciona un ajuste de potencia, después de un minuto, la placa de inducción se apagará automáticamente. Tendrá que empezar de nuevo desde el paso 1. - Puede cambiar el ajuste de potencia en cualquier momento durante la cocción.
- Page 177 Utilización del aparato • Apague la zona de cocción moviendo el cursor a la posición “ | ». Asegúrese de que aparece como 0. • apáguese toda la plancha tocando el control de encendido/apagado. • tenga cuidado con las superficies calientes La letra H muestra qué...
- Page 178 Utilización del aparato • Toque el control del booster , el indicador de la zona mostrará “P” y la potencia será máxima. Cancele la función de booster • Toque el control de selección de la zona de cocción para la que desea cancelar la función de booster •...
- Page 179 Utilización del aparato En área grande 1. Para activar la zona flexible como una sola zona grande, toque el comando Zona flexible. 2. En el modo de zona grande, le recomendamos que utilice los siguientes utensilios de cocina: utensilio para hornear de 250 o 280 mm de diámetro (forma redonda u ovalada) 250mm 280mm Le recomendamos que no utilice configuraciones distintas a las tres que se muestran...
- Page 180 Utilización del aparato (b) coloque un utensilio a cada lado del área flexible. Advertencia: Asegúrese de que el utensilio tiene más de 120 mm de diámetro. Bloqueo de los controles • puede bloquear los controles para evitar el uso no deseado (por ejemplo, para evitar que los niños encen accidentalmente las zonas de cocción).
- Page 181 Utilización del aparato A) Utilice el temporizador como indicador de tiempo Si no selecciona una zona de cocción • asegúrese de que la placa está colocada. NOTA Para utilizar el temporizador, debe haber al menos una zona de cocción activa. •...
- Page 182 Utilización del aparato • establezca las decenas de minutos tocando el control deslizante, por ejemplo 9, y ha ajustado el temporizador en 95 minutos. • una vez ajustado el temporizador, comienza la cuenta atrás inmediatamente. Se muestra el tiempo restante. cuando haya transcurrido el tiempo establecido, el zumbador emitirá...
- Page 183 Utilización del aparato • Ajuste los minutos tocando el control deslizante, por ejemplo, 5. • Toque de nuevo el control del temporizador, el '1' parpadeará. • establezca las decenas de minutos tocando el control deslizante, por ejemplo 9, y ha ajustado el temporizador en 95 minutos.
- Page 184 Utilización del aparato • cuando el tiempo de cocción ha terminado, la zona de cocción correspondiente se apaga automáticamente. ADVERTENCIA Las otras zonas de cocción seguirán funcionando si están encendidas. Las imágenes siguientes son sólo de referencia y prevalece el producto final. Ajustar varias zonas Para ajustar varias zonas, los pasos son los mismos que para ajustar una sola zona.
- Page 185 Utilización del aparato Si toca el control de selección de la zona de cocción, la hora ajustada se mostrará en la luz del temporizador. c) Cancelar el temporizador • Toque el control de selección de la zona de cocción para la que desea cancelar el temporizador.
-
Page 186: Mantenimiento Y Limpieza
Información práctica Mantenimiento y limpieza ¿Qué? ¿Cómo? Importante ! • Cuando la plancha está apagada, aunque no haya ninguna indicación de superficie caliente, la zona 1 Apague la placa de de cocción puede seguir inducción. emitiendo calor. Tenga mucho cuidado. 2. - Page 187 Información práctica ¿Qué? ¿Cómo? Importante ! Elimine inmediatamente estos residuos con una espátula, con un cuchillo plano o con un rascador apto para placas de • Quite las manchas de inducción, prestando los alimentos derretidos o atención a las superficies endulzados tan pronto como de cocción calientes: sea posible.
-
Page 188: Instrucciones De Cocción
Información práctica Instrucciones de cocción ADVERTENCIA Tenga cuidado al freír alimentos, ya que el aceite y la grasa se calientan muy rápidamente, especialmente si utiliza el refuerzo. A temperaturas extremadamente altas, el aceite y la grasa pueden encenderse espontáneamente, causando graves riesgos de incendio. - Page 189 Información práctica 3. Engrase de aceite ambas caras del filete con ayuda de un pincel. Vierta una pequeña cantidad de aceite sobre la sartén caliente y coloque encima la carne. 4. Dé la vuelta al filete tan solo una vez durante el cocinado. El tiempo exacto de cocinado dependerá...
- Page 190 Información práctica Ajustes de alimentación Los siguientes ajustes son tan solo indicativos. El ajuste exacto depende de varios factores, incluidos el equipo empleado y las cantidades cocinadas. Experimente con la plancha para encontrar los ajustes que mejor se adapten a usted. Ajustes de la Adecuado para alimentación...
-
Page 191: Consejos Y Trucos
Información práctica Consejos y trucos Problema Causas posibles ¿Qué hacer? • Compruebe que la placa de inducción está conectada a la fuente de alimentación y encendida. La placa de inducción no se • Verifique si hay un corte No hay corriente. enciende. - Page 192 Información práctica Problema Causas posibles ¿Qué hacer? El ventilador integrado de • esto es normal y no la placa de inducción se requiere acción por su Ruido del ventilador utiliza para evitar que los parte. No desconecte la procedente de la placa de componentes electrónicos alimentación de la placa inducción.
-
Page 193: Solución De Problemas
Información práctica Visualización e inspección de averías La placa de inducción está equipada con una función de autodiagnóstico. Con esta prueba, el técnico puede verificar el funcionamiento de varios componentes sin desmontar o desmontar la placa de la superficie de trabajo. Solución de problemas 1) Código de error que aparece durante el uso y la solución: Código... - Page 194 Información práctica Código Problema Solución de error La tensión de alimentación es Compruebe si la tensión de alimentación es inferior a la tensión nominal. normal. Vuelva a encenderlo cuando la alimentación La tensión de alimentación es sea normal. superior a la tensión nominal. Retire y vuelva a insertar la conexión entre la placa de la pantalla y la placa de Error de comunicación.
- Page 195 Información práctica Error Problema Solución A Solución B La temperatura ambiente puede ser Alta temperatura demasiado alta. La de la placa. entrada de aire o la ventilación pueden estar bloqueadas. El indicador de modo de cocción está Compruebe que el encendido, pero la ventilador funciona Algo no funciona...
- Page 196 Información práctica Error Problema Solución A Solución B Conexión defectuosa entre la placa de la fuente Compruebe la de alimentación conexión. y la placa de la Las zonas de cocción pantalla. del mismo tamaño La placa de (por ejemplo, la visualización Vuelva a colocar primera y la segunda)
- Page 197 Información práctica Embalaje y medio ambiente DESECHAR LOS MATERIALES DEL EMBALAJE Los materiales del embalaje protegen su aparato de los daños que puedan ocurrir durante el transporte. Estos materiales son respetuosos con el medio ambiente, puesto que pueden reciclarse. El reciclado de los materiales permite, al mismo tiempo, ahorrar las materias primas y reducir la producción de residuos.
- Page 198 Información práctica...
- Page 199 Grazie! G r a z i e d i a v e r s c e l t o q u e s t o p ro d o t t o VA L B E R G . S c e l t i , t e s t a t i e r a c c o m a n d a t i d a E L E C T R O D E P O T , i p ro d o t t i a m a rc h i o VA L B E R G a ss i c u ra n o u n u t i l i z z o s e m p l i c e , p r e s t a z i o n i a f f i d a b i l i e u n a q u a l i t à...
-
Page 200: Panoramica Dell'apparecchio
Indice Premessa Panoramica Descrizione dell’apparecchio dell’apparecchio Installazione Utilizzo Pannello comandi dell’apparecchio Funzionamento del prodotto Istruzioni per l’uso Manutenzione e pulizia Informazioni pratiche Istruzioni per la cottura Impostazioni della potenza Consigli e suggerimenti Visualizzazione dei guasti e ispezione Imballaggio e ambiente Gettare il vecchio apparecchio... - Page 201 Panoramica dell’apparecchio Premessa Avvertenze di sicurezza • La vostra sicurezza è importante per noi. Leggere attentamente le presenti informazioni prima di utilizzare il piano cottura. Installazione Rischio di scossa elettrica • Scollegare l’apparecchio dalla rete elettrica prima di qualsiasi operazione di uso e manutenzione. •...
- Page 202 Panoramica dell’apparecchio • Fornire queste informazioni all’installatore dell’apparecchio per ridurre i costi di installazione. • Per evitare possibili pericoli, installare l’apparecchio secondo quanto previsto dalle presenti istruzioni di installazione. • L’apparecchio può essere adeguatamente installato e messo a terra esclusivamente da una persona qualificata. •...
- Page 203 Panoramica dell’apparecchio AVVERTENZA Se la superficie presenta delle crepe, spegnere l’apparecchio per prevenire eventuali scosse elettriche, poiché la superficie in vetroceramica o materiali simili protegge le parti in tensione dell’apparecchio. • Non utilizzare un pulitore a vapore. • Non appoggiare sulla superficie della piastra oggetti metallici quali coltelli, forchette, cucchiai e coperchi in quanto possono accumulare calore.
- Page 204 Panoramica dell’apparecchio AVVERTENZA • Le parti accessibili dell’apparecchio possono riscaldarsi durante l’utilizzo. • Prestare attenzione a evitare di toccare le parti calde. • Impedire ai bambini al di sotto degli 8 anni di avvicinarsi a ameno che non siano sorvegliati continuamente. •...
- Page 205 Panoramica dell’apparecchio • Nelle condutture fisse deve essere previsto un mezzo di scollegamento dalla rete di alimentazione, con una distanza di apertura dei contatti da tutti i poli, in conformità con le norme di installazione. • Per informazioni sull’installazione, fare riferimento al seguente paragrafo del manuale.
- Page 206 Panoramica dell’apparecchio Pericoli connessi alle superfici calde • Durante l’uso, le parti accessibili dell’apparecchio possono sviluppare un calore tale da provocare ustioni. • Finché la superficie non si è raffreddata, non toccarla con parti del corpo, vestiti né altri oggetti, ad eccezione di padelle e padelle idonee.
- Page 207 Panoramica dell’apparecchio • Non lasciare oggetti o utensili sull’apparecchio. • P e r e v i t a re i n t e r f e re n z e c a u s a t e d a l c a m p o elettromagnetico, non lasciare né...
- Page 208 Panoramica dell’apparecchio • Non riparare né sostituire parti dell’apparecchio se non esplicitamente raccomandato nel manuale. Ogni altra operazione di manutenzione deve essere realizzata da un tecnico qualificato. • Non appoggiare né lasciare cadere oggetti pesanti sul piano cottura. • Non salire sul piano di cottura. •...
- Page 209 Panoramica dell’apparecchio Congratulazioni per l’acquisto del suo nuovo piano di cottura a induzione. Si consiglia di dedicare un po’ di tempo alla lettura del presente manuale di installazione e di istruzioni per comprendere perfettamente come installarlo e utilizzarlo. Pe r l’ i n sta l l a z i o n e , le g g e re l a s e z i o n e d e d i ca ta all’installazione.
- Page 210 Panoramica dell’apparecchio Panoramica dell’apparecchio Vista dall’alto Zona 1800/2000 W maximum. Zona 1900/2000 W maximum. Zona 3000/3600 W maximum. Zona 1900/2000 W maximum. Zona 1800/2000 W maximum. Zona 3000/3600 W maximum. Pannello comandi Piastra in vetro...
- Page 211 Panoramica dell’apparecchio Principio di funzionamento La cottura a induzione è un metodo di cottura sicura, avanzata, efficiente ed economica. Funziona grazie a vibrazioni elettromagnetiche che generano calore direttamente nella pentola, piuttosto che indirettamente attraverso il riscaldamento della superficie del vetro. Il vetro diventa caldo solo perché...
-
Page 212: Utilizzo Dell'apparecchio
Utilizzo dell’apparecchio Installazione Scelta del materiale di installazione • Ritagliare il piano di lavoro secondo le dimensioni indicate nell’immagine. • Per l'installazione e l'uso, è necessario lasciare uno spazio di almeno 5 cm intorno al taglio. • Assicurarsi che lo spessore del piano di lavoro sia di almeno 30 mm. Scegliere un piano di lavoro in materiale isolante e resistente al calore (il legno e simili materiali fibrosi o igroscopici non dovrebbero essere usati come piano di lavoro, a meno che non siano trattati in modo specifico) per evitare scosse elettriche e deformazioni causate dalla radiazione di calore del... - Page 213 Utilizzo dell’apparecchio NOTA La distanza di sicurezza tra la piastra e l'armadio sopra la piastra deve essere di almeno 760 mm. muro Mini 30 mm (mm) (mm) (mm) 50 mini 20 mini Ingresso Uscita dell’aria dell’aria 5 mm AVVERTENZA Assicurare un'adeguata ventilazione Assicurarsi che il piano cottura a induzione sia ben ventilato e che l'ingresso e l'uscita dell'aria non siano bloccati.
- Page 214 Utilizzo dell’apparecchio Mini 50 mm Maxi 5 mm Maxi 5 mm AVVERTENZA Sono presenti dei fori di ventilazione all'esterno della piastra. È NECESSARIO assicurarsi che questi fori non siano bloccati dal piano di lavoro una volta che la piastra è installata. AVVERTENZA •...
- Page 215 Utilizzo dell’apparecchio • L'interruttore sia di un tipo approvato e abbia una separazione dei contatti in aria di 3 mm su tutti i poli (o su tutti i conduttori attivi [fase] se le regole locali di cablaggio permettono questa variazione dei requisiti). •...
- Page 216 Utilizzo dell’apparecchio AVVERTENZA In ogni caso, i ganci non devono toccare la superficie interna del piano di lavoro dopo l'installazione (vedere immagine). ATTENZIONE 1. La piastra a induzione deve essere installata da un tecnico o un installatore qualificato. Abbiamo professionisti al vostro servizio.
- Page 217 Utilizzo dell’apparecchio Collegare la piastra alla rete elettrica AVVERTENZA Questa piastra deve essere collegata alla rete elettrica solo da una persona qualificata. Prima di collegare la piastra alla rete, controllare che: 1. Il sistema di cablaggio della casa è adatto per l'alimentazione della piastra.
- Page 218 Utilizzo dell’apparecchio Giallo/Verde Nero Marrone AVVERTENZA Se il numero totale di zone di cottura dell'apparecchio scelto è 4 o più, l'apparecchio può essere collegato direttamente alla rete tramite un collegamento elettrico monofase, come mostrato qui sotto. Giallo/Verde Nero Marrone...
- Page 219 Utilizzo dell’apparecchio • Se il cavo è danneggiato o deve essere sostituito, l'operazione deve essere effettuata dal servizio post-vendita con strumenti specifici per evitare qualsiasi incidente. • Se l'apparecchio è collegato direttamente alla rete, si deve installare un interruttore di corrente residua con un'apertura di contatto di almeno 3 mm.
-
Page 220: Pannello Comandi
Utilizzo dell’apparecchio Pannello comandi On/Off Booster Zona flessibile Cursore tattile di potenza/timer Timer Blocco Selezione delle zone di cottura... -
Page 221: Funzionamento Del Prodotto
Utilizzo dell’apparecchio Funzionamento del prodotto Comandi touch • I comandi si attivano al tocco e non richiedono pressione. • Premere con il polpastrello, non con la punta del dito. • Ogni volta che viene registrato un contatto, si avverte un bip. •... - Page 222 Utilizzo dell’apparecchio • Non utilizzare padelle con bordi seghettati o con fondi curvi. • Accertarsi che la padella abbia un fondo liscio, che aderisca al vetro e che abbia le stesse dimensioni della zona di cottura. Utilizzare solo padelle dello stesso diametro del disegno della zona di cottura.
-
Page 223: Istruzioni Per L'uso
Utilizzo dell’apparecchio Istruzioni per l’uso Cominciare la cottura • Toccare il comando On/Off. Una volta che la piastra è accesa, il bip suona una volta, tutti gli indicatori mostrano “ – ” o “ – – ”; questo indica che la piastra è entrata in modalità standby. •... - Page 224 Utilizzo dell’apparecchio • - Selezionare il livello di potenza toccando il cursore - Se non si seleziona un'impostazione di potenza, dopo un minuto la piastra a induzione si spegne automaticamente. Sarà necessario ricominciare dal punto 1. - È possibile cambiare l'impostazione della potenza in qualsiasi momento durante la cottura. aumentare la potenza ridurre la...
- Page 225 Utilizzo dell’apparecchio • - Spegnere la zona di cottura spostando il cursore su “ | ». Assicurarsi che venga visualizzato “0”. • Spegnere la piastra toccando il comando On/Off. • Fare attenzione alle superfici calde La lettera H indica quali superfici di cottura sono calde. Scompare quando queste aree si sono raffreddate a una temperatura sicura.
- Page 226 Utilizzo dell’apparecchio • Toccare il comando booster , la spia della zona mostra “P” e la potenza sarà al massimo. Annullare la funzione booster • Toccare il comando di selezione della zona di cottura per la quale si desidera annullare la funzione booster •...
- Page 227 Utilizzo dell’apparecchio Nella zona grande 1.Per attivare la zona flessibile come una singola zona grande, toccare il controllo della zona flessibile. 2.In modalità zona grande, si raccomandano le seguenti padelle: padelle di 250 o 280 mm di diametro (forma rotonda o ovale) 250mm 280mm Si raccomanda di non usare configurazioni diverse dalle tre presentate sopra, poiché...
- Page 228 Utilizzo dell’apparecchio (b) Collocare una padella su ogni lato della zona flessibile. Avvertenza: Assicurarsi che la padella sia più grande di 120 mm di diametro. Blocco dei comandi • È possibile bloccare i comandi per evitare un uso involontario (ad esempio per evitare che i bambini accendano accidentalmente le zone di cottura).
- Page 229 Utilizzo dell’apparecchio a) Utilizzare il timer come indicatore di tempo Se non vengono selezionate zone di cottura • Accertarsi che la piastra sia accesa. NOTA Per utilizzare il timer, almeno una zona di cottura deve essere attiva. • Toccare il controllo del timer, il numero "10" verrà visualizzato sul timer e "0" lampeggerà. •...
- Page 230 Utilizzo dell’apparecchio • Impostare le decine di minuti toccando il cursore, per esempio 9 per impostare il timer a 95 minuti. • - Una volta che il timer è impostato, inizia il conto alla rovescia immediatamente. Viene visualizzato il tempo rimanente. •...
- Page 231 Utilizzo dell’apparecchio • Regolare i minuti toccando il cursore, per esempio su 5. • Toccare di nuovo il comando del timer, il numero “1” lampeggerà. • Impostare le decine di minuti toccando il cursore, per esempio 9 per impostare il timer a 95 minuti.
- Page 232 Utilizzo dell’apparecchio • Quando il tempo di cottura è terminato, la zona di cottura corrispondente si spegne automaticamente. AVVERTENZA Le altre zone di cottura continueranno a funzionare se erano accese. Le immagini qui sotto sono solo per riferimento, e il prodotto finale prevale. Impostare zone multiple Per impostare più...
- Page 233 Utilizzo dell’apparecchio Se si tocca il comando di selezione della zona di cottura, il tempo impostato viene visualizzato nell'indicatore del timer. c) Annullare il timer • Toccare il comando di selezione della zona di cottura per la quale si desidera annullare il timer.
-
Page 234: Manutenzione E Pulizia
Informazioni pratiche Manutenzione e pulizia Cosa? Come? Importante! • Quando il piano cottura è spento, la spia “superficie calda” non si accende, ma la zona di cottura potrebbe comunque essere rovente! 1. Spegnere la piastra a Prestare particolare induzione. attenzione. 2. - Page 235 Informazioni pratiche Informazioni pratiche Cosa? Come? Importante! Rimuovere immediatamente questi residui con una spatola, un coltello piatto o un raschietto idoneo per • Rimuovere il prima piastre a induzione, facendo possibile eventuali macchie tuttavia attenzione alle di residui fusi o sostanze superfici che potrebbero zuccherate.
- Page 236 Informazioni pratiche Istruzioni per la cottura AVVERTENZA Fare attenzione quando si frigge il cibo, perché l'olio e il grasso si riscaldano molto rapidamente, specialmente quando si usa il booster. A temperature estremamente elevate, l'olio e il grasso possono infiammarsi spontaneamente, causando un serio pericolo di incendio.
- Page 237 Informazioni pratiche 3. Ungere con un pennello entrambi i lati della bistecca con dell’olio. Versare qualche goccia di olio nella padella calda, quindi collocarvi la carne. 4. Girare la bistecca una sola volta durante la cottura. Il tempo esatto di cottura dipenderà dallo spessore della carne e dal grado di cottura desiderato.
- Page 238 Informazioni pratiche Impostazioni della potenza Le impostazioni sottostanti sono unicamente indicative. Le impostazioni esatte dipenderanno da una serie di fattori, tra cui le padelle o padelle utilizzate e la quantità di cibo da cucinare. Sperimentando le varie possibilità offerte dalla piastra è possibile individuare le impostazioni che meglio rispondono alle proprie esigenze.
-
Page 239: Consigli E Suggerimenti
Informazioni pratiche Consigli e suggerimenti Problema Possibili cause Cosa fare • Controllare che la piastra a induzione sia collegata alla rete elettrica e accesa. La piastra a induzione non • Verificare l’eventuale Assenza di corrente. si accende. presenza di un'interruzione di corrente in casa o nel quartiere. - Page 240 Informazioni pratiche Informazioni pratiche Problema Possibili cause Cosa fare La ventola incorporata • - Questo è normale e nel piano di cottura a non richiede alcuna azione induzione serve a prevenire da parte dell’utente. Rumore della ventola dalla il surriscaldamento Non spegnere la cucina piastra di induzione.
-
Page 241: Risoluzione Dei Problemi
Informazioni pratiche Informazioni pratiche Visualizzazione dei guasti e ispezione La piastra a induzione è dotata di una funzione di autodiagnosi. Con questo test, il tecnico può controllare il funzionamento di diversi componenti senza smontare o rimuovere la piastra dalla superficie di lavoro. Risoluzione dei problemi 1) Codice di errore che appare durante l'uso e soluzione: Codice di... - Page 242 Informazioni pratiche Codice di Problema Soluzione errore La tensione di alimentazione è inferiore alla tensione Controllare se la tensione di alimentazione è nominale. normale. Riaccendere la corrente una volta che La tensione di alimentazione l'alimentazione è normale. è superiore alla tensione nominale.
- Page 243 Informazioni pratiche Errore Problema Soluzione A Soluzione B La temperatura ambiente potrebbe essere troppo alta. Alta temperatura La presa d'aria della piastra. o la ventilazione potrebbero essere L'indicatore del modo bloccate. di cottura è acceso, Verificare che la ma la zona non si Qualcosa non padella funzioni riscalda.
- Page 244 Informazioni pratiche Errore Problema Soluzione A Soluzione B Errato collegamento Verificare il tra la scheda di collegamento. Le zone di cottura alimentazione e la della stessa scheda del display. dimensione (per La scheda del esempio la prima e la display della parte Sostituire la scheda seconda) visualizzano di comunicazione è...
- Page 245 Informazioni pratiche Imballaggio e ambiente GETTARE I MATERIALI DI IMBALLAGGIO I materiali d’imballaggio proteggono l’apparecchio dai danni durante il trasporto. Questi materiali sono rispettosi dell’ambiente in quanto possono essere riciclati. Riciclare questi materiali consente di risparmiare le materie prime e di ridurre la produzione di rifiuti. Gettare il vecchio apparecchio RACCOLTA SEPARATA DI RIFIUTI ELETTRICI ED ELETTRONICI Questo apparecchio riporta il simbolo RAEE (Rifiuti di apparecchiature...
- Page 246 Note / Notes / Notities / Notas / Note...
- Page 247 Note / Notes / Notities / Notas / Note...
- Page 248 Note / Notes / Notities / Notas / Note...
Need help?
Do you have a question about the IH 4 TB2FZS 007C and is the answer not in the manual?
Questions and answers