
Subscribe to Our Youtube Channel
Related Manuals for Taramps ProAudio T 4.400


Summary of Contents for Taramps ProAudio T 4.400
- Page 1 4 x 100W RMS The installation of this product must be done by a qualified professional.
- Page 2 12 months from the date of purchase. In case of defect during the warranty period, TARAMPS responsibility is limited to the repairing or substitution of the device of its own making.
-
Page 3: Safety Requirements
This manual covers all features, operations and instructions to solve any doubt that may arise during the installation. Please take some time to read it carefully in order to ensure the proper installation and the use of all benefits that this product can offer. For questions, please call +55 (18) 3266-4050, e-mail support@taramps.com.br or visit www.taramps.com.br. Safety requirements -To ensure proper use, please read through this manual before using the amplifier. -
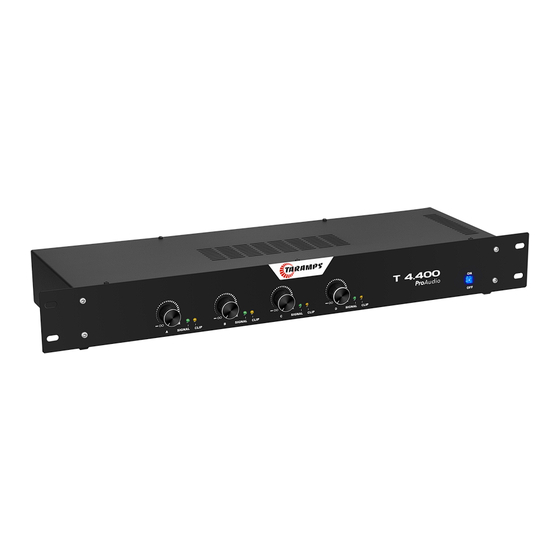
Page 4: Front Panel
Front panel Illustrative Images 1 - 19" RACK MOUNT HOLE: Use these holes to fix the T 4.400 on the rack. 2 - VOLUME: Volume adjustment of the selected channel (A, B, C or D). 3- SIGNAL LED: Indicates the existence of an audio signal at the input of the channel in use on the amplifier (A, B, C or D). 4 - CLIP LED: Flashing according to the song, it indicates that the amplifier is operating at the distortion threshold of the channel in use (A, B, C or D). - Page 5 Stereo connection example 1/4" signal inputs: To connect audio mixer, equalizer, audio processor, receiver, etc... Mode Key in stereo position 88 88 ► USB Bridge connection example Mode Key in bridge position 88 88 ► USB...
- Page 6 Parallel connection example Mode Key in parallel position 88 88 ► USB Mode: Bridge / Parallel ATTENTION: If the connection is bridge or parallel, it is mandatory that the audio signal enters the A/C inputs as per the connection examples above. Use the MODE switch to change the desired modes.
-
Page 7: Technical Features
**Frequency response measured at twice the minimum impedance. Taramps reserves the right to modify the contents of this document at any time without prior notice and does not have the obligation to apply the changes in units which were previously produced. - Page 8 Fabricado por / Manufactured by: TARAMPS ELECTRONICS LTDA CNPJ / TAX ID: 11.273.485/0001-03 R. João Silvério, 121 • Res. Manoel Martins Alfredo Marcondes - SP Indústria Brasileira - Made in Brazil...
Need help?
Do you have a question about the ProAudio T 4.400 and is the answer not in the manual?
Questions and answers