
Subscribe to Our Youtube Channel
Related Manuals for Wassermann Polyquick 160-T105


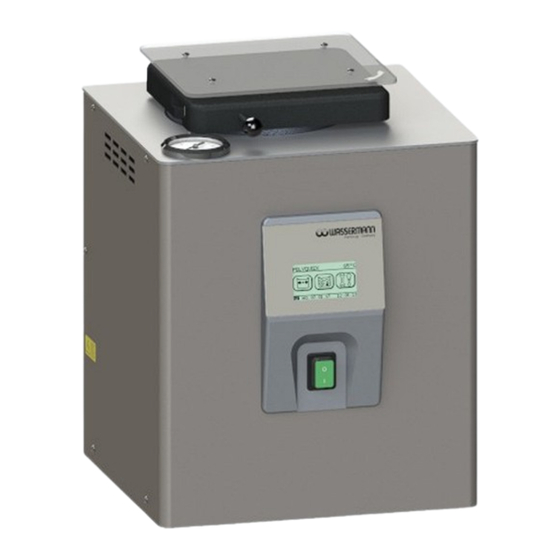
Summary of Contents for Wassermann Polyquick 160-T105
- Page 1 Combination Automat Polyquick 160-T105 Pressure Polymerisation Unit and Compactor USER MANUAL...
- Page 2 Dear customer, Thank you for choosing a product from the Wassermann range. Wassermann Dental- Maschinen incorporates the highest standards of quality and the latest technology. In order to enjoy maximum performance and years of trouble-free operation, please read this user manual carefully before you connect this unit and start work, and operate the unit according to the recommended guidelines.
-
Page 3: Table Of Contents
Contents 1 Features..........................4 2 Safety Symbols used in this Manual.................4 3 Safety Guidelines......................5 4 Responsibility for Operation or Damage................6 5 Application.........................6 6 Before Starting........................7 6.1 Transport........................7 6.2 Installation........................7 6.3 Storage........................7 7 Installation/ Start-up......................8 7.1 Setting the correct Pressure..................9 7.2 Start-up........................10 8 Operation........................17 8.1 General Operating Instructions................17 8.2 Operation........................18... -
Page 4: Features
Features • Compact table-top unit for pressure polymerisation up to 105 °C in a water bath • Large capacity Ø 150 mm, depth 285 mm • Touch screen for fast and easy operation • 13 programmes, each with three individually configurable polymerisation stages •... -
Page 5: Safety Guidelines
Safety Guidelines Configuring and operating this equipment requires precise knowledge and observance of the instructions in this user manual. The equipment is designed only for its intended application. WARNING: Servicing and repairs should be carried out only by authorised specialists. Disconnect the power plug before starting any maintenance work. -
Page 6: Responsibility For Operation Or Damage
Wassermann Dental-Maschinen GmbH are not extended by these instructions. Application The Polyquick 160-T105 is a pressure polymerisation unit for hot and cold polymerisation of plastics. This automat is designed for polymerisation of up to 3 flasks in flask holder or 2 cast resin flasks or rebasing frames or 6 orthodontic regulatings at one time. -
Page 7: Before Starting
Before Starting Transport Before transporting the unit, ensure that it has been unplugged from the power socket. Make sure that it is packed correctly in order to avoid accidental damage. Be sure to check for any transport damage when unpacking the goods. Note down any damage if found. -
Page 8: Installation/ Start-Up
Installation/ Start-up ATTENTION: Before start-up screw it to the swivel door! Thermal protection cover • Spacer sleeve, 4 pieces • Screw, 4 pieces • RISK OF SCALDING! Before commissioning, please install the following connections: Install the pressure hose included in the scope of supply and provide for an appropriate outlet. -
Page 9: Setting The Correct Pressure
Setting the correct Pressure Before filling the tank, remove the accessories. Afterwards set the correct polymerisation pressure. Proceed as follows (image, see 7.2): 1. Activate main switch (green rocker switch). 2. Close lid. 3. Touch the Pressure key (image, see 7.2). (2.5 bar default). 4. -
Page 10: Start-Up
Start-up Define the unit's main parameters before switching it on. These settings are performed in the Set-Up Menu . Familiarise yourself with the system's various options before starting the polymerisation process. This particularly applies to functions (Please see „setup menu page 1“ on page 11 of this manual). The Start menu in Polymerisation mode Name of the unit Actual-Temperatur... - Page 11 Setup menu page 1 In the Setup menu the following settings can be made: Preheating temperature Clock timer Forward in menu Sleep Heater ON/OFF back to Start menu Mode: Polymerisation/ Compaction without heater Setup menu page 2 °C/°F Date and Time Forward in menu Work mode Information...
- Page 12 Description of features 5 – 14 Pressure ON/ OFF Bevore starting the programme you have to choose the pressure. Pressure regulator at 20 °C: min. 2 bar, max. 5 bar Temperatures higher than 100 °C: Working is only possible under pressure. If no pressure is set, the heating switches off at 100 °C.
- Page 13 Programme parameter und Polymerisation Defines the parameters for the programme temperature. You can store 13 programme counter (1-13). In every counter up to three polymerisation stages #1-3 can be mapped. Touch the numbers to change the values. Polymerisation level 1 (1): Delete Next step Save...
- Page 14 The Polymerisation Stop/Pause Break-of Pause Back Start Preheating temperature Defines the target temperature once the main switch has been activated. The pre-heat temperature also applies to waiting times and rest periods. Default: 60°C If the programme temperature selected is higher, the temperature reverts back to this value when the programme ends.
- Page 15 Clock timer This defines the weekday activation and deactivation times. Programmes running currently have a higher priority; they are not switched off until complete. Sleep button display When you press the Sleep button, the unit goes into the Sleep mode (all functions except the Timer function are switched off).
- Page 16 Selection of the temperature unit (Fahrenheit or Celsius) Pictograms for the time and date function cycle. Selection of the working mode Defines whether the polymerisation process should start immediately or only after the heating value has been reached. (a) (Default) The unit heats to the temperature programmed under .
-
Page 17: Operation
Information Here the parameters of the touch screen, sensors, hardware and software are displayed. Operation General Operating Instructions All instructions for using the unit, whether in verbal or written form, are based on our own experience and experimentation and can only be regarded as guidelines. Please put on heat-resistant gloves During longer periods of non-use please disconnect the power plug. -
Page 18: Operation
Operation Open the lid. • First set the workpieces, then fill the water till all the polymerisation parts are • covered (max. up to the engraving = Marking in the tank) and close the lid up to the stop. Switch on the main switch, the unit will automatically heat up to 60°C or up to the •... -
Page 19: Troubleshooting
Touchscreen Calibrate the touch display Switch on the unit. While the logo of malfunction Wassermann appears please contact the touch display two times. Then you will reach the self-explanatory touch panel-calibration (p. 20, fig. 2-3). Please contact our service department. - Page 20 If the previous recommendations do not solve the problem, contact your dental depot or our service department. Fig. 1 * VIDEO: CALIBRATION https://t1p.de/TDRec Fig. 3 Fig. 2...
-
Page 21: Care And Maintenance
Care and Maintenance 10.1 Cleaning Disconnect the power plug before starting any maintenance work. The identification plate has always to be kept in easily legible condition and has not to be removed. Remove external dirt from time to time with some form of cold cleaner. Use only cold cleaners to avoid damaging the paintwork or removing the lettering. -
Page 22: Spare Parts
Spare Parts If necessary please contact our service hotline phone. 10.5 Service Hotline 0049 (0)40 / 730 926 -20/ -24 10.6 Scope of Delivery/ Accessories Polyquick 160-T105 (Item no. 170979) Incl. in delivery: Flask bracket support • Flask basket •... -
Page 23: Warranty
This warranty does not cover damage caused by improper use, external mechanical causes, transport damage or interference with the unit by unauthorized persons. Technical Data Polyquick 160-T105 Item no.: 170979 Voltage* 220–240 V / 50/60 Hz Power consumption 4.2 A... -
Page 24: Disposing Of The Unit
Disposing of the Unit The unit has to be disposed by an authorized recycling operation. The selected company has to be informed of all possibly health-hazardous residues in the unit. 12.1 Information on Disposal for Countries within the EU To conserve and protect the environment, prevent environmental pollution and improve the recycling of raw materials, the European Commission adopted a directive that requires the manufacturer to accept the return of electrical and electronic units for proper disposal or recycling. -
Page 25: Eu Declaration Of Conformity
Dental-Maschinen GmbH Unit and Rudorffweg 15-17 Compactor for 21031 Hamburg dental Germany applications Model: Polyquick 160-T105 Item no. 170979 Applicable DIN EN 61010-1 standards: DIN EN 61000-6-3 DIN EN 61000-6-1 DIN 45635-1 DIN EN 60335-1 Hiermit wird bestätigt, dass die oben bezeichnete Maschine den genannten EU-Richtlinien entspricht. - Page 26 Notes:...
Need help?
Do you have a question about the Polyquick 160-T105 and is the answer not in the manual?
Questions and answers