
Related Manuals for Taurus HM973IXD


Summary of Contents for Taurus HM973IXD
- Page 1 HM973IXD Català Horno encastrable Built-in oven Four encastrable Forno embutido Встроенная печь...
-
Page 3: Descripción Del Aparato
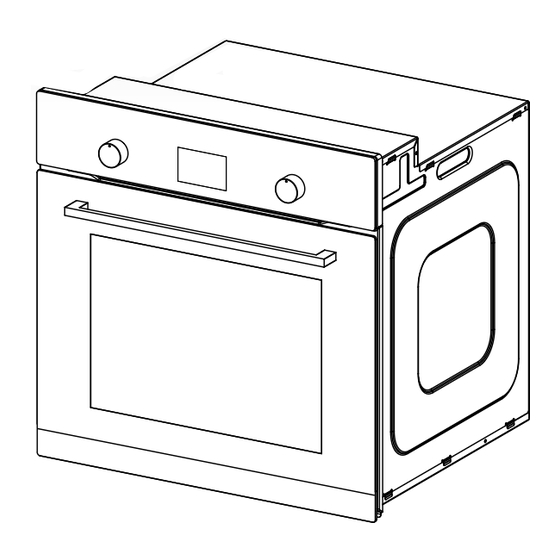
Español Horno eléctrico HM973IXD Descripción del aparato 1 - Mando de selección de función del horno 2 - Mando de control de temperatura 3 - Temporizador 4 - Manilla de la puerta del horno 5 - Bandeja 6 - Estante del horno Instalación... - Page 4 Atención Recuerde que para conectar el circuito de seguridad al terminal de la caja de conexiones marcado con el suministro eléctrico para el horno debe tener un interruptor de seguridad que permita cortar la alimentación en caso de emergencia. La distancia entre los puntos de contacto de trabajo del interruptor de seguridad debe ser de 3 mm como mínimo.
-
Page 5: Instrucciones De Uso
Funcionamiento Panel de control y módulo de visualización Icono de horas de trabajo Icono de fin del tiempo de trabajo El temporizador se enciende y se apaga la luz indicadora Luz indicadora de calentamiento de barbacoa (la luz se encenderá cuando se caliente el tubo de calentamiento, y se apagará... - Page 6 3. A continuación, el indicador de los minutos «00» comenzará a parpadear; pulse «+» o «-» hasta llegar a "15". 4. Pulse de nuevo para confirmar la configuración. NOTA: Si desea cancelar o modificar la configuración del reloj, pulse y la pantalla volverá a mostrar las 12:00.
- Page 7 confirmar. La hora “11” se mantendrá fija en pantalla, y los minutos “00” comenzarán a parpadear. Pulse “+” o “-” hasta llegar a “15”. Pulse de nuevo, y la luz se mantendrá encendida. La alarma emitirá 10 pitidos cuando llegue la hora de fin (11:15). Para silenciar la alarma pulse NOTAS: Durante el período de cocción, en la pantalla se mostrará...
-
Page 8: Funciones Del Horno
FUNCIONES DEL HORNO Luz de horno independiente Poniendo el mando en esta posición, se enciende la luz del interior del horno. Úsela, por ejemplo, para limpiar el interior del horno. Descongelación Esta función permite que todos los alimentos congelados se descongelen rápidamente gracias al ventilador interno. - Page 9 del horno. La luz indicadora amarilla también puede encenderse cuando se selecciona la función de luz. Calentamiento rápido: La función de calentamiento rápido es una opción que permite alcanzar los 150ºC en sólo 6 minutos aproximadamente. Modo de funcionamiento: Disponga la función del horno en la posición del calentador inferior y superior; Coloque el mando del regulador de temperatura en la posición de 150℃, El horno se calienta hasta la temperatura de 150℃...
- Page 10 No utilice productos de limpieza que contengan materiales abrasivos para la limpieza y el mantenimiento del panel frontal de vidrio. Función de limpieza con VAPOR DE AGUA Esta función le permite limpiar el horno ahorrando tiempo y dinero. Debe seguir los siguientes pasos: 1.
- Page 11 3. Cierre suavemente la puerta del horno hasta que se oiga el sonido de encaje, y una vez lleguen a la posición de pinza, sostenga la puerta con ambas manos y continúe empujando, tire hacia arriba al mismo tiempo para que el cierre de la bisagra pueda sacarse del horno. 4.
- Page 12 Actuación en caso de emergencia En caso de que se produzca una emergencia, deberá: Desconectar los controles de temperatura y función del horno Desconectar el enchufe de la red eléctrica Llamar a un centro de servicios Algunos fallos leves pueden solucionarse remitiéndose a las instrucciones que figuran en el cuadro siguiente: PROBLEMA MOTIVO...
-
Page 13: Description Of The Appliance
English Electric oven HM973IXD Description of the appliance 1 - Oven function selection knob 2 - Temperature control knob 3 - Timer 4 - Oven door handle tray 6 - Oven shelf Installation The kitchen area should be dry and well ventilated. -
Page 14: Connection Diagram
Before connecting the oven to the power supply, it is important to read the information on the data plate and the connection diagram. CONNECTION DIAGRAM Caution! Voltage of heating elements 220V- 240V Caution! In the event of any connection the safety wire must be connected to the PE terminal For 220V-240V earthed one phase connect on:... -
Page 15: Manual Operation
Operation Control panel and display module Working hours icon End of work time icon Timer on off indicator light Barbecue heating indicator light (the light will be on when the heating pipe is heated, and it will be off when the temperature point is reached, and the heating pipe will stop heating). The clock icon The alarm clock icon Keys... -
Page 16: Timer Setting
NOTE: If you want to cancel or modify the clock settings press and the display will return to 12:00. TIMER SETTING This oven has two timer functions. First is to set the time that we want the oven to be on: 1. -
Page 17: Oven Functions
During the period of cooking, the display can show the current clock and countdown time by pressing “+” or “-”. The cooking duration time can be set, but if the cooking end time is not set 5 seconds after it or by pressing , the oven will automatically start heating up. - Page 18 Bottom and top heaters on setting the knob to this position allows the oven to be heated conventionally. Fan, bottom and top heaters on At this knob position the oven executes the cake function. Conventional oven with a fan. Combined grill (Grill and the top heater) When the “combined grill”...
- Page 19 Lock function To lock the oven you must press the lock button, to unlock press again 3 seconds. Cleaning and maintenance By ensuring proper cleaning and maintenance of your oven, you can have a significant influence on the continuing fault-free operation of your appliance. Before you start cleaning, the oven must be switched off and you should ensure that all knobs are set to the 0 position.
- Page 20 Set all control knobs to the position 0. and disconnect from the mains. Unscrew and wash the lamp cover, then wipe it dry. Unscrew the light bulb from the socket and replace the bulb with a high temperature suitable bulb: - 300ºC -Voltage 230-240 V -Power 25 W...
- Page 21 Removing the inner glass panel 1. Press and hold the two sides of the grid with both hands to pull it out 2. After pulling out the grid, the inner glass can be removed. 3. The inner glass pulled out from beneath plastic fixed block. After cleaning, the inner glass, insert the following plastic fixed block, then install the above plastic mounting block.
-
Page 22: Description De L'appareil
Français Four électrique HM973IXD Description de l’appareil 1 - Bouton de sélection de la fonction four 2 - Commande de contrôle de température 3 - Minuterie 4 - Poignée de la porte du four 5 - Plateau profond 6 - Grille de four Installation La zone cuisine doit être propre et bien ventilée. -
Page 23: Schéma De Raccordement
Garder à l’esprit que pour connecter le circuit de sécurité à la borne de la boîte de jonction marquée à l'alimentation du four, il est impératif de disposer d’un interrupteur de sécurité permettant de couper l'alimentation en cas d'urgence. La distance entre les points de contact de fonctionnement de l'interrupteur de sécurité... -
Page 24: Réglage De L'horloge
Fonctionnement Control panel and display module Working hours icon End of work time icon Timer on off indicator light Barbecue heating indicator light (the light will be on when the heating pipe is heated, and it will be off when the temperature point is reached, and the heating pipe will stop heating). The clock icon The alarm clock icon Keys... -
Page 25: Réglage De La Minuterie
NOTE : Pour annuler ou modifier les paramètres d'horloge, appuyer sur et l'écran affichera à nouveau « 12:00 ». RÉGLAGE DE LA MINUTERIE Ce four dispose de deux modes de minuterie. Dans le premier, il s’agit d’indiquer l'heure à laquelle le four démarrera : 1. - Page 26 « 00 » commenceront à clignoter. Appuyer sur « + » ou « - » jusqu'à « 15 ». Appuyer à nouveau sur . Le voyant restera allumé. L’alarme émettra 10 bips sonores une fois l’heure de fin (11:15) atteinte. Il est possible de couper l'alarme en appuyant sur NOTES : Pendant la cuisson, l'écran affichera l'heure actuelle et le compte à...
-
Page 27: Fonctions Du Four
FONCTIONS DU FOUR Éclairage du four indépendant Placer le bouton dans cette position permet d’allumer la lumière à l'intérieur du four. Par exemple, l’éclairage peut être utile pour nettoyer l'intérieur du four. Décongélation Cette fonction permet de décongeler tous les aliments surgelés de façon rapide grâce au ventilateur interne. - Page 28 de l’utilisation du four, le voyant rouge s'allume et s'éteint temporairement pour maintenir la température à l'intérieur de celui-ci. Le voyant jaune peut également s'allumer lorsque la fonction d'éclairage est sélectionnée. Chauffage rapide La fonction de chauffage rapide est une option qui permet d’atteindre 150 °C en seulement 6 minutes. Mode de fonctionnement Régler le four pour utiliser les éléments chauffants inférieur et supérieur simultanément.
- Page 29 Ne pas utiliser de produits de nettoyage contenant des matériaux abrasifs pour nettoyer et entretenir le panneau frontal en verre. Fonction de nettoyage à la VAPEUR D'EAU Cette fonction permet de nettoyer le four en économisant du temps et de l'argent. Pour cela, suivre la procédure suivante : 1.
- Page 30 3. Fermer doucement la porte du four jusqu'à entendre le déclic d’encastrement. Une fois la position de blocage atteinte, maintenir la porte avec les deux mains et continuer à pousser. Tirer simultanément vers le haut pour pouvoir retirer le blocage de la charnière du four. 4.
- Page 31 Mesure à prendre en cas d’urgence En cas d'urgence : Désactiver les commandes de température du four et les commandes de fonction Débrancher l'appareil de la prise secteur. Contacter un centre de réparation. Certaines pannes mineures peuvent être résolues en consultant les instructions du tableau suivant : PROBLÈME RAISON ACTION...
-
Page 32: Descrição Do Aparelho
Português Forno elétrico HM973IXD Descrição do aparelho 1 - Botão de seleção da função de forno 2 - Botão de controlo da temperatura 3 - Temporizador 4 - Maçaneta da porta do forno 5 - Bandeja profunda 6 - Prateleira do forno Instalação... - Page 33 Recorde que, para conectar o circuito de segurança ao terminal da caixa de distribuição elétrica que liga ao forno, deverá ter um interruptor de segurança que permita cortar o fornecimento elétrico em caso de emergência. A distância entre os puntos de contacto de trabalho do interruptor de segurança deve ser de 3 mm no mínimo.
-
Page 34: Ajuste Do Relógio
Funcionamento Painel de controlo e módulo de visualização Ícone de horas de funcionamento Ícone de fim de tempo de funcionamento O indicador luminoso do temporizador acende-se e apaga-se O indicador luminoso de funcionamento da função grill (a luz acende quando a resistência aquece e desliga-se quando o ponto de temperatura é... -
Page 35: Ajuste Do Temporizador
3. Em seguida, o indicador dos minutos «00» começa a piscar, para o ajustar prima «+» ou «-» até chegar a"15". 4. Prima novamente para confirmar a configuração. NOTA: Se desejar cancelar ou modificar a configuração do relógio, prima e o ecrã volta a mostrar 12:00. - Page 36 Prima o botão durante 3 segundos e o indicador luminoso começa a piscar. O ecrã irá mostrar “00:00” com os dígitos que indicam as horas “00” a piscar. Prima“+” ou “-” até chegar a “11” e, em seguida, prima para confirmar. A hora “11”mantém-se fixa no ecrã e os minutos “00” começam a piscar.
-
Page 37: Funções Do Forno
FUNÇÕES DO FORNO Luz de forno independente Ao colocar o botão nesta posição, a luz interior do forno acende-se. Utilize-a, por exemplo, para limpar o interior do forno. Descongelação Esta função permite que todos os alimentos congelados se descongelem rapidamente graças ao ventilador interno. Calor de fundo aceso Quando o botão é... - Page 38 Se uma receita recomendar colocar os alimentos num forno preaquecido, tal não deve ser feito antes da luz vermelha se apagar pela primeira vez, o que indica que se alcançou a temperatura pretendida. Ao utilizar o forno, a luz vermelha acende-se e apaga-se temporariamente para manter a temperatura no interior do forno.
- Page 39 O interior do forno apenas deve ser lavado com água morna e umas gotas de detergente. Em seguida, utilize água limpa. Após a limpeza, certifique-se de que o interior do forno está completamente seco. Atenção Não utilize produtos de limpeza que contenham materiais abrasivos para a limpeza e a manutenção do painel frontal de vidro.
- Page 40 2. As dobradiças do sistema de fecho devem estar totalmente levantadas. 3. Feche suavemente a porta do forno até ouvir o ruído de encaixe e, uma vez atingida a posição em forma de pinça, segure a porta com ambas as mãos e continue a empurrar e, ao mesmo tempo, puxe- a para cima para que o sistema de fecho da dobradiça possa sair do forno.
- Page 41 Como atuar em caso de emergência No caso de ocorrer alguma situação de emergência, deve: Desligar os controlos de temperatura e de função do forno Desligar o aparelho da corrente elétrica. Contactar o serviço de assistência técnica Algumas falhas leves podem ser solucionadas seguindo as instruções indicadas no quadro seguente: PROBLEMA MOTIVO ACTUAÇÃO...
-
Page 42: Български Език
Български език Електрическа фурна HM973IXD Описание на уреда 1 - Контролер за избор на режима на фурната 2 - Контролер за температурата 3 - Tаймер 4 - Ръкохватка на вратата на фурната 5 - Дълбока тава 6 - Полица на фурната... -
Page 43: Схема На Свързване
ВНИМАНИЕ Не забравяйте, че за включване на безопасния кръг към терминала на означената конекторната кутия с електроподаването на фурната следва да притежавате обезопасителен прекъсвач, позволяващ прекъсване на захранването при извънредни случаи. Разстоянието между контактните работни точки на прекъсвача следва да бъде най-малко 3 mm. Преди... -
Page 44: Настройки На Часовника
Работа на урeда Контролно табло и модул за разглеждане Изображение за работни часове Изображение за край на работата Темпоризаторът се включва и светлинният индикатор се изключва Индикаторна светлина за работа на барбекюто (светлината се включва, когато нагревателната тръба загрее и се изключва при достигане температурната точка, при което... - Page 45 1. Цифрата “12” указваща часовете ще започне да примигва. За да я настроите натиснете “+” или “-”, докато достигнете до “15”. 2. Натиснете или , за да потвърдите. 3. След това индикаторът за минути «00» ще започне да примигва. За настройването му натиснете...
- Page 46 настроите часа, използвайки брояча на минути. След като настъпи часа за спиране, алармата ще се задейства. В случай, че часовникът показва 10:00 и алармата следва да се настрои за 11:15: Натиснете бутон в продължение на 3 секунди, и лампичката ще започне да примигва. На...
- Page 47 ВНИМАНИЕ В положение на режим „скара“, при поставяне на регулатора на температура в положение, различно от нулата, червената светлина може да светне, въпреки, че фурната не загрява. РЕЖИМИ НА ФУРНАТА Независима светлина на фурната Поставяйки контролера в това положение се включва вътрешното осветление...
- Page 48 Червената светлина указва, че фурната се загрява до желаната температура. Изгасването на червената светлина указва, че фурната е достигнала определената температура. Ако някоя рецепта препоръчва поставяне на ястията в предварително загрята фурна това следва да се прави след като червената светлина да е изгаснала за първи път, което от своя страна указва, че...
- Page 49 Вътрешността на фурната следва да се измива с хладка вода и малко количество съдомиялен препарат. След това използвайте хладка вода. След почистването се уверете, че вътрешността на фурната е напълно изсъхнала. Внимание! Моля не използвайте абразивни препарати за почистване и поддръжка на челната стъклена плоскост.
- Page 50 2. Пантите на затвора следва да са напълно повдигнати. 3. Затворете внимателно вратата на фурната, докато се чуе изщракване и, след като достигнете положението на щипката, задръжте вратата с двете ръце и продължете да натискате. Издърпайте нагоре едновременно, така че затвора на пантата да може да се извади от...
- Page 51 3. Вътрешното стъкло се изважда изпод фиксирания пластмасов блок. След почистване на вътрешното стъкло вкарайте следващия фиксиран пластмасов блок. След това поставете горния монтажен пластмасов блок. Действия в извънредни случаи При извънреден случай следва да постъпите по следния начин: Изключете котролерите за температура и режим на фурната. Изключете...
- Page 52 Podrá encontrar el más cercano accediendo al Pour savoir lequel est le plus proche, vous pou- siguiente enlace web: http://taurus-home.com/ vez accéder au lien suivant : http://taurus-home. com/ También puede solicitar información relacionada poniéndose en contacto con nosotros por el telé- Vous pouvez aussi nous contacter pour toute fono que aparece al final de este manual.
- Page 53 Μπορείτε επίσης να ζητήσετε πληροφορίες, επικοινωνώντας μαζί μας. Pode fazer o download deste manual de instruções e suas atualizações em http://taurus- Μπορείτε να «κατεβάσετε» από το διαδίκτυο home.com/ το παρόν εγχειρίδιο οδηγιών και τις σχετικές ενημερώσεις του στο http://taurus-home.com/ Nederlands Русский...
- Page 54 عليك م ر اجعة أي оторизирани сервизи. Най-близкия до Вас сервиз можете да .مركز من م ر اكزنا لخدمات املساعدة التقنية الرسمية откриете на следния линк: http://taurus-home. ميكنك العثور عىل األقرب عن طريق الدخول إىل ر ابط com/ :املوقع التال...
- Page 55 Gibraltar 11 Horse Barrack Lane, 54000, Gibraltar 00350 200 75397 / 00350 200 41023 Greece Sapfous 7-9, 10553, Athens +30 21 0373 7000 Guinea BP 206, GN, Conakry (224) 622204545 Hong Kong Unit H,13/F., World Tech Centre, Hong kong (852) 2448 0116 / 9197 3519 Hungary Késmárk utca 11-13, 1158, Budapest +36 1 370 4519...
- Page 56 Avda. Barcelona, s/n E 25790 Oliana Spain...
Need help?
Do you have a question about the HM973IXD and is the answer not in the manual?
Questions and answers