Table of Contents
Advertisement
Available languages
Available languages
Quick Links
Advertisement
Table of Contents

Related Manuals for snode WR88


Summary of Contents for snode WR88
- Page 1 INSTRUCTION MANUAL IMPORTANT: Read all instructions carefully before using this product. Preserve this owner’s manual for future reference. The specifications of this product may vary from its pictures, some parts may be different without notice. USER MANUAL...
-
Page 2: Table Of Contents
TABLE OF CONTENT IMPORTANT PRECAUTIONS PARTS LIST ASSEMBLY INSTRUCTION TRAINING GUIDE DIAGRAM TRAINING INTRODUCTION 11-12 LCD MONITOR OPERATION INSTRUCTIONS 13-14 PARTS REQUEST FORM WICHTIGE VORSICHTSMASSNAHMEN PARTS LIST BAUANLEITUNG 17-22 TRAININGSLEITFADEN-DIAGRAMM TRAININGSEINFÜHRUNG 24-25 BEDIENUNGSANLEITUNG FÜR LCD-MONITOREN 26-27... -
Page 3: Important Precautions
IMPORTANT PRECAUTIONS Please keep this manual for future reference. 1.It is important to read all the contents of instruction manual carefully before assembling and using the rower. Only the correct installation, maintenance and using the rower can achieve a safe and effective training effect. It is the responsibility of the owner to ensure that all users of the rower are adequately informed of all warnings and precautions. -
Page 4: Parts List
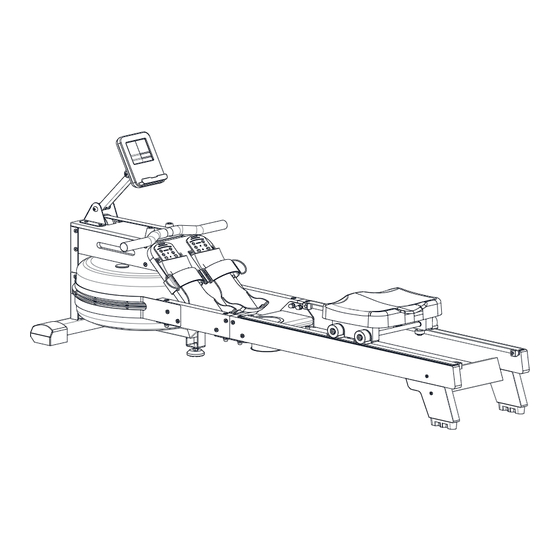
PARTS LIST Open the packing box and you can take out the following parts in the box. Parts list description quantity description quantity Left Slide Rail Set Main Frame Set Right Slide Rail Set Seat User Manual 2PCS Monitor Set Battery Connection Plate Pump... -
Page 5: Assembly Instruction
ASSEMBLY INSTRUCTION 1. Remove the main frame assembly (A), left rear slide rail set (B), right rear slide rail set (C), and the kit (F) from the carton. 2. Remove the 2 screws (100) as shown in the figure, and in the direction shown in the figure, pass the 2 hexagon socket flat head screws (100) through the left and right rear slide rail set (B/C) in the corresponding holes and pass through them, then use a hexagonal wrench (101) and a Phillips wrench (103) to lock the... - Page 6 ASSEMBLY INSTRUCTION Take out the connection plate (05), and then put 4 hexagon socket head screws (74) through the holes on the riser plate (04), left and right rear slide rail set (B/C), and put in the corresponding pre-embedded nuts of the connection plate (05), and then lock the 4 hexagon socket head cap screws (74) with the hexagon socket spanner (102).
- Page 7 ASSEMBLY INSTRUCTION Take out the monitor set (E), and use the Allen wrench (102) to remove the 4 pre-locked screws (72) on the main frame assembly (A). Then connect the wiring (E1) on the monitor set (E) to the wiring (A1) on the main frame assembly (A); place it on the main frame in the direction shown in the figure;...
- Page 8 ASSEMBLY INSTRUCTION : 1. Unplug the water tank plug (43) from the water tank upper cover (32). 2. Fill in water according to Figure 1; insert the elbow part of the pump (104) into the water tank, then put the hose part of the pump (104) into the bucket, and press the switch on the pump (104) to fill the water tank.
- Page 9 ASSEMBLY INSTRUCTION ·Only fill the water tank with tap water. Add water purification tablets (one bottle is included in the package). Do not use low-quality water purification tablets or bleach, which will damage the water tank and will not be covered by the warranty. ·Add water purification tablets every 3 months or as needed.
- Page 10 ASSEMBLY INSTRUCTION ·When the product is to be stored, first move the seat (D) to the front (to prevent the seat from falling quickly when the product is folded and damaging the product); then lift the footboard (04) with your hands until the rolling wheel (48) at the front end of the track touches the ground.
-
Page 11: Training Guide Diagram
TRAINING GUIDE DIAGRAM Start position Keep your arms straight in front of you, shoulders relaxed, head up, eyes look forward, feet and calves compressed vertically. Sliding process Grab the handle with your hands, keep the body in correct posture and angle. Gradually straighten your legs. -
Page 12: Training Introduction
TRAINING INTRODUCTION Use the rower can not only enhance physical fitness and exercise muscle, but also play a role in weight loss through a reasonable diet. Warm-up exercise before training This stage of warm up exercise can enhance the trainer’s body blood circulation and make the muscles in a good condition, at the same time reduce the risk of cramping or muscle strain during training. - Page 13 TRAINING INTRODUCTION At least 12mins of training to keep the heart rate within the corresponding target range. At the beginning of training , most of people continue to train for 15-20mins. Recovery phase after training During the recovery phase, repeat the activities in the preparation. During the process, you can reduce the amplitude and speed of the exercise appropriately for about 5mins.
-
Page 14: Lcd Monitor Operation Instructions
LCD MONITOR OPERATION INSTRUCTIONS DISPLAY AND BUTTON 1. All Display 2. Display Function Item Function Description Range Setting Workout time display during 0: 00 Increase or Decrease TIME rowing 99: 59 per minute,00:00~99:00 Scan every 6 seconds (M: S) Computer Will display the time needed to 0: 00 TIME/500M... - Page 15 LCD MONITOR OPERATION INSTRUCTIONS 3. Button Function Item Description Confirm setting or selection. MODE Select main window display. Hold on pressing for 1.5 seconds, to enter the computer setting. Setting selection. Converting the display:TIME//TIME/500M,DIST//STROKE,CAL//WATT (when with WATT), SPM//PULSE (when with PULSE). Setting selection.
-
Page 16: Gn: Wichtige Vorsichtsmassnahmen
WICHTIGE VORSICHTSMASSNAHMEN Bitte bewahren Sie dieses Handbuch zum späteren Nachschlagen auf. 1. Es ist wichtig, den gesamten Inhalt der Bedienungsanleitung sorgfältig zu lesen, bevor Sie das Rudergerät zusammenbauen und verwenden. Nur durch die richtige Installation, Wartung und Nutzung des Rudergeräts kann ein sicherer und effektiver Trainingseffekt erzielt werden. Es liegt in der Verantwortung des Besitzers, sicherzustellen, dass alle Benutzer des Rudergeräts ausreichend über alle Warnungen und Vorsichtsmaßnahmen informiert sind. -
Page 17: Parts List
PARTS LIST Öffnen Sie den Verpackungskarton und Sie können die folgenden Teile im Karton herausnehmen. Parts list description quantity description quantity Hauptrahmenbaugruppe Linke hintere Spurbaugruppe Rechter hintere purbaugruppe Sitzkissenanordnung Uhrenrahmenbaugruppe Teileablage 2PCS Benutzerhandbuch Batterie Gleisverbindungsplatte Pumpe Wassertablette... -
Page 18: Bauanleitung
BAUANLEITUNG 1. Nehmen Sie die Hauptrahmenbaugruppe (A), die linke hintere Spurbaugruppe (B), die rechte hintere Spurbaugruppe (C) und die Teileablage (F) aus dem Karton. 2. Nehmen Sie gemäß Diagramm 2 Schrauben (100) entsprechend der Richtung in der Abbildung heraus, führen Sie 2 Sechskant-Madenschrauben (100) durch die entsprechenden Löcher der linken und rechten hinteren Spurbaugruppe (B/C) und führen Sie sie durch, und sichern Sie dann die 2 Hutmuttern (95) und 2 Sechskant-Madenschrauben (100) mit einem Inbusschlüssel (101) und einem... - Page 19 BAUANLEITUNG Die Gleisverbindungsplatte (05) herausnehmen, dann die Löcher an den 4 Sechskant-Madenschrauben (74) durch die Fußplatte (04) und die linken und rechten hinteren Gleisbaugruppen (B/C) in die entsprechenden eingelassenen Muttern der Gleisverbindungsplatte (05) einrasten lassen und dann die 4 Sechskant- Madenschrauben (74) mit einem Inbusschlüssel (102) arretieren.
- Page 20 BAUANLEITUNG Nehmen Sie die Uhrenrahmenbaugruppe (E) heraus, entfernen Sie zuerst die vier Schrauben (72), die an der Hauptrahmenbaugruppe (A) vorverriegelt sind, mit einem Inbusschlüssel (102) und verbinden Sie dann die Verkabelung (E1) der Uhrenrahmenbaugruppe (E) mit der Verkabelungsverbindung (A1) an der Hauptrahmenbaugruppe (A).
- Page 21 BAUANLEITUNG 1. Ziehen Sie den Wassertankstopfen (43) von der oberen Wassertankabdeckung (32) ab. 2. Wasser gemäß Abbildung 1 einfüllen; Führen Sie den Winkelteil der Pumpe (104) in den Wassertank ein, legen Sie dann den Schlauchteil der Pumpe (104) in den Eimer und drücken Sie den Schalter an der Pumpe (104), um den Wassertank zu füllen.
- Page 22 BAUANLEITUNG ·Befüllen Sie den Wassertank nur mit Leitungswasser. Fügen Sie Wasserreinigungstabletten hinzu (eine Flasche ist in der Packung enthalten). Verwenden Sie keine minderwertigen Wasserreinigungstabletten oder Bleichmittel, da diese den Wassertank beschädigen und nicht von der Garantie abgedeckt werden. ·Fügen Sie alle 3 Monate oder nach Bedarf Wasserreinigungstabletten hinzu. Wenn das Wasser sehr trüb ist, ersetzen Sie bitte das Wasser im Tank.
- Page 23 BAUANLEITUNG : ·Wenn das Produkt gelagert werden soll, bewegen Sie zunächst den Sitz (D) nach vorne (um zu verhindern, dass der Sitz beim Zusammenklappen des Produkts schnell herunterfällt und das Produkt beschädigt). Heben Sie dann das Trittbrett (04) mit Ihren Händen an, bis das Rollrad (48) am vorderen Ende der Schiene den Boden berührt.
-
Page 24: Trainingsleitfaden-Diagramm
TRAININGSLEITFADEN-DIAGRAMM Startposition Halten Sie Ihre Arme gerade vor sich, die Schultern entspannt, den Kopf nach oben, den Blick nach vorne gerichtet, Füße und Waden vertikal zusammengedrückt. Gleitvorgang Fassen Sie den Griff mit Ihren Händen und halten Sie den Körper in der richtigen Haltung und im richtigen Winkel. -
Page 25: Trainingseinführung
TRAININGSEINFÜHRUNG Der Einsatz des Rudergeräts kann nicht nur die körperliche Fitness verbessern und Muskeln trainieren, sondern auch durch eine vernünftige Ernährung eine Rolle bei der Gewichtsabnahme spielen. Aufwärmübung vor dem Training Diese Phase des Aufwärmtrainings kann die Blutzirkulation des Körpers des Trainers verbessern und die Muskeln in einen guten Zustand versetzen, während gleichzeitig das Risiko von Krämpfen oder Muskelzerrungen während des Trainings verringert wird. - Page 26 TRAININGSEINFÜHRUNG Mindestens 12 Minuten Training, um die Herzfrequenz im entsprechenden Zielbereich zu halten. Zu Beginn des Trainings trainieren die meisten Menschen 15 bis 20 Minuten lang weiter. Erholungsphase nach dem Training Wiederholen Sie während der Erholungsphase die Aktivitäten der Vorbereitung. Während des Vorgangs können Sie die Amplitude und Geschwindigkeit der Übung für etwa 5 Minuten entsprechend reduzieren.
-
Page 27: Bedienungsanleitung Für Lcd-Monitoren
BEDIENUNGSANLEITUNG FÜR LCD-MONITOREN DISPLAY UND TASTE 1. Alle anzeigen 2. Display Function Artikel Bedienungsanleitung Reichweite Einstellung Trainingszeitanzeige während 0: 00 Erhöhen oder verringern TIME des Ruderns 99: 59 pro Minute, 00:00~99:00 Scannen Sie alle 6 Sekunden (M: S) Der Computer zeigt die benötigte Zeit an Je nach 0: 00 TIME/500M... - Page 28 BEDIENUNGSANLEITUNG FÜR LCD-MONITOREN 3. Tastenfunktion Artikel Bedienungsanleitung Bestätigen Sie die Einstellung oder Auswahl. MODE Wählen Sie die Anzeige des Hauptfensters. Halten Sie die Taste 1,5 Sekunden lang gedrückt, um die Computereinstellungen aufzurufen. Einstellungsauswahl. Konvertieren der Anzeige:TIME//TIME/500M,DIST//STROKE,CAL//WATT (wenn mit WATT), SPM//PULSE (wenn mit PULSE). Einstellungsauswahl.
-
Page 29: Parts Request Form
PARTS REQUEST FORM SNODE GROUP, Inc. EMAIL THIS FORM WITH YOUR RECEIPT OF PURCHASE TO If you have any questions please contact us via email (support@snodesport.com) and we will respond as soon as possible. Thank you for your kind support and understanding!
Need help?
Do you have a question about the WR88 and is the answer not in the manual?
Questions and answers