
Related Manuals for KitchenAid KSM150PSOB


Summary of Contents for KitchenAid KSM150PSOB
- Page 1 User Manual of Product 1: KitchenAid KSM150PSOB Artisan Series 5-Qt. Stand Mixer with Pouring Shield - Onyx Black User Manual of Product 2: KitchenAid Fresh Prep Slicer/Shredder Attachment, White...
- Page 2 K45 Series KSM45–KSM200 Series...
-
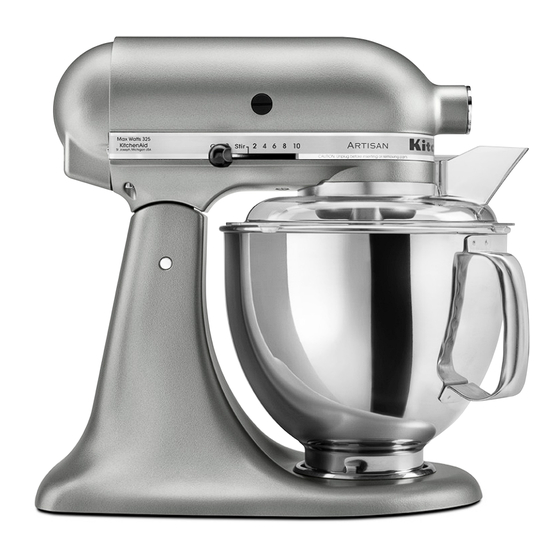
Page 3: Parts And Features
PARTS AND FEATURES PARTS AND ACCESSORIES Attachment hub Motor head Beater shaft Flat beater Speed control Bowl Wire whip Dough hook Flex Edge beater* Pouring shield* *Accessory sold separately... -
Page 4: Stand Mixer Safety
Return appliance to the nearest Authorized Service Facility for examination, repair or adjustment. 7. The use of accessories not recommended or sold by KitchenAid may cause fire, electric shock or injury. 8. Do not use the Stand Mixer outdoors. -
Page 5: Electrical Requirements
STAND MIXER SAFETY 10. Do not let the cord contact hot surfaces, including the stove. 11. Remove the flat beater, wire whip, or spiral dough hook from the Stand Mixer before washing. SAVE THESE INSTRUCTIONS This product is designed for household use only. ELECTRICAL REQUIREMENTS Voltage: 120 V Frequency: 60 Hz... -
Page 6: Using The Stand Mixer
USING THE STAND MIXER CHOOSING THE RIGHT ACCESSORY ACCESSORY USE TO MIX DESCRIPTION FLAT BEATER Normal Cakes, creamed frostings, candies, to heavy cookies, biscuits, pie pastry, meatloaf, FLEX EDGE BEATER* mixtures mashed potatoes WIRE WHIP Mixtures Eggs, egg whites, heavy cream, that need air boiled frostings, sponge cakes, incorporated... -
Page 7: Speed Control Guide
USING THE STAND MIXER SPEED CONTROL GUIDE NOTE: The speed control can be set between the speeds listed in the chart to obtain speeds 1, 3, 5, 7, and 9 if a finer adjustment is required. Do not exceed Speed 2 when preparing yeast doughs as this may cause damage to the Stand Mixer. - Page 8 USING THE STAND MIXER ASSEMBLING THE STAND MIXER Raise the motor head: Slide the Check to be sure that the Stand locking lever to the unlock position Mixer is unplugged, and the speed and lift the motor head. Once lifted, control is turned to “0”.
- Page 9 USING THE STAND MIXER ASSEMBLING THE STAND MIXER Lower the motor head: Slide the locking lever to the unlock position and guide the motor head down. Make sure motor head is completely down, then slide the locking lever to the lock position. Before mixing, test lock by attempting to raise motor head.
- Page 10 USING THE STAND MIXER OPERATING THE STAND MIXER NOTE: The Stand Mixer may warm up during use. Under heavy loads with extended mixing time, the top of the unit may become hot. This is normal. Plug the Stand Mixer into a grounded 3 prong outlet.
- Page 11 USING THE STAND MIXER NOTE: The pouring shield* can be used to avoid ingredients splashing out of the bowl when mixing as well as to easily pour ingredients in the bowl while mixing. (OPTIONAL) Pour ingredients into the bowl through the pouring chute. DISASSEMBLING THE STAND MIXER Raise the motor head: Check to be sure that the Stand Mixer is...
-
Page 12: Optional Attachments
USING THE STAND MIXER OPTIONAL ATTACHMENTS KitchenAid offers a wide range of optional attachments such as the spiralizer, pasta cutters, or food grinder that may be attached to the Stand Mixer attachment power hub as shown here. Check to be sure that the Stand... -
Page 13: Tips For Great Results
2 or more egg whites GRADUALLY to 8 Whipping stages With your KitchenAid Stand Mixer, egg whites whip quickly. Avoid over whipping. WHIPPED CREAM Pour cold whipping cream into chilled bowl. Attach bowl and wire whip. To avoid splashing, gradually turn to designated speed and whip to desired stage. -
Page 14: Mixing Tips
TIPS FOR GREAT RESULTS MIXING TIPS Mixing time Cake mixes Your KitchenAid Stand Mixer will mix When preparing packaged cake mixes, use faster and more thoroughly than most Speed 4 for medium speed and Speed 6 other electric mixers. Therefore, the for high speed. -
Page 15: Care And Cleaning
CARE AND CLEANING CLEANING THE STAND MIXER IMPORTANT: Do not wash the wire whip in the dishwasher. Do not immerse the Stand Mixer body in water or other liquids. These parts should be hand washed. Turn Stand Mixer off and unplug before cleaning. -
Page 16: Troubleshooting
TROUBLESHOOTING If your Stand Mixer should malfunction, please check the following: 1. The Stand Mixer may warm up during use. Under heavy loads with extended mixing time periods, you may not be able to comfortably touch the top of the unit. This is normal. 2. -
Page 17: Warranty And Service
IF THIS PRODUCT FAILS TO WORK AS WARRANTED, CUSTOMER’S SOLE AND EXCLUSIVE REMEDY SHALL BE REPAIR OR REPLACEMENT ACCORDING TO THE TERMS OF THIS LIMITED WARRANTY. KITCHENAID AND KITCHENAID CANADA DO NOT ASSUME ANY RESPONSIBILITY FOR INCIDENTAL OR CONSEQUENTIAL DAMAGES. This warranty gives you specific legal rights and you may also have other rights which vary from state to state or province to province. -
Page 18: Hassle-Free Replacement Warranty-Canada
Call toll-free 1-800-807-6777. For service information in Mexico: Call toll-free 01-800-0022-767. ©2017 KitchenAid. All rights reserved. KITCHENAID and the design of the stand mixer are trademarks in the U.S. and elsewhere. Used under license in Canada. WARRANTY AND SERVICE | 17... -
Page 19: Pièces Et Caractéristiques
PIÈCES ET CARACTÉRISTIQUES PIÈCES ET ACCESSOIRES Prise à accessoires Tête du moteur Arbre du batteur Batteur plat Commande de vitesse Fouet métallique Crochet à pâte Batteur à côté souple* Écran verseur* *Clé vendue séparément 18 | PIÈCES ET CARACTÉRISTIQUES... -
Page 20: Consignes De Sécurité Importantes
SÉCURITÉ DU BATTEUR SUR SOCLE CONSIGNES DE SÉCURITÉ IMPORTANTES Lors de l’utilisation d’appareils électriques, il faut toujours observer certaines précautions élémentaires de sécurité, y compris les suivantes : 1. Lire toutes les instructions. 2. Pour éviter tout risque de choc électrique, ne pas immerger le batteur sur socle dans de l’eau ou tout autre liquide. -
Page 21: Spécifications Électriques
Retourner l’appareil au centre de service agréé le plus proche pour examen, réparation ou réglage. 7. L’utilisation d’accessoires non recommandés ou non vendus par KitchenAid peut provoquer un incendie, un choc électrique ou des blessures. 8. Ne pas utiliser le batteur sur socle à l’extérieur. - Page 22 UTILISER LE BATTEUR SUR SOCLE CHOIX DE L’ACCESSOIRE APPROPRIÉ UTILISER ACCESSOIRE POUR DESCRIPTION MÉLANGER ARBRE DU BATTEUR Mélange Gâteaux, glaçages crémeux, confiseries, normal à lourd biscuits, pâtisseries, pain de viande, purée BATTEUR À CÔTÉ de pommes de terre SOUPLE* FOUET Mélange où...
- Page 23 UTILISER LE BATTEUR SUR SOCLE GUIDE DE COMMANDE DE VITESSE REMARQUE : Il est possible de régler la commande de vitesse entre les vitesses indiquées dans le tableau (vitesses 1, 3, 5, 7 et 9) si un ajustement plus précis est nécessaire.
- Page 24 UTILISER LE BATTEUR SUR SOCLE ASSEMBLER LE BATTEUR SUR SOCLE Soulever la tête du moteur : Glisser le levier de fermeture à la position Vérifier pour être certain que le déverrouillée et soulever la tête du batteur sur socle est débranché moteur.
- Page 25 UTILISER LE BATTEUR SUR SOCLE ASSEMBLER LE BATTEUR SUR SOCLE Abaisser la tête du moteur : Glisser le levier de fermeture à la position déverrouillée et abaisser la tête du moteur. Vérifier que la tête du moteur est complètement abaissée, puis glisser le levier à...
- Page 26 UTILISER LE BATTEUR SUR SOCLE METTRE EN MARCHE LE BATTEUR SUR SOCLE REMARQUE : Il est possible que le batteur sur socle chauffe durant son utilisation. Lorsque l’on mélange des préparations épaisses pendant une période prolongée, il se peut que le dessus de l’unité devienne chaud. Ceci est normal. Brancher le batteur sur socle sur une prise à...
- Page 27 UTILISER LE BATTEUR SUR SOCLE REMARQUE : L’écran verseur* peut être utilisé pour éviter que les ingrédients n’éclaboussent à l’extérieur du bol et pour faciliter l’ajout d’ingrédients dans le bol pendant le fonctionnement. (OPTIONEL) Ajouter les ingrédients dans le bol à partir du bec verseur. DÉMONTER LE BATTEUR SUR SOCLE Soulever la tête du moteur : Vérifier que le batteur sur socle est...
-
Page 28: Accessoires Optionnels
ACCESSOIRES OPTIONNELS KitchenAid offre une grande variété d’accessoires optionnels comme le Spiralizer, les couteaux à pâte ou les broyeurs d’aliments qui peuvent être fixés à l’arbre de commande du batteur sur socle comme illustré ici. -
Page 29: Conseils Pour Obtenir Des Résultats Optimaux
2 blanc d’œufs ou plus graduellement jusqu’à 8 Étapes pour battre les blancs d’œufs Grâce à votre robot sur socle KitchenAid, les blancs d’œufs sont rapidement battus en neige. Soyez donc très attentif afin d’éviter de trop les travailler. CRÈME FOUETTÉE Versez la crème froide dans un bol refroidi. -
Page 30: Conseils De Mélange
CONSEILS POUR OBTENIR DES RÉSULTATS OPTIMAUX CONSEILS DE MÉLANGE Temps de mélange Pâtes à gâteaux en sachet Votre robot sur socle KitchenAid Lorsque vous préparez des mélanges à mélangera plus rapidement et plus gâteaux vendus dans le commerce, utilisez efficacement que la plupart des autres la 4e vitesse comme vitesse moyenne et robots électriques. -
Page 31: Entretien Et Nettoyage
ENTRETIEN ET NETTOYAGE NETTOYER LE BATTEUR SUR SOCLE IMPORTANT : Ne pas laver le fouet métallique au lave-vaisselle. Ne pas immerger le corps du batteur sur socle dans de l’eau ou tout autre liquide. Ces pièces devraient être lavées à la main. Éteindre le batteur sur socle et le débrancher avant de le nettoyer. -
Page 32: Dépannage
DÉPANNAGE Si le batteur sur socle fonctionne mal, vérifier ce qui suit : 1. Il est possible que le batteur sur socle chauffe durant son utilisation. Lorsque l’on mélange des préparations épaisses pendant une période prolongée, il se peut que le dessus de l’unité... -
Page 33: Garantie Et Dépannage
GARANTIE ET DÉPANNAGE GARANTIE ET DÉPANNAGE DE BATTEUR SUR SOCLE KITCHENAID POUR LES 50 ÉTATS DES ÉTATS-UNIS, LE DISTRICT FÉDÉRAL DE COLUMBIA, PORTO RICO ET LE CANADA La présente garantie couvre l’acheteur et les propriétaires suivants du batteur sur socle lorsqu’il est utilisé dans les 50 États des États-Unis, le district fédéral de Columbia, à... - Page 34 Mexique : 01-800-0022-767. ©2017 KitchenAid. Tous droits réservés. KITCHENAID et la forme du batteur sur socle sont des marques de commerce aux É.-U. et dans d’autres pays. Utilisé sous licence au Canada. GARANTIE ET DÉPANNAGE | 33...
-
Page 35: Piezas Y Características
PIEZAS Y CARACTERÍSTICAS PIEZAS Y ACCESORIOS Eje para aditamentos Cabeza con motor Eje del batidor Batidor plano Control de velocidad Tazón Batidor de alambre Gancho para masa Batidor con borde limpiador flexible* Escudo vertedor* *El accesorio se vende por separado 34 | PIEZAS Y CARACTERÍSTICAS... -
Page 36: Seguridad De La Batidora Con Base
SEGURIDAD DE LA BATIDORA CON BASE SALVAGUARDIAS IMPORTANTES Al utilizar aparatos eléctricos, se deben seguir las precauciones básicas de seguridad, entre las que se incluyen las siguientes: 1. Lea todas las instrucciones. 2. Para evitar el riesgo de choque eléctrico, no ponga la batidora con base en agua ni en ningún otro líquido. - Page 37 Devuelva el aparato al lugar más cercano de servicio autorizado para su examen, reparación o ajuste. 7. El uso de accesorios no recomendados o no vendidos por KitchenAid puede provocar un incendio, choque eléctrico o lesiones.
- Page 38 SEGURIDAD DE LA BATIDORA CON BASE REQUISITOS ELÉCTRICOS Tensión: 120 V~ Frecuencia: 60 Hz Potencia: 250 W MAX para los modelos K45SS 275 W MAX para los modelos K45, KSM45-KSM80 300 W MAX para los modelos KSM85-KSM110 325 W MAX para los modelos KSM120-KSM200 NOTA: La clasificación de potencia para su batidora con base está...
- Page 39 CÓMO USAR LA BATIDORA CON BASE GUÍA PARA EL CONTROL DE VELOCIDAD NOTA: Si se necesita un ajuste más preciso, puede fijarse el control de velocidad entre las velocidades indicadas en la tabla para obtener las velocidades 1, 3, 5, 7 y 9. No exceda la velocidad 2 al preparar masas con levadura, ya que se puede dañar la batidora con base.
- Page 40 CÓMO USAR LA BATIDORA CON BASE CÓMO ENSAMBLAR LA BATIDORA CON BASE Levante la cabeza con motor: Deslice la palanca de bloqueo a la posición de desbloqueo y levante Verifique que la batidora con base la cabeza con motor. En cuanto esté...
- Page 41 CÓMO USAR LA BATIDORA CON BASE CÓMO ENSAMBLAR LA BATIDORA CON BASE Baje la cabeza con motor: Deslice la palanca de bloqueo a la posición de desbloqueo y guíe la cabeza con motor hacia abajo. Asegúrese de que la cabeza con motor esté completamente bajada y deslice la palanca de bloqueo a la posición de bloqueo.
- Page 42 CÓMO USAR LA BATIDORA CON BASE USO DE LA BATIDORA CON BASE NOTA: La batidora con base se puede calentar durante el uso. Con cargas pesadas y tiempo de mezclado extendido, la parte superior de la unidad se puede calentar. Eso es normal. Enchufe la batidora con base en un tomacorriente de 3 terminales con descarga a tierra.
- Page 43 CÓMO USAR LA BATIDORA CON BASE NOTA: Puede utilizar el escudo vertedor* para evitar salpicar ingredientes fuera del tazón al mezclar, además de usarlo para verter ingredientes fácilmente en el tazón mientras mezcla. (OPCIONAL) Vierta los ingredientes en el tazón a través del conducto para verter.
- Page 44 ADITAMENTOS OPCIONALES KitchenAid ofrece una amplia variedad de aditamentos opcionales, como el aditamento para corte en espiral, los cortadores de pasta, los molinillos de alimentos, que se pueden fijar en el eje del motor de aditamentos de la batidora con base, como se muestra aquí.
-
Page 45: Claras De Huevo
2 o más claras de huevo PROGRESIVAMENTE HASTA 8 Fases a la hora de montar claras de huevo Con su batidora de pie KitchenAid montará las claras rápidamente. De forma que tenga cuidado para que no las monte en exceso. NATA MONTADA Vierta la nata para montar fría en el bol previamente enfriado. -
Page 46: Consejos Para Mezclar
CONSEJOS PARA OBTENER EXCELENTES RESULTADOS CONSEJOS PARA MEZCLAR Tiempo de batido Masas para pasteles Su batidora de pie KitchenAid mezclará Cuando prepare masas envasadas para más rápido y mejor que la mayoría de las pasteles, emplee la velocidad 4 para una batidoras eléctricas. -
Page 47: Cuidado Y Limpieza
CUIDADO Y LIMPIEZA LIMPIEZA DE LA BATIDORA CON BASE IMPORTANTE: No lave el batidor de alambre en una lavavajillas. No sumerja el cuerpo de la batidora con base en el agua u otros líquidos. Estas piezas se deben lavar a mano. Apague la batidora con base y El tazón, batidor plano, gancho para desconéctela antes de limpiarla. -
Page 48: Solución De Problemas
SOLUCIÓN DE PROBLEMAS Si su batidora con base funciona mal, revise lo siguiente: 1. La batidora con base se puede calentar durante el uso. Con las mezclas densas que requieren períodos de mezclado prolongados, quizás no pueda tocar la parte superior de la unidad cómodamente. -
Page 49: Garantía Y Servicio
GARANTÍA Y SERVICIO GARANTÍA DEL BATIDORA CON BASE KITCHENAID PARA LOS 50 ESTADOS DE ESTADOS UNIDOS, EL DISTRITO DE COLUMBIA, PUERTO RICO Y CANADÁ Esta garantía se extiende al comprador y a cualquier propietario subsiguiente para el batidora con base usadas en los cincuenta estados de Estados Unidos, el Distrito de Columbia, Puerto Rico y Canadá. -
Page 50: Garantía De Reemplazo Sin Dificultades - En Canadá
México: Llame sin costo al 01-800-0022-767. ©2017 KitchenAid. Todos los derechos reservados. KITCHENAID y el diseño de la batidora con base son marcas registradas en EE.UU. y en otras partes. Usada en Canadá bajo licencia. GARANTÍA Y SERVICIO | 49... - Page 53 U.S. and elsewhere. Used under license in Canada. ©2017 KitchenAid. Tous droits réservés. KITCHENAID et la forme du batteur sur socle sont des marques de commerce aux E.-U. et dans d’autres pays. Utilisé sous licence au Canada.
- Page 54 KSMVSA...
-
Page 55: Stand Mixer Attachment Safety
PARTS AND FEATURES PARTS AND ACCESSORIES Medium shredding Coarse shredding Slicing blade blade blade Feed tube Large food pusher Small food pusher Release lever Attachment housing STAND MIXER ATTACHMENT SAFETY... - Page 56 6. If food becomes lodged in any blade or the feed tube, turn the motor off and disassemble the attachment to remove the remaining food. 7. Avoid contacting moving parts. 8. The use of attachments not recommended or sold by KitchenAid may cause fire, electric shock, or injury. 9. Do not use outdoors.
-
Page 57: Using The Stand Mixer Attachment
POTATOES CABBAGE (shred) FOR DETAILED INFORMATION ON USING THE FRESH PREP SLICER/SHREDDER ATTACHMENT Visit kitchenaid.com/quickstart for additional instructions with videos, inspiring recipes, and tips on how to use your Fresh Prep Slicer/Shredder attachment. 4 | USING THE STAND MIXER ATTACHMENT... - Page 58 USING THE STAND MIXER ATTACHMENT ASSEMBLING THE FRESH PREP SLICER/SHREDDER ATTACHMENT Slide the blade you want to use into the housing. You will hear a click Turn the Stand Mixer off and unplug. when the blade snaps into place properly on the drive shaft. For Stand Mixers with a hinged attachment hub cover: Flip up to open.
- Page 59 USING THE STAND MIXER ATTACHMENT USING THE FRESH PREP SLICER/SHREDDER ATTACHMENT NOTE: For best results, feed only one item at a time into the feed tube (ex. carrot). Do not feed items into the feed tube by hand; always use the food pushers. If food remains in the Fresh Prep Slicer/Shredder attachment after running, turn the Stand Mixer to “0”...
- Page 60 CARE AND CLEANING CLEANING THE FRESH PREP SLICER/SHREDDER ATTACHMENT IMPORTANT: The housing of the Fresh Prep Slicer/Shredder attachment must be hand washed only using warm, soapy water. The Fresh Prep Slicer/Shredder attachment blades and accessories are dishwasher safe, top rack only. After using the Fresh Prep Slicer/ Clean the housing of the Fresh Prep Shredder attachment, remove all...
-
Page 61: Warranty And Service
IF THIS PRODUCT FAILS TO WORK AS WARRANTED, CUSTOMER’S SOLE AND EXCLUSIVE REMEDY SHALL BE REPAIR OR REPLACEMENT ACCORDING TO THE TERMS OF THIS LIMITED WARRANTY. KITCHENAID AND KITCHENAID CANADA DO NOT ASSUME ANY RESPONSIBILITY FOR INCIDENTAL OR CONSEQUENTIAL DAMAGES. This warranty gives you specific legal rights and you may also have other rights which vary from state to state or province to province. - Page 62 Call toll-free 1-800-807-6777. For service information in Mexico: Call toll-free 01-800-0022-767. ®/™ © 2016 KitchenAid. All rights reserved. The design of the Stand Mixer is a trademark in the U.S. and elsewhere. Used under license in Canada. WARRANTY AND SERVICE | 9...
- Page 63 PIÈCES ET CARACTÉRISTIQUES PIÈCES ET ACCESSOIRES Lame pour coupe Lame pour coupe Lame pour trancher moyenne grossière Tube d’alimentation Poussoir de Poussoir de grande taille petite taille Levier de Logement pour dégagement accessoires SÉCURITÉ POUR L’ACCESSOIRE DU BATTEUR SUR SOCLE 10 | SÉCURITÉ...
- Page 64 éteindre le moteur et démonter l’accessoire pour retirer les résidus alimentaires. 7. Éviter tout contact avec les pièces en mouvement. 8. L’utilisation d’accessoires non recommandés ou non vendus par KitchenAid peut causer un incendie, un choc électrique ou des blessures.
- Page 65 SÉCURITÉ POUR L’ACCESSOIRE DU BATTEUR SUR SOCLE 15. Pour éviter tout dommage, ne pas laver ou immerger les accessoires dans de l’eau ou tout autre liquide. CONSERVER CES INSTRUCTIONS Ce produit est conçu uniquement pour un usage domestique. UTILISER L’ACCESSOIRE DE BATTEUR SUR SOCLE TABLEAU DE LA TRANCHEUSE/RÂPE POUR LA PRÉPARATION DE PRODUITS FRAIS REMARQUE : Pour obtenir de bons...
- Page 66 POUR OBTENIR DES INFORMATIONS DÉTAILLÉES SUR L’UTILISATION DE LA TRANCHEUSE/RÂPE POUR LA PRÉPARATION DE PRODUITS FRAIS Visiter kitchenaid.com/quickstart pour des instructions supplémentaires avec des vidéos, des recettes qui inspirent, et des conseils sur la façon d’utiliser la trancheuse/râpe pour la préparation de produits frais.
- Page 67 UTILISER L’ACCESSOIRE DU BATTEUR SUR SOCLE Pour les batteurs sur socle dont la prise à accessoires multifonction est équipée d’un couvercle à charnière : Relever le couvercle pour ouvrir. Pour les batteurs sur socle dont la prise à accessoires multifonction est équipée d’un couvercle amovible : Tourner le bouton de l’accessoire dans le sens antihoraire pour retirer le couvercle de la prise à...
- Page 68 UTILISER L’ACCESSOIRE DU BATTEUR SUR SOCLE UTILISER LA TRANCHEUSE/RÂPE POUR LA PRÉPARATION DE PRODUITS FRAIS REMARQUE : Pour obtenir de bons résultats, n’insérer qu’un seul aliment à la fois dans le tube d’alimentation (par exemple une carotte). Ne pas insérer à la main des aliments dans le tube d’alimentation; toujours utiliser les poussoirs.
- Page 69 ENTRETIEN ET NETTOYAGE ENTRETIEN DE LA TRANCHEUSE/RÂPE POUR LA PRÉPARATION DE PRODUITS FRAIS IMPORTANT : Le logement de la trancheuse/râpe pour la préparation de produits frais ne peut être lavé qu’à la main à l’aide d’eau chaude et savonneuse. Les lames et pièces amovibles de la trancheuse/râpe pour la préparation de produits frais sont résistantes au lave-vaisselle dans le panier supérieur seulement.
-
Page 70: Garantie Et Dépannage
UNIQUE RECOURS DU CLIENT CONSISTE À EN OBTENIR LA RÉPARATION OU LE REMPLACEMENT CONFORMÉMENT AUX TERMES DE LA PRÉSENTE GARANTIE LIMITÉE. KITCHENAID ET KITCHENAID CANADA DÉCLINENT TOUTE RESPONSABILITÉ AU TITRE DES DOMMAGES FORTUITS OU INDIRECTS. Cette garantie vous confère des droits juridiques spécifiques et vous pouvez également jouir d’autres droits qui peuvent varier d’un État à... - Page 71 Mexique : 01-800-0022-767. ®/™ © 2016 Tous droits réservés. KITCHENAID et la forme du batteur sur socle sont des marques de commerce aux É.-U. et dans d’autres pays. Utilisé sous licence au Canada. 18 | GARANTIE ET DÉPANNAGE...
- Page 72 PIEZAS Y CARACTERÍSTICAS PIEZAS Y ACCESORIOS Hoja para cortar en Hoja para cortar Hoja para rebanar juliana mediana en juliana gruesa Tubo de alimentación Palanca de desenganche Cavidad del accesorio Empujador de Empujador de alimentos grande alimentos pequeño SEGURIDAD DEL ACCESORIO DE LA BATIDORA CON BASE SEGURIDAD DEL ACCESORIO DE LA BATIDORA CON BASE | 19...
-
Page 73: Medidas De Protección Importantes
7. Evite tocar las piezas que estén en movimiento. 8. El uso de accesorios no recomendados o no vendidos por KitchenAid puede provocar un incendio, choque eléctrico o lesiones. - Page 74 SEGURIDAD DEL ACCESORIO DE LA BATIDORA CON BASE 15. Para evitar daños, no sumerja la cavidad del accesorio en agua ni en otros líquidos. GUARDE ESTAS INSTRUCCIONES Este producto ha sido diseñado únicamente para uso doméstico. TABLA DE HOJAS DEL ACCESORIO PARA REBANAR/CORTAR EN JULIANA NOTA: Para obtener resultados óptimos, coloque solo un alimento a la vez en...
- Page 75 COL (en juliana) PARA OBTENER INFORMACIÓN DETALLADA SOBRE EL USO DEL ACCESORIO CORTADOR/RALLADOR DE ALIMENTOS FRESCOS Visite KitchenAid.com/quickstart para ver instrucciones adicionales con videos, recetas inspiradoras y consejos sobre cómo usar el accesorio cortador/rallador de alimentos frescos. ARMADO DEL ACCESORIO CORTADOR/RALLADOR DE ALIMENTOS...
- Page 76 CÓMO USAR EL ACCESORIO DE LA BATIDORA CON BASE Para batidoras con base con una cubierta de receptáculo para accesorio con bisagra: Levántela para abrirla. Para batidoras con base con una cubierta de receptáculo para accesorio desmontable: Gire la perilla del accesorio en el sentido contrario a las agujas del reloj para quitar la cubierta del receptáculo para accesorios.
- Page 77 CÓMO USAR EL ACCESORIO DE LA BATIDORA CON BASE USO DEL ACCESORIO CORTADOR/RALLADOR DE ALIMENTOS FRESCOS NOTA: Para obtener resultados óptimos, coloque solo un alimento a la vez en el tubo de alimentación (por ej. una zanahoria). No coloque alimentos en el tubo de alimentación con la mano; siempre use los empujadores de alimentos.
- Page 78 CUIDADO Y LIMPIEZA LIMPIEZA DEL ACCESORIO CORTADOR/RALLADOR DE ALIMENTOS FRESCOS IMPORTANTE: La cavidad del accesorio cortador/rallador de alimentos frescos solo se debe lavar a mano con agua tibia y jabonosa. Las hojas y aditamentos del accesorio cortador/rallador de alimentos frescos se pueden lavar en el lavavajillas, solo en la rejilla superior.
-
Page 79: Garantía Y Servicio
ÚNICO Y EXCLUSIVO RECURSO DEL CLIENTE SERÁ EL DE REPARARLO O REEMPLAZARLO SEGÚN LOS TÉRMINOS DE ESTA GARANTÍA LIMITADA. KITCHENAID Y KITCHENAID CANADA NO SE RESPONSABILIZARÁN POR DAÑOS INCIDENTALES O CONSECUENTES. Esta garantía le otorga derechos legales específicos, y es posible que usted tenga también otros derechos, los cuales varían de un estado a otro o de una provincia a otra. - Page 80 México: Llame sin costo al 01-800-0022-767. ®/™ © 2016 Todos los derechos reservados. KITCHENAID y el diseño de la batidora con base son marcas registradas en EE.UU. y en otras partes. Usada en Canadá bajo licencia. GARANTÍA Y SERVICIO | 27...
- Page 81 CERTIFICADO DE GARANTIA PEQUEÑOS ELECTRODOMÉSTICOS MARCA KITCHENAID GARANTÍA VÁLIDA SÓLO EN EL PAÍS DE ADQUISICIÓN DEL PRODUCTO GARANTIZADO IMPORTANTE: Para su utilización este Certificado o Tarjeta de Garantía debería presentarse junto a la factura o boleta de compra original del producto garantizado. Para Colombia la factura será exigible sólo en los casos en que la normativa local así lo permita.
- Page 82 CERTIFICADO DE GARANTIA ELECTRODOMESTICOS MENORES KITCHENAID NOTA: Cuando la reparación y/o manipulación del producto garantizado fuera realizado por servicios técnicos no autorizados por el Garante y/o por el uso de piezas no originales, la Garantía otorgada quedará sin efecto alguno.
- Page 83 Los reclamos podrán ser derivados a través del Área de Atención al Cliente a través de la línea telefónica 502+2470-0858 MEXICO Garante: Whirlpool México, S.A de C.V. Dirección: Antigua Carretera a Roma Km 9, Col. Milagro, Apodaca, N.L. México 66634 Para una atención personalizada llámenos a la línea 01800 0022 767 Consulte también nuestro sitio web www.kitchenaid.com.mx...
- Page 84 Línea telefónica gratuita nacional : 800 9447 565 Horario de atención: llámenos de lunes a viernes de 8:00 am a 5:00 pm E-mail: serviciook@whirlpool.com © 2016 KitchenAid. Todos los derechos reservados. Las especificaciones están sujetas a cambios sin previo aviso.
- Page 85 U.S. and elsewhere. Used under license in Canada. © 2016 Tous droits réservés. KITCHENAID et la forme du batteur sur socle sont des marques de commerce aux É.-U. et dans d’autres pays. Utilisé sous licence au Canada.
Need help?
Do you have a question about the KSM150PSOB and is the answer not in the manual?
Questions and answers