
Subscribe to Our Youtube Channel
Related Manuals for Queclink CV200

Summary of Contents for Queclink CV200
- Page 1 CV200 Dash Camera User Manual CV200 User Manual Intelligent 4G Dash Camera with All-In-One Telematics QSZCAMCV200UM0104 Version: 1.04...
- Page 2 QSZCAMCV200UM0104 General Notes Queclink offers this information as a service to its customers, to support application and engineering efforts that use the products designed by Queclink. The information provided is based upon requirements specifically provided to Queclink by the customers. Queclink has not undertaken any independent search for additional relevant information, including any information that may be in the customer’s possession.
-
Page 3: Table Of Contents
CV200 Dash Camera User Manual Content 0. Revision history ..........................1 1. Introduction ..........................2 1.1. Reference ........................... 2 1.2. Terms and abbreviations ....................3 Driver Monitoring System ......................... 3 2. Product overview .......................... 4 2.1. Package list ......................... 4 2.2. - Page 4 CV200 Dash Camera User Manual 6.3.2. Loading the application ..................33 7. Maintenance ..........................35 7.1. Reboot the product ......................35 7.1.1. Reboot button ....................... 35 7.1.2. Reboot command ....................35 7.2. Retrieve the logs....................... 35 8. LED description ........................... 36 9.
-
Page 5: Revision History
CV200 Dash Camera User Manual 0. Revision history Revision Date Author Description of change 1.00 2023-03-09 Gavin Jiang Initial version 1.01 2023-06-13 Gavin Jiang Modified some descriptions Add blinking frequency value in the table of LED 1.02 2023-06-25 Gavin Jiang Description Add section “3.4 &... -
Page 6: Introduction
CV200 Dash Camera User Manual 1. Introduction The CV200 series is the 2nd generation dashcam product, developed upon the Qualcomm™ IOT platform, it’s an all-in-one device combining high-definition recording with full telematics features. It depends on discrete design, builds in front-facing camera, and accepts the additional plug &... -
Page 7: Terms And Abbreviations
CV200 Dash Camera User Manual 1.2. Terms and abbreviations Table 2. Terms and Abbreviations Abbreviation Description GNSS Global Navigation Satellite System Global Position System Glonass Russian High Orbit Satellite Navigation System G-SENSOR Gravity Sensor Access Point Station CAT6 LTE Category 6... -
Page 8: Product Overview
CV200 Dash Camera User Manual 2. Product overview 2.1. Package list DASH CAM (*1) Function Cable (*1) Adhesive Tape (*2) Torx Screw (*4) Warranty Card (*1) 2.2. Accessories TF Card Debug Cable Film Panic Button BLE WKF300 Screw Drivers Interior Camera DMS Camera 2.3. -
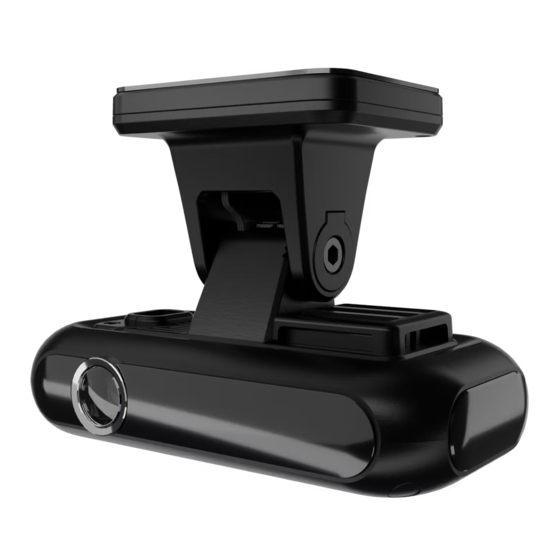
Page 9: Front View
CV200 Dash Camera User Manual Number Definition Feature Multi-function SOS alarm, Wi-Fi switch, Panic alarm Button LED Indicator Indicate device states Microphone Pick up cabin audio Speaker Virtual voice alerts Bracket Base With adhesive pad to install the unit over windshield... -
Page 10: Interface View
CV200 Dash Camera User Manual 2.5. Interface view Number Definition Feature Tamper-Resistant Cover Prevent the SIM & TF cards from theft USB-C Slot For debugging and data communication TF Card Slot For TF card SIM Card Slot For nano SIM... -
Page 11: Debug Cable
CV200 Dash Camera User Manual Connect it to the ignition signal output slot of ACC_IN (White) fuse box BATTERY+ (Red) Connect it to the power source slot of fuse box GND (Black) Connect it to the ground wire of your vehicle... -
Page 12: In-Vehicle Installation
CV200 Dash Camera User Manual 3. In-vehicle installation 3.1. Configurating the parameters Follow the steps to setup the dashcam. 1. Take out the dashcam from the package box. 2. Open the tamper-resistant cover by screw driver. 3. Place SIM card and memory card into slots gently. - Page 13 CV200 Dash Camera User Manual *Before inserting the TF card, ensure that the metal contacts on the TF card are facing towards the mount connector of the product. *The product only accepts the MicroSD (TF) type cards. *UHS type TF cards provide high speed write and read performance.
-
Page 14: Mounting The Dashcam
CV200 Dash Camera User Manual 6. Decompress the “Manage Tool” package and run it to setup the parameters. Mount the Tamper-Resistant cover back after completing configuration. *Debug cable isn’t included into standard package, please contact the supplier if necessary *After the product is powered on, wait for 30-60 seconds until it’s fully started 3.2. - Page 15 Voice Prompt : Enable WiFi 5. Download Qucam mobile application, search the Wi-Fi hotspot of product and connect to it. *Default hotspot SSID / Password: queclink / 12345678 6. Login the “Live” tab of mobile application to get the live view of front-facing camera.
- Page 16 CV200 Dash Camera User Manual 7. Unscrew the bracket shaft by hex drive. Adjust the angle until approx. 30% view of your vehicle bonnet is showing at the bottom of view, and then remove the protection film of lens. 8. Screw the bracket shaft to complete the installation.
-
Page 17: Installing The Interior Camera
CV200 Dash Camera User Manual 3.3. Installing the Interior camera Follow the steps to install the interior camera properly. 1. Select a location on the windshield that can record the entire cabin view. 2. Peel off the protective film from the double-sided tape and attach the interior camera to the windshield. - Page 18 CV200 Dash Camera User Manual 4. Login the “Live” tab of mobile application to get the live view of interior camera. 5. Unscrew the bracket shaft by Philips driver, adjust the angle of interior camera. 6. Remove the protection film of lens, and screw the shaft to complete the installation.
-
Page 19: Installing The Dms Camera
CV200 Dash Camera User Manual 3.4. Installing the DMS camera Follow the steps to install the DMS-feature camera properly. 1. Select a location on the dashboard to place the camera. For best accuracy of DMS, install the DMS camera in the recommended area. - Page 20 CV200 Dash Camera User Manual Step #2 DMS feature calibration The DMS module offers “dynamic self-calibration” essentially, but firstly it needs to initialize the “calibration done” state manually to assure the camera is installed on the correct position to avoid faulty/false alarms. The steps are as following: 1.
- Page 21 CV200 Dash Camera User Manual...
-
Page 22: Manage The Local Storage
CV200 Dash Camera User Manual 4. Manage the local storage 4.1. TF card contents The product only accepts the TF card that is running the FAT32 file system. All folders will be generated automatically after the TF card is mounted successfully. Follow the steps to operate the folders and files. -
Page 23: Storage Space Assignment
CV200 Dash Camera User Manual Symbol Description YYYYMMDD indicates year, month, and day hhmmss indicates hour, minutes and second 5) /queclink/video The folder stores all continuous and events recordings circularly. File format: YYYYMMDD_hhmmss_tt_c.mp4, each file is generated per minute. Symbol... - Page 24 CV200 Dash Camera User Manual * It offers the storage space assignment feature to divide the whole local storage into "continuous" and "protected" sections as specified percent rate. The recordings of crucial events will be copied to "protected" section to avoid the frequent overwritten operation.
-
Page 25: Using Qucam Mobile App
CV200 Dash Camera User Manual 5. Using QuCam mobile App Queclink Mobile App is a management tool specifically designed for viewing and managing recorded videos and configure various product features on your smartphone. Please download Mobile app by scanning the QR-CODE. -
Page 26: Downloading The Recorded Videos
Connect the dash camera hotspot in the Wi-Fi setting. Enter correct Wi-Fi password to connect the dash camera. * The Wi-Fi name and password at AP mode is “queclink” and “12345678”, please modify it by Manage Tool if necessary. 3) Connect the QuCam to the product Launch Mobile App, follow the on-screen instructions to connect the product to your mobile phone. -
Page 27: Monitoring The Live View
CV200 Dash Camera User Manual Follow the steps to play recorded videos. 1) Open the Mobile window or Camera window, tap “filter” icon to open filter page. 2) Select the filter options according to “Front / Interior”, “Event Type”, “Recording Time”... -
Page 28: Calibrate The Dms Features
CV200 Dash Camera User Manual Open the Live window, tap “Front/Interior” button to switch the video source. Adjust the angle of front and interior for best view at first installation. * While installing the front and interior facing camera, use the Live window to help you adjust your product in the most effective position. -
Page 29: Connecting By Ip/Port Mode (For Demonstration Purpose)
CV200 Dash Camera User Manual * The product identifies the FAT32 filesystem of TF card restrictedly. * The product sounds beep once formatting is started or completed. * The REC indictor turns off during formatting and turns on after TF card is mounted again. -
Page 30: Querying Information
CV200 Dash Camera User Manual Add the camera manually CV200XEU 001 Input the IP address that is accessible by mobile app 5.8. Querying information Open the About window to show all camera and mobile app information. CV200XEU 1) Camera Status List the connection status of product. - Page 31 CV200 Dash Camera User Manual f) Local Storage Show the capacity of local storage and provide the “formatting” feature 2) Language The QuCam app provides multiple language options, English language default. 3) Version Show the QuCam app version. 4) Privacy Policy...
-
Page 32: Updating The Product
2) Open the configuration file path ‘.\conf\svr.ini ‘, confirm the supported file type and FOTA service path. Run the FOTA tool “wxFotaSvr.exe” as administrator. 3) Input the service port to start the HTTP server, switch to the folder of CV200 project. - Page 33 CV200 Dash Camera User Manual *All available links will be auto-generated and listed. Copy the corresponding URL to add into ‘GTUPD’ command. For example: AT+GTUPD=cv200,0,0,10,0,,,http://192.168.90.21:8080/CV200/deltabin/ CV200_MCU_R00A01V15.enc,,1,,,,0001$ AT+GTUPD=cv200,0,0,10,0,,,http://192.168.90.21:8080/CV200/deltabin/ CV200_R00A02V07.apk,,0,,,,0001$ Symbol #1 (red color): it indicates the transmission protocol. Value “0” means HTTP Symbol #2 (yellow color): it indicates the application type.
-
Page 34: Fota Based On Ftp Service
The reference code changes as below: Updating “. enc”: 110-210-211-310-311 Updating “. apk”: 100-200-201-300-301 *Query the document “CV200 @Track Air Interface Firmware Update Protocol” to get more information 6) Double check the current version of applications. 6.1.3. FOTA based on FTP service 1) Run the FileZilla FTP server, create users and assign the root folder. -
Page 35: Updating Over Tf Card
The reference code changes as below: Updating “. enc”:110-210-211-310-311 Updating “. apk”:100-200-201-300-301 Updating “.zip”: 1110-2110-2111-3110-3111 *Query the document “CV200 @Track Air Interface Firmware Update Protocol” to get more information 6) Double check the current version of applications. 6.2. Updating over TF card... -
Page 36: Preparation Before Operations
2) MCU Application “CV200_MCU_RxxAxxVxx.enc” 3) Firmware Application “CV200_ RxxAxxVxx.apk” *The default updating path is “queclink/bin”, the path folder will auto be generated by the product if the card has been used to record. Please create the folder path if the card is brand- new. -
Page 37: Updating Over Debug Cable
CV200 Dash Camera User Manual indicator is starting fast blinking once it detects the patch file) 4) The product will auto reboot and load the new application after updating finished, it may cost 5 minutes around. 5) Run Manage tool to login the product and check the version information from the bottom of software. - Page 38 CV200 Dash Camera User Manual 4) Check the version information from the bottom of software. *Confirm the updating files are latest and newest. *Confirm the file type for MCU and firmware, make sure the file path is proper to access.
-
Page 39: Maintenance
The product provides the remote operation command line to reboot it by serial communication or network transmission. Query the Queclink CV200 @Track Protocol for more information about “RTO sub command: 3”. *Response to the rebooting request may be delayed due to the device needs to finish processing unfinished tasks first. -
Page 40: Led Description
CV200 Dash Camera User Manual 8. LED description Power (Red) GPS (Blue) Record (White) Cell (Green) Status Power (Red) GPS (Blue) Record (White) Cell (Green) Power on or GPS fix normal Record normal Network connected sleep Power off or Not defined... -
Page 41: Tf Card Selection
CV200 Dash Camera User Manual 9. TF card selection Continuous Recording Event Recording Folder /queclink/video /queclink/video & /queclink/protected File 1 minute 30 seconds (default, configurable) Length Definition Record while ignition on and driving Record while events are triggered What’s the bitrate difference of image quality? (For reference only) - Page 42 CV200 Dash Camera User Manual 30fps + 68MB 4.7 GB 6.8 Hrs. 13.6 Hrs. 27.2 Hrs. 15fps +12MB 15fps + 34MB 2.7 GB 11.8 Hrs. 23.6 Hrs. 47.2 Hrs. 15fps 12MB Low Quality File Size Frame Rate (Front + 32GB Card...
- Page 43 CV200 Dash Camera User Manual What kind of speed of TF card should be used? We strongly suggest you use high-quality with high-speed class card, such as the endurance series of SanDisk, Samsung, Transcend or Toshiba. Purchase them from reliable manufacturer or reputable vendors.
-
Page 44: Event Recording Type
CV200 Dash Camera User Manual 10. Event recording type Event Code Recording Type Normal Record Ignition ON Ignition OFF Power Disconnected Crash Detection Harsh Acceleration Harsh Braking Harsh Turning Over Speed Alarm Panic Button Clicking (Panic Event) Panic Button Hold On (SOS Alarm) -
Page 45: Warranty
TF card may be deleted during repair. Every product requested for repair is regarded as a device that has had its data backed up. The after-sale service does not back up your data. Queclink is not responsible for any data loss. - Page 46 15.19 Labeling requirements. This device complies with part 15 of the FCC Rules. Operation is subject to the following two conditions: (1) This device may not cause harmful interference, and (2) this device must accept any interference received, including interference that may cause undesired operation.
- Page 47 Declaration of Conformity Hereby, [Queclink Wireless Solutions Co., Ltd.] declares that the radio equipment type [Intelligent 4G Dash Camera with Full Featured Telematics, CV200XEU] is in compliance with Directive 2014/53/EU.The full text of the EU declaration of conformity is available at the following internet address:www.Queclink.com...
Need help?
Do you have a question about the CV200 and is the answer not in the manual?
Questions and answers