
Related Manuals for Queclink CV100LG

Summary of Contents for Queclink CV100LG
- Page 1 CV100LG User Manual CV100LG User Manual Telematics Dual-Lens LTE CAT4 DASH CAM QSZCAMCV100LGUM0304 Version: 3.04 QSZCAMCV100LGUM0304...
- Page 2 Furthermore, system validation of this product designed by Queclink within a larger electronic system remains the responsibility of the customer or the customer’s system integrator. All specifications supplied herein are subject to change.
-
Page 3: Table Of Contents
CV100LG User Manual Contents 0. Revision history ..........................1 1. Introduction ..........................2 1.1. Reference ........................... 2 1.2. Terms and abbreviations ....................3 2. Product overview .......................... 4 2.1. Package list ......................... 4 2.2. Optional accessories ......................4 2.3. Rear view ..........................4 2.4. - Page 4 CV100LG User Manual 5.3. Storage space assignment ....................30 6. Using QuCam mobile App ......................31 6.1. Connecting the product to your mobile phone..............31 6.2. Downloading the recorded videos ................... 32 6.3. Playing the recordings ...................... 33 6.4. Monitoring the live view ....................34 6.5.
-
Page 5: Revision History
CV100LG User Manual 0. Revision history Revision Date Author Description of change 2021-09-09 Gavin Jiang Initial version 2021-09-15 Gavin Jiang 1) Add chapter 11 1) Comply to document standard 2) Add section 4.17/4.18 3.01 2021-11-10 Gavin Jiang 3) Modify section 8.4 4) Modify chapter 11 3.02... -
Page 6: Introduction
CV100LG User Manual 1. Introduction CV100LG is a compact video telematics dash camera designed for a wide variety of vehicle tracking and video monitoring applications. It’s set with dual-lens imaging system to capture real-time high-definition video clips and record the traffic status, driver’s behavior to track exactly what happened before, during and after an incident by recording driving data like view of road, audio, speed, GNSS location, acceleration, braking, crashing, etc. -
Page 7: Terms And Abbreviations
CV100LG User Manual 1.2. Terms and abbreviations Table 2. Terms and Abbreviations Abbreviation Description GNSS Global Navigation Satellite System Global Position System Glonass Russian High Orbit Satellite Navigation System G-SENSOR Gravity Sensor Access Point Station CAT4 LTE Category 4 Bluetooth Low Energy... -
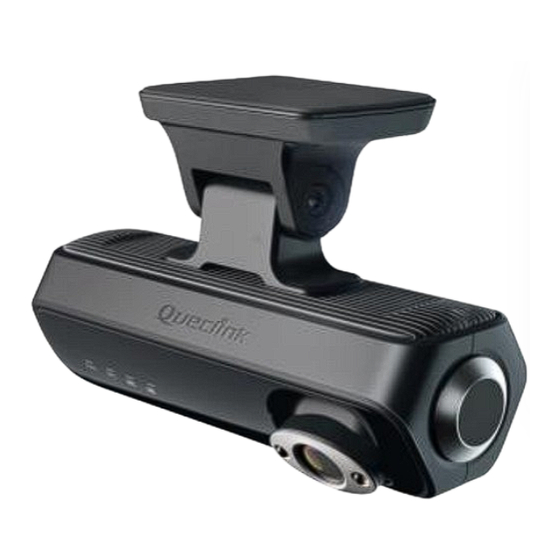
Page 8: Product Overview
CV100LG User Manual 2. Product overview 2.1. Package list DASH CAM (*1) Bracket Base (*1) Function Cable (*1) Tamper-resistant Panel (*1) Torx Screw (*6) Warranty Card (*1) Adhesive Tape (*2) 2.2. Optional accessories Screw Drivers BLE Panic Button TF Card... -
Page 9: Front View
CV100LG User Manual Number Definition Feature Interior Camera 720P HD camera for driver view LED Indicator Local working status for reminders Infrared LED For night vision Multi-function Button SOS Alarm, Wi-Fi switch, Panic alarm Good heat-conduction performance for reliable 24*7... -
Page 10: Function Cable
CV100LG User Manual computer TF Card Slot For TF card SIM Card Slot For nano SIM Built-in Bracket Rotate to adjust the field of view Reboot Button Short click to reboot the product instantly 2.5. Function cable The products supply the hardwired connection with your vehicle, please plug the proper cables as the descriptions. - Page 11 CV100LG User Manual Length = 1.5m PVC Number Definition Feature USB_COM Communicate the product over the COM port Communicate the product over the ADB command USB_ADB Type-C (L type) Interact with debugging PC over Type-C to USB 2-in-1 cable QSZCAMCV100LGUM0304...
-
Page 12: In-Vehicle Installation
CV100LG User Manual 3. In-vehicle installation 3.1. Installing the SIM & TF cards Follow the steps to insert the SIM & TF cards into the product. 1. Ensure the product is turned off. 2. Remove the temper-resistant panel by driver 3. -
Page 13: Powering On By Hardwire
CV100LG User Manual 4. Insert the memory card into the slot and push it into the slot until you hear a click. *Before inserting the TF card, ensure that the metal contacts on the TF card are facing towards the mount connector of the product. -
Page 14: Configuring For Initialization
CV100LG User Manual Battery_IN ACC_IN 3. Close the vehicle fuse box and turn on ACC to check that the product is powered on. *Using a fuse removal tool can make the hardwiring process easier. *Location of Battery + and ACC_IN power source may differ by car manufacturers and models. - Page 15 CV100LG User Manual 3. Decompress the “Manage tool” package and run the executive application. 4. Select the proper COM (serial) port that communicates with the product, connect it and it will print the “login success” message. 5. Mount the tamper-resistant panel back after completing configuration.
-
Page 16: Installing To The Windshield
CV100LG User Manual *Debug Cable isn’t included into standard package, please contact the supplier if necessary *After the product is powered on, wait for 30-60 seconds until it’s starting *Mount the tamper-resistant panel back after completing all operations *PC system requirement:... - Page 17 CV100LG User Manual 4. Attach the product on the surface of windshield, keep watching live view in order to confirm the exact position. 5. Unscrew the bracket shaft by hex drive. Adjust the angle of front camera until approx. 30% view of your vehicle bonnet is showing at the bottom of view and screw the bracket in the end.
- Page 18 CV100LG User Manual 8. Peel off the protective sheet of 3M adhesive tape and attach the bracket base at the position of windshield vertically. 9. Align the bracket into the base and slide it into, and secure it by 3 pieces of torx screws.
- Page 19 CV100LG User Manual *The placement of product can record the entire view in front of the vehicle without obstructing the drivers view *De-attaching and re-attaching the 3M tape will cause the stickiness lost *Clean the windshield by wiper and make sure there is no stain at front the product...
-
Page 20: Feature Settings
CV100LG User Manual 4. Feature settings 4.1. Configuring the APN network Input the public or private APN information that is indicated by your mobile service provider to tell the product what kind of 4G/3G/2G cellular network will be registered and connected. -
Page 21: Calibrating The System Time
CV100LG User Manual Define the dash camera name Change the administrative password Synchronized the ODO mileage of your vehicle Power management rule options The actions to response the incoming call Backup battery working switch Backup battery charging rules LED indicator switch *You must enable the “Backup Battery supply”, otherwise parts of features may be invalid. -
Page 22: Recording The Coordinate Periodically
CV100LG User Manual Time zone offset Hour Offset adjustment Minute Offset adjustment Daylight saving switch NTP server address Input UTC time manually *The priority of calibrating the system time: Manual Time < NTP Time < GPS Time. 4.5. Recording the coordinate periodically In order to track and determine the location of the product, it should periodically store and transmit the GPS positioning report to the server. -
Page 23: Uploading The Critical Evidences
CV100LG User Manual Recording feature switch Event type list Event Linkage actions to record and snapshot for recording and uploading *Select the desired events and record the footage while it’s triggered. * The event recordings will be stored into local TF card until overwritten. -
Page 24: Detecting The Crash Alarm
CV100LG User Manual *You must activate the specified events detection by the configurations. *You must enable the event recordings and snapshots features before transmit by FTP. *The FTP server must be reachable from the product. *The FTP path isn’t blank and can’t accept the single “/ “symbol. -
Page 25: Configuring The Geo-Fence Feature
HBM detection feature switch *Adjust the parameters as your desired. Read the CV100LG @Track Air interface protocol for more explanation information. 4.11. Configuring the GEO-fence feature Configure GEO-fence rules to safeguard your vehicle at any time, the product will record and report the event as the detection policies instantly. -
Page 26: In-Cab Alert Control
CV100LG User Manual *The responds depend on the Mode setting, the product can make the SOS call to the preset number, send the SOS alarm notification to the report server, or send the SMS message to the preset SMS gateway attached the location by google map link. -
Page 27: Changing The Wi-Fi Mode
CV100LG User Manual Detection switch The threshold of voltage detection The debounce Time setting *For the private car, taxi that using 12V vehicle battery, the threshold value should be less than 12000mV. 10000mV and 115000mV are recommended. *For HGV, LGV that using 24V vehicles battery, the threshold value should be less than 24000mV. -
Page 28: Starting The Parking Mode
CV100LG User Manual The BLE button switch The valid range of MAC list The MAC address of BLE button *The compatible BLE button: WKF300, WPB300, please inquiry the detailed information with your supplier. 4.18. Starting the parking mode The product will enter the parking mode while ignition vehicle off. If it detects an impact/bump, it saves a separate event recording file and send the crash event report. -
Page 29: Requesting Live Streaming
CV100LG User Manual The command number Query type – Time range query Video source – the video channel Video time – the time point Pre&Post Event – the total duration of recordings *The product will report “failed” if there is no specified file found or generated. -
Page 30: Downloading Pictures
CV100LG User Manual The command number Pushing Mode – feature switch RTMP Server & Encoder key - media sever to accept and forward streaming Streaming Type – Video file Video Source – the video file name 2. Request any video footage at any time point remotely as the configured parameters, including the time point and video duration. -
Page 31: Querying Files
CV100LG User Manual 4.23. Querying files It can send back the name list of memory-stored media files to the telematic server after receiving the query command. The command number Camera source – the video channel File Type – picture or video Event Type –... -
Page 32: Manage The Local Storage
CV100LG User Manual 5. Manage the local storage 5.1. Read the TF card The product only accepts the TF card what is running the FAT32 file system. All folders will be generated automatically after the TF card was mounted successfully. Follow the steps to operate the folders and files. - Page 33 CV100LG User Manual 3) /queclink/event The folder stores the related data of all events. File format: YYYYMMDD_hhmmss_tt.qdat, each file is generated and separated per event. Symbol Description YYYYMMDD indicates year, month, and day hhmmss indicates hour, minutes and second indicates event types 4) /queclink/track The folder stores the GPS and G-sensor compositive data.
-
Page 34: Storage Space Assignment
CV100LG User Manual 5.3. Storage space assignment The local storage is overwritten circularly, the oldest files will be removed automatically while the capacity is full. The product eliminates manual formatting on TF card, which greatly extends TF card life. Assign the storage percent... -
Page 35: Using Qucam Mobile App
CV100LG User Manual 6. Using QuCam mobile App Queclink Mobile App is a management tool specifically designed for viewing and managing recorded videos and configure various product features on your smartphone. Please download Mobile app by scanning the QR-CODE. * Compatible with mobile phone that is running Android OS 5.0 or later. -
Page 36: Downloading The Recorded Videos
Connect the dash camera hotspot in the Wi-Fi setting. Enter correct Wi-Fi password to connect the dash camera. * The Wi-Fi name and password at AP mode is “queclink” and “12345678”, please modify it by Manage Tool if necessary. 3) Connect the QuCam to the product Launch Mobile App, follow the on-screen instructions to connect the product to your mobile phone. -
Page 37: Playing The Recordings
CV100LG User Manual to deselect it. 2) QuCam will display the progress of your video downloads on screen after starting downloading. 3) Once videos have finished downloading, they will appear in the Mobile window. 6.3. Playing the recordings The videos screen layout as follow: Follow the steps to play recorded videos. -
Page 38: Monitoring The Live View
CV100LG User Manual 6.4. Monitoring the live view Follow the steps to preview the real-time videos. Open the Live window, tap “Front/Interior” button to switch the video source. Adjust the angle of front and interior for best view at first installation. -
Page 39: Connecting By Ip/Port Mode (For Demonstration Purpose)
CV100LG User Manual * The product identifies the FAT32 filesystem of TF card restrictedly. * The product sounds beep once formatting is started or completed. * The REC indictor turns off during formatting and turns on after TF card is mounted again. -
Page 40: Querying Information
CV100LG User Manual Add the camera manually Input the IP address that is accessible by mobile app 6.7. Querying information Open the About window to show all camera and mobile app information. 1) Camera Status List the connection status of product. Tap info button for further information. - Page 41 CV100LG User Manual f) Local Storage Show the capacity of local storage and provide the “formatting” feature 2) Language The QuCam app provides multiple language options, English language default. 3) Version Show the QuCam app version. 4) Privacy Policy Display the related policies and disclaimer.
-
Page 42: Updating The Product
It is named ‘FotaTool V0.06’ from Queclink. FTP server (FileZilla Open-source server downloaded from internet. E.g., FileZilla recommended) After the TCP socket established between server and CV100LG, it’s Platform server used to trigger the updating process by typing the command remotely. - Page 43 CV100LG User Manual 4) Input the service port to start the HTTP server, switch to the folder of CV100LG project. *All available links will be auto-generated and listed. Copy the corresponding URL to add into ‘GTUPD’ command. For example: AT+GTUPD=cv100,0,0,10,0,,,http://192.168.90.41:8080/CV100LG/deltabin/CV100LG_MCU_R 01A02V01.enc,,1,,,,0001$...
-
Page 44: Fota Based On Ftp Service
The reference code changes as below: Updating “. enc”:110-210-211-310-311 Updating “. apk”:100-200-201-300-301 *Query the document “CV100LG @Track Air Interface Firmware Update Protocol” to get more information 7) Double check the current version of applications. 7.1.3. FOTA based on FTP service 1) Run the FileZilla FTP server, create users and assign the root folder. - Page 45 CV100LG User Manual 2) Copy the application file into root folder ‘D:\FTP\DASHCAM\deltabin’. 3) Copy the corresponding URL to add into ‘GTUPD’ command. For example: AT+GTUPD=cv100,0,0,10,2,,,ftp://cv100lg:cv100lg@192.168.90.41:21/DASHCAM/deltabin/C V100LG_MCU_R01A02V01.enc,,1,,,,0001$ AT+GTUPD=cv100,0,0,10,2,,,ftp://cv100lg:cv100lg@192.168:90.41:21/DASHCAM/deltabin/C V100LG_MTK_R01A02V01.apk,,0,,,,0001 Symbol #1 (red color): it indicates the transmission protocol. Value “2” means FTP Symbol #2 (yellow color): it indicates the application type.
-
Page 46: Updating Over Tf Card
The reference code changes as below: Updating “. enc”:110-210-211-310-311 Updating “. apk”:100-200-201-300-301 *Query the document “CV100LG @Track Air Interface Firmware Update Protocol” to get more information 6) Double check the current version of applications. 7.2. Updating over TF Card The way is used to upgrade MCU software, application firmware and platform firmware by external TF card. -
Page 47: Mcu Updating
CV100LG User Manual *The default updating path is “queclink/bin”, the path folder will auto be generated by the product if the card has been used to record. Please create the folder path if the card is brand- new. 7.2.2. MCU updating 1) Confirm the current firmware version by Manage tool if need. -
Page 48: Updating Over Debug Cable
CV100LG User Manual For example, the platform would be updated from V1.17(present version) to V1.20(target version), the updating file must be named “CV100_package_V1.17 _to_V1.20.zip”. 3) Plug the card into product, confirm the power indicator status while updating. (The indicator is starting fasting blinking) 4) The product will auto reboot and load the new application after updating finished. - Page 49 CV100LG User Manual 4) Check the version information from the bottom of software. *Confirm the updating files are latest and newest. *Confirm the file type for MCU and firmware, make sure the application path is proper to load. *Update the MCU and firmware one by one, the product cannot load both simultaneously.
-
Page 50: Maintenance
8.2. Reset the parameters You may reset the parameters of product for recover some unknow troubles. Query the Queclink CV100LG @track protocol for more information about “RTO sub command: 4” section. 8.3. Power off the product In order to saving the battery power, for example the purpose of long-time shipment or vehicle idle, we must power off the product. - Page 51 CV100LG User Manual *Please inquiry the detailed information of logs filter with your suppliers. QSZCAMCV100LGUM0304...
-
Page 52: Specification
CV100LG User Manual 9. Specification Part Item Specification Connectivity Cellular LTE CAT.4 / WCDMA / GSM WiFi 802.11 b/g/n 2.4GHz Bluetooth BLE 4.1 GNSS GPS, Glonass Camera Image Sensor Dual crystal-clear HD CMOS Lens Front: 158° FOV 6-layer glass/Interior: 149°... - Page 53 CV100LG User Manual Dedicated Mobile App QuCam with features for free Interface Slot USB Type-C, TF Slot, Nano SIM Slot Output Open drain, software-defined feature Connector Type 4-pin connector Multi-functional SOS Alarm, Wi-Fi switch, Panic alarm Button Indicators 4 single-color LED indicators named CELL, GPS,...
-
Page 54: Led Description
CV100LG User Manual 10. LED Description Power (Red) Cell (Green) Record (White) GPS (Blue) Status Power (Red) GPS (Blue) Record (White) Cell (Green) Internet Power on or sleep GPS fix normal Record normal connection normal Power off Not defined Record is stopped Not defined .enc file is updating... -
Page 55: Tf Card Selection
CV100LG User Manual 11. TF card selection Continuous Recording Event Recording Folder /queclink/video /queclink/video & /queclink/protected File 1 minute 30 seconds (default, configurable) Length Definition Record while events are triggered Record while ignition on and driving What’s the bitrate difference of image quality? (For reference only) - Page 56 CV100LG User Manual 30fps + 15fps 23.0 Hrs. 74MB + 21MB 5.6 GB 5.8 Hrs. 11.5 Hrs. 24fps + 24fps 60MB + 27MB 5.0 GB 6.3 Hrs. 12.6 Hrs. 25.1 Hrs. 15fps + 15fps 46MB + 21MB 3.9 GB 8.2 Hrs.
- Page 57 CV100LG User Manual 6MB/s Can’t work correctly 4MB/s Can’t work correctly 2MB/s Can’t work correctly *It’s better to format the TF card at least once every 6 months. *Replace the TF card periodically if it shows instability after long-term running.
-
Page 58: Troubleshooting
CV100LG User Manual 12. Troubleshooting Ensure that the red protective cover (plastic film) has been removed from the mount pad. Make sure that the glass is smooth and clean. Press the mount firmly to the glass ensuring that there is 100% The mount will not stay in contact with the glass. - Page 59 CV100LG User Manual Setup menu of the product. Please ensure that you have configured the product’s Wi-Fi AP My Mobile Device will not Mode. connect to my product Double-click the function button to turn hotspots on. The QuCam mobile app will...
-
Page 60: Warranty
The after-sale service does not back up your data. Queclink is not responsible for any data loss. 15.21NOTE: The manufacturer is not responsible for any radio or TV interference caused by unauthorized modifications to this equipment.
Need help?
Do you have a question about the CV100LG and is the answer not in the manual?
Questions and answers