Advertisement
Advertisement
Table of Contents

Related Manuals for Eastwood 22220


Summary of Contents for Eastwood 22220
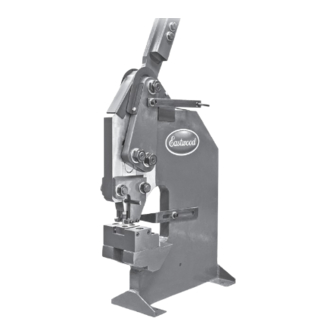
- Page 1 Item #22220 BENCH MOUNTED METAL PUNCH INSTRUCTIONS...
-
Page 2: Specifications
The EASTWOOD BENCH MOUNTED METAL PUNCH is designed to rapidly produce repeatable, clean, accurate holes in mild steel and aluminum up to 3/16” [4.8mm] thick making it perfect for industrial production applications and high-volume fabrication shops. A unique, Eastwood engineered Anti-Lift Foot prevents lifting of the workpiece after punching providing greater accuracy, speed and convenience. -
Page 3: Safety Information
• Be sure there is sufficient working room around the tool to allow for safe handling of various sizes of metal. • The Eastwood Manual Metal Punch was specifically designed to be operated by one person only. Never have one person operate the Handle while another feeds the workpiece or serious injury could occur. - Page 4 SET-UP • The Eastwood Bench Mounted Metal Punch can require substantial input force to operate and must be securely mounted on a heavy, solid workbench, stand, floor etc., capable of holding the static weight of the unit plus the ability to counter the high force stresses from operation.
- Page 5 LOWER FEMALE DIE REMOVAL • Using a 5mm Hex Key, loosen the four, clamping set-screws (FIG 3). • Withdraw the Lower Female Die (FIG 4). To order parts and supplies: 800.343.9353 >> eastwood.com...
- Page 6 Wedge Pin in from the left (Fig 8). • When fully seated, the Wedge Pin head will protrude approx. 1/4” on left side of the Die Drive Block. • Release Handle and remove scrap material. FIG. 7 Eastwood Technical Assistance: 800.343.9353 >> techelp@eastwood.com...
-
Page 7: Operation
Upper Male Die and the face of the Depth Fence then re-tighten Clamp Screw. OPERATION The Eastwood Bench Mounted Metal Punch is designed with a unique Ant-Lift Foot (FIG 9) preventing the workpiece from be- ing lifted with Handle release following a punching operation. -
Page 8: Maintenance
If you have any questions about the use of this product, please contact The Eastwood Technical Assistance Service Department: 800.343.9353 >> email: techelp@eastwood.com PDF version of this manual is available at eastwood.com The Eastwood Company 263 Shoemaker Road, Pottstown, PA 19464, USA 800.343.9353 eastwood.com © Copyright 2018 Easthill Group, Inc. 8/18...
Need help?
Do you have a question about the 22220 and is the answer not in the manual?
Questions and answers