
Subscribe to Our Youtube Channel
Related Manuals for VOCiC W3331F


Summary of Contents for VOCiC W3331F
- Page 1 Mobility Scooter INSTRUCTION MANUAL Model: W3331F > > > English 1 service-us@vocic.vip...
-
Page 2: Table Of Contents
Contents 1. Introduction........................ 2 2. Specification and Structure..................3 3. Initial Assembly......................6 4. Disassembly........................8 5. Comfortable adjusting....................9 6. Operation........................1 1 7. Battery and Charging....................12 8. Care and maintenance.....................16 9. Safety.........................18 10. Electromagnetic interference................24... -
Page 3: Introduction
1.Introduction Welcome to our corporation for purchasing the scooter. This scooter design combines the most advanced state-of-the-art components with modern, attractive styling. We are certain that the best performances, safety and comfort, and trouble-free operation of your scooter will add convenience to your daily living. -
Page 4: Specification And Structure
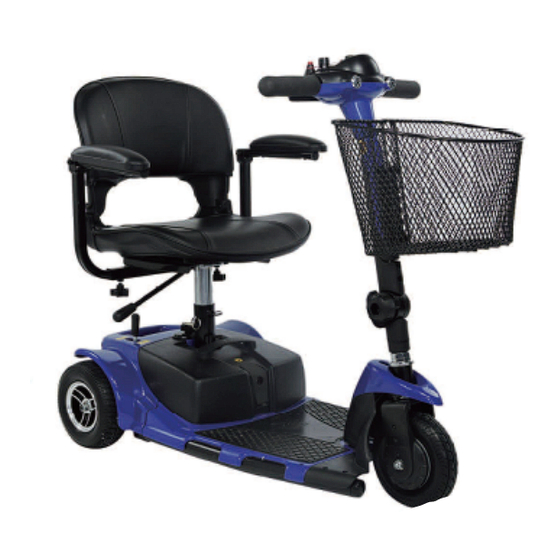
2.Specification and Structure Your scooter mainly consists of four parts: a front section, a rear section, a seat unit and battery. A tiller console, handle bar and a footplate are located on the front section. A driving motor, a brake system and the control electronics are located on the rear section. The seat unit contains a seatback and armrests etc. - Page 5 Powerindicator Speed 1. TILLER CONSOLE (see fig.2) Adjustment Knob a. Key Switch b. Speed Adjustment Knob c. Battery Condition Indicator Tiller d. Horn Button Key switch e. Headlight Button f. Throttle Control Lever Controllever fig.2 g. Tiller 2. CHARGING AND CONTROL SYSTEM (see fig.3) a.
- Page 6 Specification Overall Dimension(L*W*H) 940mmX500mmX840mm Seat Height 520mm Seat Width 430mm Seat Depth 350mm Armrest Height 210mm Backrest Height 330mm Net Weight 38Kg Max. Speed 6km/h Braking Distance ≤1500mm Min. Turning Radius ≤800mm±200mm Weight Capacity 120kg Travel Distance in Theory 15 km/9.32 Miles Static Stability ≥9°...
-
Page 7: Initial Assembly
3. Initial Assembly For convenience of transportation and reduction of possible damage, the batteries and the seat unit are separately packaged. So, you need assemble them onto the main frame of your scooter. OPENING THE PACKING BOX Open the packing box of your new scooter, and take off all protective liner, and then take off the scooter that has folded from the box. - Page 8 ASSEMBLE BATTERY UNIT ● Put battery into trough, align electrode terminal on battery with that in the trough(see fig.6). ASSEMBLE SEAT UNIT ● Put the seat onto the seat support(see fig.8). ● Pull out the seat-lock lever, adjust seat to the position, as you like. The seat will be locked automatically.
-
Page 9: Disassembly
4. Disassembly For convenience to transport and store, your detachable scooter in structure is designed to be disassembled and be assembled easily without any special tools. If your scooter is the version breaking apart, you can easily disassemble it into four pieces; the front section, the rear section, the seat unit and the batteries (see fig.10). -
Page 10: Comfortable Adjusting
5. Comfortable Adjusting Before operating the scooter, you may find the to make some adjustments to increase your confirm, such as seat height, armrest. SEAT HEIGHT ADJUSTMENT You can choose the different holes to change the seat height. Pull back the seat lock lever under the right side of the seat to unlock the seat. Lift the seat up and off... - Page 11 POWER SWITCH (SEE FIGURE 2) ● Plug the key into the power opening. ● Indicator on the gauge illuminates. ● Plug out the key, power indicator is off. WARNING! Do not use the key switch to stop your scooter unless an urgent event has happened.If your scooter has stopped for a long period, power down it to prevent unintended motion.
-
Page 12: Operation
6. Operation SEAT HEIGHTHORN BUTTON (See Figure 2). This button activates a warning horn. brake lever HEADLIGHT BUTTON (See Figure 2). This button activates headlights. fig.16 OFF-BOARD CHARGER(See Figure3). Open the agraffe on the battery case and you can use this off-board charger to change your batteries through a 3-pin charger power receptacle in the middle of the scooter. -
Page 13: Battery And Charging
7. Battery and Charging Your scooter two long-lasting, 12-volt, deep cycle batteries. These batteries are sealed and maintenance free. Since they are sealed, there is no need to check the electrolyte (fluid) level. Deep-appearance to automotive batteries, they are not interchangeable. Automotive batteries are not designed to handle a long, deep discharge, and also are unsafe for use in scooter. - Page 14 NEW BATTERY’ S USAGE To break-in new batteries for maximum efficiency, please follow the notes here below: ●Fully recharge any new battery prior to its initial use. This brings the battery up to about 90% of its peak performance level. ●Operate your scooter throughout house and yard.
- Page 15 WHAT TYPE OF BATTERIES SHOULD I USE? We recommend deep-cycle batteries that are sealed and maintenance free. Both SLA and Gel-Cell are deep-cycle batteries that are similar in performance. Refer to the following specifications to reorder deep-cycle batteries: type Deep-cycle sealed lead-acid Or gel cell size 6.0X3.9X3.8in voltage...
- Page 16 HOW CAN ENSURE MAXIMUM BATTERY LIFE? A fully charged deep-cycle battery will provide reliable performance and extended battery life. Keep your scooter batteries fully charged whenever possible. Batteries that are regularly and deeply discharge, in frequently charged, or stored without a full charge may be permanently damaged, causing unreliable operation and limited battery life.
-
Page 17: Care And Maintenance
8. Care and Maintenance For a safe use and an extent useful life, your scooter like any motorized vehicle requires routine maintenance check. Preventive maintenance is very important. You can perform some of these regular checks by yourself. If you follow the maintenance checks in this section as scheduled, you can help ensure that your scooter gives you years of trouble-free operation. - Page 18 CAUTION! If you do not use the scooter for a long period, recommend you to block up your scooter’ s kickstand not to make the tires touch with the ground. DAILY CHECK ●With the power off, check the throttle control lever. Make sure it is returns to the primary position when you release it.
-
Page 19: Safety
9. Safety SAFETY CHECK BEFORE USING Recommend you to perform a safety check before each use to make sure your scooter operates smoothly and safely. See VIII “CARE AND MAINTENANCE” .Perform the following instructions prior to using your scooter: ●Check all electrical connections. Make sure they are tight and not corroded. ●Check all connections to the battery box. - Page 20 The maximum safe incline angle is of 8 degrees for your scooter. If a slope is less than this angle, it is safety for your scooter whenever climb or descent. WARNING! Any attempt to climb or descent a slope steeper than 8 degrees may put your scooter in an unstable and cause it to tip, resulting in personal injury and/or damage to your scooter.
- Page 21 STATIONARY OBSTACLE (STEPS,CURBS,ETC.) WARNING! Do not attempt to climb or slide down any obstacles higher than 25 millimeters without helps of an attendant. Do not attempt to have your scooter proceed backward down any step, curb or other obstacle. This may cause your scooter to tip and cause personal injury.
- Page 22 SCOOTER TRANSPORT Now there are no standards approved for tie-down systems in a moving vehicle of any type to transport a person while seated in a scooter.Although your scooter may be equipped with a positioning belt, this is not designed to provide proper restraint during motor vehicle transport. Anyone traveling in a motor vehicle should be properly secured in the motor vehicle seat with safety belts fastened securely.
- Page 23 WARNING! Position yourself as far back as possible in the scooter seat to prevent the scooter from tipping and causing injury.Avoid using your armrests for weight bearing purposes. Such use may cause your scooter from tipping and causing injury.Avoid putting all of your weight on the footplate. Such use may cause your scooter to tip and cause your injury.
- Page 24 WARNING! Position yourself as far back as possible in the scooter seat to prevent the scooter from tipping and causing injury.Avoid using your armrests for weight bearing purposes. Such use may cause your scooter from tipping and causing injury.Avoid putting all of your weight on the footplate. Such usemay cause your scooter to tip and cause your injury.
-
Page 25: Electromagnetic Interference
10. Electromagnetic Interference EMI/RFI WARNING Radio wave, a form of electromagnetic energy, can cause unintended motion of electric mobility vehicles. When electromagnetic energy adversely affects the operation of an electrical device, that adverse effect is called Electromagnetic Interference(EMI) or Radio Frequency Interference (RFI). - Page 26 Your Home Rehabilitation Partner CERTIFICATE Product name: Mobility Scooter Itme Model: W3331F SN: J362210331F23001 Date of manufacture: Inspector: Product inspection: Zhejiang Innuovo Rehabilitation Devices Co.,Ltd. Instagram Facebook Youtube...
Need help?
Do you have a question about the W3331F and is the answer not in the manual?
Questions and answers
Disarm backup alarm or adjust volume