Table of Contents
Advertisement
Quick Links
Advertisement
Table of Contents

Subscribe to Our Youtube Channel
Related Manuals for VOCiC D61


Summary of Contents for VOCiC D61
- Page 1 Mobility Scooter INSTRUCTION MANUAL > > > English �...
-
Page 2: Table Of Contents
Contents 1. INTRODUCTION......................1 2. STRUCTURE AND PERFORMANCE................2 3. EMC DECLARATION.....................5 4. ASSEMBLY........................6 5. COMFORT ADJUSTMENTS..................8 6. OPERATION.........................9 7. MAINTENANCE......................14 8. CLEAN........................15 9. SAFETY........................16 10. WARRANTY.......................19 11. PARTS ORDER INFORMATION................20... -
Page 3: Introduction
�. INTRODUCTION Read and follow all instructions,warnings,and notes in this manual before attempting to operate your scooter for the first time.If there is any information in this manual which you do not understand,or if you require additional assistance for assembly or operation,please contact with your authorized local provider. -
Page 4: Structure And Performance
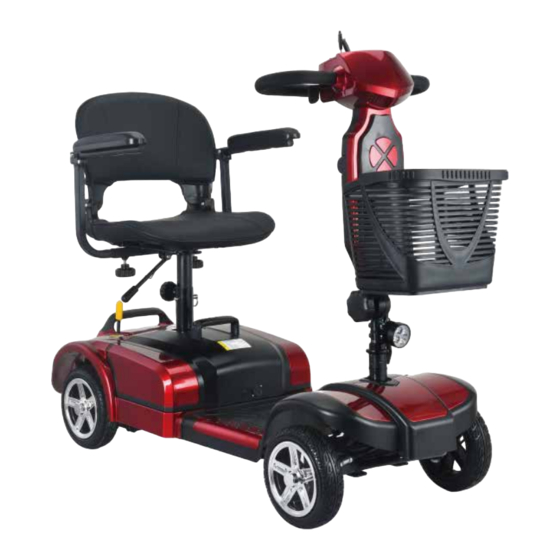
�. STRUCTURE AND PERFORMANCE This scooter mainly consists of four parts: front body,rear body, seat unit and batteries (See photo � ). Controller Seat Basket Battery Anti-roller wheel Head light Tire Photo 1 Front body consists of controller,handlebar and footrest . Rear body consists of drive motor, brake, electric controller unit. - Page 5 d. Front light button Press this button to turn on the light, then press this button again to turn off the light. e. Horn button Press this button,the horn sounds. f. Left control lever Pull the lever backward with your left hand, the scooter moves backwards. The bigger the angle is, the faster the speed is.
- Page 6 SPECIFICATIONS Table 1 - SPECIFICATIONS Overall size (LxWxH) ����*���*����mm Battery ��V ��AH Scooterweight ( G.W/N.W) ��KG/��KG Maximum speed �km/h Brake Electromagnetic brake system Weight capacity ���kg Ground Clearance ��mm Tyres Φ ���*��mm Power of motor ��v ���w Controller ��V ��A Charger DC��V �A Max Grade Ability...
-
Page 7: Emc Declaration
�. EMC DECLARATION Report No.: XMT0201909872L. This mobility scooter complies with the Regulation EN �����-�-� / EN �����-�-� /EN �����-�-�, the test result is pass. Product Name: Electric Scooter Item No:... -
Page 8: Assembly
�. ASSEMBLY For convenience of transportation and reduction of possible damage, the batteries and seat unit are separately packaged. So you need assemble them onto the main frame of your scooter. OPENING THE PACKING BOX Open the packing box of your new scooter ,and take off all protective liner ,and then take off the scooter that has folded from the box . - Page 9 BATTERY ASSEMBLY Put the batteries into the battery tray. Note that the electrode terminals on the batteries should be aligned with that on the rear body .Then , a battery platen on the rear body is turned by ��°to suppress the battery box , and then firmly tighten a knob on the platen. NOTICE �.
-
Page 10: Comfort Adjustments
�. COMFORT ADJUSTMENTS WARNING! Pull out the power key before adjustment , never do it when driving. SEAT HEIGHT · Pull up the seating fixing bar to release the seat . · Pull up the seat . · Remove the latch by pulling the latch-ring outward ( see photo � ) . ·... -
Page 11: Operation
�. OPERATION How to drive this mobility scooter a. Get on the scooter, pull the electric lock key and turn on the power. b. Hold the handle with both hands and slowly pull the lever backward with your right hand to move forward. - Page 12 · When the battery are fully charged , unplug the input connector of the charger from the wall outlet and then its output connector from the �-pin charger socket of scooter . · The batteries can also be charged off-scooter. *Please turn off...
- Page 13 WARNNING! If your scooter has stopped for a long period, power down it to prevent unintended motion. Throttle Control Lever ( See photo �) This lever, which locates on the left side of the tiller console, allows you to control the forward or reverse speeds of your scooter up to the maximum speed you preset with speed adjustment knob.
- Page 14 Battery Condition Indicator ( see photo � ) · When your scooter is powered up , this indicator shows the remaining capacity of the batteries by � color ranges on it : red, yellow and green . · When pointing to green , it indicates that the batteries are fully charged . ·...
- Page 15 3. 3-PIN CHARGER SOCKET ( see photo3 ) This socket is used to connect to the charger. When the batteries are charged, this socket makes your scooter out of work. WARNING! A wrong connection may cause damages to the charger.
-
Page 16: Maintenance
�. MAINTENANCE GENERAL GUIDELINES · Avoid knocking or bumping the tiller console and consoles. · Avoid prolonged exposure of your scooter to extreme conditions, such as overheat, cold or moisture. · Keep the tiller console clean. · Check all connectors to ensure that they are tight and secured properly. ·... -
Page 17: Clean
�. CLEAN · Controller: .Wipe the controller surface with a dry and soft cloth · Motor: Clean the dirty on the surface of the motor, especially the dirty on the lead line of the motor. Forbidden to enter water. If the water exceeds �cm, the motor will enter water, which may permanently damage the motor ·... -
Page 18: Safety
�. SAFETY �. PRE-RIDE SAFETY CHECK · Check all electrical connections. Make sure they are tight and not corroded. · Check all connections to the battery box. Make sure they are secured properly. · Check the brakes. Make sure they are sensitive and reliable. ·... - Page 19 �. OUTDOOR DRIVING SURFACES Your scooter is designed to provide optimum stability under normal driving conditions-dry, level surfaces composed of concrete, blacktop,asphalt, or hard dirt. But you should avoid driving on the following roads: · Surface that you feel unsure about or soft pavement. ·...
- Page 20 �. TRANSFER ONTO OR OFF SCOOTER To avoid an injury, the following safety precautions are useful for you while you attempt to transfer on or off your scooter. · Remove the key from the key switch, see V. OPERATION. · Ensure your scooter is not in manual freewheel mode. Flip up or move away the armrests. ·...
-
Page 21: Warranty
��. WARRANTY All of design and production processes of Inlowa products are managed in accordance with ISO ���� to guarantee their quality.Warranty service will be performed by the authorized Inlowa provider incooperation with the Inlowa after-service department. Warranty Registration Card User Name ID No. -
Page 22: Parts Order Information
WARRANTY INCLUDING �. Five years warranty on the front and the rear main frames from the date of purchase. �. One-year warranty on the following parts from the date of purchase from the date of purchase: · Electric control system and the controller. ·...
Need help?
Do you have a question about the D61 and is the answer not in the manual?
Questions and answers