Advertisement
Quick Links
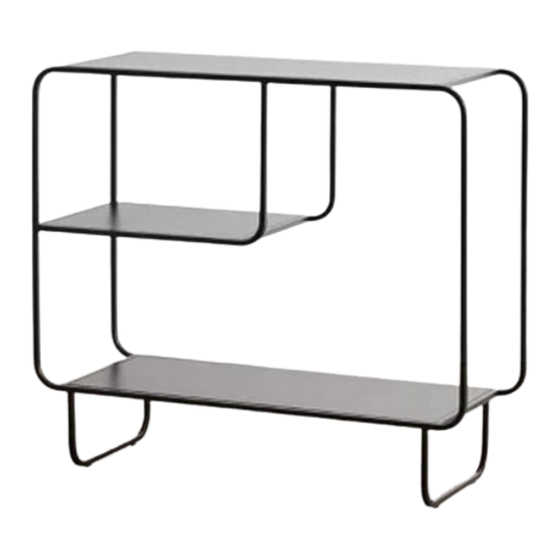
ALANA CONSOLE
Assembly Instructions
TOOLS REQUIRED BUT NOT INCLUDED: NONE
WARNINGS:
At least two people recommended for assembly
Do not throw away packing materials and carton until after assembly.
Assemble all parts on a clean smooth surface
Do no drag the shelf while moving.
CARE INSTRUCTIONS:
Avoid direct exposure to sunlight.
Do not place overheat or air conditioning vents.
Adjust levelers so that the furniture sits flat on uneven floors.
Blot spills do not rub, with a clean white cloth.
Do not use harsh chemicals.
Before cleaning any part test a small spot in a hidden area.
You may need to re-tighten all bolts after initial use.
PARTS INCLUDED
A-L) Metal Front Frame x1
D) Middle Short Shelf x1
H) Metal L Tip Kit x1
L) Wall Screw [4x32] x1
EXCLUSIVE AND CONFIDENTIAL PROPERTY OF URBAN OUTFITTERS, INC.
© 2017 UO, Inc. All rights reserved, including all applicable copyright, design and patent rights.
Any unauthorized reproduction, adaptation, distribution or other infringement will be prosecuted.
A-R) Metal Back Frame x1
E) Top & bottom Shelf x2
I) Allen Key [3mm] x1
B) Cross Rail x6
F) Screw [M5xL10mm] x32
J) Allen Key [4mm] x1
C) Metal Leg x2
G) Bolt [M6xL10mm] x1
K) Drywall Anchor [13x40] x1
Page 1 of 4
Advertisement

Related Manuals for URBAN OUTFITTERS ALANA


Summary of Contents for URBAN OUTFITTERS ALANA
- Page 1 J) Allen Key [4mm] x1 H) Metal L Tip Kit x1 L) Wall Screw [4x32] x1 EXCLUSIVE AND CONFIDENTIAL PROPERTY OF URBAN OUTFITTERS, INC. Page 1 of 4 © 2017 UO, Inc. All rights reserved, including all applicable copyright, design and patent rights.
- Page 2 (I). Align Metal Left Frame (A-L), with Metal top and bottom shelf (E), Middle Short Shelf (D). Insert Bolt (F). Once all screws are inserted and partially tightened, tighten all screws completely. EXCLUSIVE AND CONFIDENTIAL PROPERTY OF URBAN OUTFITTERS, INC. Page 2 of 4 ©...
- Page 3 Align both metal legs (C) on the console. Insert bolts (F). Once all screws are inserted and partially tightened, tighten all screws completely. Attach the anti-tip bracket (H) with bolt (G) using allen key (J). EXCLUSIVE AND CONFIDENTIAL PROPERTY OF URBAN OUTFITTERS, INC. Page 3 of 4 ©...
- Page 4 Warning: Young children may be injured by tipping furniture and the use of a tipping restraint is highly recommended. The tipping restraint is only a deterrent it is not a substitute for proper adult supervision. EXCLUSIVE AND CONFIDENTIAL PROPERTY OF URBAN OUTFITTERS, INC. Page 4 of 4 ©...
Need help?
Do you have a question about the ALANA and is the answer not in the manual?
Questions and answers