Table of Contents
Advertisement
Quick Links
Advertisement
Table of Contents

Subscribe to Our Youtube Channel
Related Manuals for kincrome KP705


Summary of Contents for kincrome KP705
- Page 1 80L Wet & Dry Workshop Vac KP705 ED2 DECEMBER 2023...
-
Page 2: General Power Tools Safety Warnings
80L Wet & Dry Workshop Vac General Power Tools Safety Warnings KP705 WARNING Read all safety warnings and all instructions. Failure to follow the warnings and instructions may result in electric shock, fire and/or serious injury. Save this manual for future use. -
Page 3: Risk Of Electric Shock
80L Wet & Dry Workshop Vac General Power Tools Safety Warnings (cont) KP705 4) Risk of Electric Shock a) Never touch the mains plug and the socket with wet hands. b) Do not pull the plug from the socket by pulling on the connecting cable. -
Page 4: Know Your Product
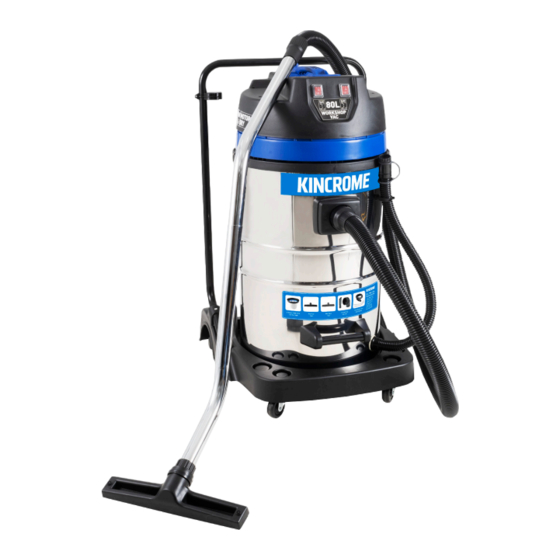
80L Wet & Dry Workshop Vac Know Your Product KP705 Wand Connection Coupling 14. Vacuum Tank Vacuum Hose 15. Trolley Handle Carry Handle 16. Tank Retention Clips Motor 17. 1st Motor ON/OFF Switch Vacuum Hose Inlet Connector 18. 2nd Motor ON/OFF Switch Tank Drain Hose 19. -
Page 5: Vacuum Filter
80L Wet & Dry Workshop Vac User Instructions KP705 1) Assembly Remove all of the vacuum components from the box and dispose of all the packaging materials thoughtfully and as per your local council guidelines. Connect the 2 Piece Extension Wands (13) together by locating the lower handle locating rib into the upper handle rib receptor to create the vacuum wand (fig 1). -
Page 6: Operation
80L Wet & Dry Workshop Vac User Instructions (cont) KP705 4) Installation of the Filters 1. Remove the Motor (4) from the Vacuum Tank (14) by releasing the Tank Retention Clips (16) on the side of the vacuum. 2. Insert the Cloth Filter (20) onto the upper top ring of Vacuum Tank (14) (fig 5a). - Page 7 80L Wet & Dry Workshop Vac User Instructions (cont) KP705 5c) Vacuuming Note: When vacuuming dry materials it may be required to open the front or rear face of the Dry Floor Tool (10) or Wet Floor Tool (24) to allow the larger debris (wood shavings, large dirt clumps etc.) to be sucked into the vacuum.
-
Page 8: Tank Removal
80L Wet & Dry Workshop Vac User Instructions (cont) KP705 7) Tank Tilt The Wet & Dry Workshop Vacuum is fitted with a tank tilt feature. The tank tilt feature enables you to empty dust and debris from the Vacuum Tank (14) without needing to lift a full heavy tank. -
Page 9: Troubleshooting
80L Wet & Dry Workshop Vac Troubleshooting KP705 PROBLEM CAUSES SOLUTIONS Check the electric power Power cord is disconnected supply line is connected to your wall socket correctly Check that the vacuum is turned on. To Vacuum cleaner turn on the vacuum press either one or Vacuum is not switched ON both ON/OFF Switches (17 &... -
Page 10: Spare Parts
For a full list of available spare parts for this item visit the you have carried out the above operations, or in the Kincrome website www.kincrome.com.au or alternatively event of anomalies other than those described above, contact Kincrome Customer Service. contact Kincrome Customer Service on 1300 657 528 for assistance. Notes... - Page 11 80L Wet & Dry Workshop Vac Notes KP705...
- Page 12 Kincrome Express Warranty, you can, at your cost, send the product to the above address for repair or replacement. Your rights under a Kincrome Express Warranty are in addition to any other rights you have under the Australian Consumer Law or other applicable laws.
Need help?
Do you have a question about the KP705 and is the answer not in the manual?
Questions and answers