Advertisement
Quick Links
CONNECTORS
USB 3.2 Gen 1 A-Port:
GND_DRAIN
StdB_SSTX+
StdB_SSTX+
StdB_SSTX -
StdB_SSTX -
VCC
GND
D-
D+
HARDWARE INSTALLATION
Please note the following installation instructions. Because there are large differences between the
PC's, we can give you only a general installation instructions for the EX-11088-2. Please refer your
computer's reference manual whenever in doubt.
1.
Turn off the power to your computer and any other connected peripherals.
2.
Remove the mounting screws located at the rear and/or sides panels of your Computer and
gently slide the cover off.
3.
Please install now the external power supply to the card (see at Connectors at JP2).
4.
Locate an available PCIe expansion slot and insert the card. Make sure that the card is
plugged in correctly.
5.
Then attach the card with a screw to the rear panel of the computer.
6.
Gently replace your computer's cover and the mounting screws.
DRIVER INSTALLATION
Windows XP / Vista / 7 / Server 2003 & 2008R2
After starting Windows is recognizes a new "USB (Universal Serial Bus)-Controller". Start the
„VIA_XHCI_Driver_V4.40_AP" setup which is in the "VIA_XHCI_Driver_V4.40_AP" folder (see
picture):
Follow the installation instructions and complete the installation.
Windows will now install automatically you right driver for your particular operating system. After
the installation the operating system detects the card and automatically install them.
5
DRIVER INSTALLATION
CHECK INSTALLED DRIVER
Open the >Device manager<. Now you should see at „USB-Controller" the following new entry's:
Attention!
Never plug in with
force or in wrong
direction.
If you see this or a similar information the device is installed correctly.
Windows 8.x / 10 / 11 / Server 2012R2 / 2016 / 2019 / 2022
After the hardware installation, the operating system will recognize the device automatically and
install the drivers.
CHECK INSTALLED DRIVER
Open the >Device manager<. Now you should see at „USB-Controller" the following new entry's:
If you see this or a similar information the device is installed correctly.
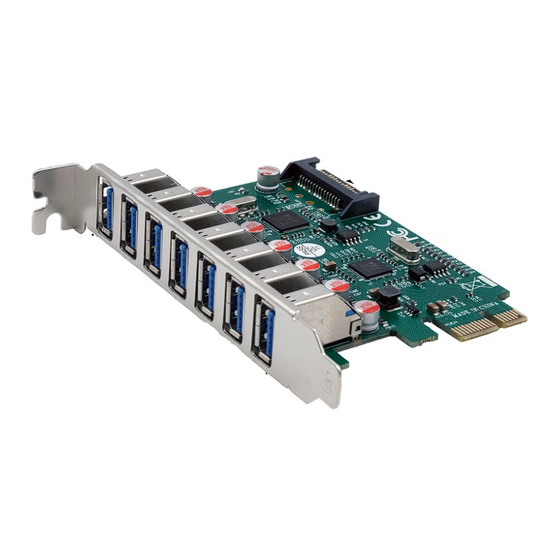
AUFBAU
BESCHREIBUNG & TECHNISCHE DATEN
Die EX-11088-2 ist eine USB 3.2 Gen 1 PCI-Express Karte. Sie ist mit 7 externen Port's ausge-
stattet, die jeweils 900mA Strom zu Verfügung stellen. Es werden alle PCI-Express Slots von x1
bis x16 unterstützt. Der PCI-Express Bus unterstützt optimal die Leistung des schnellen VIA
Chipsatz. Die EX-11088-2 gewährleistet so eine sichere Datenübertragung und exzellente
Performance von bis zu 5Gbit pro Sekunde! Sie unterstützt alle USB Anschlüsse von 1.1 bis
3.2. Die EX-11088-2 benötigt zusätzlichen Strom vom PC-Netzteil, um die volle Leistung von
900mA an den externen Port's zu gewährleisten.
Kompatibilität:
Betriebssysteme:
Anschlüsse:
Lieferumfang:
Zertifikate:
ANSCHLÜSSE
JP2:
6
EX-11088-2
Anleitung
Vers. 1.0 / 14.03.22
J1-J7: 7x externe USB 3.2 Gen 1 A-Buchse
PCI-Express x1 bis x16
Windows XP / Vista / 7 / 8.x / 10 / 11 / Server 20xx
7x USB 3.2 Gen 1 A-Buchse, 1x SATA 15 Pin
EX-11088-2, Treiber CD, Anleitung
Pin
Belegung
Pin
Belegung
1
3.3 Volt (Orange)
7
5 Volt (pre-charge)
2
3.3 Volt (Orange)
8
5 Volt (Rot)
3
3.3 Volt (pre-charge)
9
5 Volt (Rot)
4
Ground (Schwarz)
10
Ground (Schwarz)
5
Ground (Schwarz)
11
Reserviert
6
Ground (Schwarz)
12
Ground (Schwarz)
Um die EX-11088-2 zu betreiben, muss die Karte mit dem Stromanschluss vom PC-Netzteil
verbunden werden!
Achtung! Stecker nie bei eingeschaltetem PC ein oder ausstecken!
1
JP2: SATA 15 pin Power
Anschluss vom PC-Netzteil
Pin
Belegung
13
12 Volt (pre-charge)
14
12 Volt (Gelb)
15
12 Volt (Gelb)
Advertisement

Related Manuals for Exsys EX-11088-2


Summary of Contents for Exsys EX-11088-2
- Page 1 Die EX-11088-2 ist eine USB 3.2 Gen 1 PCI-Express Karte. Sie ist mit 7 externen Port‘s ausge- CHECK INSTALLED DRIVER Then attach the card with a screw to the rear panel of the computer.
- Page 2 PCIe Steckplatz ein. Beachten Sie, das die EX-11088-2 korrekt tisch und installiert diesen. The EX-11088-2 is a plug & play high-speed USB 3.2 Gen 1 expansion card for the PCI Ex- eingesteckt ist und das kein Kurzschluss entsteht.
Need help?
Do you have a question about the EX-11088-2 and is the answer not in the manual?
Questions and answers